Get all your news in one place.
100's of premium titles.
One app.
Start reading
Digital Camera World
Wendy Evans

My technique for creating bizarre portraits will have your people pics looking like a Picasso

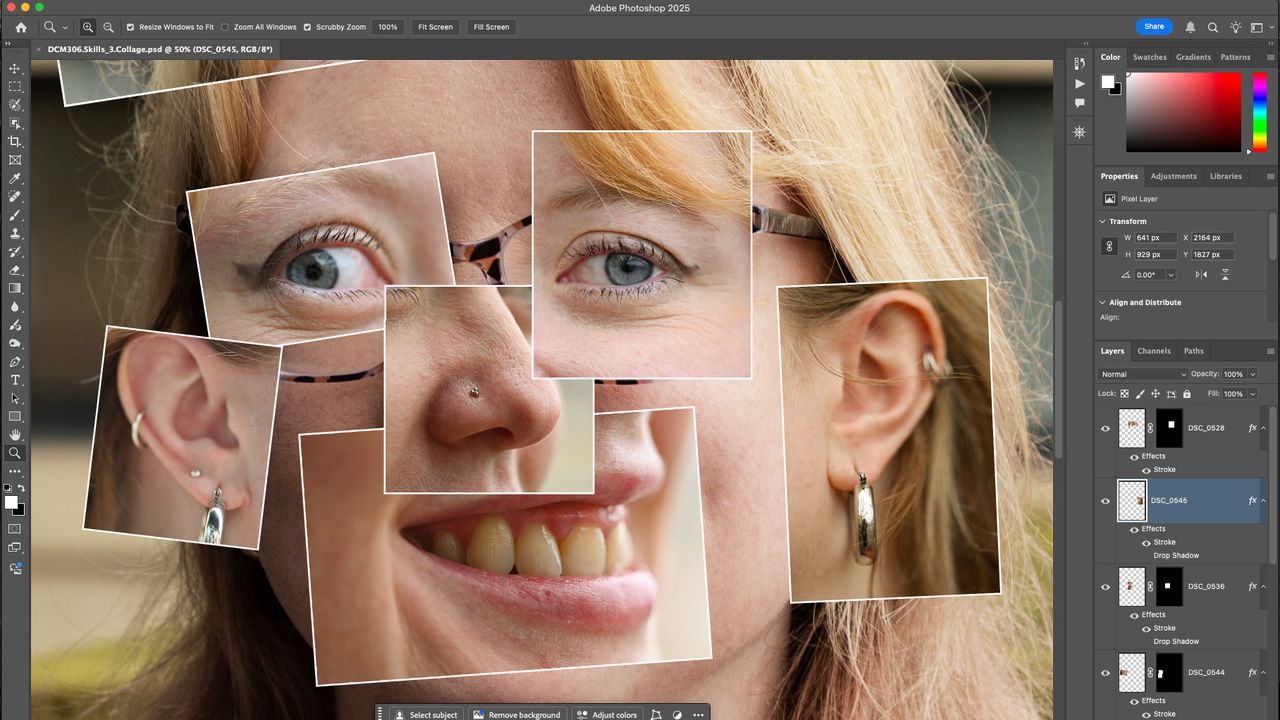
Putting the images together over the top of the background photo.

Unlike the aforementioned Frankenstein this particular portrait project doesn’t require you to scour mortuaries or dig up body parts from the local cemetery. All the facial elements are coming from the same person, but once assembled will produce something as weird or wonderful (but mainly weird) as you like. There are different ways of capturing each feature, as well, but the basic plan is to take a head and shoulders shot with a portrait lens, or 50-100mm focal length lens. You can go with a wide aperture and completely throw the background out of focus, but also soften features in front of or further back from the focal point. Or, you can use an f/8 aperture and try to get the base image all in focus.

You then need to switch to a macro lens and shoot close up images of each facial element – eyes, nose, mouth, ears are the basics – but it’s worth including other parts like the forehead or chunks of neck. Don’t be afraid to get pretty close to fill the frame, because otherwise you’ll need to select and mask off parts of these close up images. You can go for detail, with a narrow aperture, or throw it wide open and just add the shallow depth of field to the sense of unreality. The trick is to shoot the close ups from different angles or with different expressions than the main image. Then it’s time to compose your creation.
(Image credit: Future)

How to create a bizarre portrait

1 Shoot the baseline portrait

The baseline portrait to start the process with (Image credit: Wendy Evans)

The baseline image is the one onto which everything else will be added. Use a portrait lens to capture a head and shoulders portrait. Either go wide with an aperture such as f/1.8 or add more depth and detail with a narrower aperture such as f/8.

2 Capture the close-ups

Close-up shot of the mouth, but from a different angle (Image credit: Wendy Evans)

Switch to a macro or close-focusing lens for close-up shots of individual features. Use a wide aperture to avoid having to increase the ISO if you're struggling for light. Ask your subject to exaggerate their expressions for a wilder aesthetic.

3 Start your composite

Putting the images together over the top of the background photo (Image credit: Future)

Load your base portrait into your chosen photo editing software then drop in the individual photos. Resize to fit, rotate some for effect and use masks to remove unwanted parts. Also, add a white border! Save the project so you can make variations and then flatten the layers and export your creation as a JPEG.

You may also like...

Top tips for Top Guns: Don't shoot like a maverick in air museums! Here's how to use your camera like an ace. Boudoir photography: 13 pro secrets for capturing tasteful boudoir portraits with fine-art flair. The pixel stretch trend is back! Here's how to do it easily in Photoshop.

Sign up to read this article
Read news from 100's of titles, curated specifically for you.
Already a member? Sign in here
Related Stories
Top stories on inkl right now
One subscription that gives you access to news from hundreds of sites
Already a member? Sign in here
Our Picks
Fourteen days free
Download the app
One app. One membership.
100+ trusted global sources.