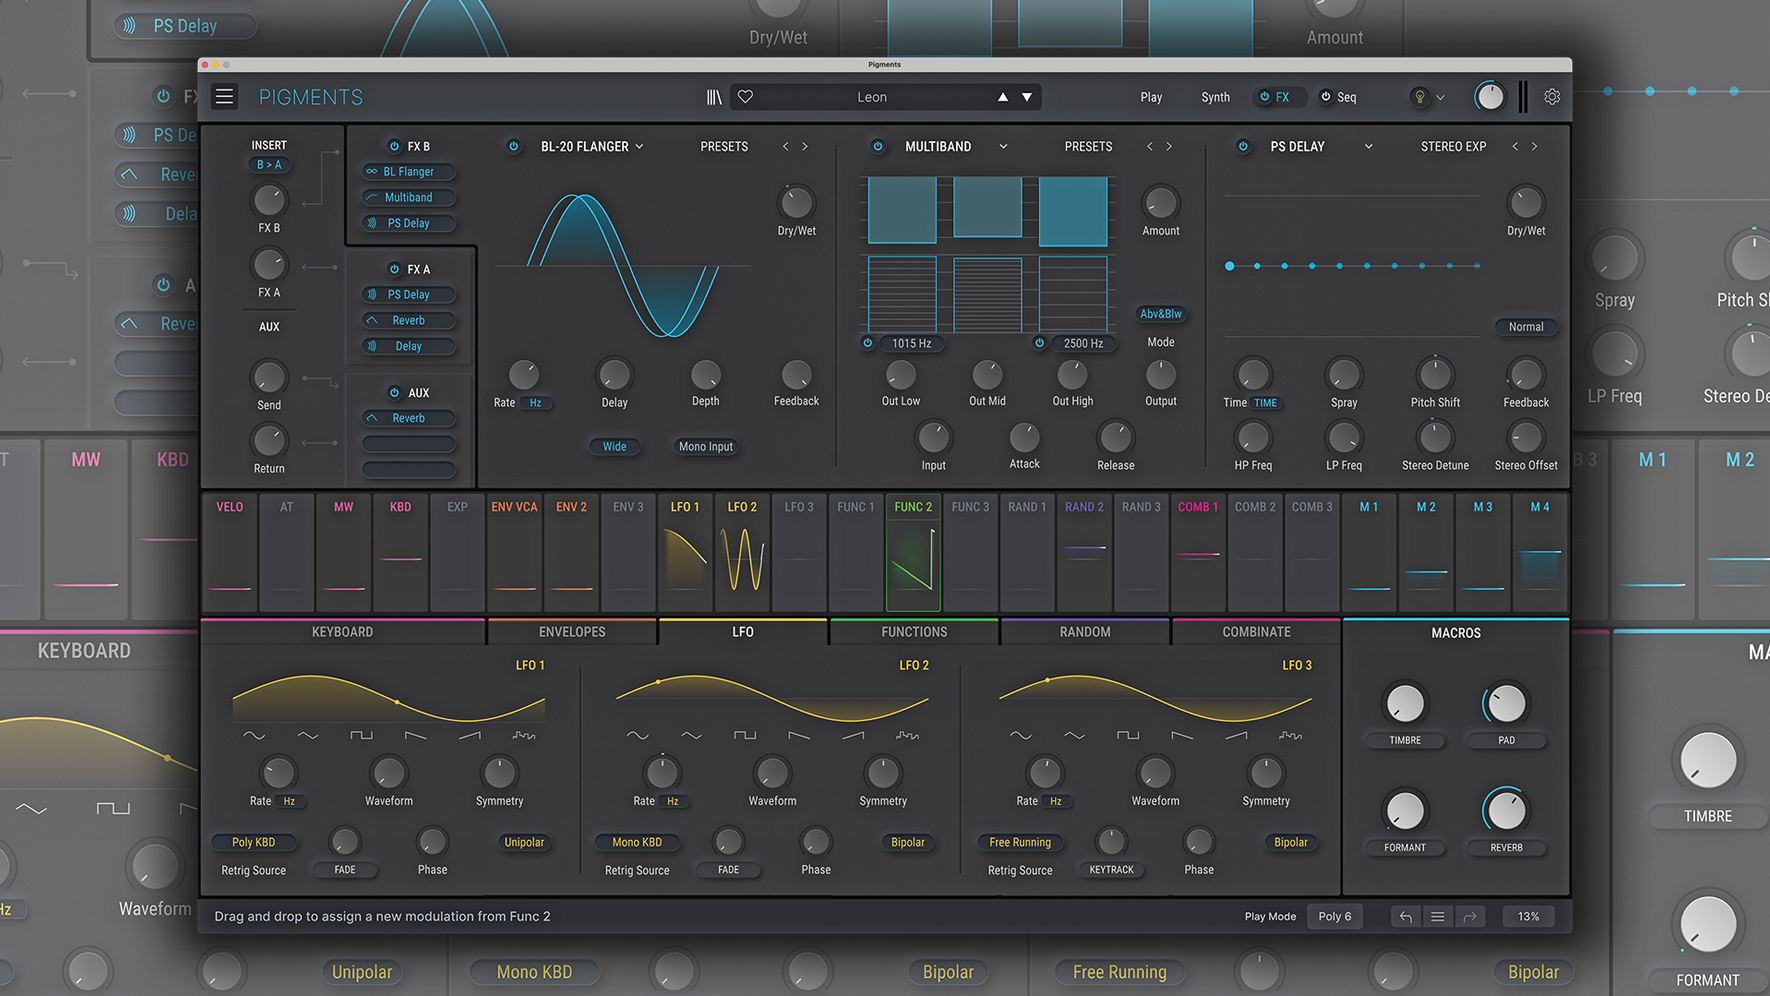
French company Arturia are one of the longest-running developers of vintage synth emulations, and while they started producing analogue hardware over a decade ago, many still know them for their incredibly popular and wide-ranging V Collection, an assortment of VSTs based on classic synthesizers.
But with the release of Pigments, back in 2017, Arturia proved that they had more up their sleeves than mere emulations, as Pigments was a completely new, original design that wasn’t based on a circuit from 40 years ago.
So what is Pigments? Arturia call Pigments a 'Polychrome Software Synthesizer' with the ability to create any sound you can imagine. And while that might sound like marketing hyperbole, looking at the specs and more importantly, listening to the sounds that come out of Pigments means that maybe Arturia weren’t joking. So, let’s dive in...
The basics
At its core, Pigments relies on two main “engines” that each have four different types: a Virtual Analog engine that combines three oscillators; a Wavetable engine with a huge assortment of wavetables, including the ability to import your own; a Sample playback engine that blurs the line between sample playback and granular sound design; and finally a Harmonic engine that puts additive synthesis within reach.
These two main engines are also joined by a third Utility engine that adds an additional two layers of sample playback and a virtual oscillator that is always available regardless of the other two engine types. This can act as a sub-oscillator but doesn’t solely need to be.
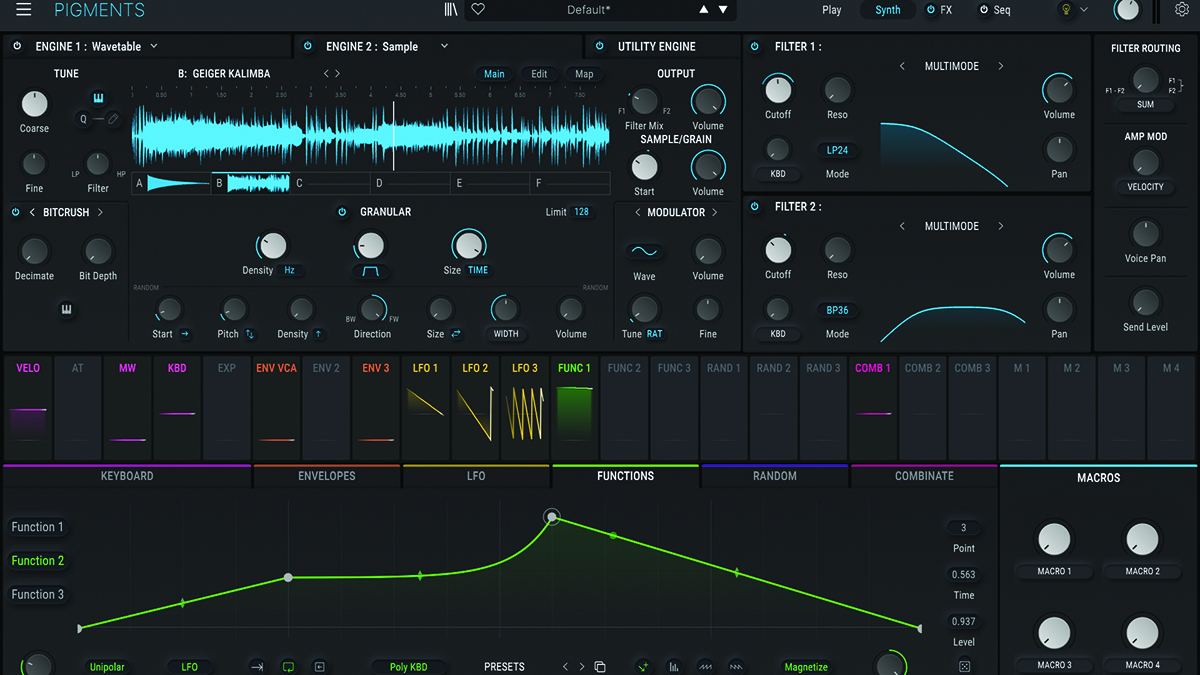
These engines are combined with two multimode filters, three envelopes and three LFOs, as well as three Function Generators that can act as either additional envelopes or LFOs. There are also three Random Generators, a suite of built-in effects, and a very powerful built-in sequencer. But the real beauty of Pigments is how these features are so cleverly integrated.
While Pigments was already an incredibly deep synthesiser in its initial released form, Arturia have continued to build and expand on its functionality and sound-shaping abilities. V4 introduces a number of quality of life updates but also adds some things that users have been requesting from the start.
One of the most unique things about Pigments when it was first introduced was its unique and accessible take on wavetable synthesis. It offers users the ability to upload their own waveforms, which was not possible on many instruments that employed wavetables!
The first version only had the Analog and Wavetable oscillator sections, while the Sample / Granular and Harmonic (additive synth) came in later updates. Other V4 updates included the new Play page, which combines everything needed into a more streamlined UI. There’s also now the ability to turn off the effects and sequencer sections with a single button press for each section, which is handy to focus on sound design.
Arturia have also introduced a new filter type modelled after the MS-20; this is a great way to get a bit more raggedness around the edges of your sound. There are also two new effects including a Shimmer Reverb and a Super Unison effect.
Arturia have also introduced a new filter type modelled after the MS-20; this is a great way to get a bit more raggedness around the edges of your sound
There are also new preset packs available in V4 that are easily accessible via the store from within Pigments. These show just how much potential is waiting to be locked within, as the range of sounds is quite astonishing. Even the preset browser shows how much thought Arturia has put into their products. It’s very easy to sort and search by tags and favourites, as well as quickly seeing user-created presets.
Pigments V4 is now compatible with Oddsound's MTS-ESP Suite, developed in conjunction with Richard D James, so even more odd sonic spelunking is to be had within. And while all of the changes we have mentioned so far have been quality of life updates, there are actual upgrades to each of the four oscillator engines as well. It’s now possible to create ring modulation and pulse width modulation tones from within the Wavetable engine. The Harmonic engine also has a new phase modulation option to create never-before-heard tones.
Three quick tips to get started
1. Lightbulb moment
If you’re new to Pigments, Arturia have included a helpful guide mode that can be turned on by clicking the small lightbulb icon directly to the left of the master volume control in the top right corner of Pigments. Turning this on also shows more about each patch and its programmer, which is a fun way to get inside the machine, so to speak.
2. See the light
While we have always loved the elegant UI of Pigments, V4 saw the introduction of a Light Mode that changes the entire look of the instrument from all black to a soft grey colour palette. This new colouring scheme is a bit easier to read in dark studios or darkened stages, so this upgrade could make Pigments a bit more palatable for those with less than perfect vision.
3. You can always undo
Pigments includes an Undo/Redo History list that notes your sound design changes and allows you to go back to a previous state. This History list can be found by clicking the icon with the three small lines at the bottom right of the UI. Each entry in the list also shows any changes that have been made.
Utilizing the Utility Engine
Introduced with the V3 update to Pigments, Arturia added a third synth engine to complement the first two. Called the Utility Engine for its wide functionality, this module is actually capable of adding three additional layers to your sound. The first two tabs control simple sample playback, labelled Noise, though these can play back any type of sound.
The difference between these and the main Sample Engines is great, as the Utility devices are far more stripped-back, making them quicker to use, though it’s worth mentioning that you can’t upload your own user samples to these. The third layer of the Utility Engine is a virtual analogue oscillator with a choice of five waveforms.
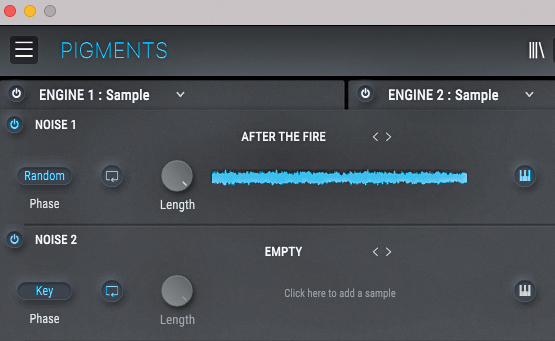
Each noise engine has greater complexity than it may seem on the surface. It’s possible to make each noise layer play back at a static pitch no matter what key is pressed, or to have the sample follow the pitch of the keyboard.
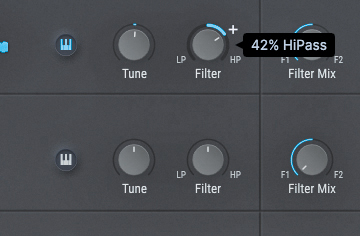
To toggle this feature, select or deselect the small keyboard icon next to the sample waveform display. Continuing with the theme of efficiency, each sample player in the Utility Engine also has its own dual filter, similar to those found on DJ mixers.
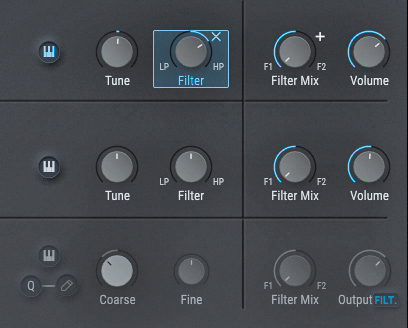
Turning the knob to the left will add a low-pass filter, while turning it to the right will introduce a high-pass filter. Adding modulation to this filter is as quick as pressing the “+” sign that appears when you hover over the filter knob.
Let's get granular
With its Granular Engine, Arturia ups the ante when it comes to sample manipulation. Here’s how to make the most of it...
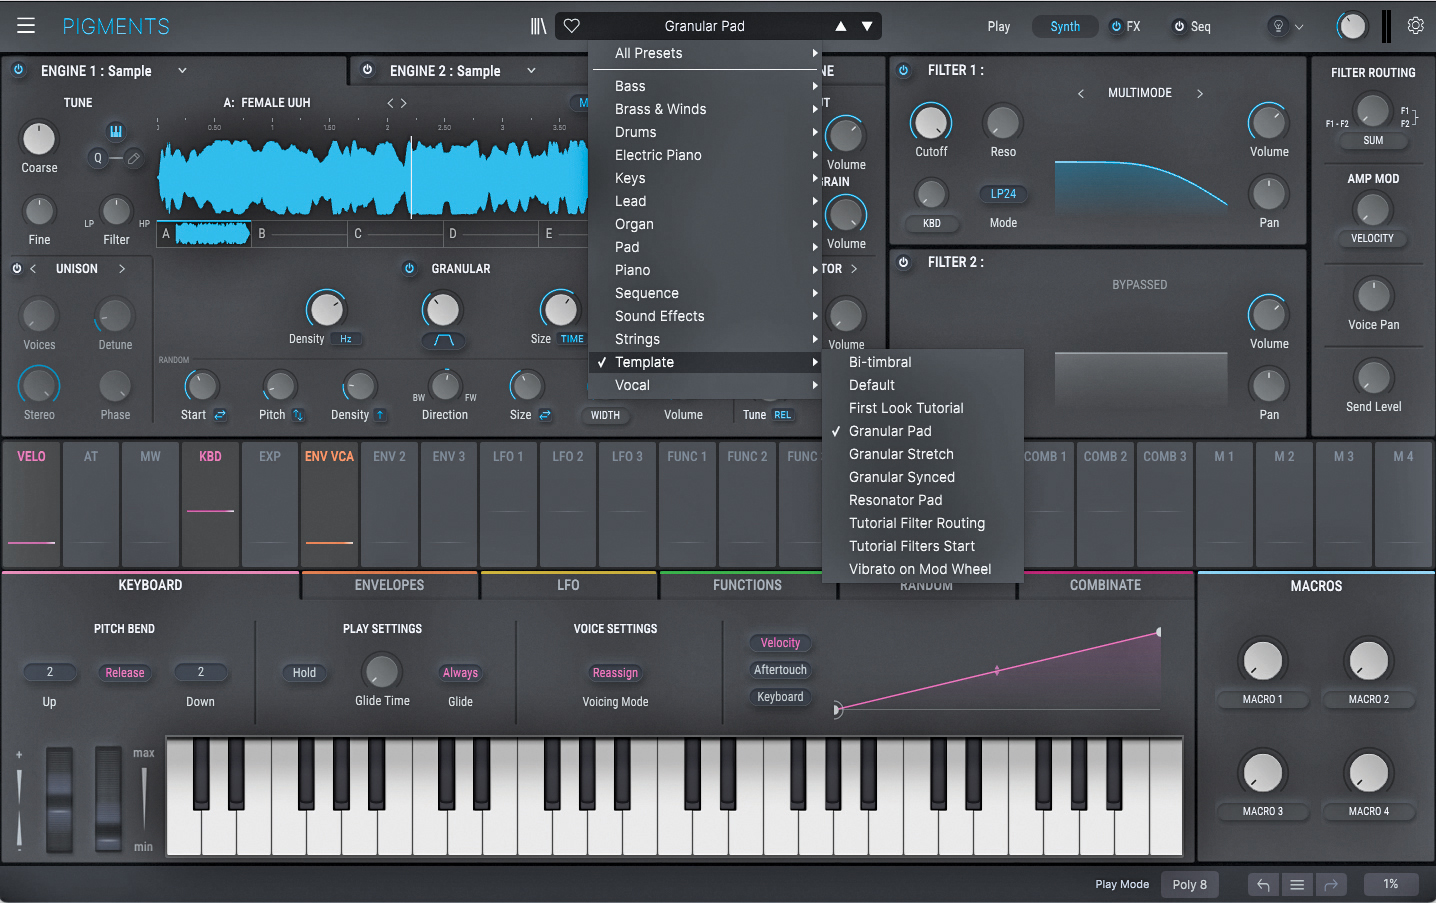
The Sample Engine was added to Pigments in V2 and immediately greatly increased the timbral possibilities inherent to Pigments. Unlike most sample playback synth engines, Pigments also allows users to play back samples granularly. For this Walkthrough, let’s load up the Granular Pad preset and begin to explore.
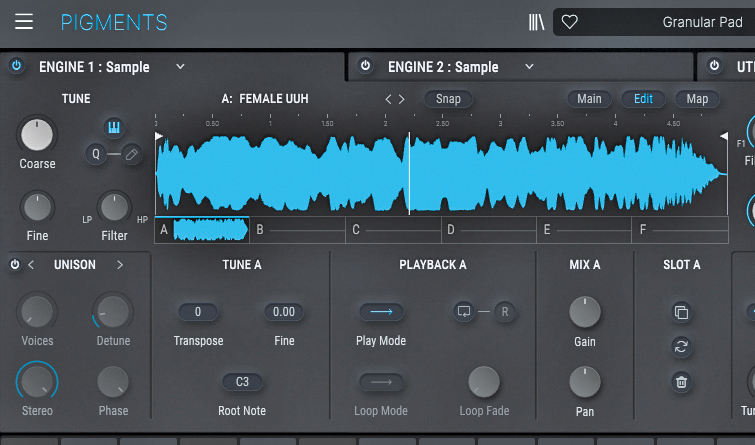
Even before getting into the Granular engine, Pigments is already an incredibly powerful sample-based synthesiser. Each sample engine can play back up six samples. In order to edit how these samples play, click on the Edit tab right above the sample waveform. You’ll then see Tune, Playback, Mix and Panning options for each sample.
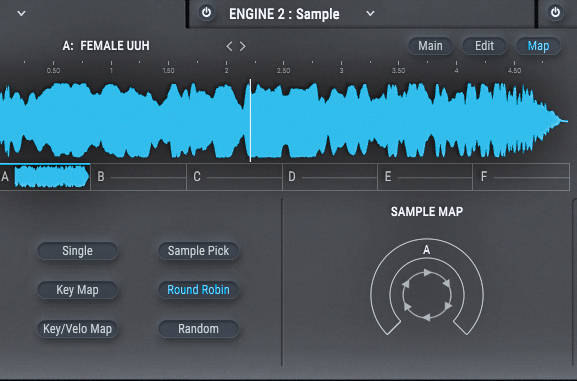
Clicking on the Map tab allows for even more flexibility. Here you can set samples to be played back individually or they can be triggered by key range. There’s also the ability to trigger samples based on velocity, in Round Robin mode, or simply randomly, which can create some very unique textures when combining disparate samples.
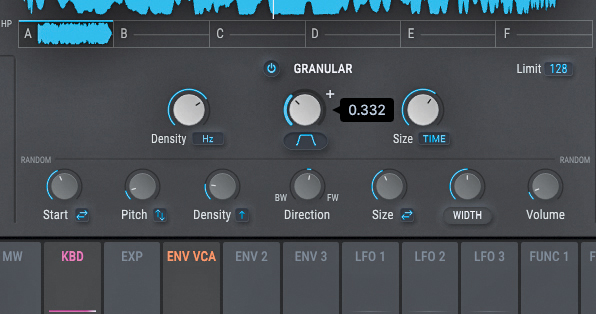
Turning on the Granular Engine is where the real fun begins, however. Navigate back to the main tab in the Sample Engine and underneath the sample waveforms you will find the Granular tab. The main three controls are at the top of that tab and control the rate that new grains are generated, the envelope for each grain, and the length of each grain.
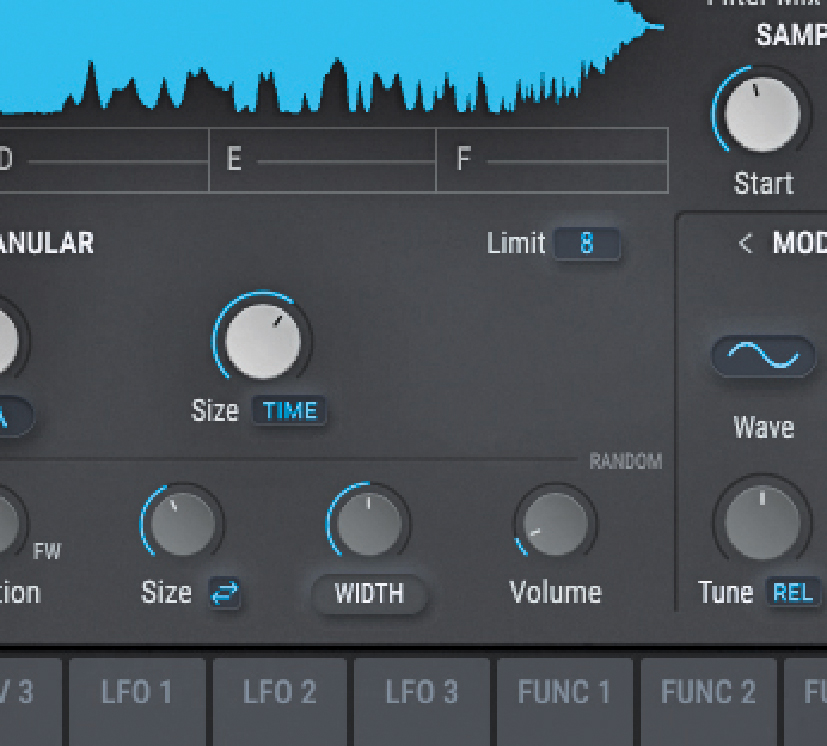
You can create some interesting textures by reducing the number of grains possible to a low value with the Limit field, at the top right of the Granular tap. Here we have set it to 8 to allow each individual grain room to bloom. Experimenting with the bottom row of parameters adds a level of randomness which can add texture to longer sounds.
Expression and modulation
Assigning modulation is even faster in Pigments 4. While in the main Synth screen, you’ll see the large row of modulation sources in the middle of your screen.
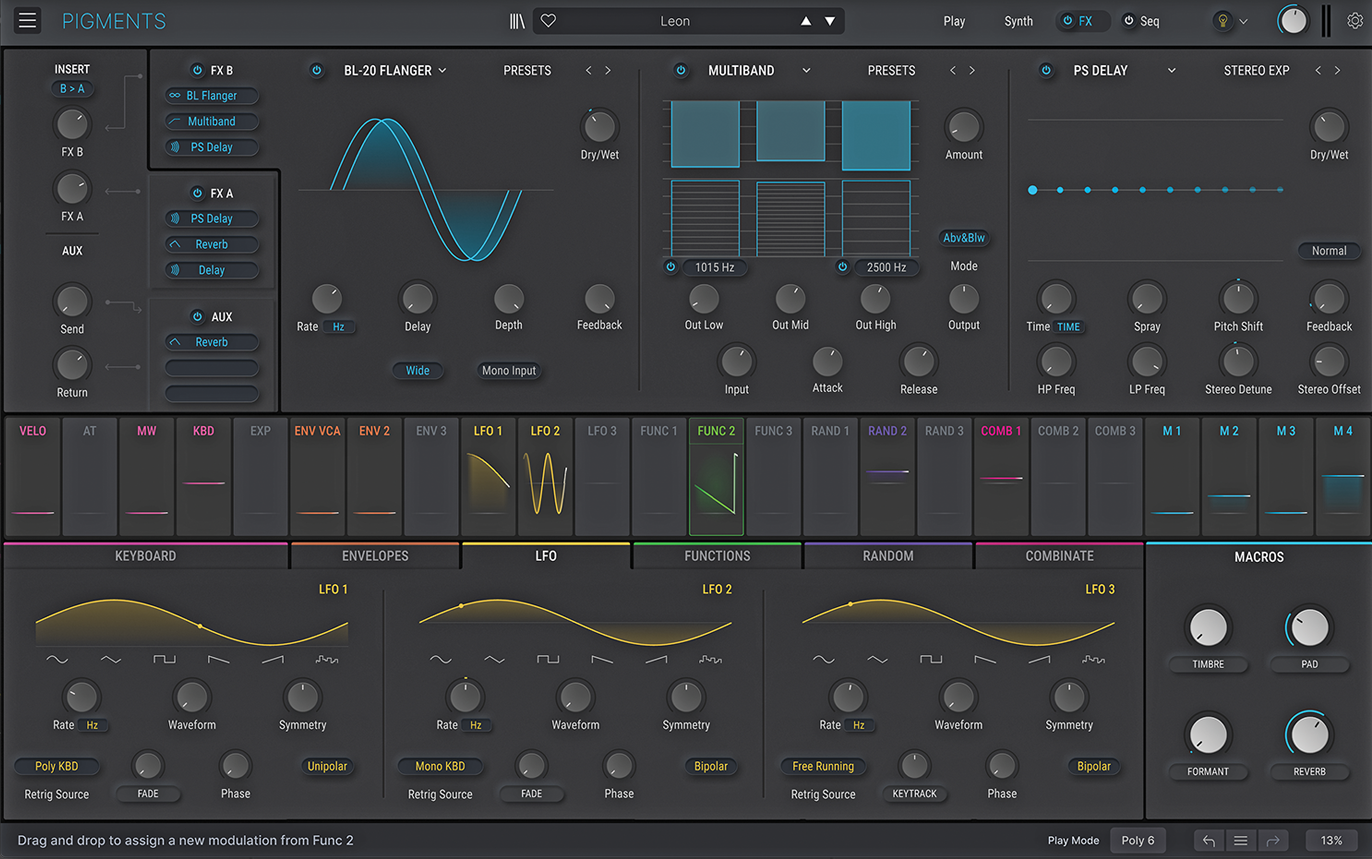
Simply click on a modulation source and drag and drop onto whatever parameter you’d like. When doing this, you’ll see a coloured circle appear below that parameter, with a positive and negative depth control that sets how much that parameter will be modulated. When several modulation sources are applied to the same parameter, you’ll see multiple circles appear.
What’s more is that as you hold a modulation source above a parameter, you’ll instantly hear the effect of that modulation source, which makes it very quick and easy to make those decisions. All in all, this is one of the most elegant solutions we have ever seen to assigning modulation along your signal path.
Play mode
The new “Play” screen in Pigments V4 combines all of the most essential parameters of your patch on a single screen, reducing it to the basics for what could be considered a live performance take on using Pigments. The modulation strip that lives in the centre of the screen while in Synth view becomes a visual representation of all the Modulation going on within your patch, and is colour coded to match the modulation sources.
You still have a lot of control from the Play page, including settings for the effects, amplitude envelope, and basic Engine and filter settings. Beginners to Pigments could even start with the Play page before diving into the deeper architecture held within.
Function generators
For those who aren’t satisfied with the stock of three built-in LFOs and three-built in envelopes, Pigments also offers Function Generators. These can act in either LFO or envelope mode (meaning looping or one shot, essentially). Users can draw shapes in for these Functions with a seemingly unlimited number of break points, so very complex LFO shapes are possible.
There are also presets that you can load inside the Function Generators for commonly used things such as square wave LFO or an asymmetrical saw, but we think it’s more fun to roll your own given the flexibility within. Each of the three Function Generators can also have its own retrigger settings, of which there are 16 options that you can choose from, including each of the LFOs and the Function Generators themselves!
Easy LFOs
It’s also now easier to select LFO waveforms compared to previous versions of Pigments, as they are represented graphically below the real time representation of the selected LFO waveform. It’s still possible to dynamically fade between these waveform shapes, as the LFO is continuously variable. Similar to the Function Generators, each of the LFOs has its own retrigger settings that go far beyond most normal synths.
Again, Arturia have made Pigments incredibly visually friendly by showing where each LFO is in its cycle with a small moving dot on the waveform. This takes a lot of the guesswork out of assigning modulation and is another small touch that speeds up workflow a considerable amount.
Randomize it
If the Envelopes, LFOs, and Function Generators weren’t enough to keep you busy, Pigments also has three Random modulation operators, each with a choice of three random modes – Turing, Sample and Hold, and Binary.
Just like the LFOs and envelopes, these have a host of retrigger source options, as well as a unique “Flip” parameter when set to Turing. Flip essentially controls just how much randomness your Random waveform will have. When set to 100%, every cycle through the waveshape will be different.
Exploring Pigments' sequencer
Hiding behind the Seq tab in the main UI is a very programmable sequencer and arpeggiator.
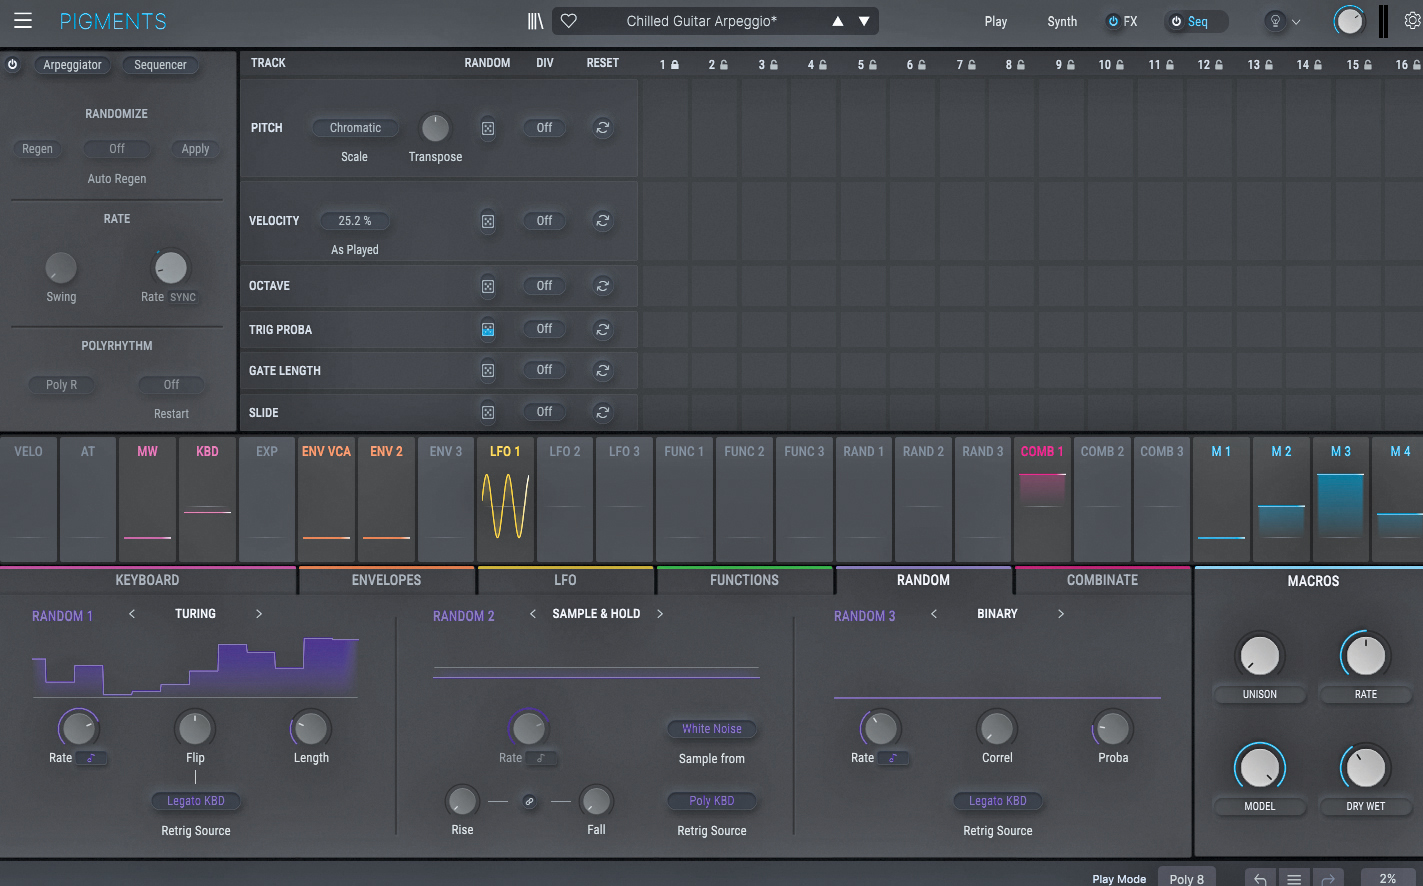
To access the sequencer and arp settings in Pigments, click on the Seq button in the top right corner of the UI. Conveniently, you can also toggle the sequencer/arpeggiator on and off by just clicking the adjacent button, which is a new feature in V4.
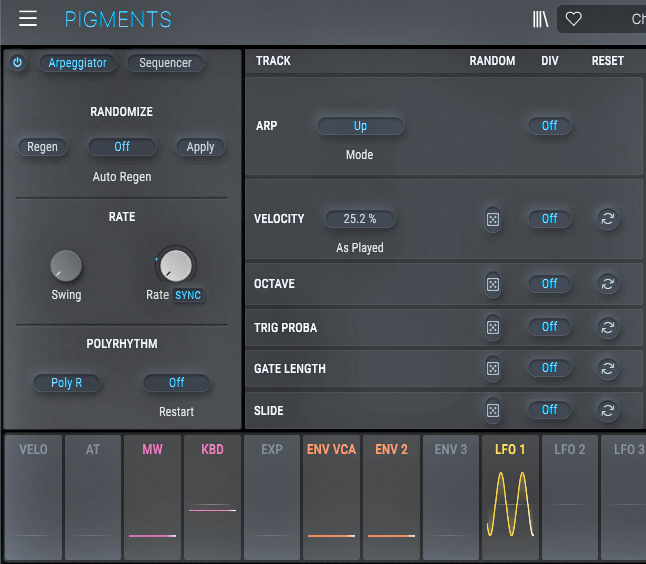
Once in this tab, you’ll see the option to select either the arpeggiator or the sequencer. They work very similarly, as both feature a range of options that aren’t usually found in a usual sequencer or arp. Selecting Arp means that whatever notes you live input will be affected, whereas the sequencer allows you to program your melodies in advance.
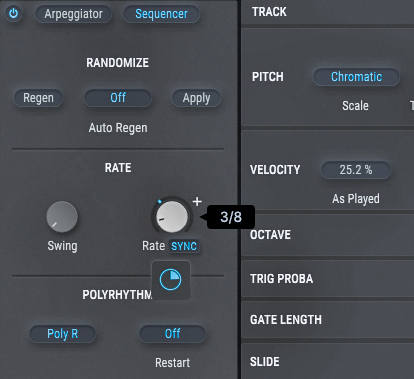
For this walkthrough, we’re going to focus on the sequencer functionality, so select that option near the top left of the Pigments UI. Under this, you’ll see the options for Rate, Randomize, and Polyrhythm. Rate can be set to a BPM value but it can also be set to Sync, in which case you can set the rate to a fraction of the Global BPM.
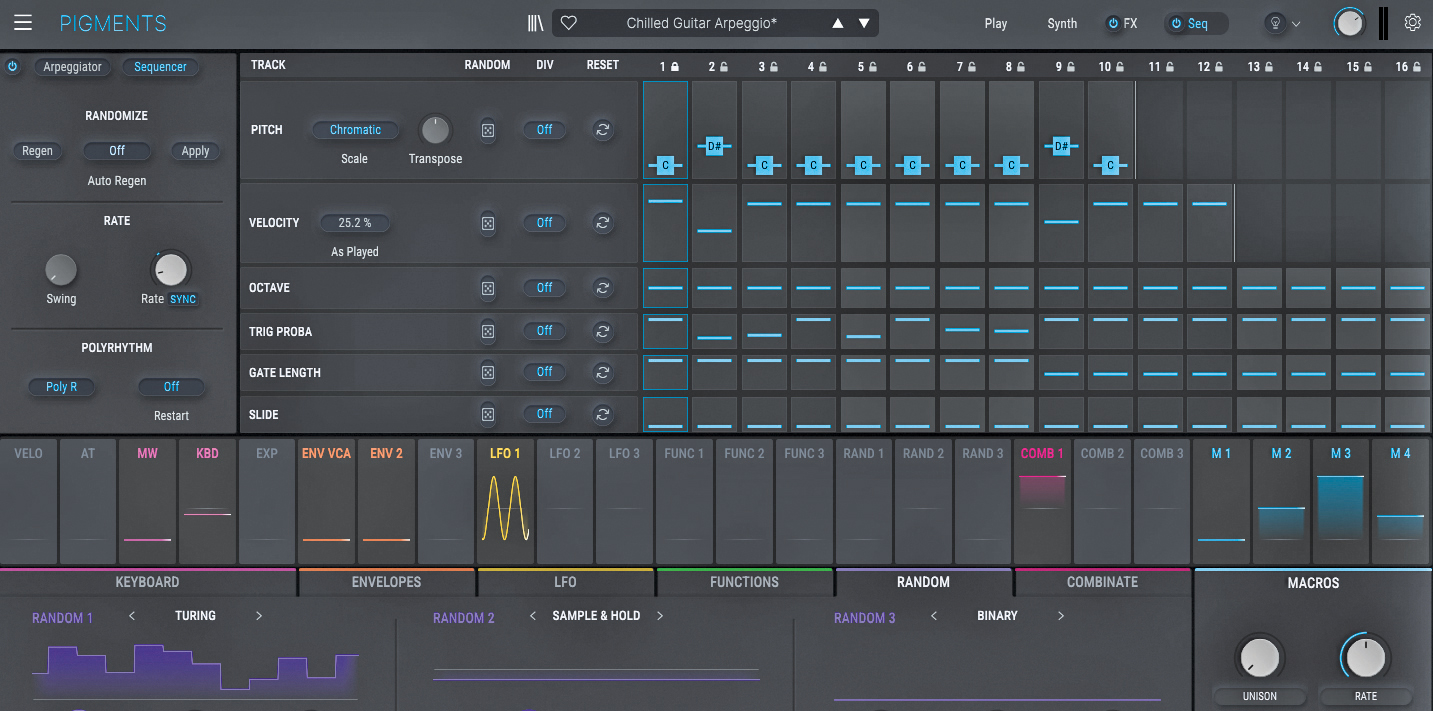
Turn on the polyrhythm functionality by pressing the Poly R button (it will be lit when turned on). This now means that the Pitch, Velocity, Octave, Trig Probability, Gate Length and Slide can each have different step lengths of up to 16 steps. For this example, let’s create a melody that has 10 steps but let’s set the overall Sequencer length to 16 steps.
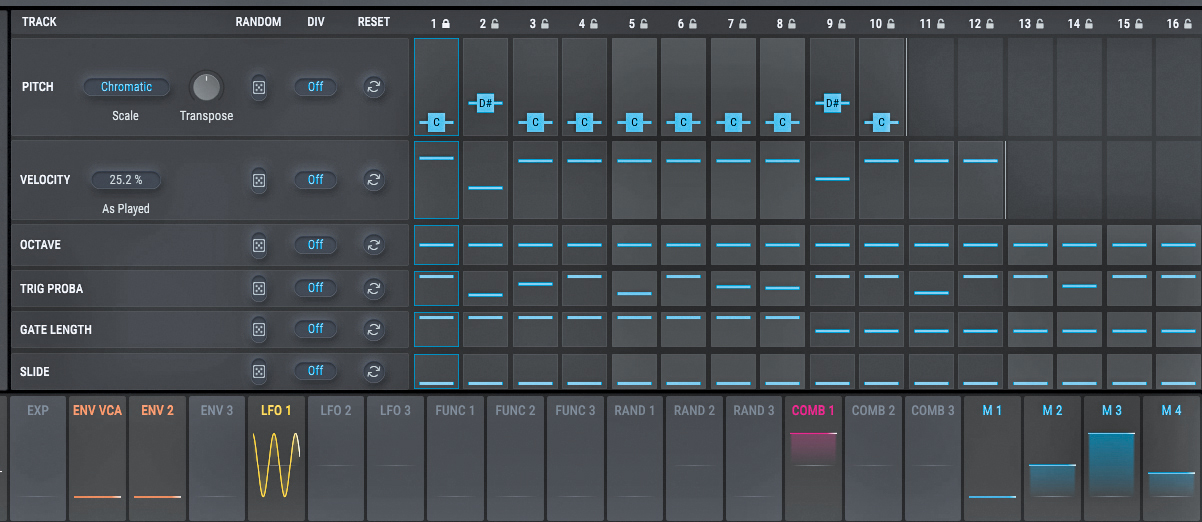
Where things get really interesting is when you start adjusting the trigger probability values, which simply means how likely a step is to play when the sequencer reaches that step. Setting step values to a low probability will create an ever-evolving pattern that never repeats twice.
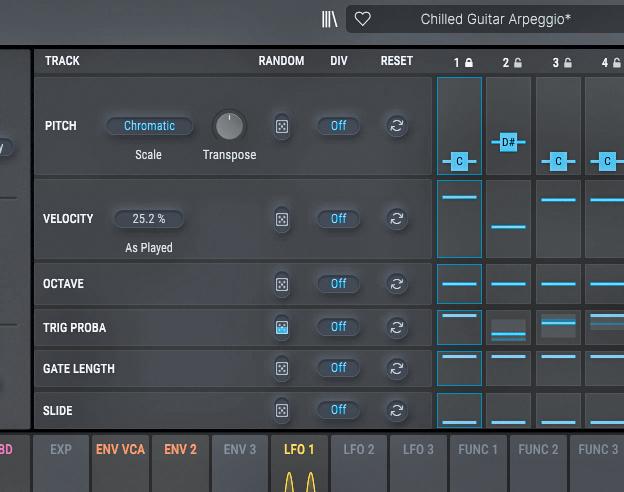
Each of the various parameters of the sequencer also has a randomise function, which can be set with the dice icon under Random. If you’d like certain steps in your Sequence to always stay the same, like for example, the first note in every sequence, you can lock that step by clicking the small lock icon next to the step number.


