
Today, we’re taking a hythmic turn, checking out rests - although sadly not the kind where you put your feet up. Instead, we’re concerned with the periods of silence that occur in music when an instrument stops playing momentarily.
When music notation was first developed, those writing it needed a way of telling the player not just when to play, but also when not to play.
This was particularly necessary when writing out parts for orchestral players, who often have to sit dormant for several bars during a performance playing absolutely nothing before their big moment - think of the guy on the cymbals who has one big crash after 132 bars of picking his fingernails.
So what does this mean for the modern computer musician? Well, while we’ll be touching briefly on the symbols for each rest, we’ll mainly be looking at how to use gaps effectively in your MIDI programming.
The feel of a piece can often depend more on what you don’t play than what you do play, and changing the values and placement of rests can make a big difference.
In practical terms, it can be as simple as just deleting a note or two from a sequence, as unless you’re going to print out your score for someone to actually play, you shouldn’t need to worry too much about how the rests are displayed in your DAW’s score editor.
After all, the most important thing isn’t what the music looks like, but what it sounds like, and the key to using rests effectively is to put them in the right places so that the remaining notes have maximum impact.
Rest notation
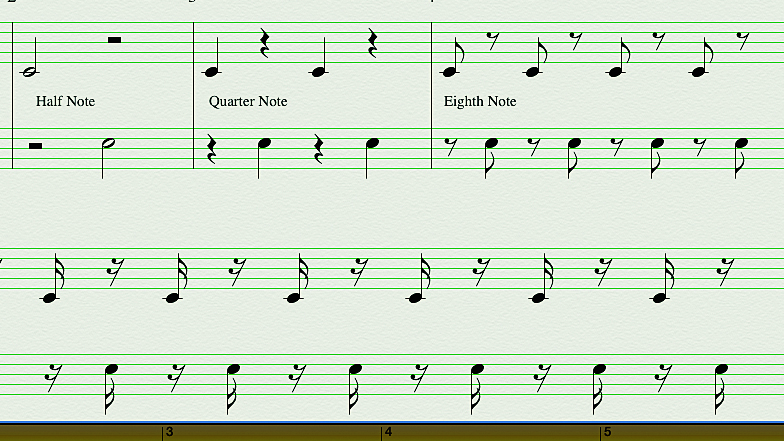
Step 1: The above image shows the musical notation symbols for common rests. Each note duration has an equivalent rest duration, seen here on the opposite stave above/below it. Here we have half-notes (minims), quarter-notes (crotchets), eighth-notes (quavers) at the top, and sixteenth-notes (semiquavers) at the bottom.
And how to use it
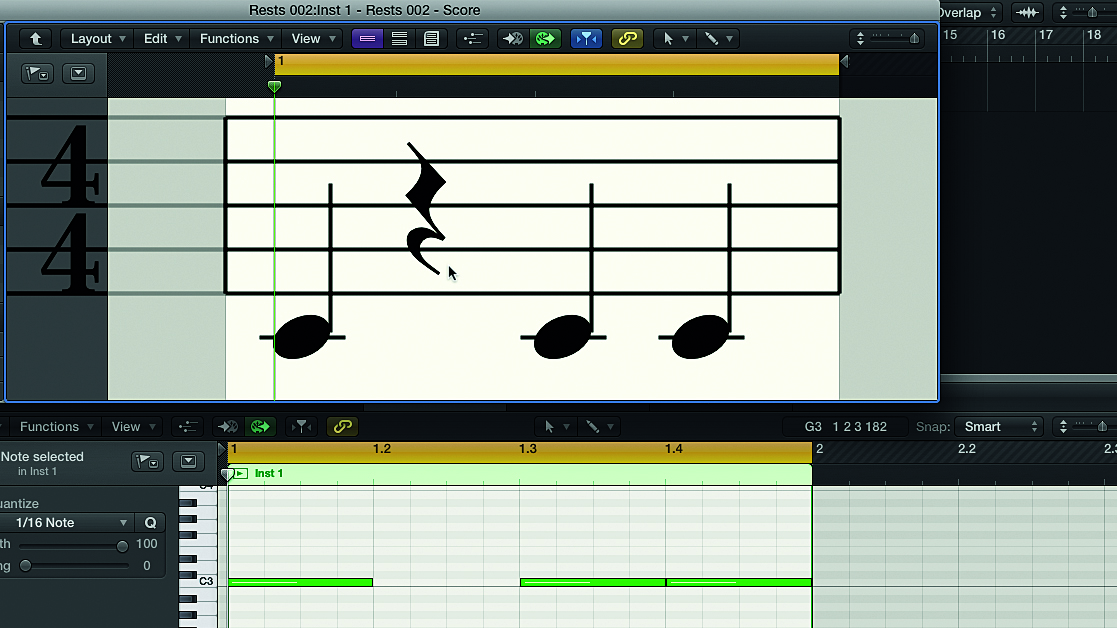
Step 2: This bar of music contained four quarter-notes, but we’ve removed the second note. The remaining beat will be heard as silence, but in notation, it’s represented visually as a rest. So while in the piano roll we just have a gap, in the score editor, the missing note is replaced with a quarter-note rest. Check out the video to hear - and see! - all this in action.
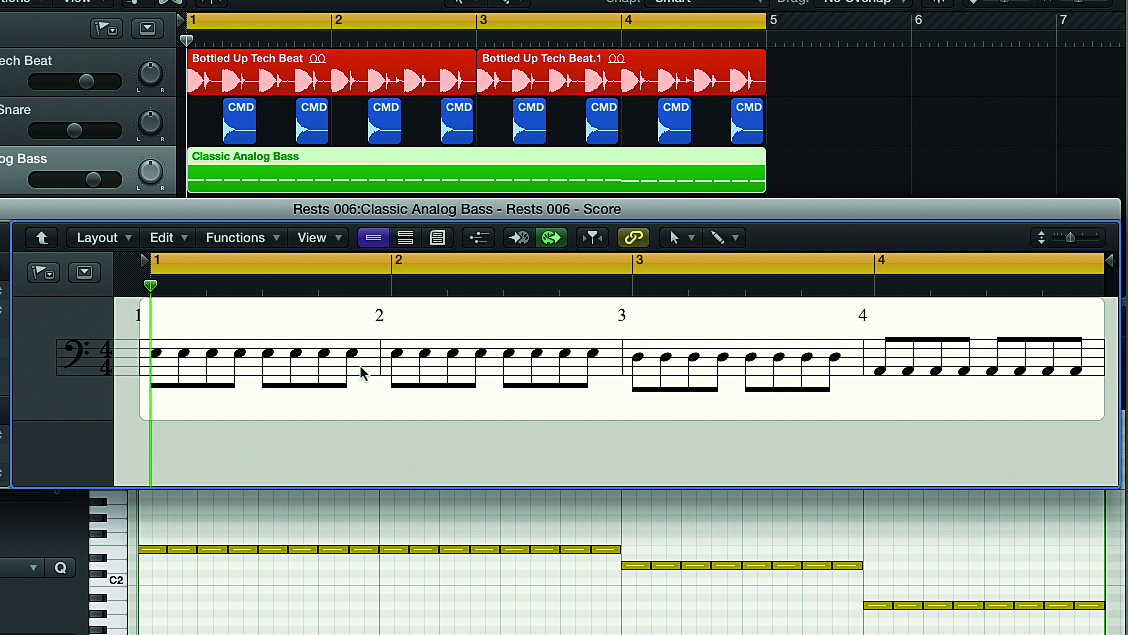
Step 3: Now that we’ve seen the symbols for the rests, let’s put silence to work with a MIDI bassline. Here’s a four-bar bass part made up entirely of eighth-notes: two bars of E, one bar of D and a final bar of A. We’re going to liven up the bassline by punching holes in the sequence; or in other words, by inserting rests.
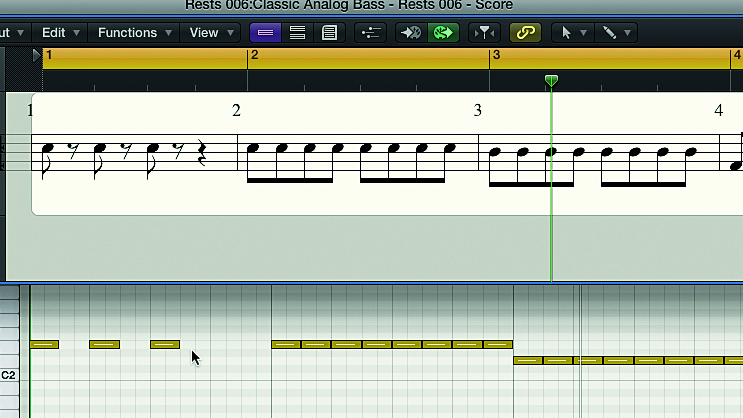
Step 4: We start by removing all the notes from bar 1 except for those on beats 1, 2 and 3. The score display shows the missing eighth-notes as eighth-note rests. The empty 4th beat is represented as a quarter-note (or crotchet) rest.
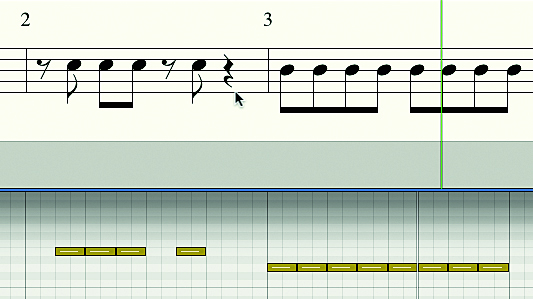
Step 5: In bar 2, we remove notes 1, 5, 7 and 8. Notes 1 and 5 get replaced by eighth-note rests in the score editor, but the gap left by notes 7 and 8 is equivalent to a quarter-note, so it’s filled by a quarter-note rest.
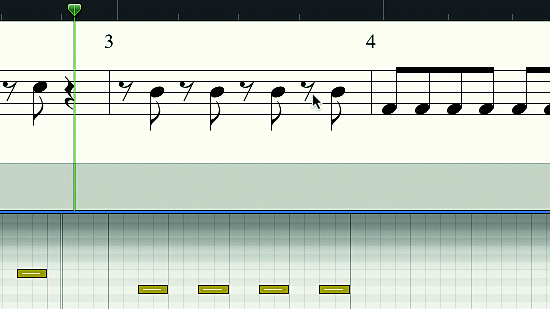
Step 6: In bar 3, we do the opposite of what we did in bar 1 and remove all the downbeat notes - 1, 3, 5 and 7 - leaving just the offbeat notes. Because the remaining notes don’t fall on the downbeats, our DAW - Logic, in this case - inserts eighth-note rests where the missing notes used to be.
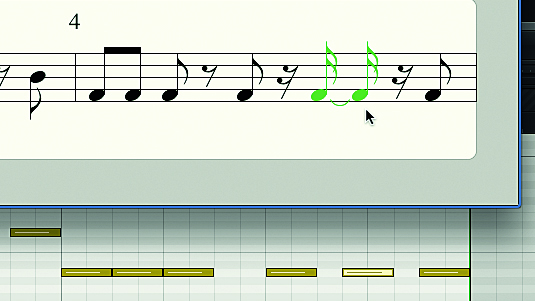
Step 7: In bar 4, we only remove notes 4 and 6, but we take note 7 and move it one 16th-note earlier. This has the effect of inserting a 16th-note (semiquaver) rest either side of the note. Interestingly, note 7 is now shown as two semiquavers tied together, rather than its proper quaver value.
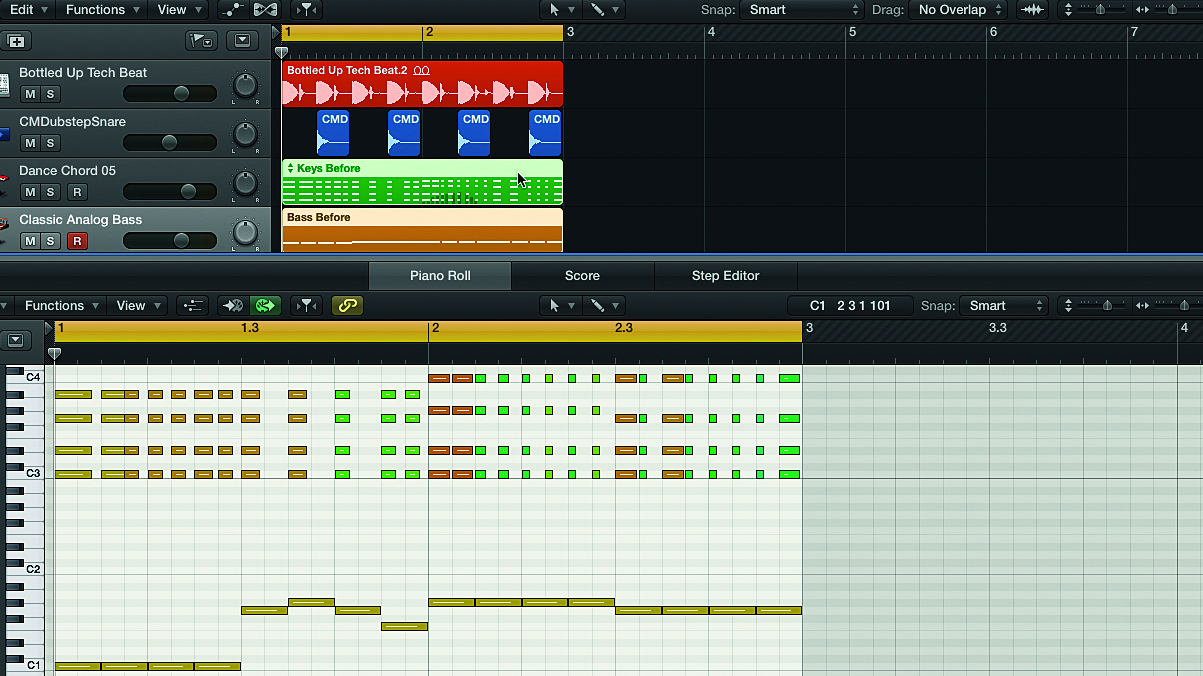
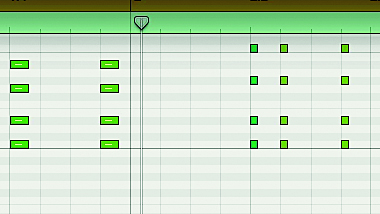
Step 8: Inserting rests can also be a useful tactic when arranging keyboard parts. For example, here’s a synth part and a bassline that are both fairly busy. As a result, they’re fighting each other for space, with notes in both parts happening all at the same time.
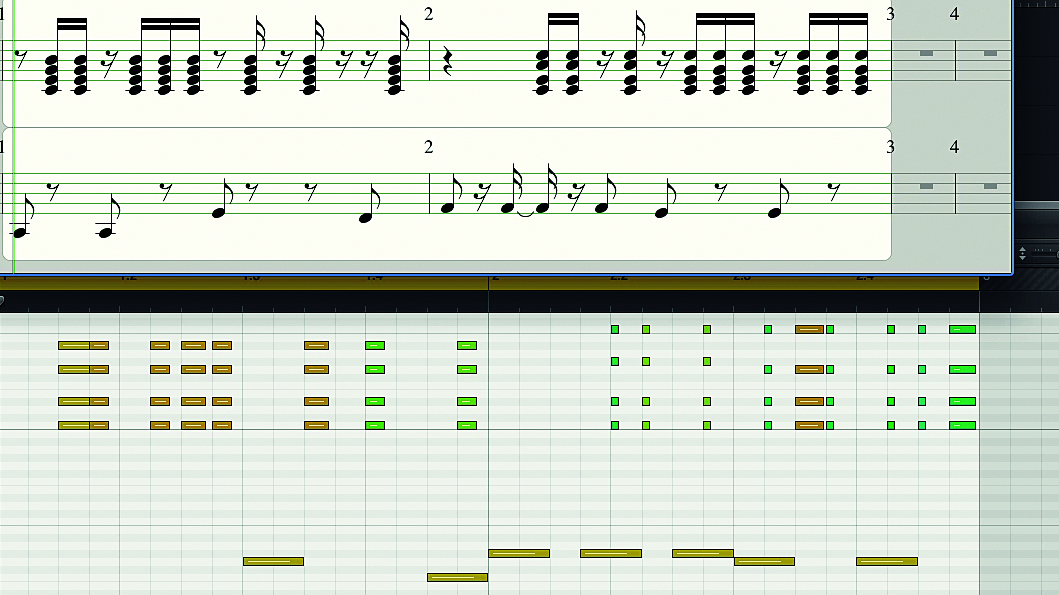
Step 9: Inserting some gaps in the synth part gives the bass room to breathe. Here, we’ve removed notes from beats 1, 2 and 3 in bar 1, along with the ‘and’ of beat 4. In bar 2, we’ve inserted a quarter-note rest on beat 1, effectively removing all notes from the entire beat.
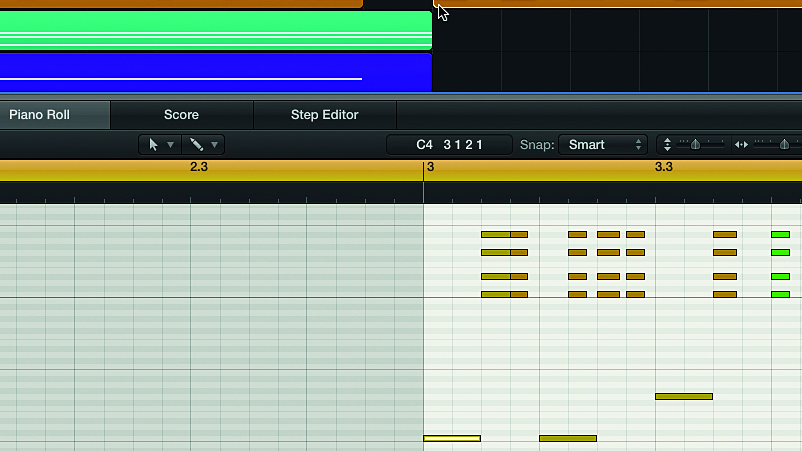
Step 10: Next we trim the bass part on the beats where we want the keyboard part to take precedence, as shown. Not only do we end up with a funkier bassline, but both parts now work much better together from a rhythmic perspective, fitting around each other.
Finishing up
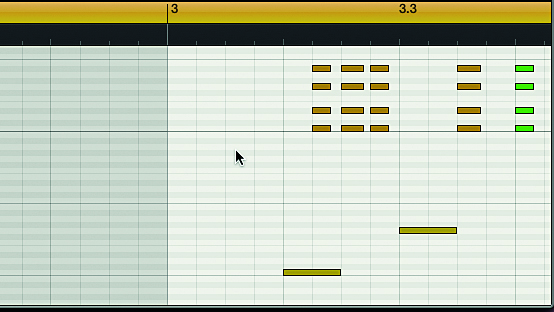
Step 11: To finish, let’s look at how you can increase the impact of a drop by inserting a quarter-note rest on the downbeat, effectively bringing in the track on the second beat of the bar rather than the first. Here’s a short build followed by a drop that comes in on the downbeat of bar 3. It works well enough, but maybe we can heighten the tension even more…
Step 12: Here’s the same build and drop with a quarter-note rest inserted on the downbeat of bar 3 across every track. After a beat of silence, everything now comes crashing back in on the second beat of the bar, giving a sort of ‘takeoff and landing’ effect. As a finishing touch, we add a crash cymbal on beat 2 to emphasise the re-entry.
Recommended listening
Daft Punk - Voyager
This cut from the 2001 Discovery album features one of the best basslines there is. With a jumpy rhythm that borders on syncopation, this über-funky line is actually based around a straight 16th-note pattern punctuated by a clever use of rests. The gaps are just as important as the notes that surround them, lending much of the overall feel to the part.
Gorgon City feat Mnek, Ready For Your Love
This superb current release is a great example of the quarter-note downbeat rest technique for drops illustrated in steps 11 and 12. The bridge before each chorus features a slowly intensifying build-up under the “most of all, most of all” lyric. Then, as the chorus “I’m ready for your love” lyric drops, the downbeat is missing. Everything kicks in a quarter-note later than you’d expect, resulting in a more impactful chorus.
Pro tips
Hip-hop drop
When putting down mixes, early-’80s hip-hop producers used to use the cut buttons on multiple mixing desk channels to drop out the rhythm tracks momentarily behind the vocal to emphasise certain lines. The technique is very effective, so it’s still popular today, but these days, of course, the cuts are more likely to be performed via DAW automation.
Come to an arrangement
When programming and arranging multiple keyboard and synth parts, try and adopt a ‘less is more’ approach to avoid everything becoming too busy. If each part contains fewer actual notes, but the notes that are there dovetail neatly around each other, you’ll build up an arrangement that works better rhythmically and in which all the parts can be heard. Knowing which notes to strip out is a good instinct to develop, so focus on keeping only the notes that are totally necessary to each part.


