Ableton Live 8 wasn’t exactly what you’d call a sweeping success when it was released in 2009. In fact, issues with stability and usability were so poorly received that it led Ableton to publicly commit to refocusing on the values that got them to Live 7: “quality over innovation”.
Thankfully, Ableton managed to course correct, but - somewhat ironically - an innocuous preset for Multiband Dynamics, one of Live 8's new devices, would end up becoming vastly influential, spawning legions of tutorials, a free copycat plugin and a new style of punchy, in-your-face compression named after the preset itself: OTT.
Multiband compressors were not, of course, new to the world in 2009. Ableton’s approach to implementing upward and downward compression and expansion across multiple frequency bands in an intuitive and easy-to-use tool was laudable, but not revelatory, and it wasn't the device itself that made a lasting impact, but a single preset designed by former Ableton employee — and Bitwig founder — Claes Johansson.

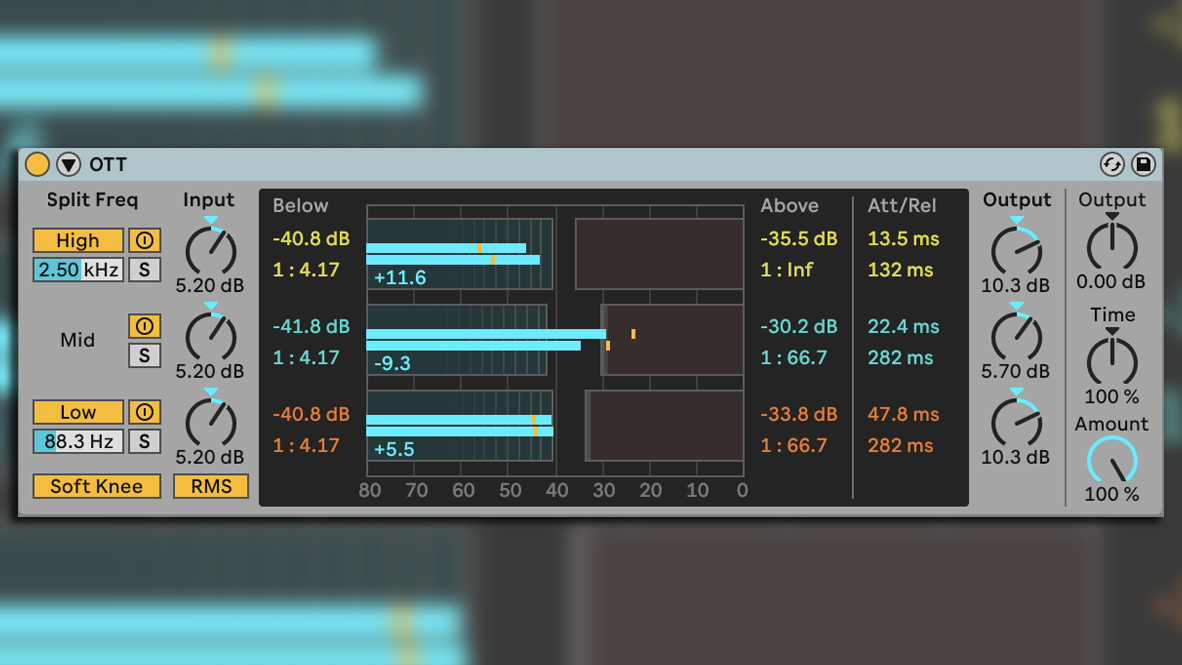
OTT's banding is bold, with the low cutoff at a sub-focused 88.3Hz and the highs at 2.5KHz: essentially going above and below the ‘clarity’ midpoint. It performs uniform, low-threshold (downward) limiting on the lows, mids, and highs, whilst also performing low-threshold moderate upward compression on each of the bands — leaving a small window in the middle of the dynamic range (7dB for the lows, 11.6dB for the mids, and 5.3dB for the highs) for things to get by unscathed, and leading to an upfront, sub- and brightness-driven output that avoids totally wringing the life out of the midrange.
The attack gets shorter from low to high, helping to avoid a flattening out of punch and presence in the bass and maintaining an especially crisp high-end. The release is moderate in the mids and lows, and quite fast in the high band, making the highs more percussive and toeing the line between drive and disorientation for the bass.
Simple enough, but it’s a combination that can sound like magic on everything from instruments to full mixes: just dragging the preset into a rack instantly brightens up a sound. One thing it isn’t, though, is subtle. OTT compression is loud, in-your-face, and has more punch than a kangaroo at boxing practice - but that's why we love it.
Not long after OTT was released into the world, its boisterous sound was being championed by the burgeoning brostep and EDM scenes, nuance and subtlety traded for abrasive, whole-body-shaking mixes that couldn’t be ignored.
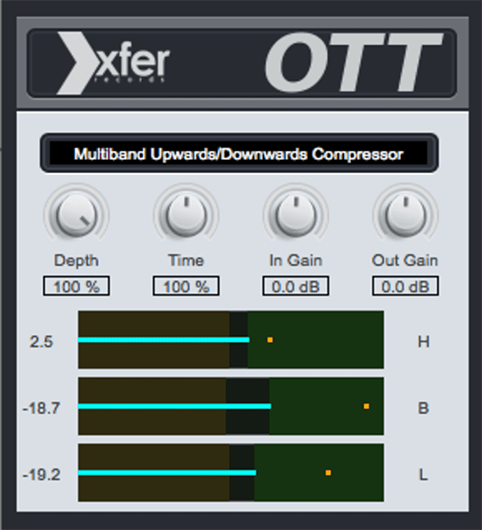
Whilst not an effect impossible to replicate elsewhere, those seeking to emulate the sonic palette of Skrillex, Flume, et al would often gravitate to Ableton Live. Until the latter part of 2012, that is, when Steve Duda of Xfer Records released a free plugin that mimics the preset. The plugin, simply named OTT, keeps the gap between the upward and downward compression of the Ableton Multiband Dynamics preset intact for each band, but allows the user to adjust where it falls by uniformly altering the threshold for both as it’s dragged.

There’s a dial for time, upward, and downward compression as well as output level for each band, but the actual values aren’t exposed: the OTT plugin isn’t about creating a versatile multiband dynamics processor, it’s about capturing the sound of Ableton’s OTT preset and giving users the option to tweak it without trying to do anything different. Oh, and then a couple of years later Duda released Serum. No big deal.
5 ways to use OTT compression
First things first: It’s important to remember that OTT gets loud, and loud gets tiring. The thing is, human beings perceive higher frequencies as louder, so if you run a balanced-sounding mix through a spectrum analyzer, you'll often see a downward slope from low to high. So when all’s equal decibel-wise, if there’s any significant high-frequency content in the signal that you're applying OTT to, it’s going to flatten the spectrum out, giving the effect of reduced levels in the bass and midrange.
If you take one thing away from experimenting with OTT it’s that, fundamentally, it's a brute-force tool for frequency range consistency, and that consistency makes everything brighter. Combat this by mixing the original signal back in with the Level dial as needed to give a taste of glue and clarity to the original character of the sound — and the bassier it is, the lighter the touch required.

6 VST plugins that will make your tracks sound louder without destroying punch
Let's run through five ways to experiment with OTT compression using Ableton's Multiband Dynamics preset. To recap: the device's bands for low, mid, and high frequency cutoff and input levels are dialled in on the left-hand side of the interface, and the level going through each is displayed in the centre. In this central panel, you'll find boxes on either side that indicate the thresholds for upwards and downwards compression or expansion, making it easy to visually set thresholds by dragging the box edges to match the level display.

Dragging up and down on the boxes sets the compression/expansion ratio with a corresponding stretching or squashing of vertical lines in the box. In the fashion of all the best-designed Ableton devices, this translates what’s happening under the hood into an easy to understand visual representation. Per-band output level and attack and release times are available too, and there’s a handy Time dial that uniformly increases and decreases attack and release across the bands for broad brushstroke sweet-spot tuning.
1. Try it on drums
OTT can instantly gift almost any drum break with that splashy, loud '90s jungle sound. You might find hi-hats and especially cymbals overwhelm the signal, though - increasing the Time dial will lengthen the compressor's attack and release times to alleviate this. This, along with a twist of the Amount dial to reign in the overall effect, should get you to where you want to be with a couple of twists to taste.
Any individual percussive sound that you want to have a lot of presence is a good candidate for OTT. If you’re looking for a sub-heavy, dull thud of a kick then you’re not going to find much use for OTT — but for four-on-the-floor kick-driven genres where the kick is direct and forward, OTT brings out its fizz and noise very well for further processing. The same goes for snares: if you want a chest-slamming pneumatic blast of a snare, a 909 snare that’s been run through OTT will have a much more expansive character than one that's been saturated through clipping alone.
2. Try it on bass
If you want to get that Skrillex-esque, aggressive 2010 dubstep sound to your bass, OTT is a quick and authentic solution. When applied correctly, the enhanced brightness from its harmonic augmentation immediately transforms a bass sound into something that pulls dual duty of bass and lead, positively ripping its way through speakers.
Instead of dialling down the Amount of the effect to claw back some of the nether-region-vibrating power of the sub, you might try giving the track some extension by copying the pattern into an unprocessed deep sine wave track — this can offer the best of both worlds, and when using multiple bass instruments (an commonly used sound design technique for aggressive bass-driven genres) and bussing them into an OTT, then combining their patterns into the separate sub, the different sounds will glue together with a consistent low-end output.

The ultimate guide to sub bass: tips and tricks for a high-class low-end
Ever design an absolutely killer bass patch that only works on one note? There’s only so much that diligent finagling of key tracking for filters and the like can achieve; sometimes the reason a synth patch sounds so good on one note is down to the unique relationship between the oscillators, the filter resonance, and assorted envelopes… change the fundamental frequency, and all the punch and power disappears.
Slap OTT compression after the synth, however, and suddenly every detail across the frequency range becomes consistent. It’s not an instant cure-all, of course — dialling in key tracking to ensure resonances, especially any self-oscillation, sound consistent is still important — but the extreme nature of OTT compression widens the margins and ensures that slight changes in power don’t affect the overall sound. OTT might change the character of your bass in a way you don’t want, but if you at least notice that its character is consistent across pitches in a way you’re struggling to achieve with traditional compression, it’s a sign that it might be worth delving into the finer points of multi-band compression to solve your issue.
3. Try it on vocals
OTT is a powerful tool for vocal consistency, and it creates an airy, breathy sound. There’s an almost artificial level of polish and cut-through to 100% OTT processed vocals that’s popular in upfront styles of dance and pop music, but dial this back to around 50% and a lot of warmth is still retained — important for soulful styles.
For a one-touch solution, it’s about as good as it gets for smoothing things out across takes and even addressing small issues with directionality to the mic. The thing is, though, the ‘garbage in, garbage out’ rule applies pretty strongly here: for OTT to really be ‘one touch’ you’ll need at least a pretty good take (or comp lane) and, crucially, a vocal with good breath and sibilance control.
Without it, they can really get out of hand. A diligently applied gate placed in the signal chain directly before the OTT compression can make a big difference to breaths without having to fiddle with OTT settings, but increasing the Time dial can also help if things are still a bit choppy. OTT isn’t a magic button though, so don’t expect it to replace manual breath-slicing or fix sibilance or distortion issues!
4. Try it on synth leads and pads
OTT will brighten up any lead instantly. Say goodbye to haunting electric pianos and foreboding pads and hello to the kind of shimmering, filled-in sounds that’ll cut through the noise in any gym’s PA system.
Further than that, for the exact reason that OTT creates consistency across different frequencies it can be a useful tool to place after a ‘bare’ instrument that you later intend to add further effects to, even if you’re not looking for the ‘OTT sound’. By creating an evenness to an instrument’s character across the entirety of its harmonics, OTT makes saturation and soft clippers behave very differently.
Add a low-pass filter to the chain and balance the output level, and you can end up with a rougher, louder-sounding instrument in a way that’s difficult to nail with traditional compression, EQ, and saturation.
5. Try it on a full mix
If you tend to default to putting a gluey compressor on your master bus to increase loudness and coherence, why not give OTT a try as an alternative? Think of the Amount dial as a combined ‘more glue and more brightness’ control, and start from zero and work your way up. You might even find that adjusting the time value gets you to where you want to be — make it too long and you’ll lose some of the driving nature of what makes OTT so bold, but shortening it below 100% and you will start to introduce more of the ultra-fast beats-scene style pump to the compression.
If you’re a ‘throw the rulebook out the window’ kind of producer, then you might consider mixing into an OTT compressor — the Ableton preset is truly latency-free, and the Xfer plugin may as well be. Rather than treating each track individually with EQ and compression to get the best out of them, OTT will simultaneously pull out the nuances of your tracks (until they aren’t nuances anymore) and glue things together, allowing you to work ‘backwards’ and focus on the level balance between tracks and very broad brush stroke EQ to smooth out how things glue together.

The Amount dial is definitely your friend in this case, as the brightness introduced can be somewhat overbearing and make it difficult to give prominence to your bass. Setting Amount to 50% is a good starting point from which you can then experiment with introducing less or more of the effect. By prioritising the end result of a full, thick, and pumping sound, throwing out the rule book, and making mixing decisions that are purely in service of it, you may well add character to your music that isn’t really possible through any other method.
Indeed, turn off the OTT effect and you might find your drums are way too loud, samples and synths way too low, and your bass all over the place. Not a situation you’d typically go into a mastering stage with! This is the extreme version of running into a fast glue compressor, or something like the Roland SP-303’s vinyl sim compression: manipulating the interplay between tracks with levels and focused entirely on the resulting sound, without particularly considering how it’ll ‘play nice’ with more polished music in the genre.
It’s unlikely you’ll truly achieve the same fidelity as a more considered mix and master with this method, but it’s a quick way to get you some of the way towards where you’d like to be. Use this approach with caution.
It's not called 'over the top' for nothing
There are, of course — as with any tool in music production — tradeoffs with OTT compression, and by extension, multiband dynamics processing in general. Any time there’s parallel processing on the frequency range of a signal, be it multiband dynamics, EQ, bandpassed saturation or anything else, there is an inevitable possibility of phase issues caused by minuscule timing errors between each band.
Natural harmonics sound as they do because of the beautiful mathematical summing of the component frequencies that make them up, and reaching into the middle and shifting those around can cause real problems. In a very basic sense, phase issues in a recording can give us the impression that something ‘just doesn’t add up’ — and that’s quite literally what’s happening.
In a technical setting, this is generally a problem; there’s little point in meticulously massaging all of your tracks into a cohesive whole only to undo it all by introducing myriad phase issues across the spectrum of the master. From a creative standpoint, though, OTT compression is about as brazen as it gets with harmonic manipulation… the fact that some of the resulting sound has arisen from phase errors between bands is really neither here nor there, when the sound itself is desirable.
The bottom line? Use your ears, trust the feeling. Multiband Dynamics is available as part of the Standard Edition of Ableton Live and the OTT preset is installed as standard, and Xfer’s OTT plugin for Mac and Windows (VST, AU, and AAX) is free. If you want bright and aggressive, it’s an essential download. If nothing else, it’s an interesting - and extreme - introduction to the fascinating world of multiband dynamics processing.


