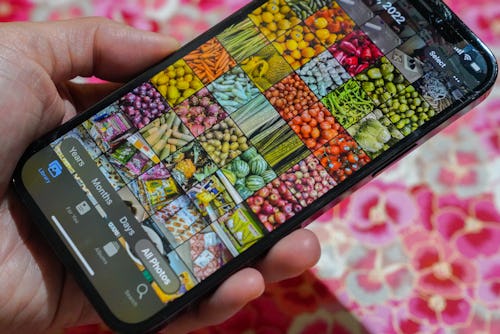
Sharing photos with family and friends shouldn't be such a hassle. Apple seems to agree. In iOS 16 and iPadOS 16, Apple has a new feature called iCloud Shared Photo Library that lets a group of friends and/or family members easily contribute photos and videos in a single album that everyone can access.
Users in an iCloud Shared Photo Library can add media manually or have their content automatically uploaded from their iPhone or iPad cameras after capture. The feature is surprisingly easy to set up and, frankly, we're all wondering why it took Apple so long to solve this problem that everyone has.
iCloud Shared Photo Library: What you need to know
Everyone participating in a iCloud Shared Photo Library needs to be using iOS 16 (or later), iPadOS 16 (or later), or macOS Ventura (or later.) Anyone using an older version of the software will not be able to see or add photos until they update.
You don’t need to pay to use iCloud Shared Photo Library; it’s included as part of iCloud. However, the person who sets up the library is its “host” and all photos are saved in their iCloud storage. If you're the host and you're anticipating tons of photos and videos being shared, you might need to upgrade your iCloud plan so there's enough space for all that sharing.
You can only be part of a single iCloud Shared Photo Library and each one can have a maximum of six people involved, which could be a limitation for larger families. The participants don’t have to be part of your Family Sharing group, however.
How to enable iCloud Shared Photo Library
Enabling iCloud Shared Photo Library is easy. You might be prompted to enable it after updating to iOS 16 or iPadOS 16, but don’t worry if you pass it up. You can still enable the feature manually.
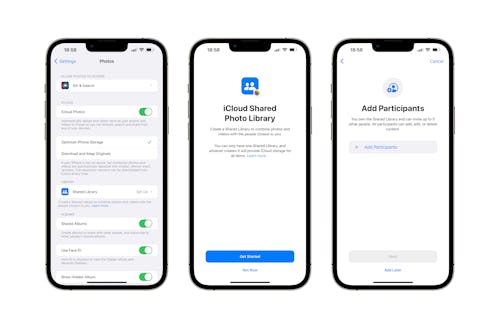
- Open the Settings app on your iPhone or iPad and tap “Photos.”
- Tap “Shared Library” and then tap “Get Started” to begin creating your iCloud Shared Photo Library.
- Tap “Add Participants” to begin adding your friends and family or tap “Add Later” if you want to skip this step for now. Search for the new participant’s name to send them an invitation.
Now it’s time to choose which photos will be added to the shared library.
- Select “All My Photos and Videos” to have every new photo and video automatically added to the shared library.
- Select “Choose by People or Date” to pick specific people or dates to be shared.
- Select “Choose Manually” to pick the photos that you want to be shared.
You can preview the library before sharing it by tapping “Preview Shared Library.” And that's it!
How to add and remove people from iCloud Shared Photo Library
You can add and remove participants whenever you want with a few taps.
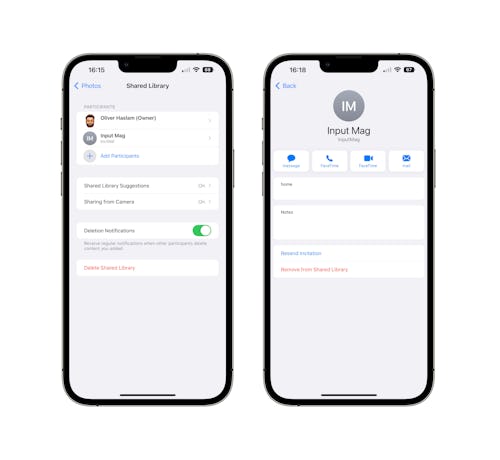
- Open the Settings app on your iPhone or iPad and tap “Photos.”
- Tap “Shared Library” to see a list of the people who already participate in your iCloud Shared Photo Library.
- Tap “Add Participants” to add someone new or tap the name of the person you want to remove.
- Tap “Remove from Shared Library” to remove the participant from your iCloud Shared Photo Library.
How to switch between your shared and personal iCloud Photo Libraries
Creating or joining an iCloud Shared Photo Library means you now have access to two libraries; the shared library and your personal one. The Photos app allows you to switch between the two or see photos and videos from both in a single view.
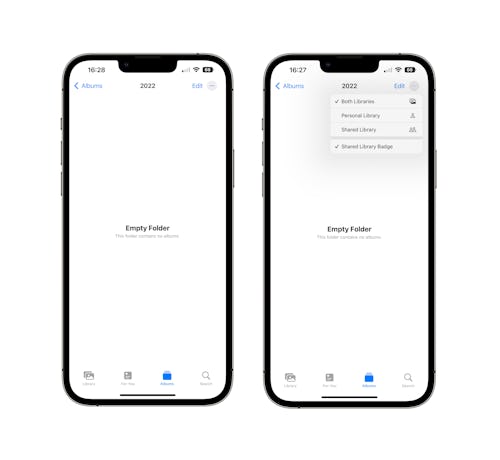
- Open the Photos app on your iPhone or iPad.
- Tap the three dots in the top right corner of your screen and select the library you want to view: “Both Libraries”, “Personal Library”, or “Shared Library”.
How to manually add photos and videos to your shared library
Now that you’ve created an iCloud Shared Photo Library you can move photos and videos between it and your personal library either automatically (scroll down for instructions) or manually.
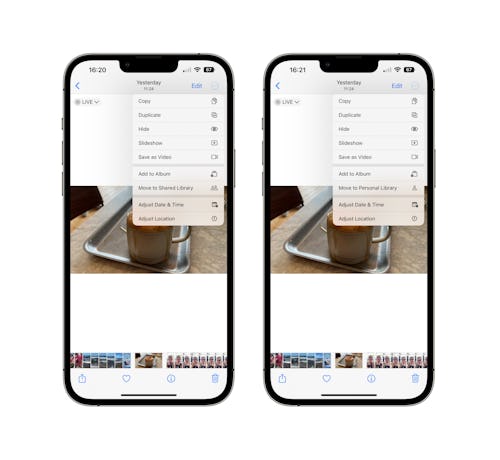
- Select the photo or video that you want to move and tap the three dots in the top right corner of your screen.
- Tap “Move to Shared Library or “Move to Personal Library.”
Automatically share photos as you take them
Share from Camera is a feature of iCloud Shared Photo Library that automatically adds all photos taken using your iPhone and iPad to your shared library. This could be useful if you’re on vacation or at an event and want to easily share photos and videos without the extra taps.
- Open the Camera app and tap the icon that looks like two people standing together to enable Share from Camera. Tap it again to disable it.
Deleting an iCloud Shared Photo Library
You can easily delete a shared library when you want to, but it can only be deleted by the person who originally created the iCloud Shared Photo Library.
- Open the Settings app on your iPhone or iPad and tap “Photos.”
- Tap “Shared Library” and select “Delete Shared Library.”
The shared library will be deleted and all participants will have two options: save only the photos and videos that they contributed or save all photos and videos that were in the shared library before it was deleted.


