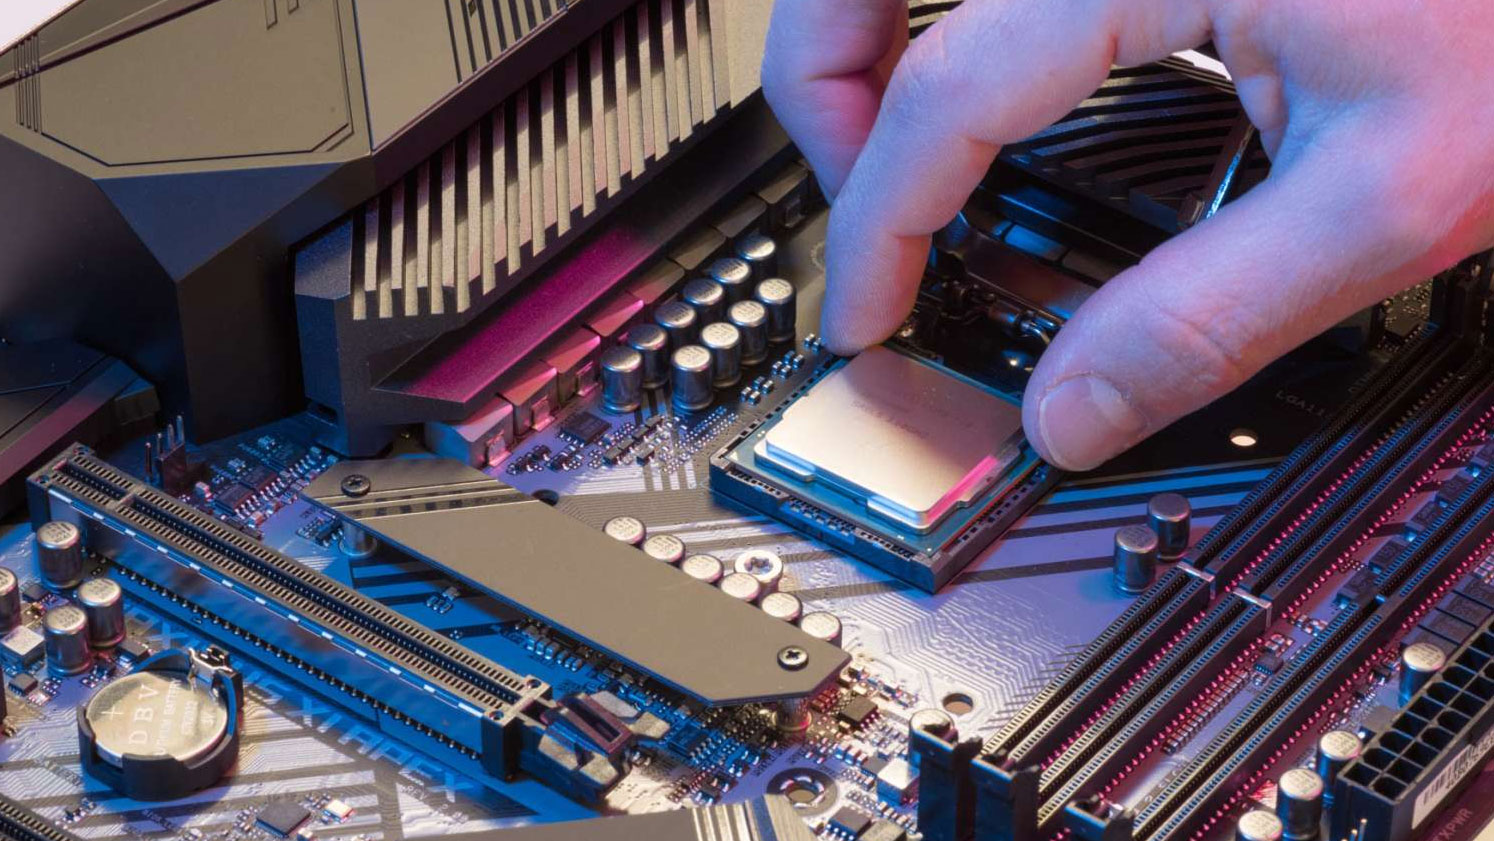
Do you want to know how to overclock your CPU? If so, this guide is for you, with all of the necessary details on how to overclock your Intel or AMD CPU.
Contrary to innumerable reports of its demise, overclocking is not dead — not by a long shot. Yes, overclocking headroom has receded as the Intel vs AMD rivalry has intensified and the chipmakers focus on squeezing out every ounce of performance, particularly in the highest-end flagship processors. However, Intel's Alder and Raptor Lake chips represent a return of generous overclocking headroom, helping the chips take key spots on our list of best CPUs for gaming.
AMD's latest Ryzen 7000 chips don't have as much headroom for manual overclocking — the company's automated overclocking features are best for tuning —, but like Intel, AMD exposes a wealth of other tuning options that can give you a nice bump in performance. The company has also added even more overclocking support for its new Ryzen 9 7950X3D and Ryzen 7 7800X3D chips, too.
Should you overclock a CPU, and how do you overclock a CPU? Well, there are a set of best practices that you should follow when you overclock your processor, and if you take a reasonable approach, the risk is minimal. Today, we'll show you how to overclock your CPU and teach you how to unlock the hidden performance lurking under your heatspreader. We also have CPU overclocking benchmarks showing the performance increases we achieved with relatively easy techniques. Here's our guide that shows the steps you take to overclock your CPU.
We'll provide the deep-dive details for each step further below, but here is the basic step-by-step process of overclocking if you're just looking for general advice:
- Determine if your CPU and motherboard support overclocking and if your cooler and power supply are sufficient.
- Run CPU stress tests and record baseline performance benchmarks.
- Enter the BIOS or open the software overclocking utility
- Set the CPU multiplier/frequency to your desired overclock
- Adjust CPU Voltage (Vcore)
- Reboot your system
- Conduct stress tests
- Wash, Rinse, Repeat
CPU Overclocking Checklist
Before we start turning up the dial on the voltages and fans, you'll need to make sure that your system is ready for overclocking. As always, we have to caution that overclocking voids the warranty on any processor, and you run the risk of damaging your chip if you apply excessive voltage. Overclocking also increases power consumption and heat, so you'll need to accept and accommodate those needs. Excessive voltage and heat can also result in reduced chip lifespan due to premature degradation if you don't stay within reasonable boundaries.
However, if you take the right precautions, the chance of damage to your chip is minimal. Modern chips have a plethora of in-built safety mechanisms that help reduce the risks associated with overclocking. If you take a common-sense and responsible approach, you can squeeze every single megahertz out of the processor without assuming unnecessary risks.
Do I own an overclockable CPU?
Naturally, you'll need an overclockable processor. AMD's generous overclocking policy means that you can overclock nearly any chip though the first-gen Ryzen 7 5800X3D is an exception. AMD also has some restrictions for the other X3D chips, like the Ryzen 9 7950X3D and 7900X3D, and Ryzen 7 7800X3D, but there are at least some knobs exposed for tuning, including for the memory and fabric.
For Intel, you'll need a K-series chip if you plan on increasing the chips' core frequency, which is the most basic method of overclocking. That's because K-Series chips have an unlocked multiplier that allows you to easily dial up the frequency on your chip. As always, you'll be at the whims of the silicon lottery when it comes to the maximum overclock you can squeeze out of your chip — some chips simply overclock better than others, even when they are otherwise identical.
Does my motherboard allow me to overclock?
AMD allows overclocking on any chipset except the A-series motherboards. For Intel, if you plan on doing full core frequency overclocking, you'll need a Z-series motherboard, as Intel doesn't allow you to change the chip's frequency on cheaper B- and H-series motherboards (you can only overclock the memory on lower-tier Intel motherboards). Most higher-end motherboards have robust power delivery subsystems but performance varies, so pay attention to motherboard reviews to find your best option. You can hit our list of Best Motherboards to see the best models on the market.
Can my CPU cooler keep my overclocked processor cool?
Keeping your CPU as cool as possible is one of the keys to attaining the highest CPU overclocks. Check out our Best CPU coolers article for recommended options, and be sure to use one of the Best Thermal Pastes to ensure your cooler is effective. Ensuring that your case has adequate ventilation is also key, so be sure to ensure that you have enough airflow.
As a general rule of thumb, more is better for cooling; a CPU cooler that can handle 40% more TDP than your CPU's rating is preferred. However, having less cooling headroom won't prevent you from extracting any gains at all — the chip's peak temperatures will just limit how much you can overclock. The definition of sufficient cooling can vary based on your personal preference, but your overriding goal should be to prevent thermal throttling. We'll dive into that shortly.
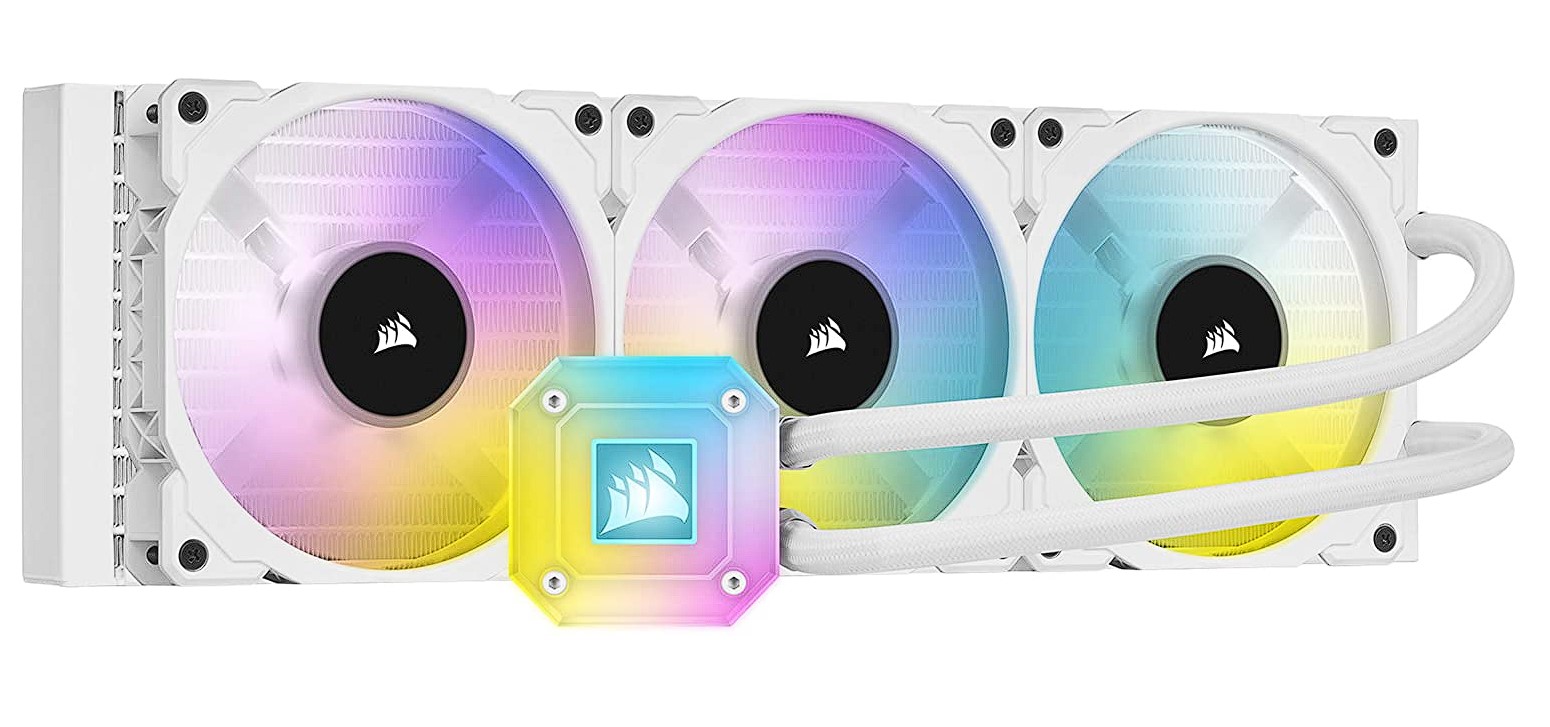
Overclocking all of the CPU cores at once ('all-core' overclocking) is the most common and easiest method of overclocking, but it does tend to generate the most heat. As a general rule, it's preferable to have a 240mm All-In-One (AIO) liquid cooler (or air cooler equivalent) for all-core overclocking with a modern Core i5 or Ryzen 5, and you'll want a more powerful 280mm AIO or better to wring out the most performance possible on the higher-end Core i7, i9, Ryzen 7 and 9 SKUs.
Overclocking cooling requirements can vary based on the generation of chip you're tuning, so be aware those guidelines don't apply to all previous-gen chips. More elegant overclocking approaches that don't use brute-force all-core overclocking methods, like manipulating turbo ratios or only overclocking a few cores, can also extract extra performance even if you're using a lesser cooler — you just have to pay close attention to your CPU temperature when you dial in the overclock. We'll also cover those methods below.
Does my power supply have sufficient headroom?
Listed here last, but certainly not least, you'll also need to ensure that you have one of the best power supplies for your system, but your requirements will vary based on the other components in your system. You can see the basic guidelines with a power supply calculator, but be sure to enter the maximum overclock frequency and voltage to ensure you have plenty of room for overclocking. Having plenty of power headroom, and clean power, is critical, so don't skimp on the power supply. However, you don't need to upgrade to the latest ATX 3.0 power supplies to do so.
How to Overclock a CPU in BIOS or Windows
Overclocking requires changing several system settings, like voltages and clock speeds. You can do software overclocking inside Windows 10 and Windows 11 with utilities like Intel's XTU or AMD's Ryzen Master, or you can enter the values directly into the system BIOS/UEFI. It's pretty simple to enter the BIOS to overclock; on the majority of platforms, you simply reboot the system and click delete or F2 repeatedly as it restarts. Both approaches have their strengths and weaknesses.
Software overclocking in Windows is a bit simpler because it uses standardized naming for the various settings, whereas motherboard makers often use different names for the same settings (luckily, the BIOS tends to have a short descriptor for each option). Additionally, overclocking in Windows allows you to make changes in real-time. In contrast, changing the values in the BIOS requires a system reboot before you see the impact. Overclocking your CPU in the BIOS does have one big advantage, though: There are far more fine-grained options available for more advanced tuners. Most die-hard overclockers stick with BIOS overclocking and use software tools for monitoring.
It is important to save your BIOS settings before you make changes. Overclocking your CPU is a trial-and-error process, so you might need to restore these settings several times. Most motherboards let you save your settings to a profile you can later restore, and you can assign simple names to keep track of multiple profiles. If you dial in good overclocked settings but would like to push even higher, it makes sense to save a profile so you can easily revert to a known-stable configuration if needed.
While the names for certain settings can vary somewhat based on your motherboard vendor, the major manufacturers (Asus, ASRock, Gigabyte, and MSI) all include a wealth of options to overclock your CPU with their enthusiast-class boards. You can go as deep as you want on a top-tier motherboard, but the basics aren't nearly as daunting as the wealth of options might suggest.
There are a plethora of settings and voltages you can manipulate for overclocking. For the scope of this article, we'll only focus on the basic settings that you'll need to get your overclock up and running. We'll refer to these basic settings in the following sections, but we have also provided a glossary of other key BIOS terms at the bottom of the article for your reference.
- CPU Ratio Multiplier - Dictates the ratio between the CPU and the BCLK. The formula to determine the processor's frequency consists of multiplying the base clock by the CPU multiplier. For example, a processor with a 100 MHz BCLK with a multiplier of 50 will operate at 5,000 MHz, or 5 GHz.
- Base Clock (BCLK) - The frequency at which the processor communicates with the memory and PCIe devices. The default BCLK for Intel chips is 100 MHz, but you can adjust this for smaller incremental performance increases. Be aware that adjusting the base clock also impacts the PCIe and memory busses, so you should refrain from adjusting your BCLK until your overclock is stable. Even then, it would be best if you did so sparingly.
- CPU Core Ratio - This lets you choose whether you want to set the multiplier for all the cores in a group, or individually. The latter is referred to as per-core overclocking, and it allows you to tune individual cores to their highest potential instead of the lowest common denominator. This approach can also allow you to squeeze at least some overclocking headroom out of systems with lesser coolers.
- Vcore - This voltage goes by many names, like Core Voltage or vCore, but it always dictates the motherboard's main input voltage to the processor. This value has the most direct input on thermals, with higher amounts of voltage generating more heat.
CPU Overclocking Stress Tests, Baseline Benchmarks
Overclocking your CPU is a balancing act that requires a few compromises, so you should establish baseline measurements of both performance and CPU thermals so you can see the impact. This baseline data helps you gauge the acceptable tradeoffs for the amount of performance you gain.
There are a plethora of software options for stress testing and monitoring — see our how to stress test your CPU guide for additional details. Some, like AIDA64 or OCCT, have in-built stress testing and monitoring, while others, like HWInfo, are purely designed to monitor performance. The chipmakers also provide their own software: Intel has Intel's eXtreme Tuning Utility (XTU) software, while AMD provides its Ryzen Master software. Both of these applications allow for monitoring and overclocking from within Windows 10 and Windows 11, but other functions, like stress testing, vary.
Stress tests are a good way to evaluate your overclock's stability because they fully stress the processor and generate a lot of heat. Some hardcore enthusiasts fry their chips for days at a time to ensure stability, while others do just a few hours of stress testing. It's up to you to decide how long you want to run the tests. Just don't fixate on them, and throw some daily use into the mix as well. Also, be sure to watch for signs of instability that are more subtle than an outright BSOD. For example, consider the system unstable if it hitches, stutters, or has momentary freezes.
Stress tests often merely serve as power viruses that will stress your system beyond what you would encounter in normal use, so it's best to use reasonable utilities and/or intense multi-threaded applications that you would find in normal PC use. We prefer AIDA64 and OCCT for quick synthetic stress testing, but employ the HandBrake and Blender applications for extended-duration testing. You can also use Prime95 or Intel Burn Test if you're interested in using the most intense tests available.
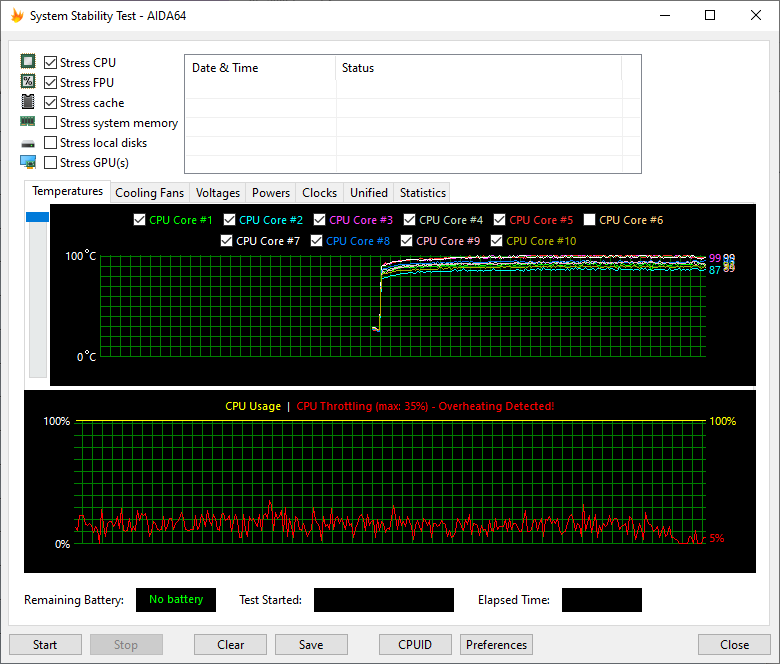
Now that you're ready, kick off your stress test and let it run until temperatures stabilize, then log the final measurements. As we've outlined in our how to check your CPU temperature article, it's best to keep most chips below 80C during load and under 30C at idle to minimize long-term wear on the processor. However, AMD's Ryzen 5000 processors are designed to run at up to 95C with a stock cooler, while Intel's highest-end Core i9 Alder Lake processors can run up to 100C during normal operation. So you'll need to check the chip specs to find the correct threshold.
Passing Prime95 doesn't necessarily mean your processor is stable for other workloads, either. Remember, you can only prove instability, not stability. This means that regardless of the length of time that you stress test your processor and pass, you can still encounter a random BSOD. As such, don't overclock mission-critical systems. You can reference our How to Stress-Test CPUs and PCs (Like We Do) article for more detail. Now that you're ready, kick off your stress test and let it run until temperatures stabilize, then log the final measurements.
Next, you want to set a performance baseline. The most general benchmarking rule is that the best performance benchmark is to simply measure the performance of the programs you use the most. However, those often don't have built-in benchmarks. In that case, you can also use similar types of programs (renderers or encoders, for instance) as a proxy for your workload.
Synthetic gaming benchmarks don't tend to translate well to real-world gaming, but given their stability and repeatability, these are great benchmarks for comparing performance before and after any changes you may make to your system. Be sure to turn off as many background tasks as possible during your benchmarks to eliminate that influence from your CPU benchmark results.
You can get away with just CineBench, but the more the merrier. Run your tests and log the results. You'll use this information to compare to later after you've overclocked the processor. Here are a few common benchmarks, but you can see a more expansive list in our CPU Benchmark article:
- Cinebench R23 (MS Store) — This rendering CPU benchmark program has both single- and multi-core benchmark modes. This is one of the most commonly-used CPU benchmarks.
- UL Benchmarks 3DMark — This synthetic CPU benchmark has a plethora of built-in tests for both CPUs and GPUs and is updated regularly with new tests. This is the go-to synthetic gaming test for many.
- CPU-Z — This is a common utility that exposes the details of your processor, but it also has a built-in CPU benchmark that is incredibly simple to run. CPU-Z test results are also widely shared among enthusiasts, so it's easy to find comparison systems.
How to Overclock a CPU
Here are the basic steps of overclocking your chip, but be aware that this is a trial-and-error process, so you'll need to be patient and reboot your PC multiple times as you dial in the perfect settings. We suggest overclocking your memory after you have dialed in your peak CPU overclock.
We also recommend changing the fewest number of variables as possible between each reboot and series of stress tests. Ideally, you would change one variable per attempt to ensure that you can determine the impact of each change correctly. We have other sections below with more specific advice for overclocking Intel and AMD CPUs, but these basic steps apply to both chipmakers:
Step 1.) Enter the BIOS or open the software overclocking utility: Our tutorial on accessing the BIOS explains how, but for most desktop PCs, hitting the Del of F2 key on your keyboard as soon as you see the motherboard logo pop up on your monitor works. You can also use a software-based overclocking utility, like Intel's XTU or AMD's Ryzen Master, to adjust many of the same parameters.
Be sure to set your fan speed/fan profiles to more aggressive settings to ensure strong cooling for your system. The strength of your cooler will largely dictate how fast you need to turn up your fans but be aware that you will have to live with the increased noise level, so set a reasonable limit. You should only dial in your overclock with the fan settings you are willing to accept long-tem: Do not turn your fans down after you have dialed the overclock, as this will lead to overheating.
Step 2.) Set the CPU multiplier to your desired overclock: This setting assigns the frequency the chip runs at. The formula to determine the processor's frequency consists of multiplying the base clock (BCLK) by the CPU multiplier. For example, a processor with a 100 MHz BCLK with a multiplier of 50 will operate at 5,000 MHz, or 5 GHz.
You can choose to apply an 'all-core' overclock, meaning that all cores will operate at the same frequency, or on newer processors, assign different frequencies for individual cores. You can also overclock via the 'Turbo Ratio,' which allows the CPU to boost to different overclocked frequencies based on the number of active cores.
There are two approaches to this step: You can gradually increase your processor's frequency using 100 MHz increments until you've hit the wall, or you can set the desired frequency and work your way up or down from there.
Step 3.) Adjust CPU Voltage (Vcore): This parameter dictates the motherboard's main input voltage to the processor. This value has the most direct input on thermals, with higher amounts of voltage generating more heat. We suggest starting with a low Vcore (1.25V or lower) as the starting point and then working your way up if your system isn't stable at your desired frequency.
Maximum voltage thresholds vary based on the generation of the processor you're overclocking. However, a general rule of thumb is not to exceed 1.40V for 9th-Gen and newer processors unless you're using exotic (sub-ambient) cooling. Higher voltages will result in faster chip degradation.
There is no magic formula when it comes to overclocking. If you want to pinpoint the exact voltage for stability, use small increments of 0.01V. If you're not the patient type, you can work with higher increments, like 0.05V.
Be aware that temperatures will rise, and frequency improvements will decline, on a non-linear basis with voltage increases. That means you'll get less of a frequency gain in exchange for more heat as you work your way up to higher voltages. We suggest not using the borderline voltage for stability. Overclocking isn't a precise science, and hardware is unpredictable— leave yourself some margin.
Step 4.) Reboot your system: If you are in the BIOS, save your changes and exit, which will trigger a system reboot. If you are using a software overclocking utility, save your changes and reboot the system normally. If the system doesn't start, proceed to Step 6.
Step 5.) Conduct stress tests: Run a few of the stress tests we listed in the previous section, carefully logging temperatures and performance as you go. If your system completes those tests and remains stable within a reasonable temperature range, you can either choose to stay at your new overclocked settings or you can proceed to the next step.
Step 6.) Wash, Rinse, Repeat: If your system doesn't boot, or if it is stuttery, hitches, blue screens (BSOD), crashes, or generally acts unstable, reboot the system and adjust your settings in the BIOS or software as necessary to attempt to address the issue. Essentially, you repeat the steps above and make changes to find stable settings. For instance, you can slowly increase the CPU voltage (Vcore) to attempt to stabilize your chosen CPU overclock frequency. Conversely, you could reduce the CPU frequency without changing the voltage.
If your system is stable through your stress tests, you can repeat the steps above to push to higher overclocked CPU frequencies. Overclocking is a delicate balancing act of frequency and voltage, and temperature largely dictates the limits. Proceed with care. Once you have dialed in your desired frequency limit, it is always advisable to try a few rounds of rebooting and reducing the core voltage slightly to find the lowest possible voltage you can use, which will ultimately result in a cooler chip that lives longer.
Optional Step.) For Intel processors only, set the AVX offset to -1 or -2 to reduce the multiplier when your processor engages in AVX workloads: AVX workloads hit the processor hard and, as a result, require more voltage to achieve stability. That makes the chip run hotter, and be less stable. It isn't uncommon to see high overclocks accompanied by -3 or -4 AVX offsets. This will help you attain higher overclocks overall, so it is highly advisable to specify an AVX offset.
Optional Step.) Configure the voltage mode to the selection of your choice: We suggest using a static (override) voltage mode until you've dialed in your overclock. After that, you can try other modes. Adaptive mode is often popular because the Vcore decreases with the multiplier, which will make the processor generate less heat and consume less power.
Optional Step.) Set the Load Line Calibration: Load Line Calibration (LLC) compensates for Vdroop by assuring that voltages remain at a more even level, thus solidifying your overclock. Some motherboard brands prefer to use numeric values to denote the LLC level, while others use non-numeric values. For the average user, a medium value should be more than enough. You can experiment with the different values to see which works best for you, though. Newer-generation motherboards, particularly higher-end models, tend to adjust this setting automatically with precision. Unless you're chasing the highest of overclocks, you can often leave this setting unaltered and stick with the "Auto" setting.
Intel P-Cores and E-Cores CPU Overclocking
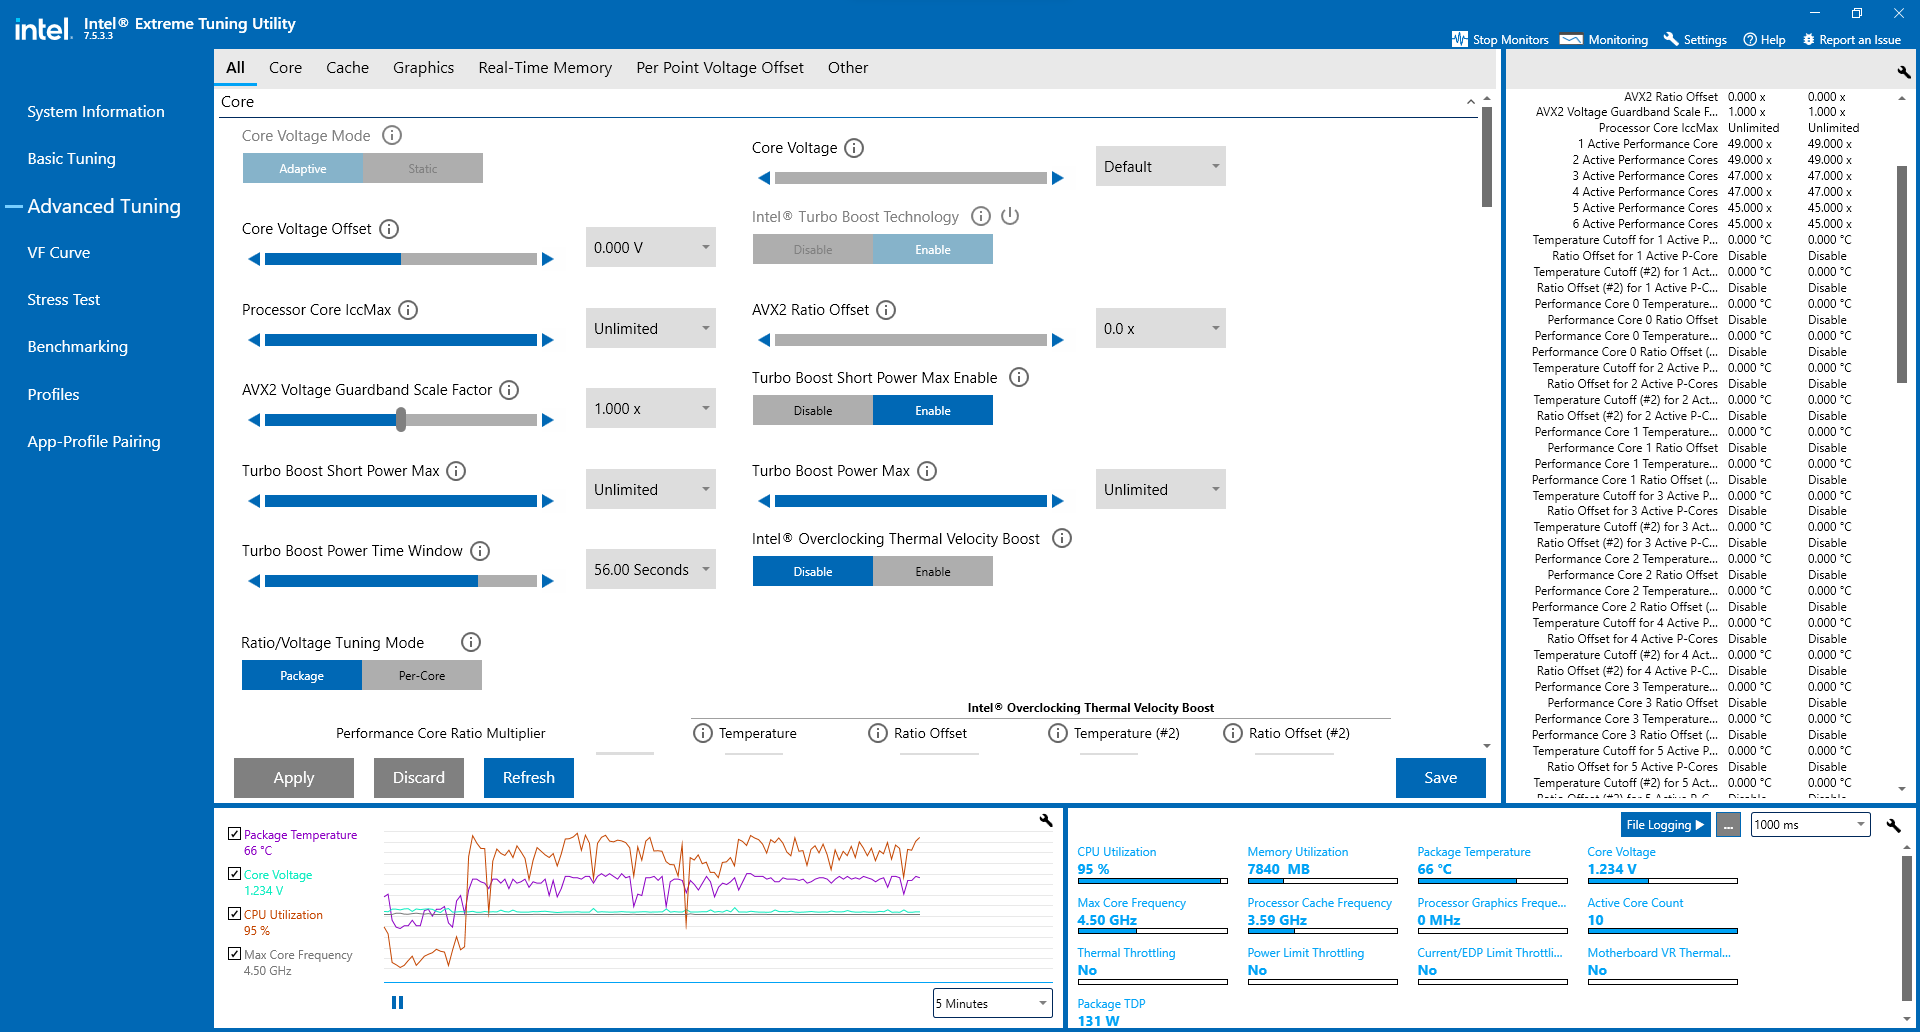
Alder Lake has P-cores for latency-sensitive work that tends to be lightly threaded, while the E-cores step in for multi-threaded work and background tasks. The E-cores can only be overclocked in groups of four, while P-Cores can be overclocked individually or in groups. Alder Lake provides plenty of options for fine-tuning — you can disable the E-cores entirely, which often allows you to eke out a slightly higher overclock (typically a single bin) on the P-Cores.
Choosing whether to disable the E-cores will depend on your own personal preference, but leaving both the P-cores and E-cores active will offer the best blend of overclocking performance for most users in both Windows 10 and Windows 11. However, this means that you'll have to overclock them separately. Head over to our How to Overclock Alder Lake CPUs guide for more detailed instructions.
All-Core, Per-Core and Turbo Ratio CPU Overclocking
You can overclock the CPU frequency in three ways: All core, Per core, and via Turbo Ratios, with the last option only available on Intel processors. The 'all core' setting is what we traditionally associate with overclocking. 'All core' is the simplest method by far because it assigns one static frequency to all cores at once. 'Simplest' doesn't always translate to 'best,' though.
Overclocking via the Turbo Ratios is one of the best ways to dial in a refined overclock, as this allows you to define the peak boost frequency based on how many cores are active. This feature can help you eke out a slightly higher overclock by targeting more robust cores with higher frequencies, but just as importantly, it allows the processor to drop back into its base frequency when the chip isn't under load. This allows the chip to run cool when it isn't busy and also reduces the amount of time the chip is at the highest frequencies, which is important for chip longevity (more on that below).
If you overclock via the turbo ratios, you'll need to make sure that your Windows power profile is set to 'Balanced' or lower (the 'High Performance' profile keeps the chip at its peak turbo frequency at all times). You can use our above step-by-step guide to overclock using this approach, but instead of modifying the CPU ratio multiplier in Step one, simply modify the Turbo Boost multipliers instead.
The 'Per Core' feature allows you to assign a unique frequency to each individual core. This can be helpful if you identify that some cores are more capable of sustaining a higher frequency than others. This setting is most useful for advanced tuners and can require a fair amount of investigative work to determine the appropriate clock speed for each core. In this case, you would cycle through each core and target it individually with a stress test as you work your way through the steps above, finding the peak for each core.
How to Overclock a CPU With Multi-Core Enhancement (MCE)
We always recommend manual tuning, but Intel has its one-click auto-overclocking Intel Performance Maximizer (IPM) tool available for some chips. This utility makes overclocking simple, and it comes straight from Intel's overclocking team.
Intel's motherboard partners have also infused their boards with predefined all-core boost profiles that go by many names, such as Multi-Core Enhancement (MCE) with ASUS motherboards and Enhanced Turbo with MSI motherboards. These features are largely referred to as MCE, but the functionality remains the same: These settings essentially apply an all-core overclock to the processor that is defined by the maximum Turbo Boost bin supported by the processor. This modifies the CPU's clock rate and voltage to deliver higher performance. Performance, power consumption, and heat are all affected, naturally.
Motherboard vendors predetermine the voltage settings at the factory, meaning the settings do not take chip quality into account. Instead, the vendor tests a large number of CPUs in each respective SKU and sets the parameters based on the worst common denominator. As such, these settings typically use a much higher voltage than required for even chips of "normal" quality, which can reduce the chips' lifespan and result in a hotter and noisier system. We always recommend manual tuning over MCE approaches, but if you have sufficient cooling and aren't as worried about heat generation and power efficiency, this is the quickest method.
How to Overclock an AMD CPU
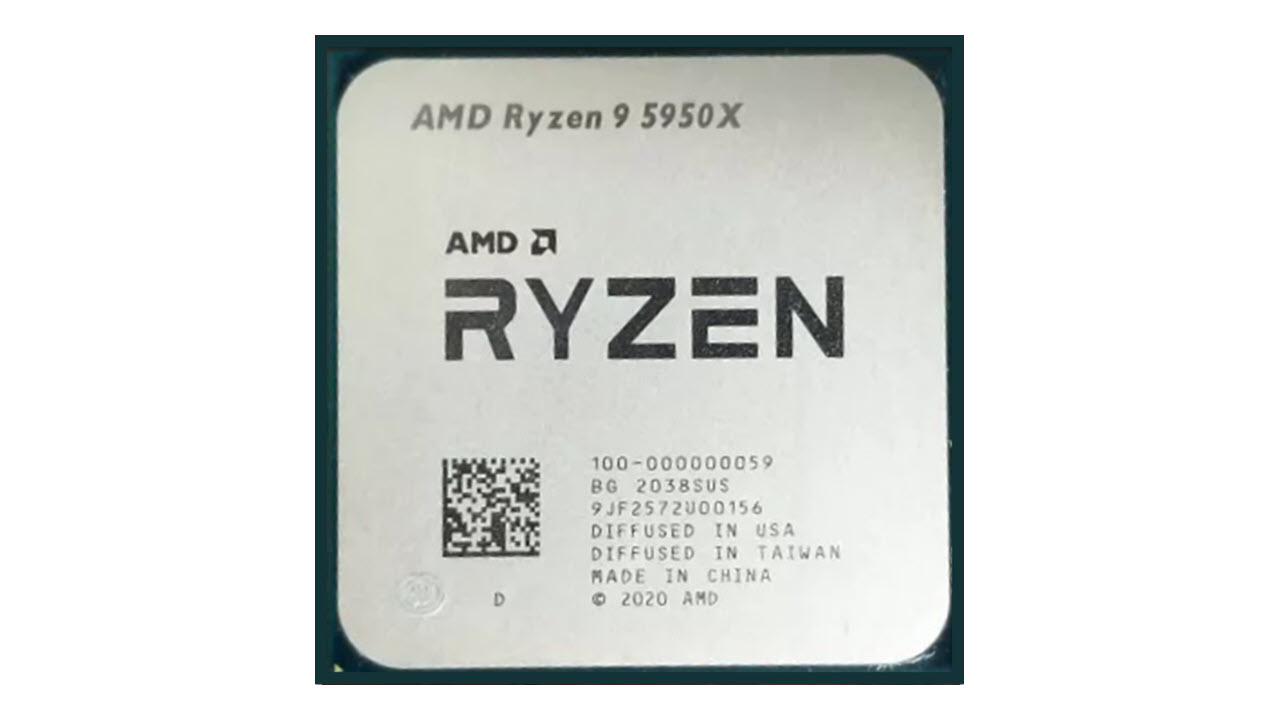
AMD's Ryzen chips don't have much manual overclocking headroom available, largely because the company's boosting algorithms automatically expose the most performance possible given the capabilities of your motherboard's power delivery subsystem and your cooler. You can choose to manually overclock your AMD CPU following the steps we outlined above, but the company's auto-overclocking Precision Boost Overdrive 2 (PBO) feature helps increase performance in a mostly-automated fashion and is the best option for the majority of Ryzen overclockers. Although this is an AMD-provided technique, engaging PBO does void the warranty.
AMD defines three types of power limits for its chips: PPT is the maximum power consumption allowed, TDC is the maximum sustained current, and EDC is the maximum burst current. You can override those settings either manually or with AMD's PBO. You can access this feature via either the BIOS or Ryzen Master software when you overclock in Windows 10 or Windows 11.
PBO typically doesn't deliver huge performance gains if you adhere to the basic presets. The basic "enabled (PBO on)" preset enables significantly higher default PPT/TDC/EDC limits, but doesn't change two important settings: PBO Scalar or Clock.
PBO Scalar overrides the AMD default settings and allows increased voltage at the maximum boost frequency and lengthens boosting duration. Changing the PBO Scalar setting unlocks the best auto-overclocking performance, so the basic preset can be lacking. You can increase this value in increments of 1X, but we typically skip right to the 10X (maximum) setting. The PBO 'Clock' setting also allows the CPU to exceed its standard boost by a defined variable. We usually max this setting out, but it does have a limited impact.
You can also use the "PBO Advanced" profile that defines the limits of each motherboard based on the capabilities of the power delivery subsystem (as defined by the motherboard vendor). This setting exposes the highest PPT, TDC, and EDC settings for the motherboard, but also doesn't change the PBO Scalar and Clock settings. However, this setting does allow you to change the PBO Scalar and Clock settings manually, with the former usually unlocking much higher auto-overclocking potential. We find that using the PBO Advanced setting with adjusted PBO Scalar and Clocks values yields the best benefits.
Ryzen also profits handsomely from memory and fabric overclocking. As such, you should pay particular attention to tuning the chips for the best possible memory frequencies with the lowest timings. Additionally, bumping up the fabric clock (FCLK) is an important component of wringing out the most performance possible. You want this value to have a 1:1 ratio with your memory data transfer speed. For instance, a 2000 MHz FLCK with DDR4-4000 is a sweet spot for memory overclockers.
This 1:1 ratio is referred to as 'coupled mode' and is the sweet spot for Zen 2 and Zen 3 processors. You'll need to dial up the CCD and IOD voltage to achieve stability with higher (1800+) FCLK ranges. However, be aware that the peak FCLK speed can vary widely based on the generation of chip you're using, so there is a bit of luck involved. We expect most Ryzen 5000 chips to reach a 2000 MHz FCLK.
Undervolting is another performance-tuning technique with AMD's Ryzen CPUs. This allows you to lower your voltages so the system can hit higher frequencies at lower voltages. Even though it can result in less heat, noise, and power consumption, this isn't used as commonly as PBO because it can require quite a bit more time to achieve the desired results. However, it does pay off. You can achieve this through the 'Curve Optimizer,' an advanced PBO setting that automates the process. This setting allows you to undervolt on a per-core or all-core basis (all-core is best for all but the most hardcore tuners).
The Curve Optimizer is automated and allows you to either increase voltages or decrease them by assigning an offset — the chip's automatic mechanisms take care of the rest. You select either a 'positive' or 'negative' 'Curve Optimizer Sign' to tell the chip if you're increasing or decreasing the voltage, and then assign a 'Magnitude' value (1-30) to tell the chip how much to automatically increase/decrease the voltage throughout the voltage/frequency curve. However, this is a 'scale' value, so it doesn't have a 1:1 correlation to the actual voltage. After applying the settings, follow the stress testing and performance benchmarking advice above, logging thermals as you go, to dial in the correct setting. This technique does require quite a bit of trial and error but can pay dividends for dedicated overclockers. AMD also has an Auto Core Optimizer tool built right into its Ryzen Master software that will do the tuning for you, but it takes about an hour to run, so plan accordingly.
CPU Overclocking Benchmark Results
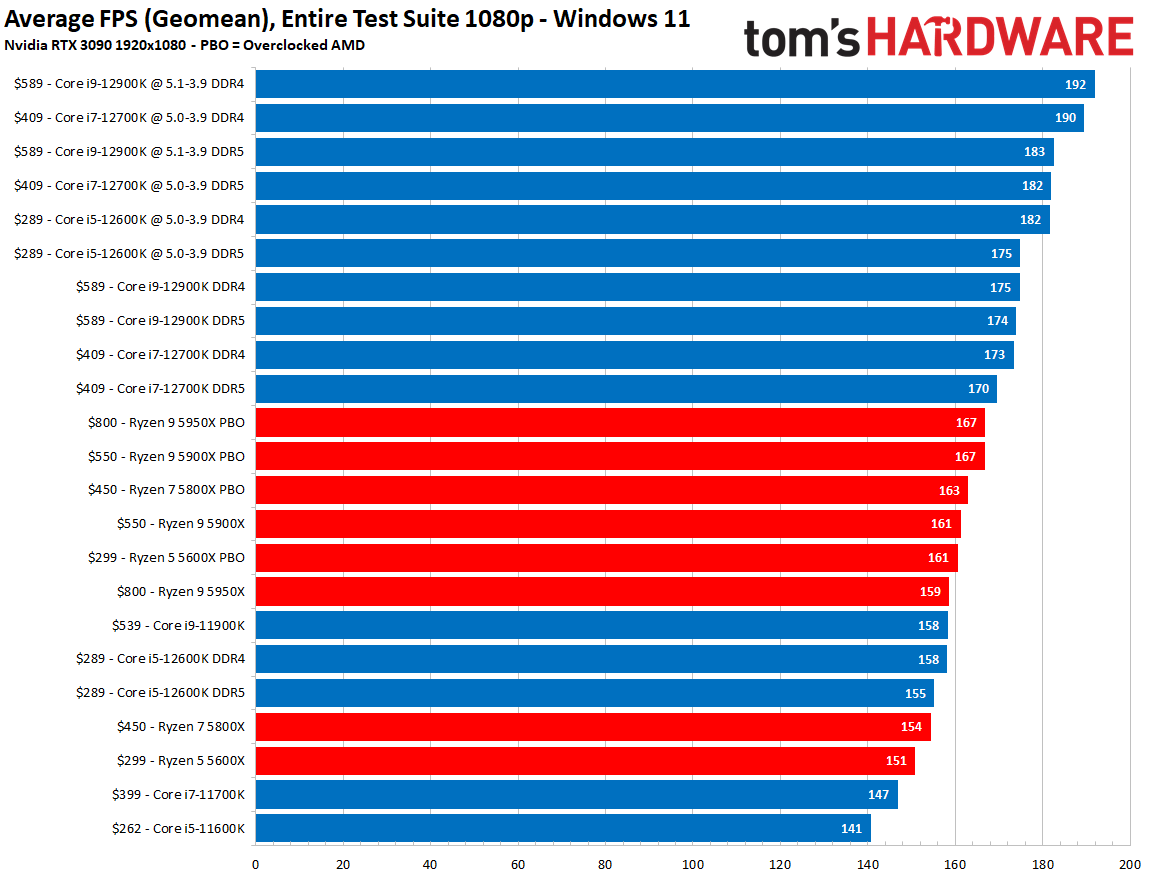
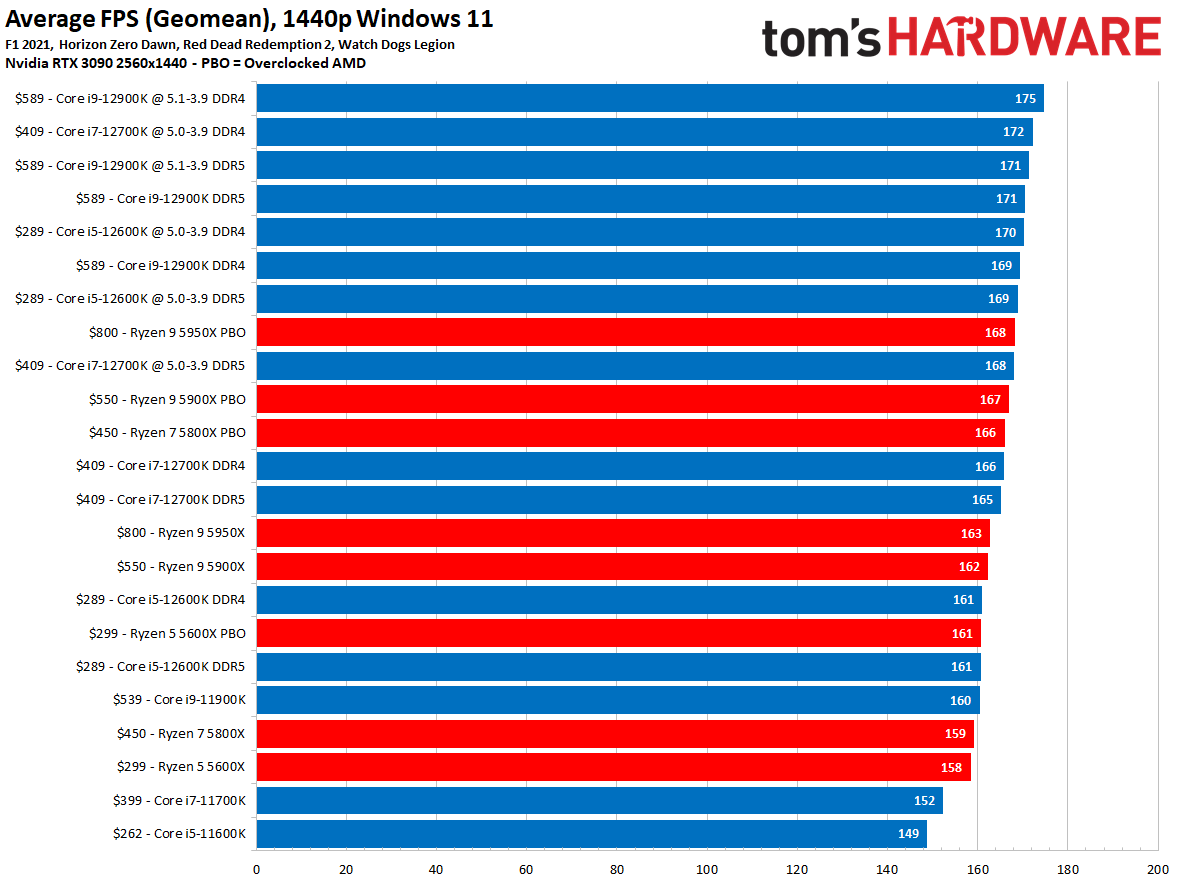
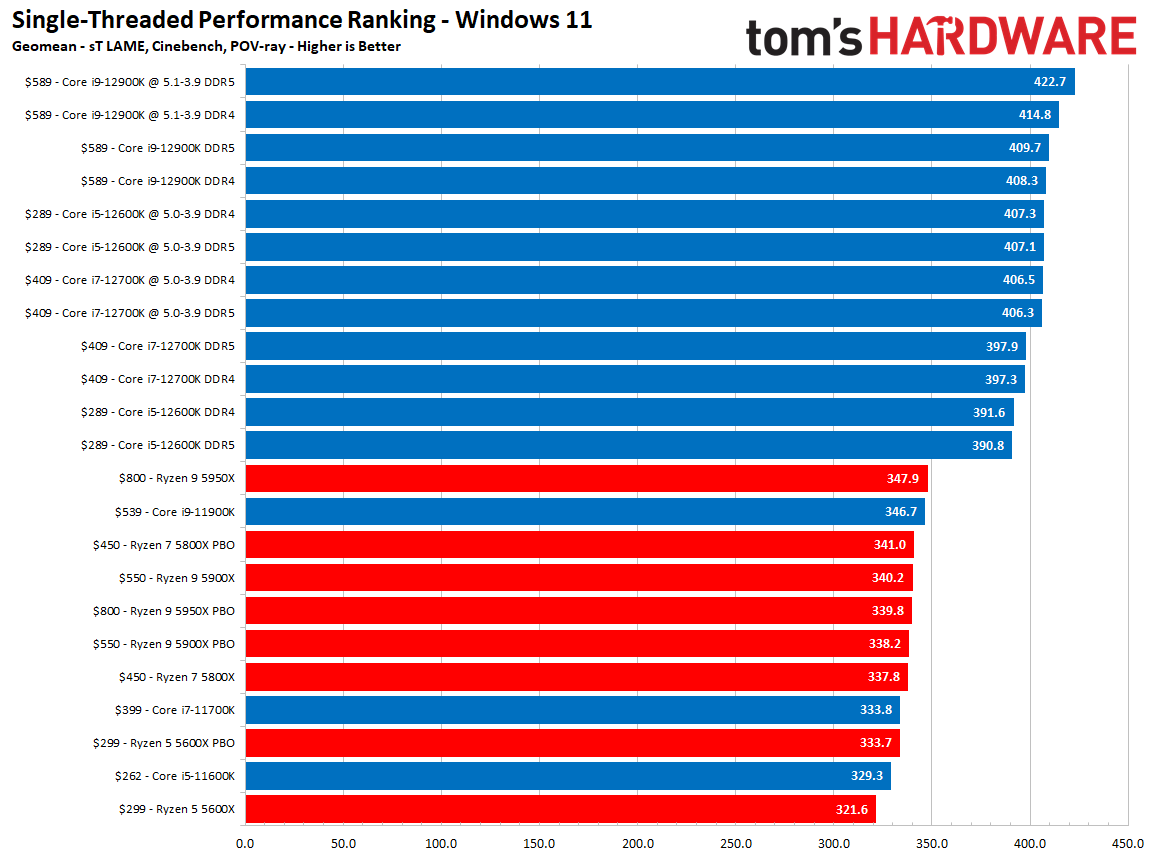
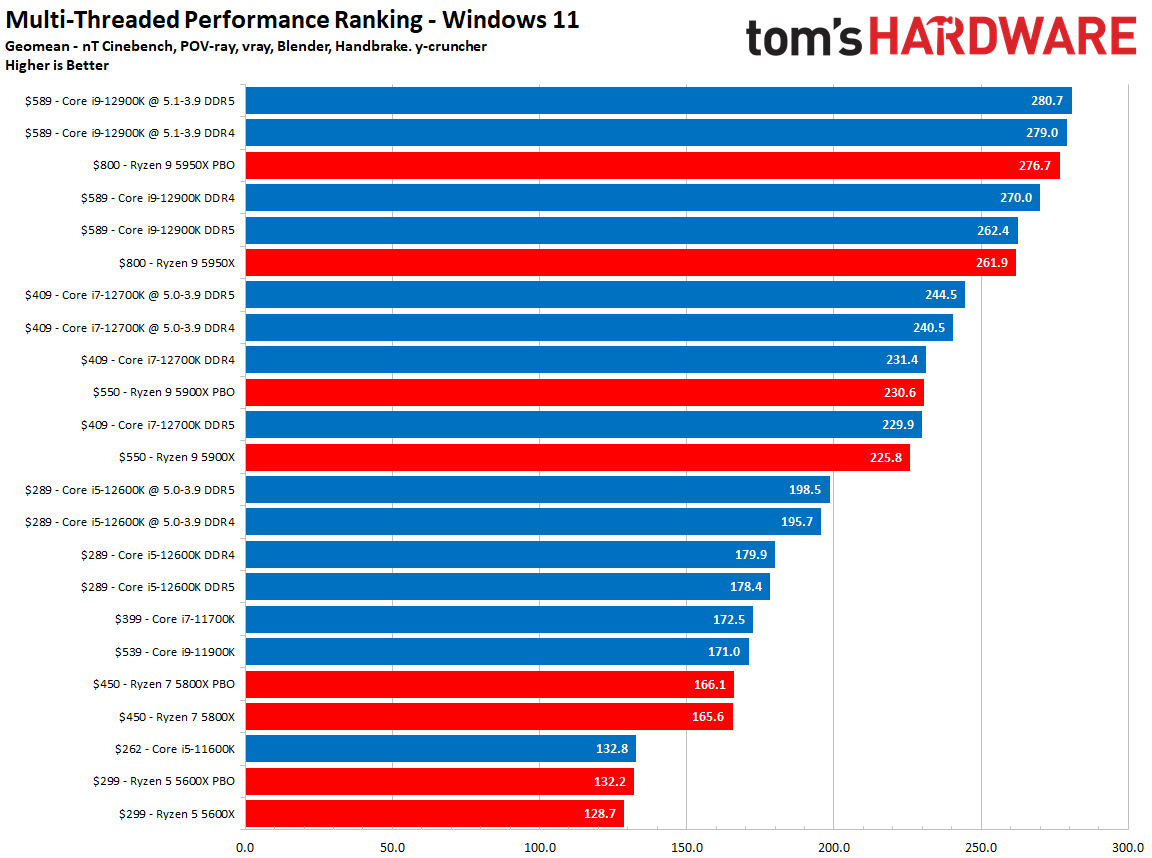
Here are the results of our overclocking with Intel's Alder Lake chips compared to the Ryzen 5000 lineup in Windows 11, along with DDR4 vs DDR5 benchmarks and overclocked configurations. You can find more detailed breakdowns of our overclocking with the Core i9-12900K and i5-12600K here, and the Core i7-12700K details are here. We've overclocked the memory with these configurations, too.
We generated these overall measurements of gaming performance as a geometric mean of our entire test suite. We also selected the most important single- and multi-threaded tests in our suite to generate those cumulative measurements. You can see an even more expansive view in our CPU Benchmark hierarchy.
As you can see above, the Alder Lake chips profit more from overclocking than the AMD Ryzen models, but both lineups do experience at least some improvement. The Core i5-12600K is a standout with a massive 15% gain in 1080p gaming performance. That's more impressive than the 9% gain you'd get from spending $110 more for the Core i7-12700K. These lower-end chips are comparatively easier to overclock, too, and don't require the highest-end cooling to pull off impressive results.
There are plenty of gains to be had for those at higher chip tiers, too. The Core i7-12700K shows similar overclocking headroom to the more expensive Core i9-12900K. After overclocking both chips, the 12700K is within 1% in gaming to the overclocked 12900K which costs a whopping $180 more.
We see similar results with the newer 13th-Gen Intel processors, too. To represent what we think a normal user can achieve, we chose relatively mundane and simple overclocks for these chips — yet we still pulled off comparable or better gains in gaming than we would expect from moving forward to a new generation of CPUs. Even though we can't guarantee that your results will match ours, it's clear that overclocking is alive and well.
CPU Overclocking Impact on Lifespan and Reliability
Increasing the chips' frequency through overclocking requires pumping more power through the chip, thus generating more heat. If you don't manage those factors correctly, higher frequencies could result in faster aging, and thus lowered life span.
Will overclocking kill your CPU? Not if you follow common-sense steps and take a conservative approach. There are settings and techniques that overclockers can use to minimize the impact of overclocking, and if done correctly, premature chip death from overclocking isn't a common occurrence.
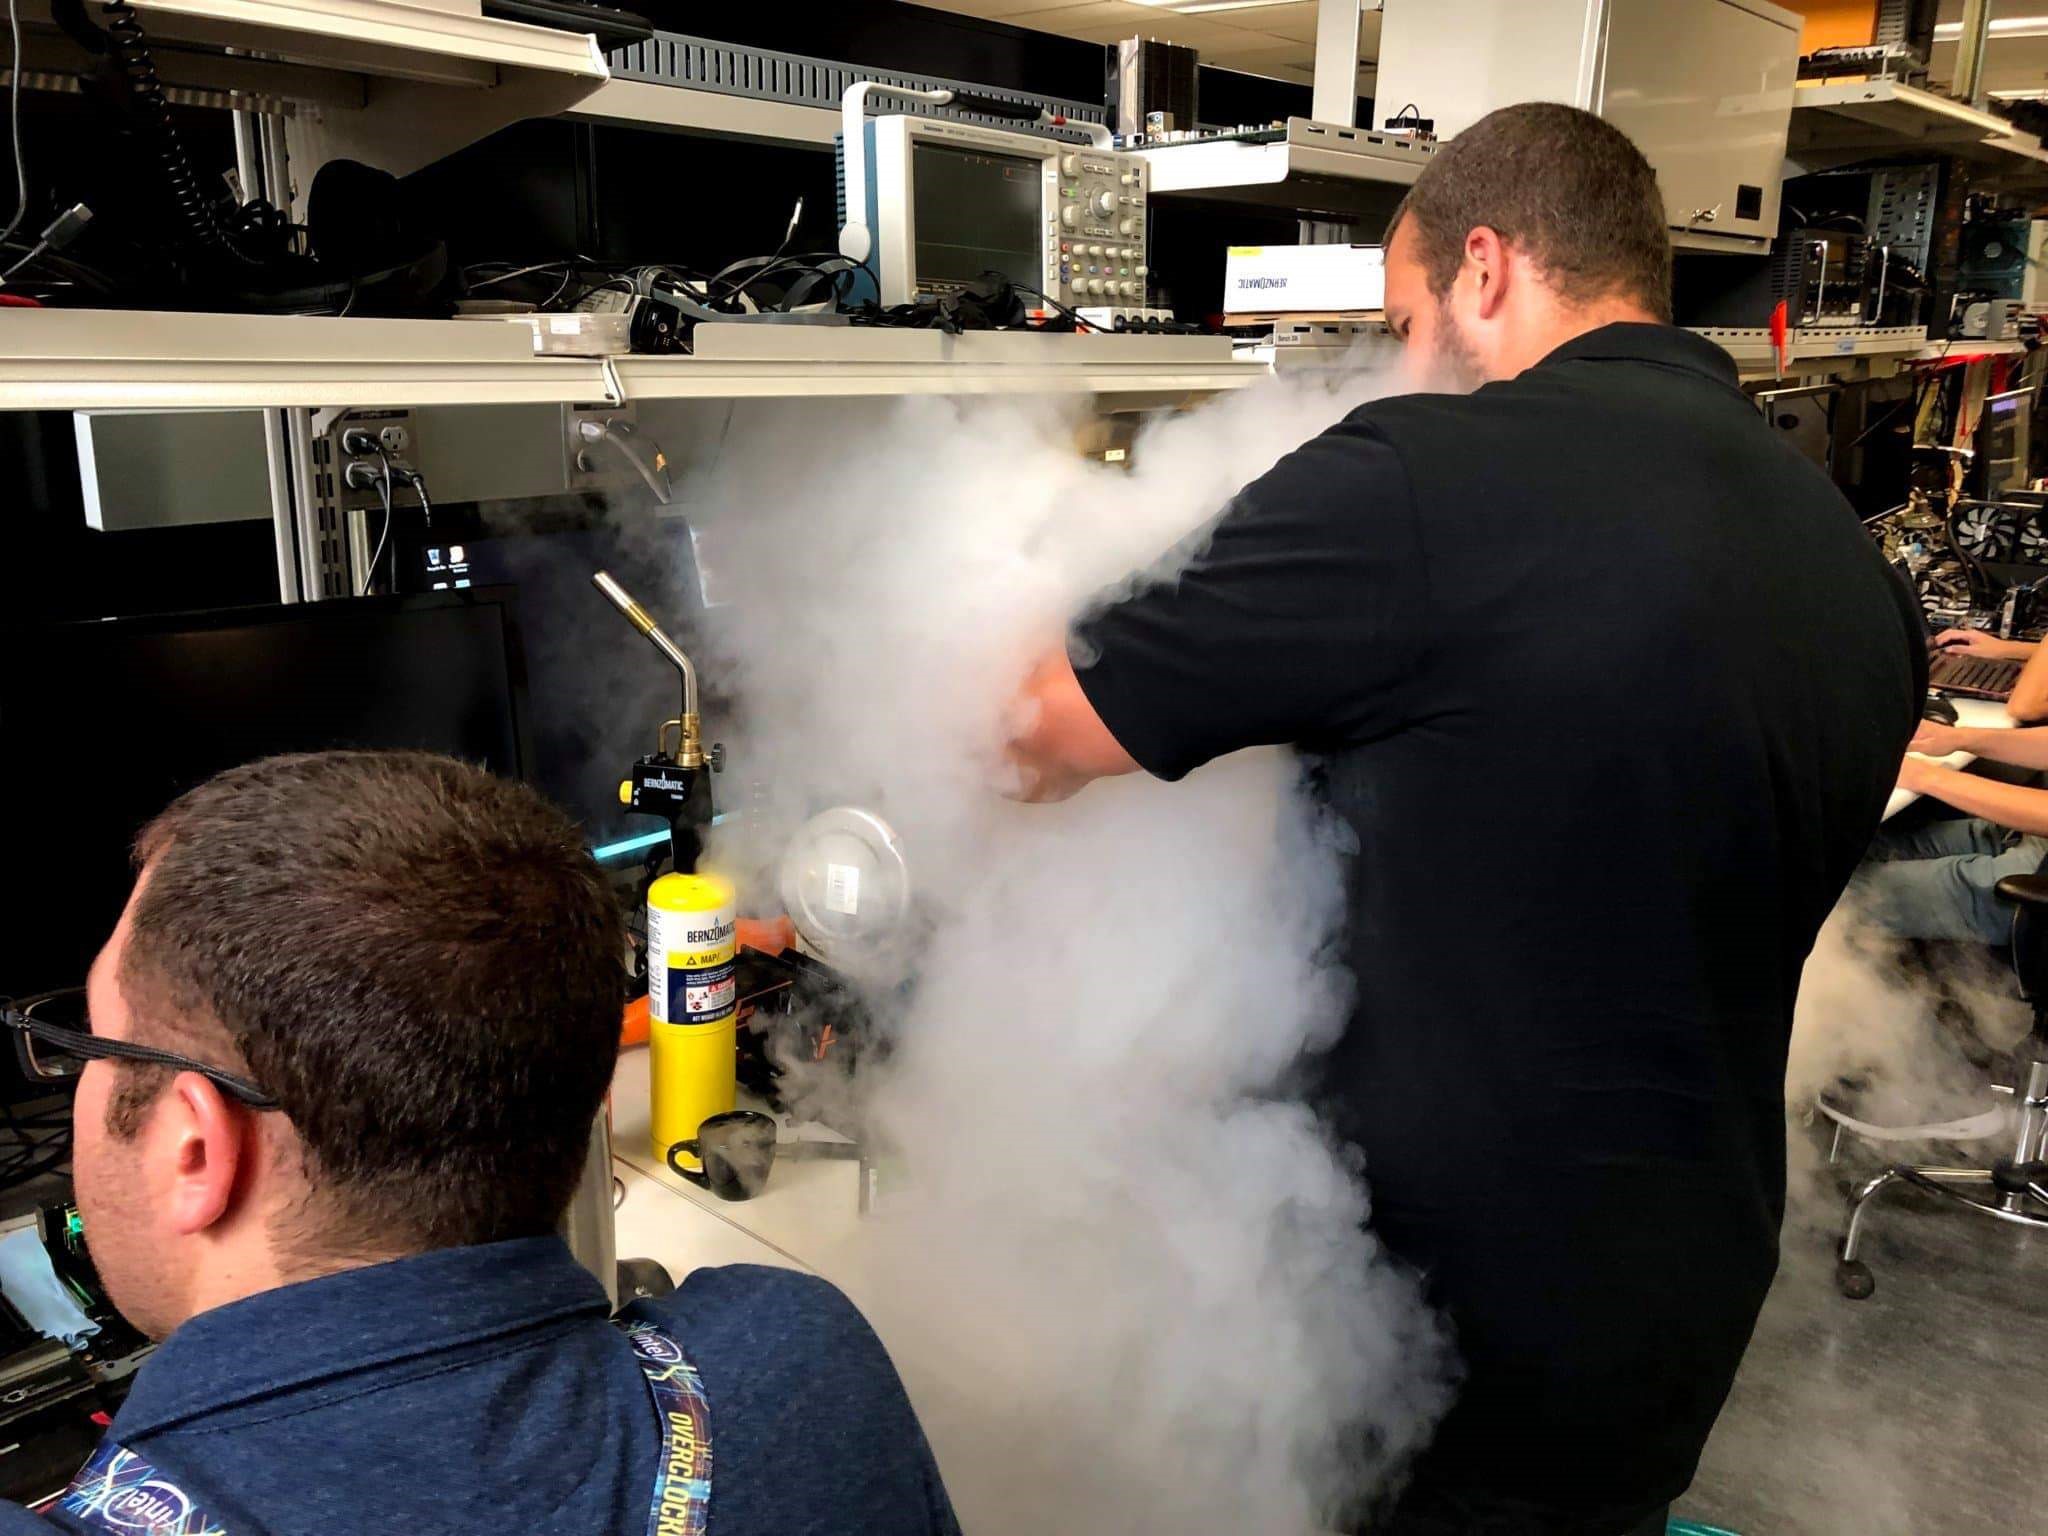
Intel's overclocking guru Dan Ragland has given us specific advice when it comes to overclocking when we visited the company's overclocking lab. We'll share an excerpt of those learnings here:
Every semiconductor process has a point on its voltage/frequency curve beyond which a processor will wear out at an untenable rate. If the chip wears enough, it triggers electromigration (the process of electrons slipping through the electrical pathways), which leads to premature chip death. Some factors are known to increase the rate of wear, such as the higher current and thermal density that comes as a result of overclocking.
All this means that, like the carton of milk in your refrigerator, your chip has an expiration date. Because increasing frequency through overclocking requires pumping more power through the chip, thus generating more heat, higher frequencies typically result in faster aging, and thus lowered life span. Intel's overclocking team recommends using adaptive voltage targets for overclocking and leaving C-States enabled. Not to mention using AVX offsets to keep temperatures in check during AVX-heavy workloads.
The amount of time a processor stays in elevated temperature and voltage states has the biggest impact on lifespan. You can control the temperature of your chip with better cooling, which then increases lifespan (assuming the voltage is kept constant). Assuming voltage remains constant, each successive drop in temperature results in a non-linear increase in life expectancy, so the 'first drop' in temps from 90C to 80C yields a huge increase in chip longevity. In turn, colder chips run faster at lower voltages, so dropping the temperature significantly by using a beefier cooling solution also allows you to drop the voltage further, which then helps control the voltage axis.
In the end, though, voltage is the hardest variable to contain. Ragland pointed out that voltages are really the main limiter that prevents Intel from warrantying overclocked processors, as higher voltages definitely reduce the lifespan of a processor. But Ragland has some advice: "As an overclocker, if you manage these two [voltage and temperature], but especially think about 'time in state' or 'time at high voltage,' you can make your part last quite a while if you just think about that. It's the person that sets their system up at elevated voltages and just leaves it there 24/7 [static overclock], that's the person that is going to burn that system out faster than someone who uses the normal turbo algorithms to do their overclocking so that when the system is idle your frequency drops and your voltage drops with it. So, There's a reason we don't warranty it, but there's also a way that overclockers can manage it and be a little safer."
That means manipulating the turbo boost ratio is much safer than assigning a static clock ratio via multipliers. As an additional note, you should shoot for idle temperatures below 30C, though that isn't much of a problem if you overclock via the normal turbo algorithms as described by Ragland.
Motherboard BIOS CPU Overclocking Glossary
- Voltage Mode - Auto lets the motherboard decide the voltage to apply to the processor while 'Manual' or 'Override' allows you to assign a fixed Vcore. Offset mode adds a specific amount of voltage to the processor regardless of the frequency, while Adaptive voltage increases the voltage when the processor operates in turbo mode.
- AVX Offset - A separate multiplier that can adjust the processor frequency when it executes AVX workloads. AVX instructions yield massive speed-ups, but these instructions also generate more heat and consume more power than other types of instructions, which can lead to system instability during overclocking. Most software and games do not use AVX instructions, so dialing the AVX offset back to reduce the core frequency during these taxing workloads is critical to attaining peak performance in non-AVX applications.
- Load-Line Calibration (LLC) - Sometimes, typically when the processor is first placed under load, the CPU doesn't receive the amount of voltage set by the user. This condition is caused by voltage droop (Vdroop) and it can result in either lower or higher voltages than intended. Load-line calibration basically compensates for Vdroop by assuring that voltages remain at a more even level. There are multiple LLC options in most motherboards, but Auto typically suffices for most users with higher-end (or newer) motherboards.
- SpeedStep - Intel - Feature that increases or decreases processor speed and voltage according to system load.
- Uncore - Intel - Regulates the frequency of the different controllers on the processor like the L3 cache, ring bus, memory controller, etc.
- FCLK - Intel - Controls the speed at which data is passed from the processor to the graphics card. AMD - Specifies the Infinity Fabric frequency (important for memory overclocking)
- VCCSA - Voltage for the System Agent. Increasing this voltage can help stability when overclocking the ring bus and cache frequency.
- VCCIO - Voltage for the memory controller and shared cache.
- Extreme Memory Profile (XMP) - Enables the XMP profile on compatible memory kits. XMP profiles apply pre-validated memory overclocks by simply toggling the feature on in either the BIOS or a software overclocking utility.
- MORE: Best CPUs for Gaming
- MORE: CPU Benchmark Hierarchy
- MORE: AMD vs Intel
- MORE: Ryzen 7000 All We Know
- MORE: Raptor Lake All We Know
-
MORE: How to check your CPU temperature


