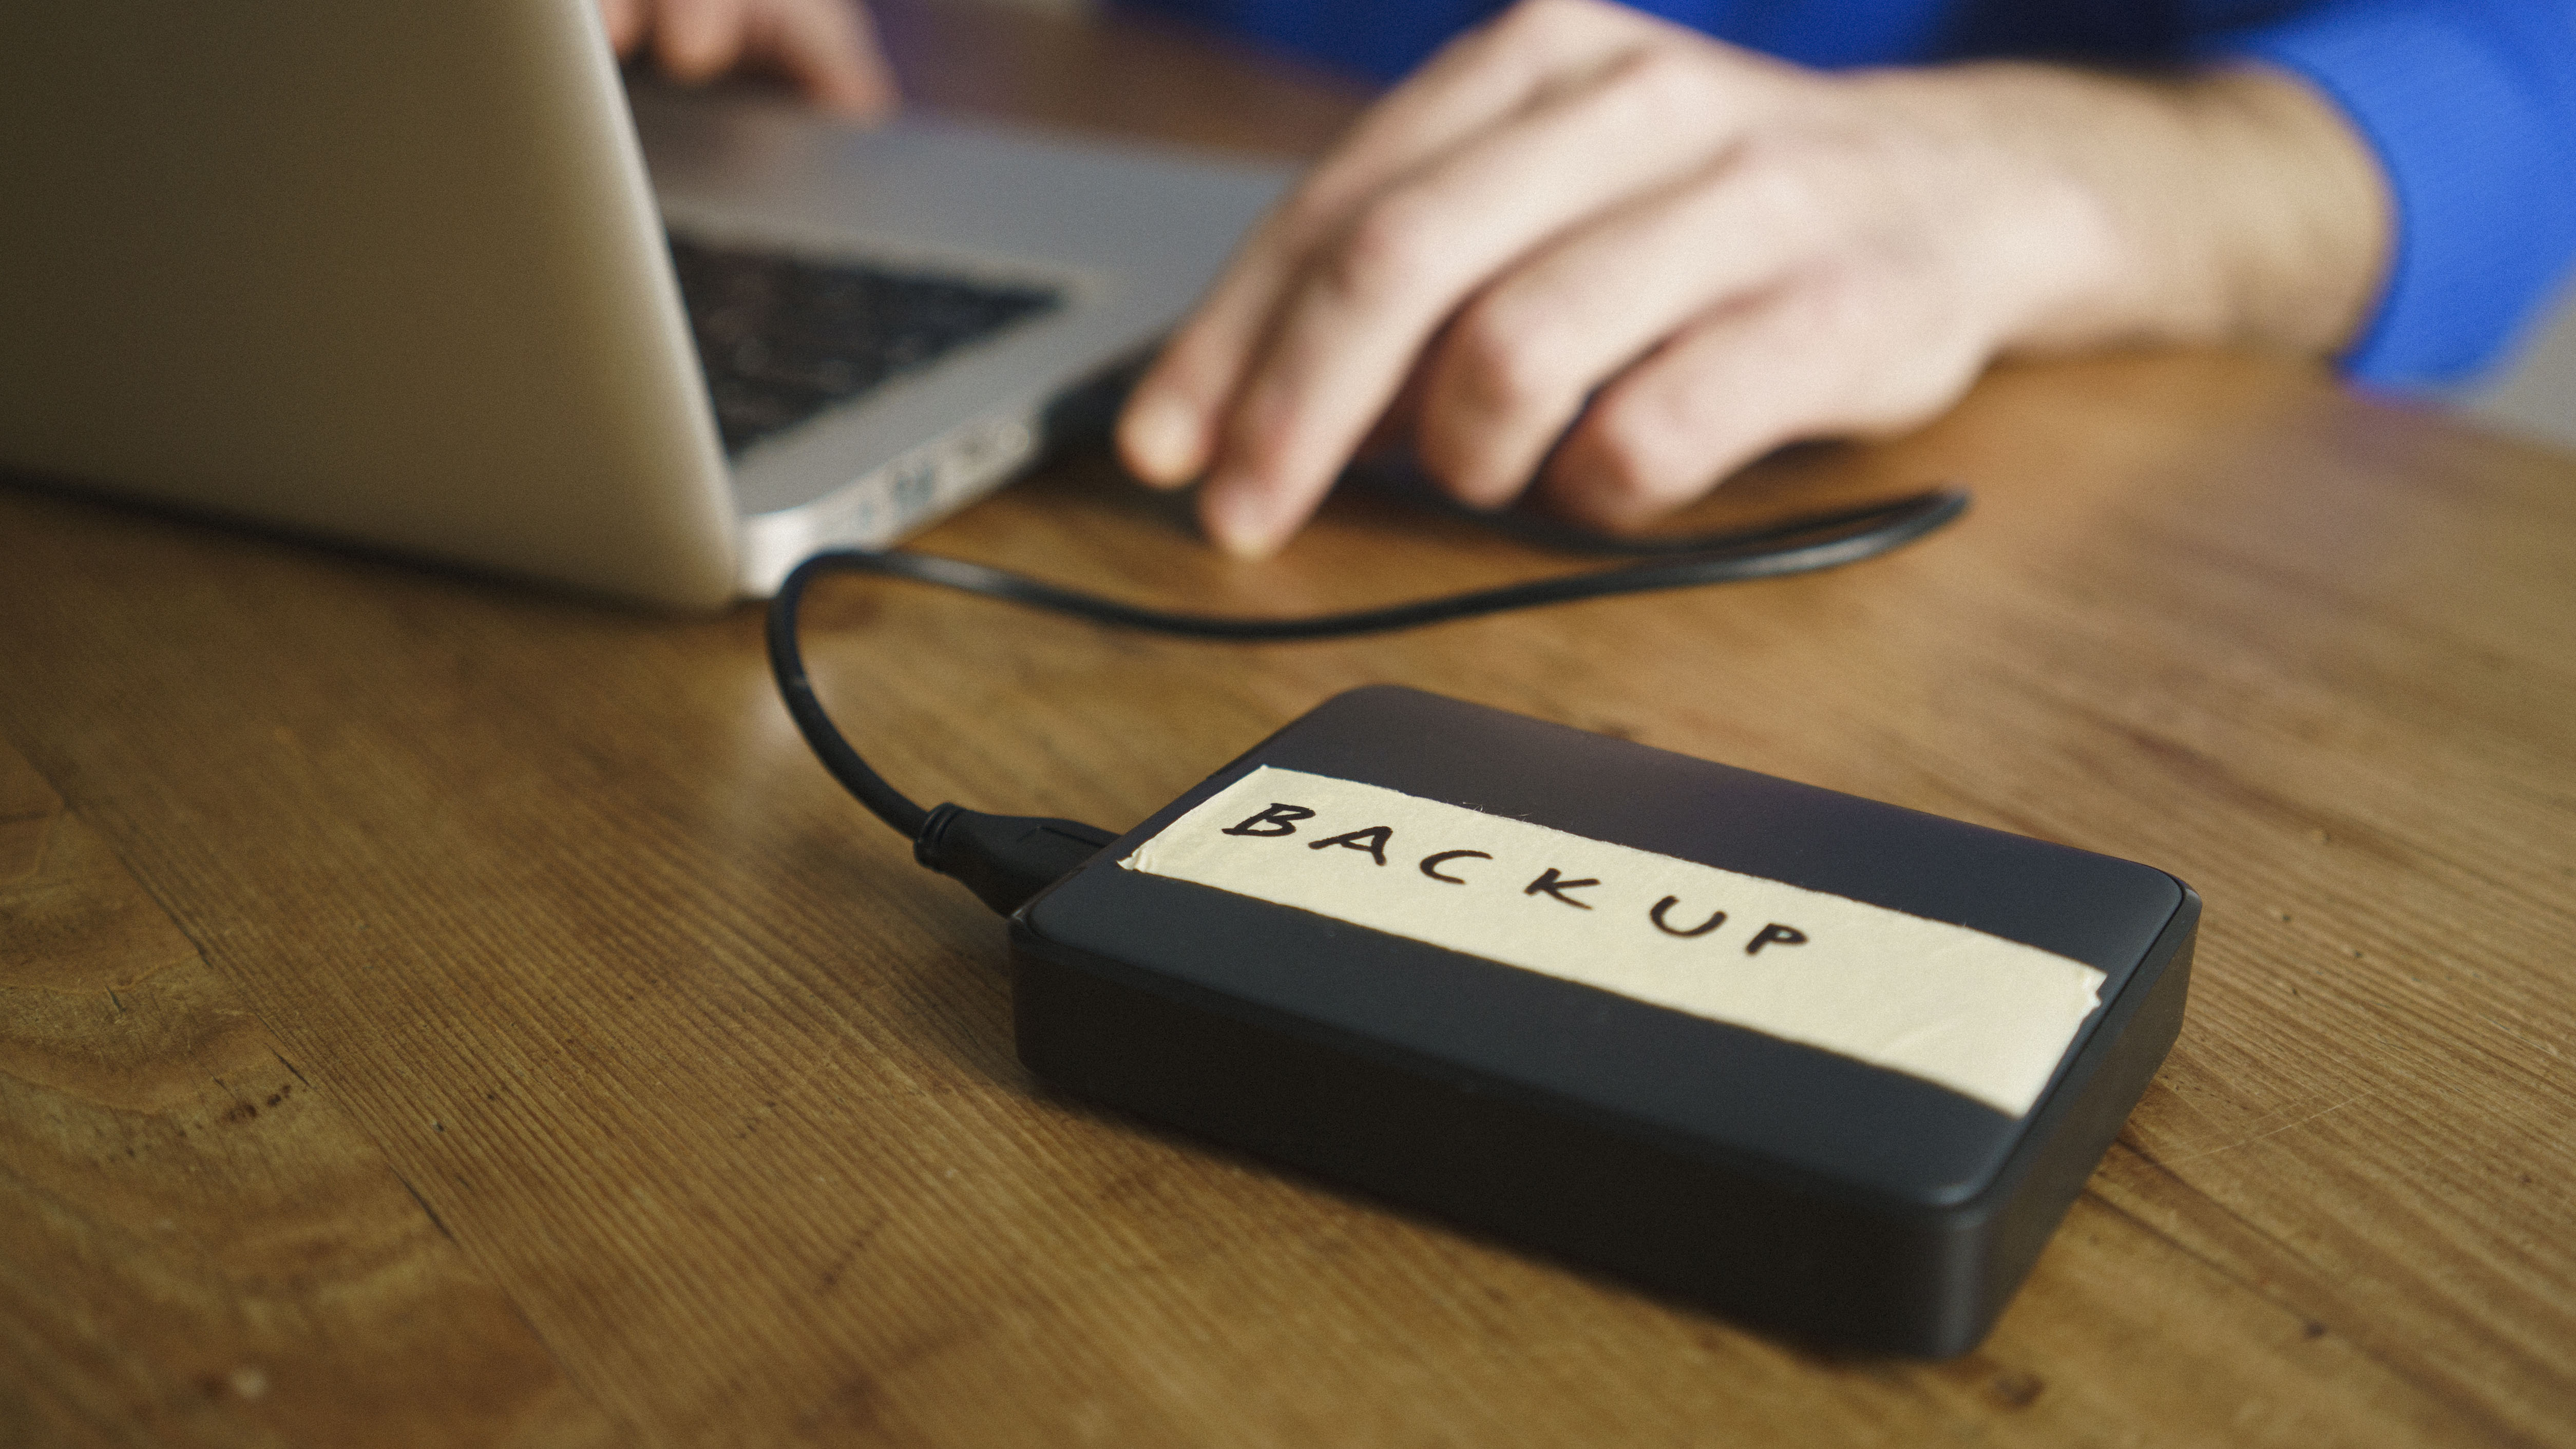
Issues with external storage can be frustrating, which is why it helps to know how to fix an external hard drive that's not showing up on your computer.
External hard drives are handy for storage and backup, and often, when they don’t work, it could be due to improper connectivity, outdated drivers, or formatting errors.
In this article, we'll guide you through the exact steps to troubleshoot this issue with external hard drives on Windows and Mac systems. And if your existing storage isn’t sufficient, we’ve rounded up the best external hard drives here.
Tools and requirements
- Windows computer
Steps for how to fix an external hard drive that's not showing up on Windows
- Reboot your computer.
- Check the physical connection: disconnect and reconnect the hard drive, reconnect to a different USB port, or reconnect with a different cable.
- Update drivers: Device Manager > Disk Drives > Right-click your external hard drive > Update driver > Search automatically for drivers.
- Reinstall drivers: Device Manager > Disk Drives > Right-click your external hard drive > Uninstall device > Uninstall. Then, reconnect your hard drive.
- Format the drive: Disk Management > Right-click your external hard drive > Format > OK.
- Windows CheckDisk: Command Prompt (Run as administrator) > Type chkdsk /f X: (X is the letter of your hard drive) > Press Enter > Wait till the process completes.
- Enable the drive: Disk Management > Right-click the gray box beside your hard drive > Select Online.
- Unallocated drive: Disk Management > Right-click the gray box beside your hard drive > Select New Simple Volume.
- Assign a drive letter: Disk Management > Right-click your hard drive > Select Change Drive Letter and Paths > Click add > Assign a letter > Click OK.
Step by step guide to fix an external hard drive that's not showing up on Windows
Before troubleshooting using the steps below, try restarting your computer or external hard drive. Although it appears simple, rebooting devices often fixes lots of technical issues.
1. Check the physical connection
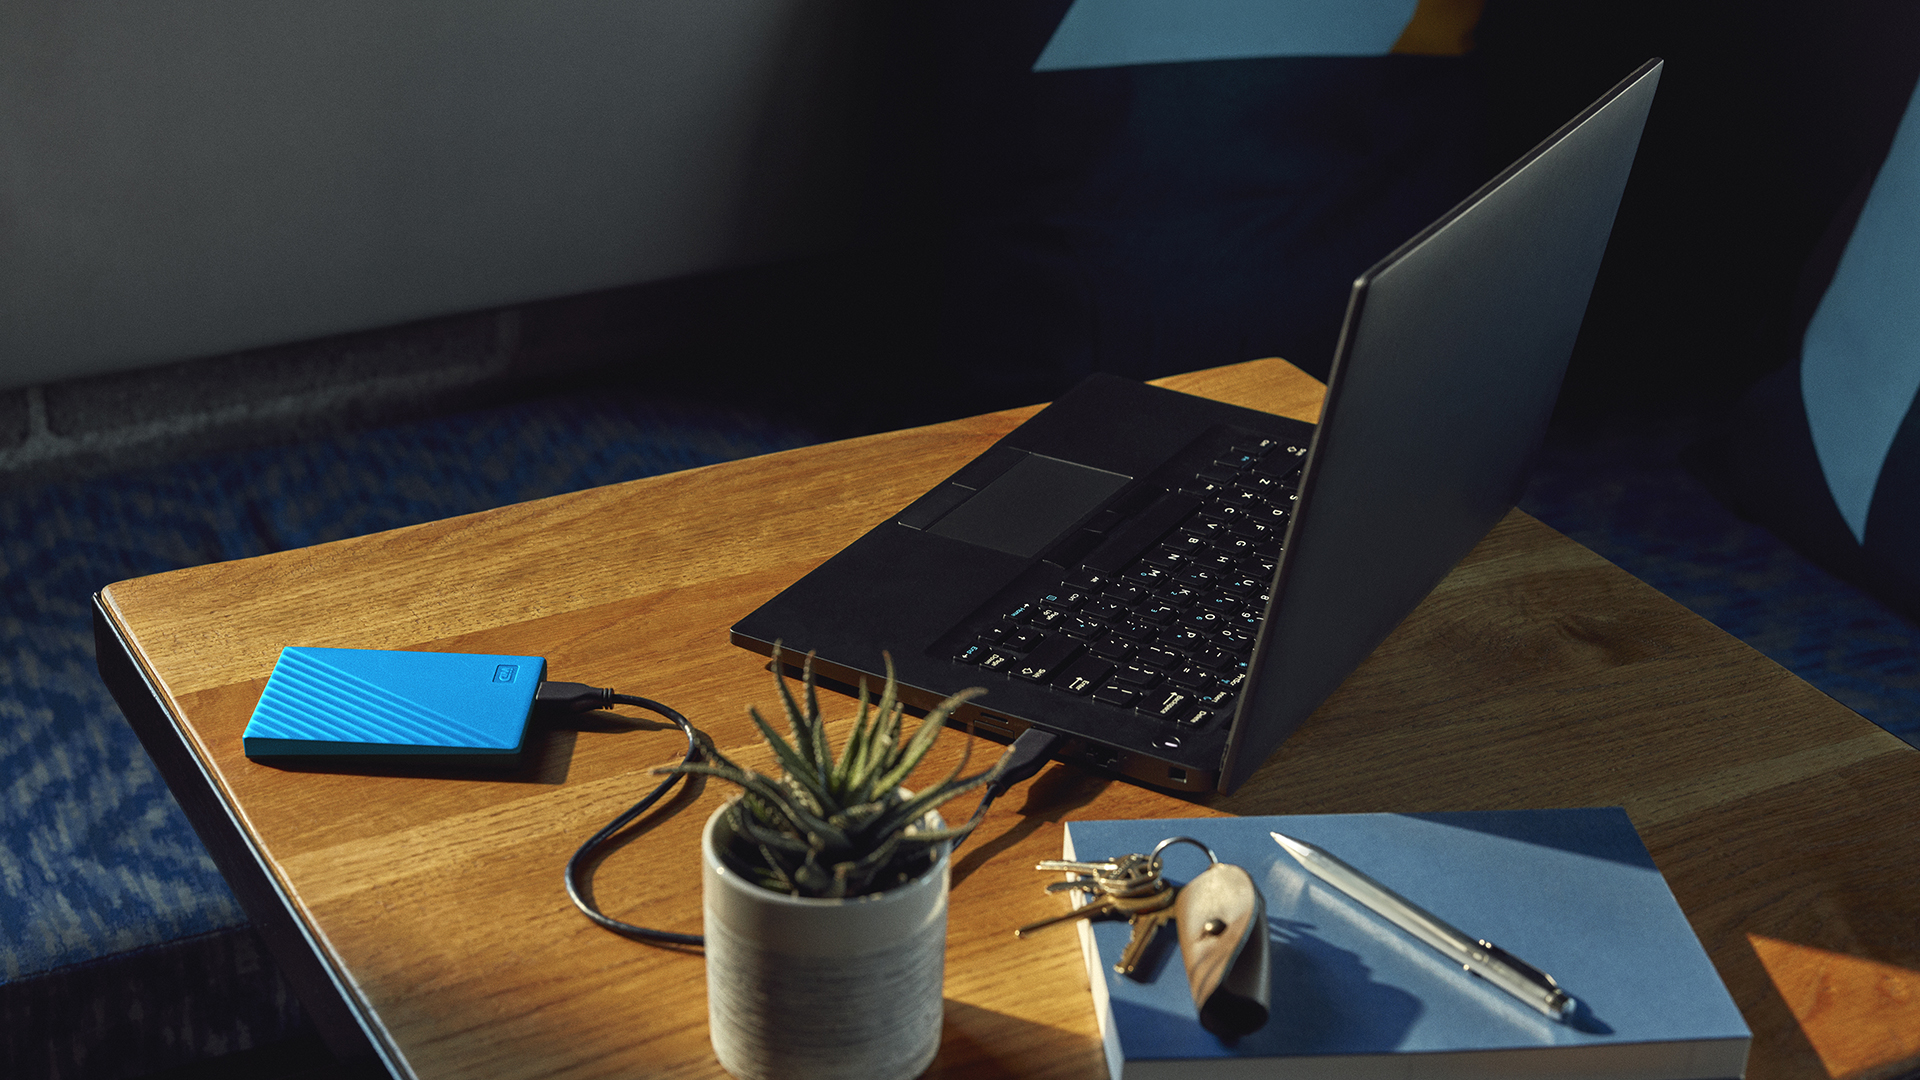
Make sure your external hard drive is connected properly to your computer:
- Disconnect and reconnect the hard drive to your computer.
- Reconnect the hard drive to a different USB port on your computer.
Use a different cable to connect your hard drive and computer.
2. Update or reinstall drivers
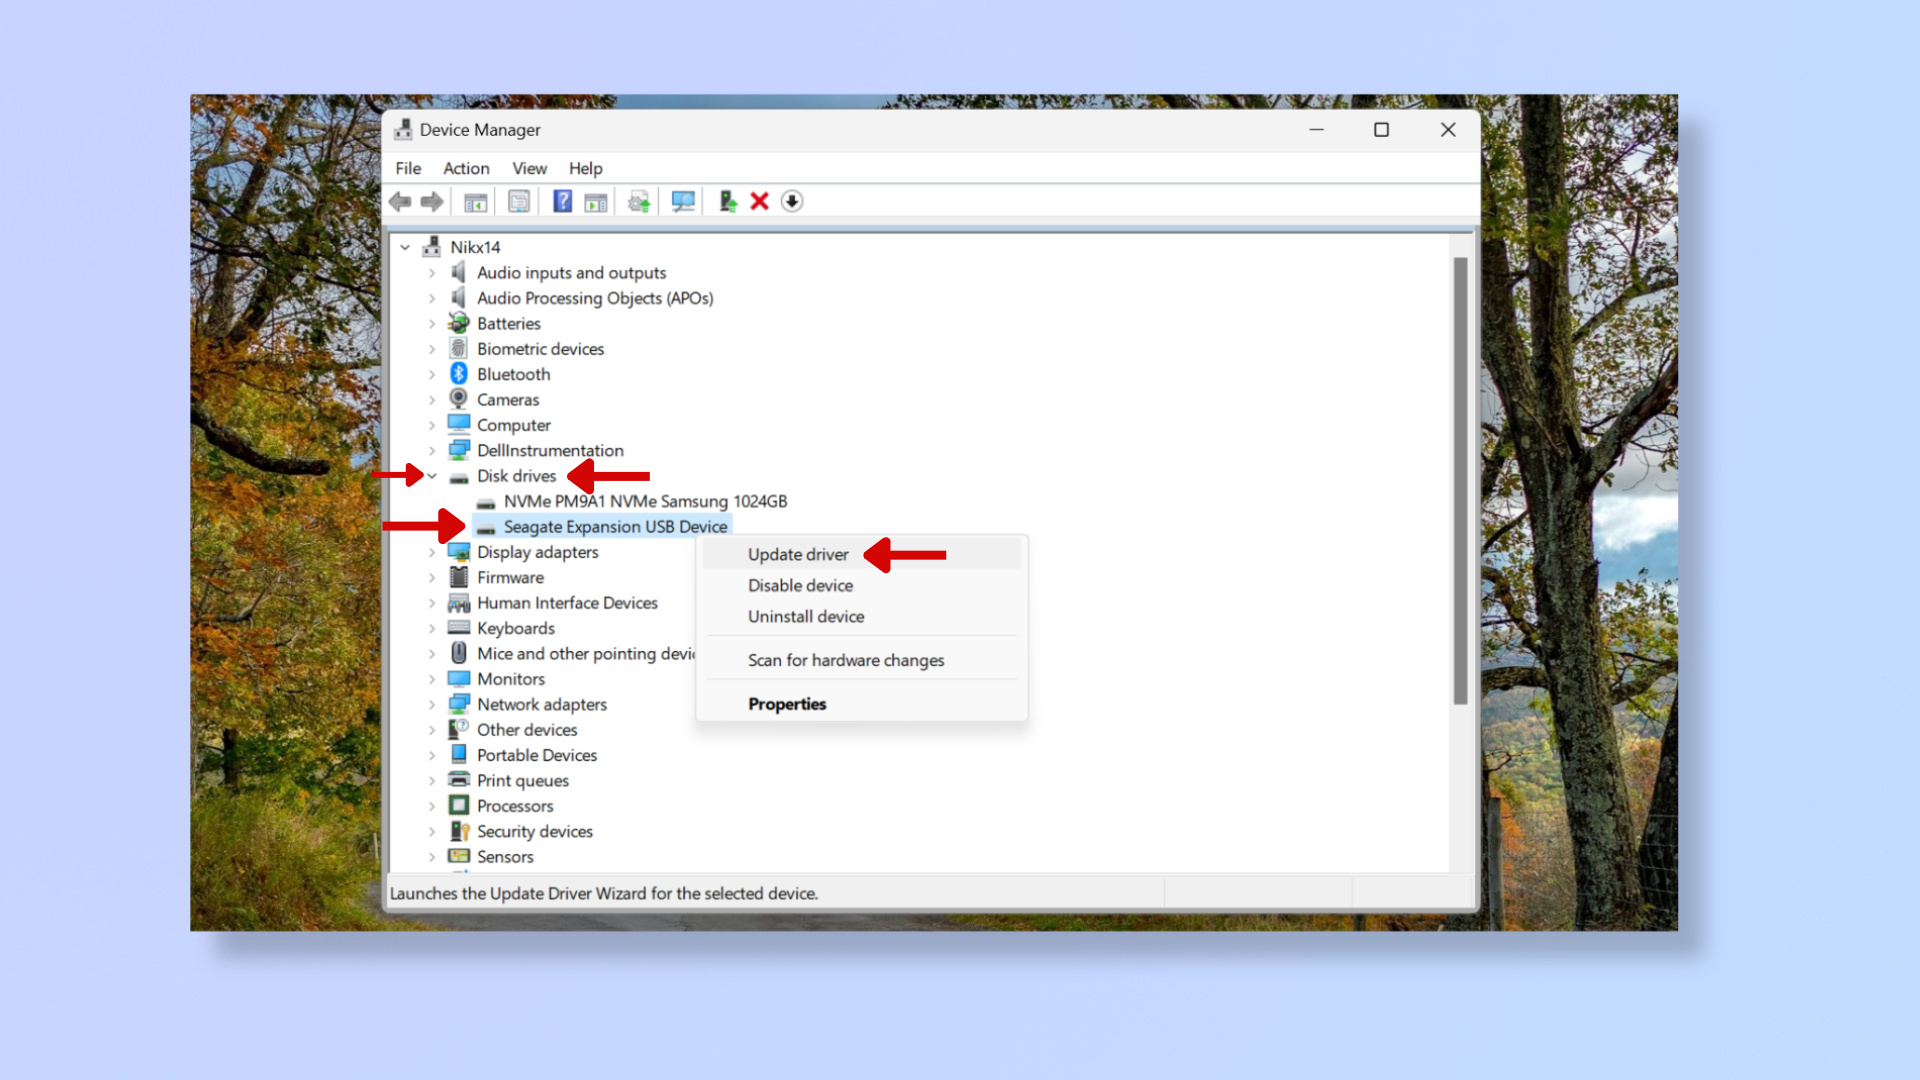
Outdated or corrupt drivers can prevent your external hard drive from being recognized. Update the drivers with these steps:
- Right-click the Start button at the bottom left corner of the screen and select Device Manager.
- Click the dropdown arrow beside Disk Drives. Right-click your external hard drive, click Update driver, then select Search automatically for drivers.
In case this isn’t resolving the problem, try this:
- Return to the Device Manager and expand Disk Drives.
- Right-click your external hard drive and click Uninstall device. Confirm by clicking Uninstall again.
- Reconnect your hard drive to initiate a new driver installation.
3. Format the hard drive
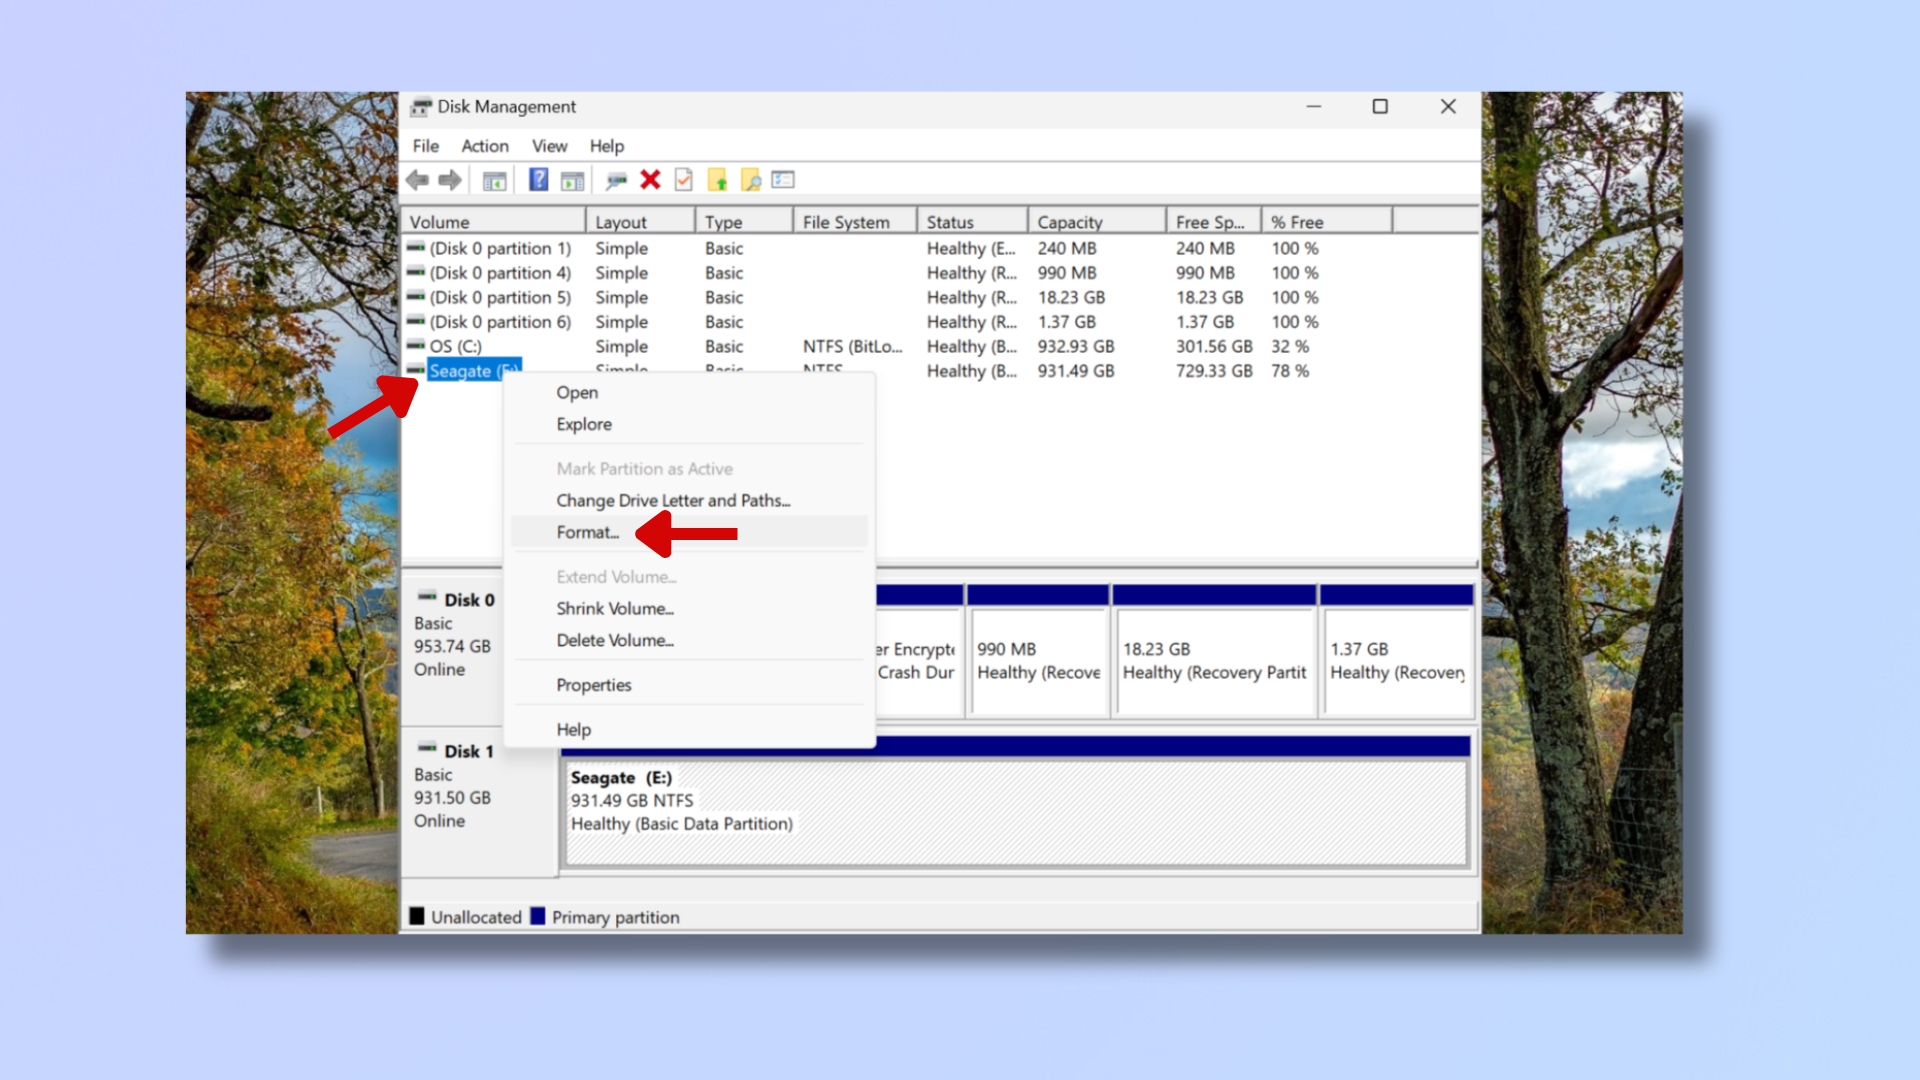
Windows can’t recognize hard drives with unsupported formats like APFS (Mac) or ext4 (Linux), in which case you’ll need to format the drive. Note that formatting a drive will erase all content on it:
- Right-click the Start button at the bottom left corner of the screen and select Disk Management.
- Right-click your external hard drive and select Format. Click OK to begin formatting your hard drive.
- Reconnect your hard drive.
4. Use Windows CheckDisk
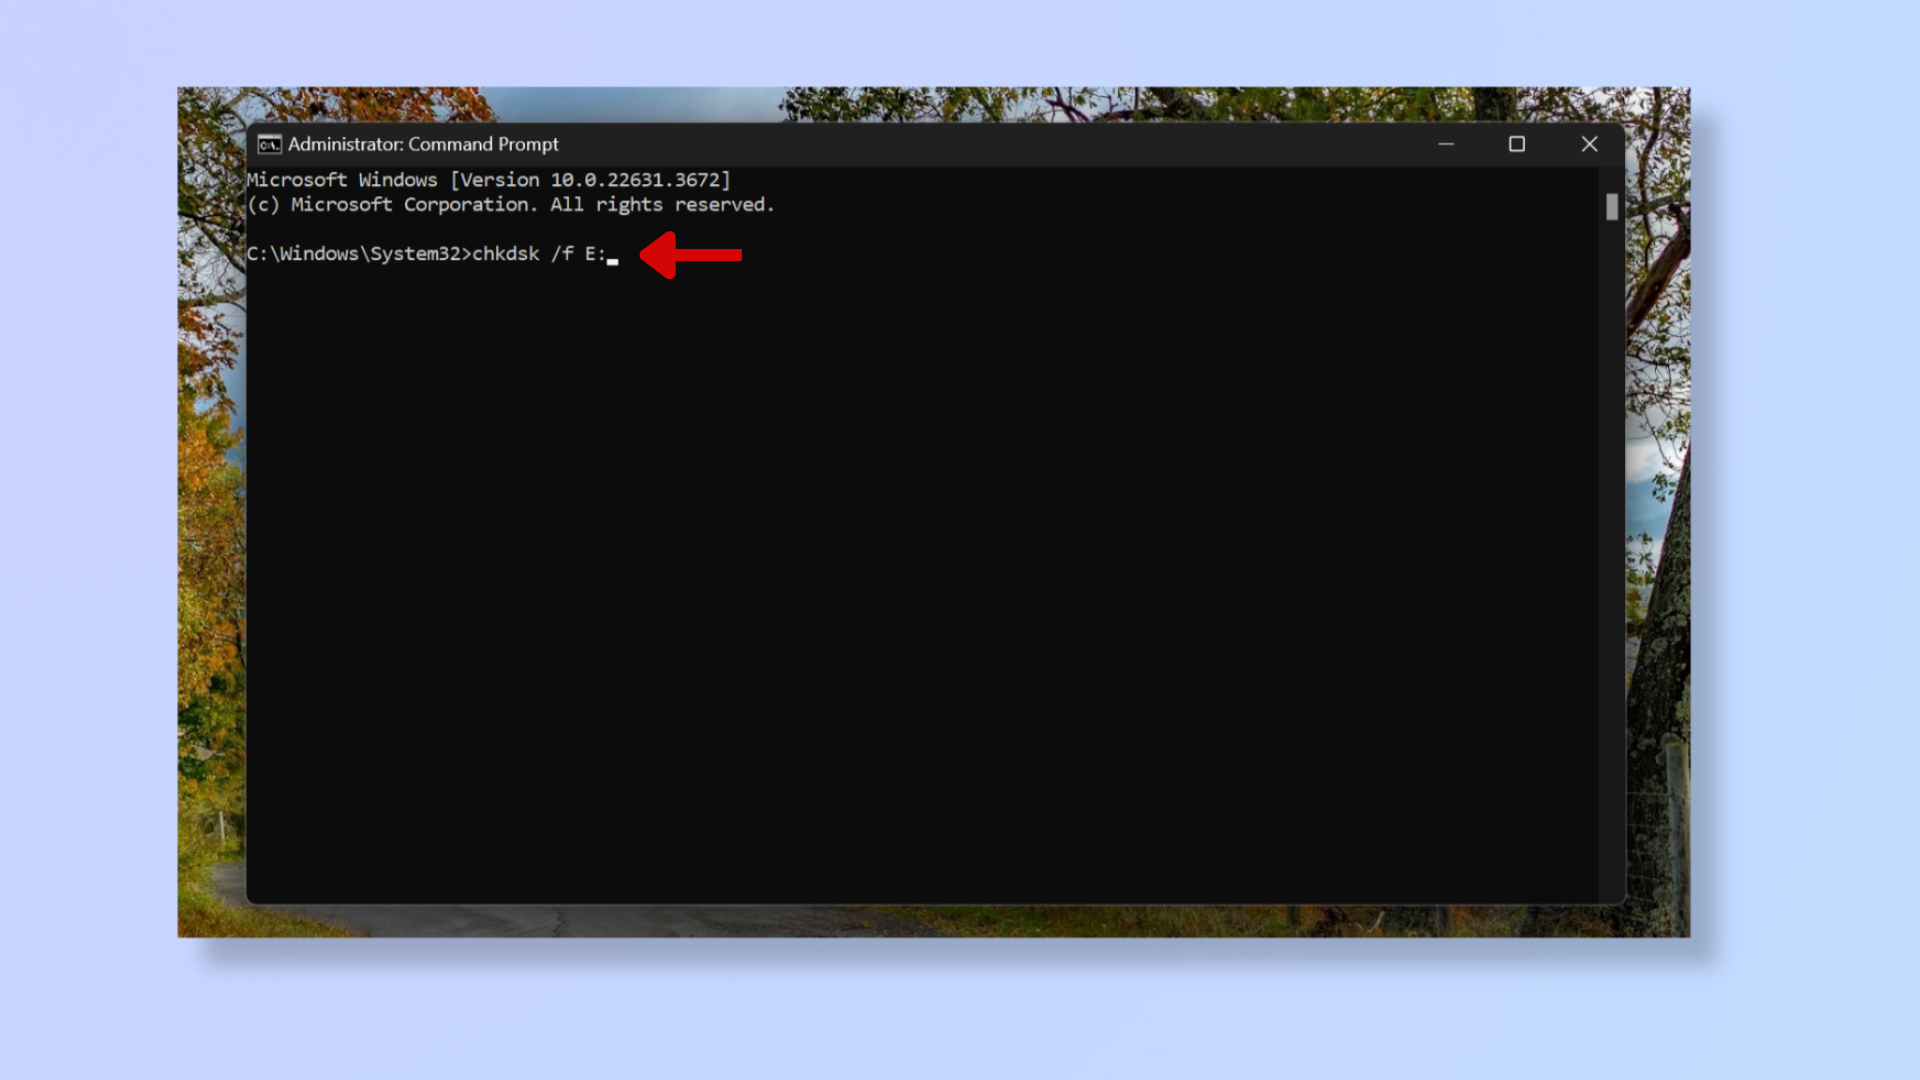
The Windows CheckDisk utility helps to troubleshoot issues related to disks. These repairs can sometimes erase data, so back up your drive before following these steps:
- Press Windows + S and type Command Prompt. Right-click it and select Run as administrator.
- Type chkdsk /f followed by the letter of your hard drive. In my case, that’s chkdsk /f E:.
- Hit Enter.
- Wait till the scanning and examining are done, and you see Total Duration.
CheckDisk may take time to complete the scan and repair if there are many errors, and you may have to restart your computer once it finishes running.
5. Enable the drive or create a New Simple Volume
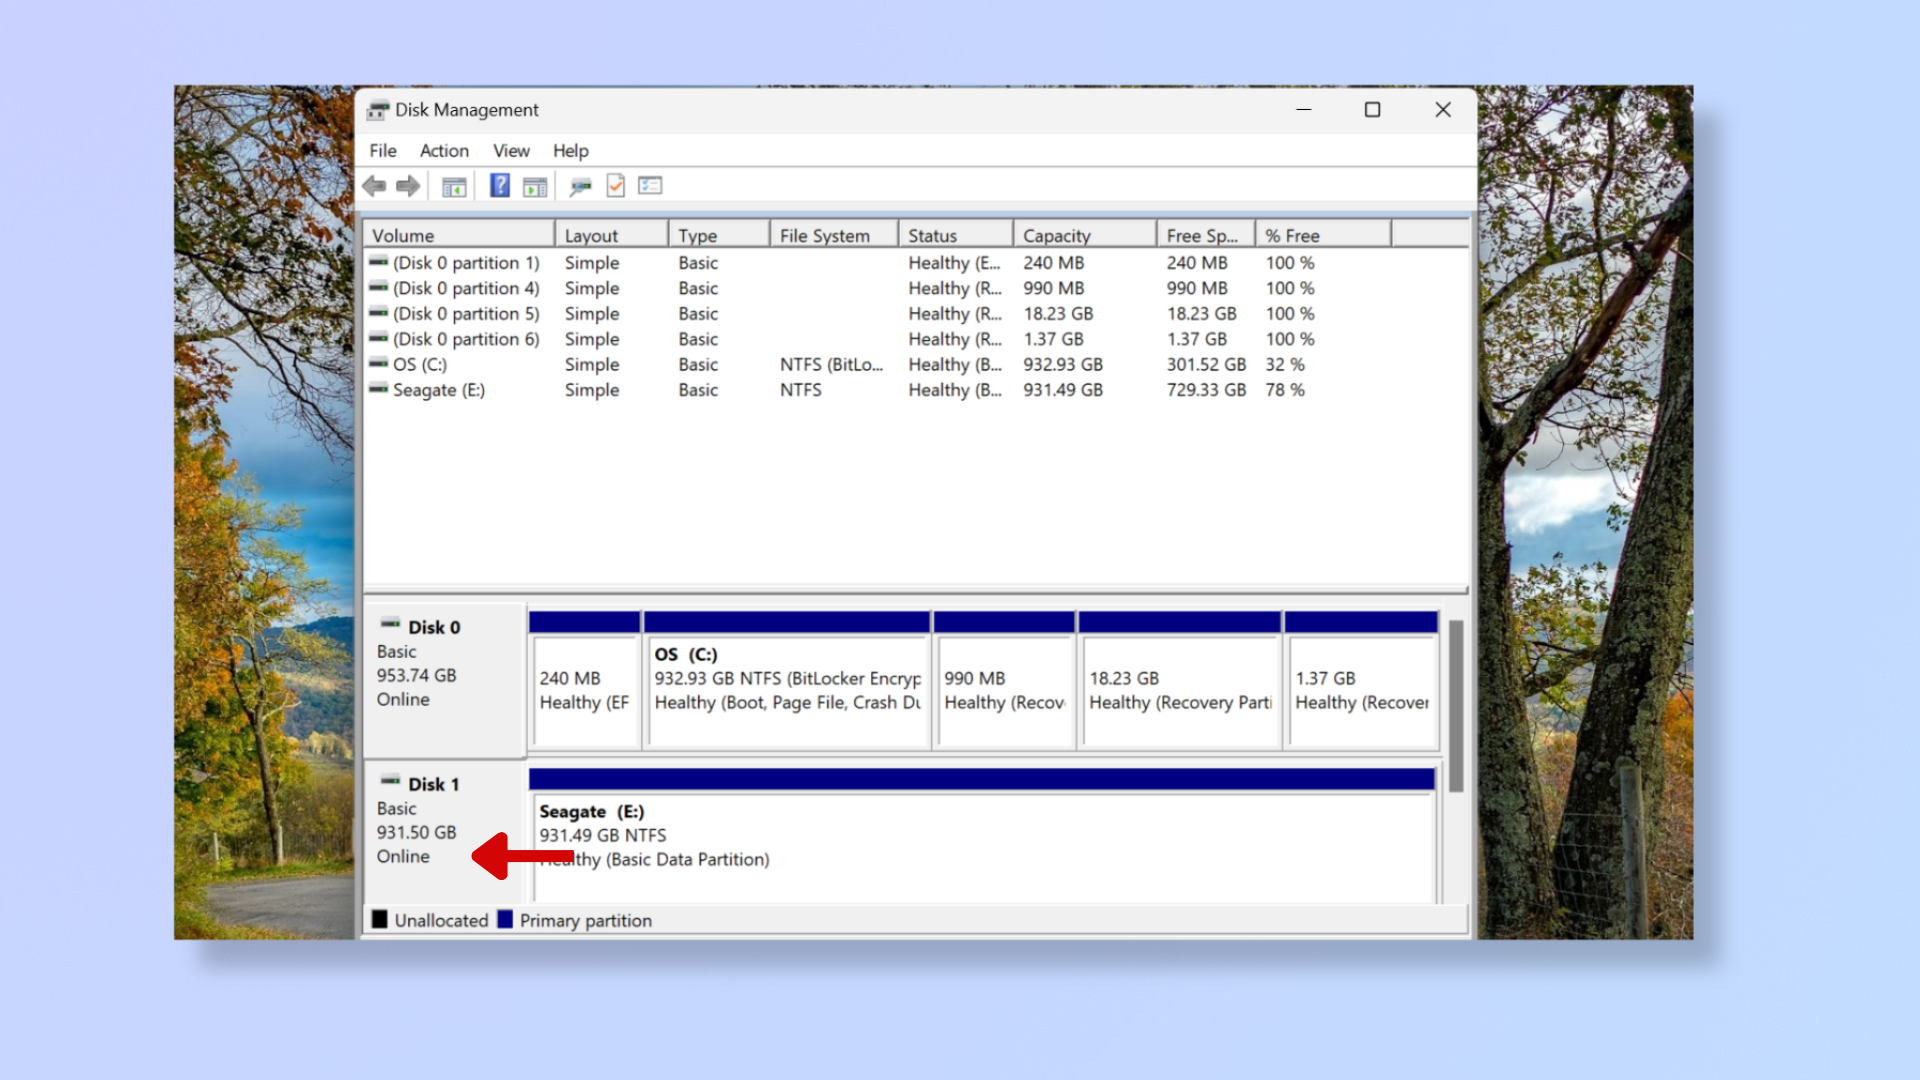
You’ll need to enable your hard drive if it’s offline:
- Right-click the Start button at the bottom left corner of the screen and select Disk Management.
- Towards the bottom of the screen, check if it says Offline under your disk in the gray box.
- If it does, then right-click the gray box and select Online.
If it says Unallocated beside your hard drive, follow these steps to format it:
- Right-click the gray box with your hard drive.
- Select New Simple Volume and follow the steps in the Wizard.
6. Assign a drive letter
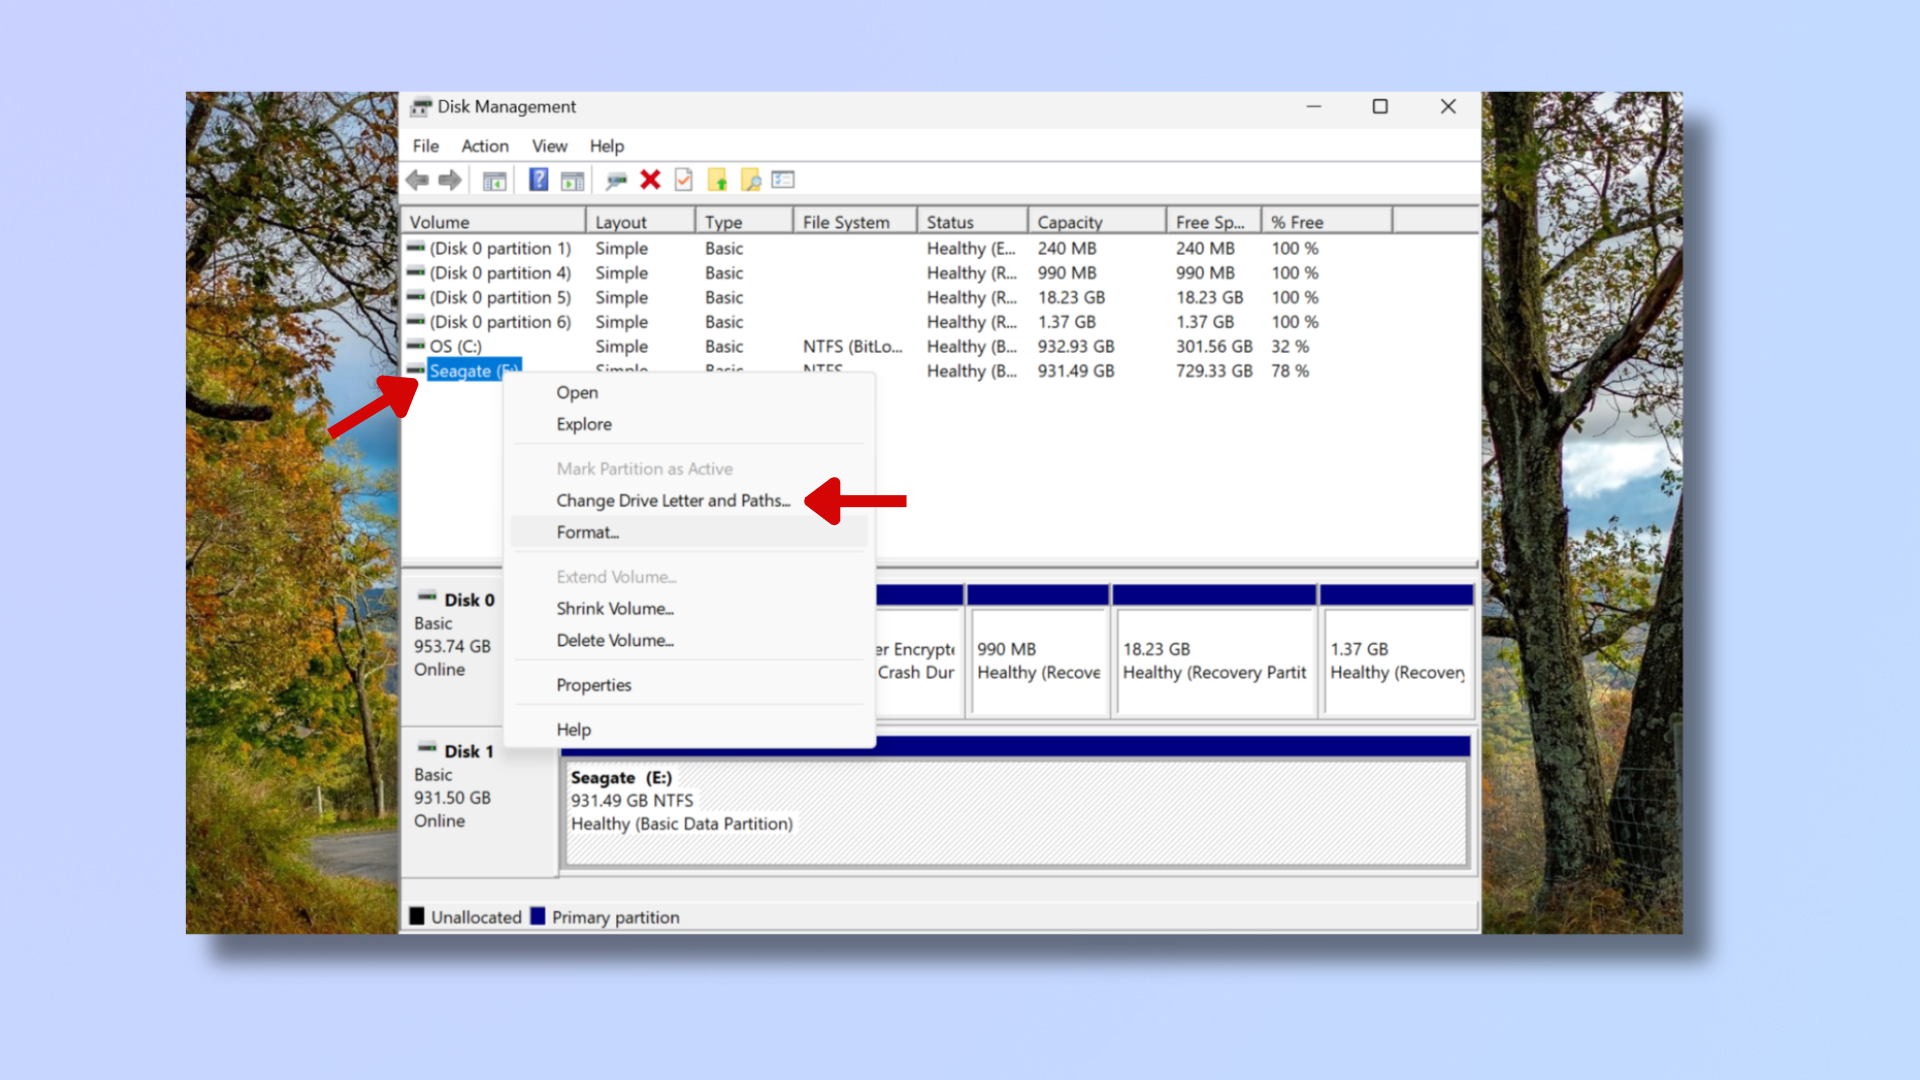
If your hard drive doesn’t have a drive letter in Disk Management, assign it one:
- Open Disk Management (right-click the Start button at the bottom left corner of the screen and select Disk Management).
- Under Volume, right-click your hard drive and select Change Drive Letter and Paths. Click add, assign a letter, and click OK.
Tools and requirements
- MacBook
Steps for how to fix an external hard drive that's not showing up on Mac
- Reboot your Mac.
- Check the physical connection: reconnect the hard drive, reconnect to a different USB port, or reconnect using a different cable.
- Update software: Launchpad > System Settings > General > Software Update > Restart Now.
- Format the hard drive: Launchpad > Disk Utility > Select your hard drive > Click Erase > Click Format > Select a new format > Click Erase.
- Use First Aid: Launchpad > Disk Utility > Select your hard drive > Click First Aid > Click Run > Click Done.
Step by step guide to fix an external hard drive that's not showing up on Mac
Before attempting the steps below, try restarting your Mac or external hard drive.
1. Check the physical connection
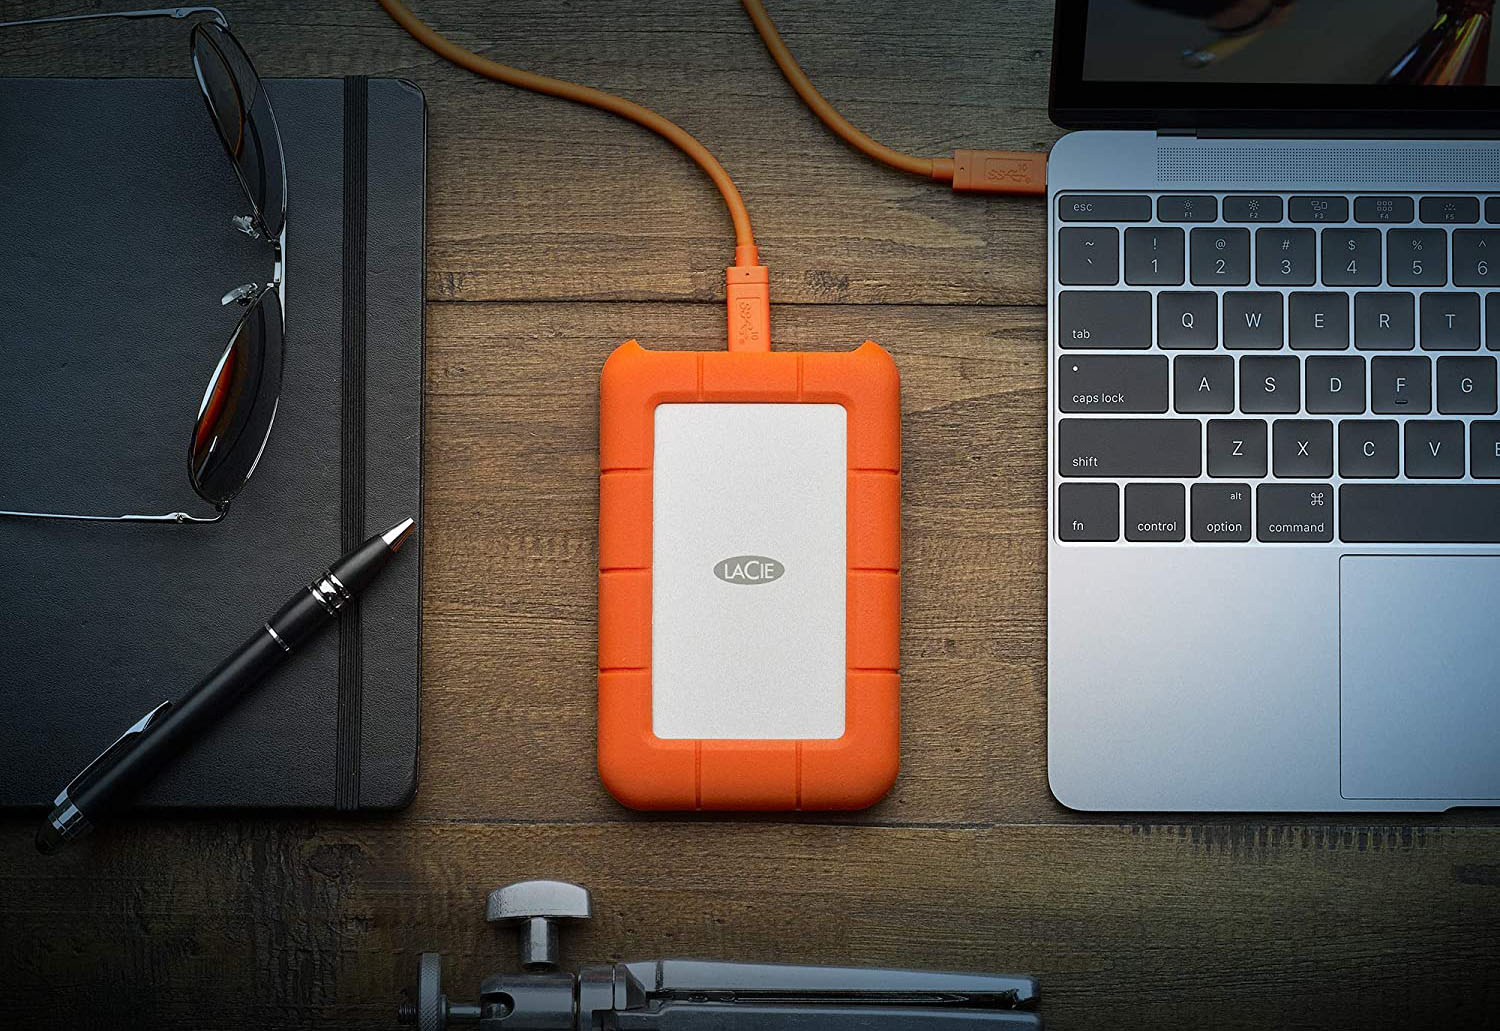
Check that your external hard drive is connected securely to your Mac:
- Reconnect the hard drive to your Mac.
- Reconnect the hard drive to a different USB port on your Mac.
- Connect the hard drive to your Mac with a different cable.
2. Update software
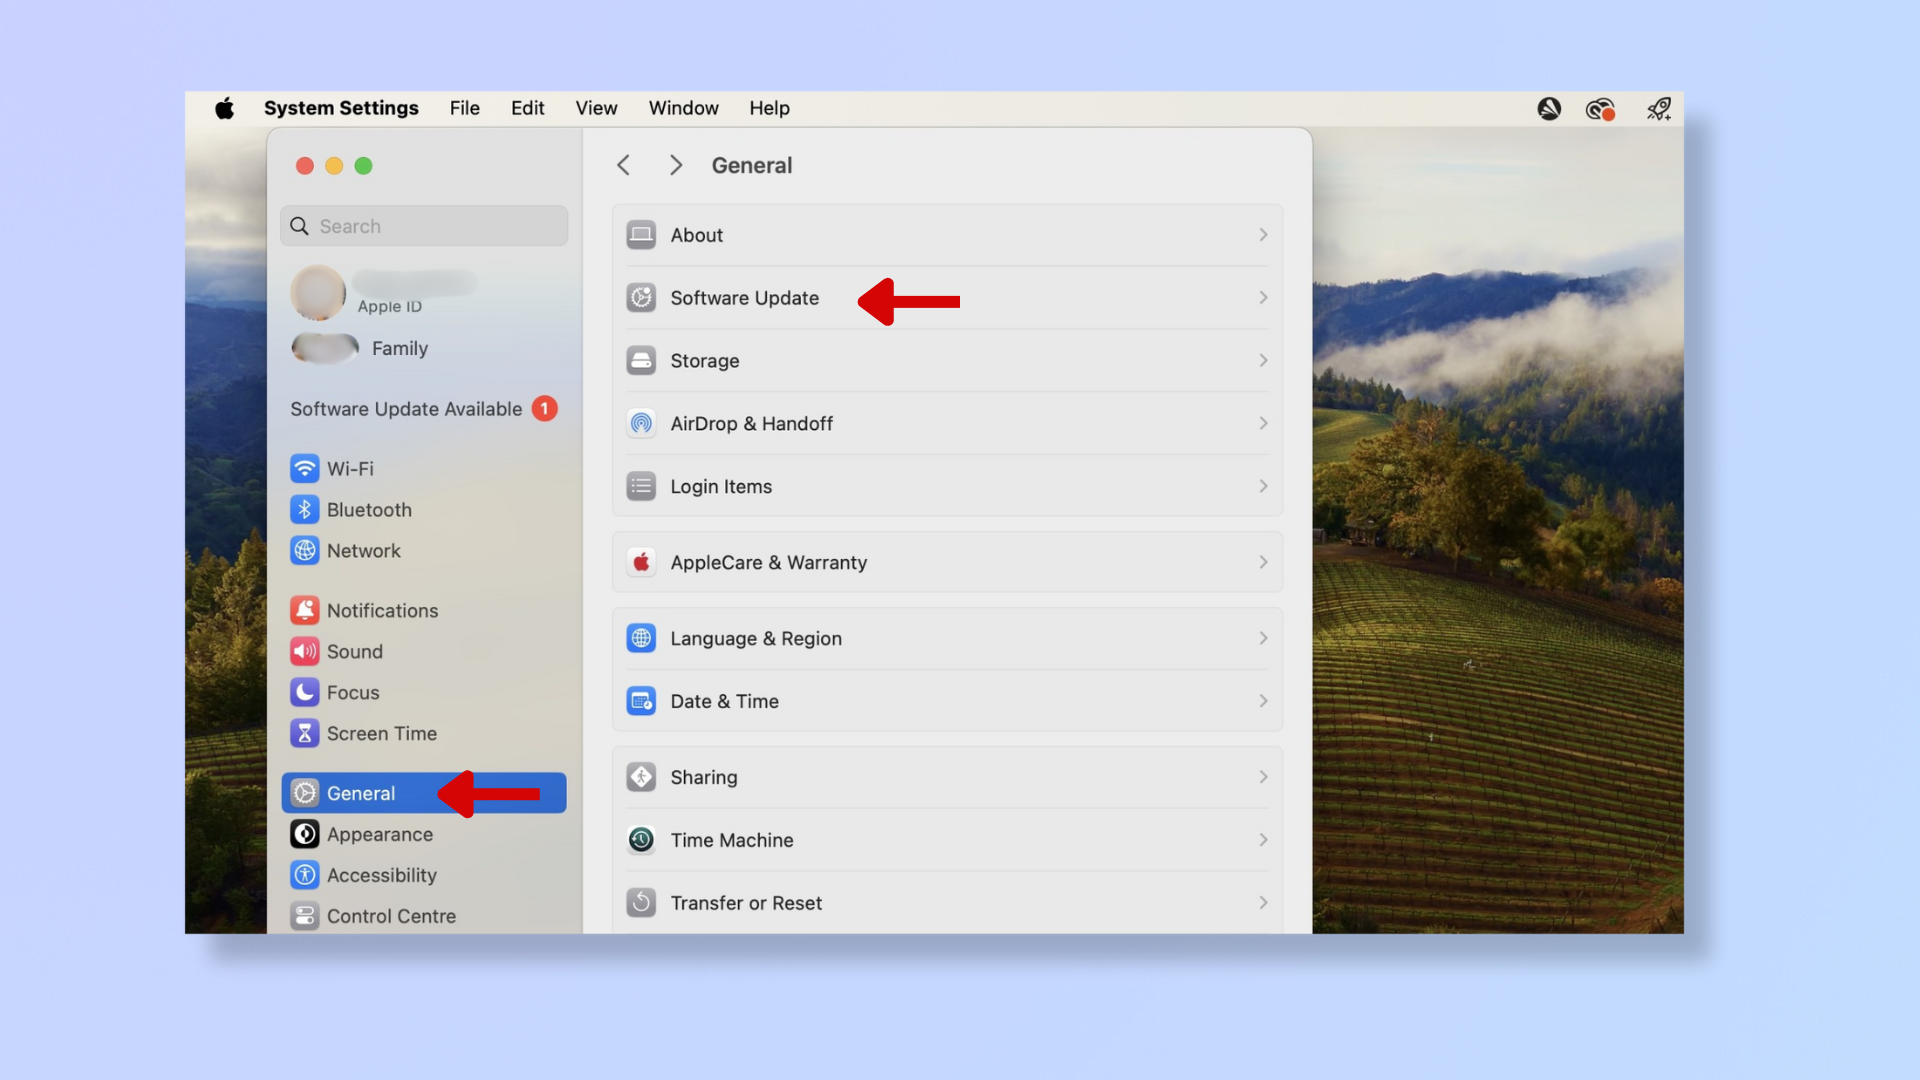
Unlike Windows, you can’t update individual drivers in a Mac, so you’ll have to do a macOS update instead:
- Open Launchpad and click System Settings.
- Click General on the left-hand menu and then select Software Update.
- Press Restart Now to begin the software update.
3. Format the hard drive
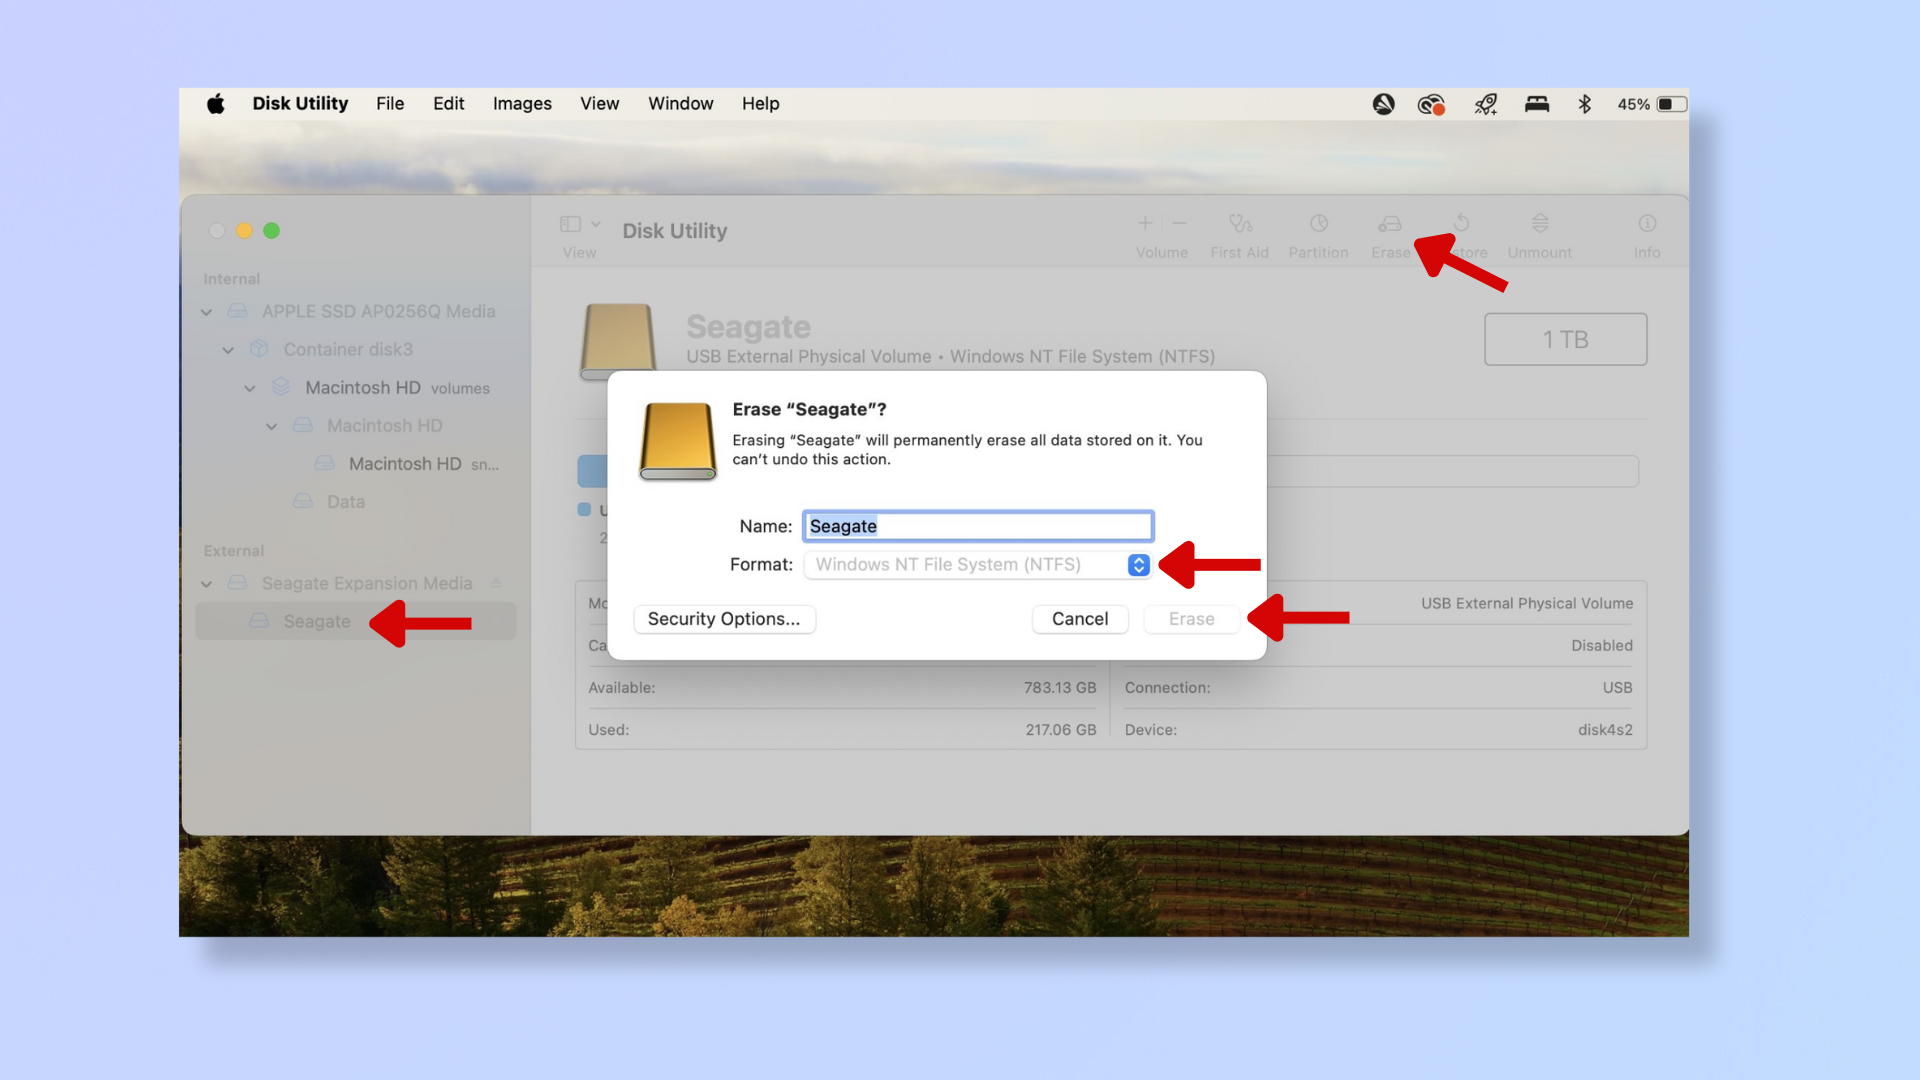
If the hard drive has an unsupported format, you’ll need to format it. Remember that formatting the drive will erase its content:
- Open Launchpad. Search and open Disk Utility.
- Select your hard drive under External.
- Click Erase towards the top right.
- Click Format and select a new format from the dropdown.
- Press Erase.
- Reconnect your hard drive after it's wiped.
4. Use First aid
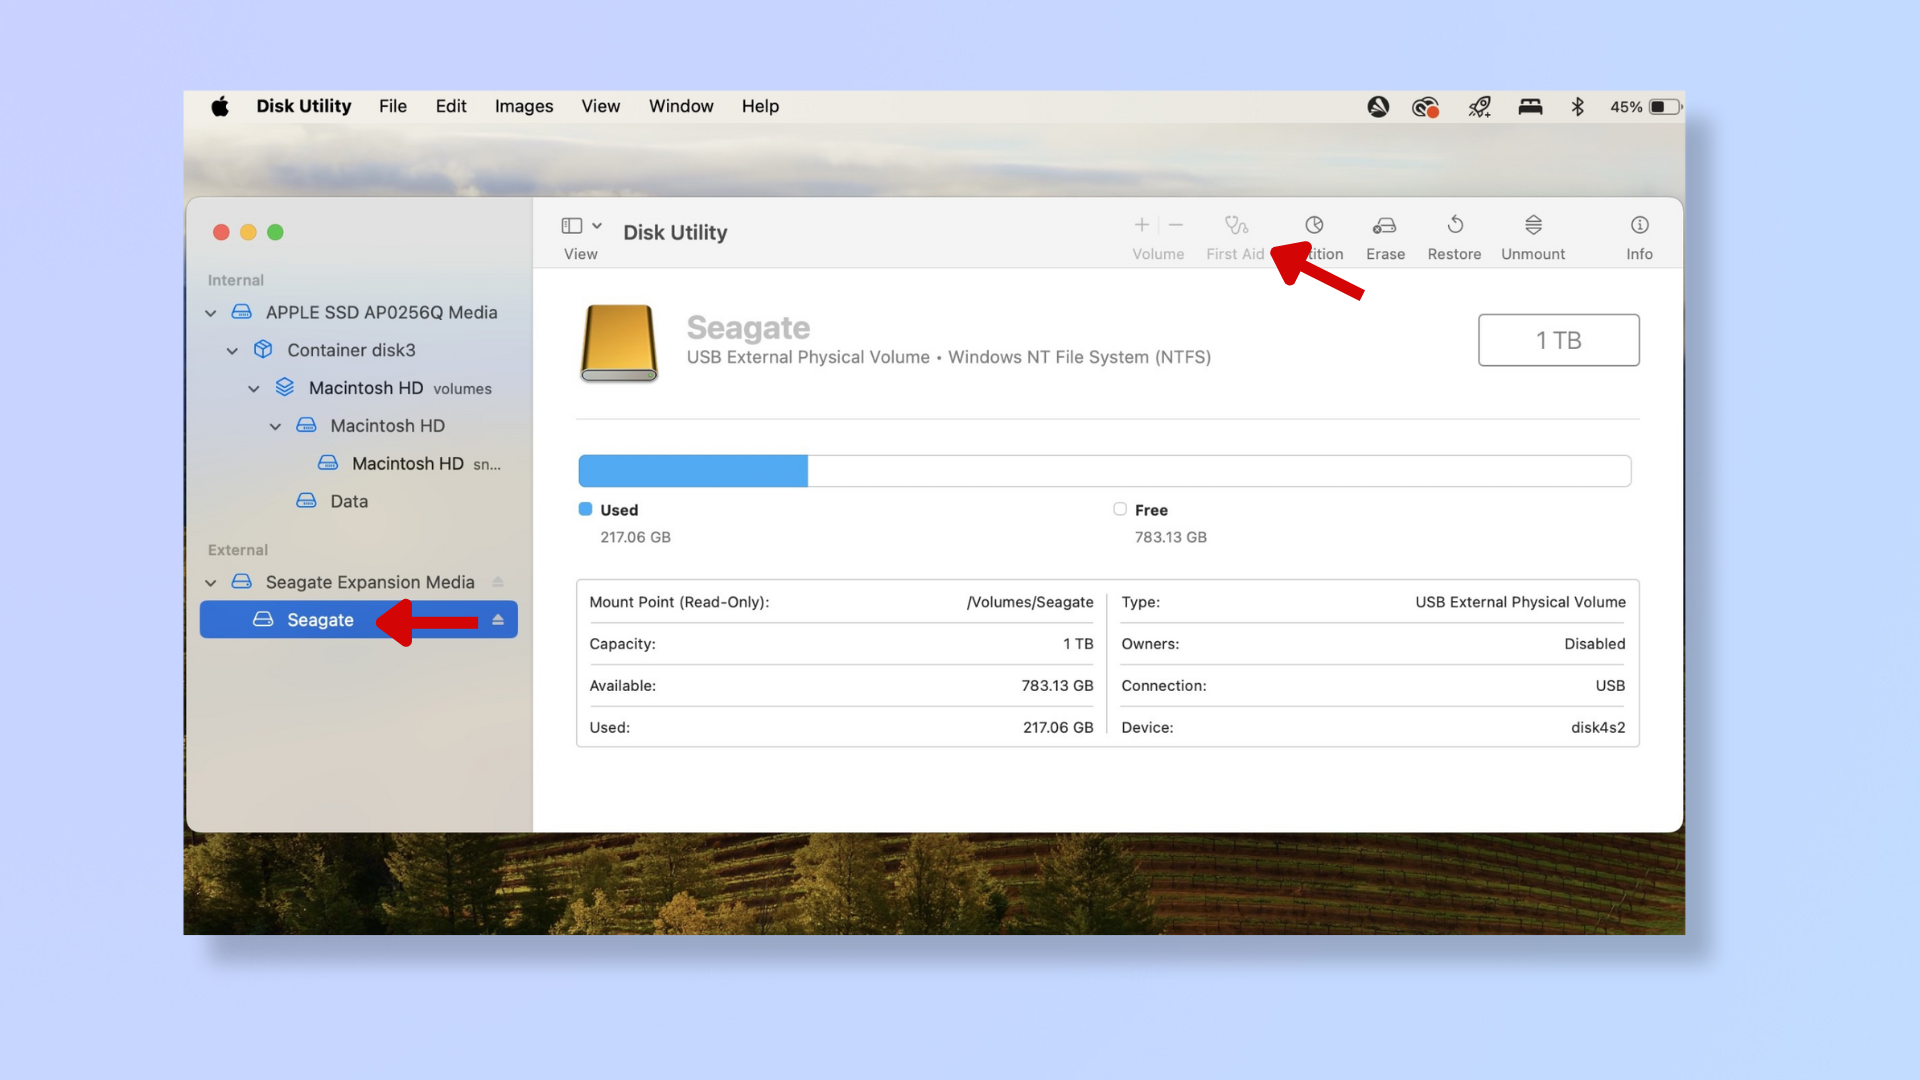
Mac’s First Aid function helps to detect and repair issues in disks:
- Open Disk Utility.
- Select your hard drive under External.
- Click First Aid towards the top right and then click Run.
- Once complete, click Done.
Note that to use First Aid, the hard drive must be formatted for macOS.
Final thoughts
Hard drive issues can be concerning, but you can often resolve them with simple troubleshooting steps. Ensuring proper connection, updating drivers, and using built-in tools like Disk Management or Disk Utility can help fix access to your drive.
But if you continue to experience issues with your hard drive, it may be time to upgrade to a new one. For more tips on storage, learn how to format an external hard drive for PS4, how to install an M.2 (NVMe/SATA) SSD on your PC, and how to install PS5 SSD.
