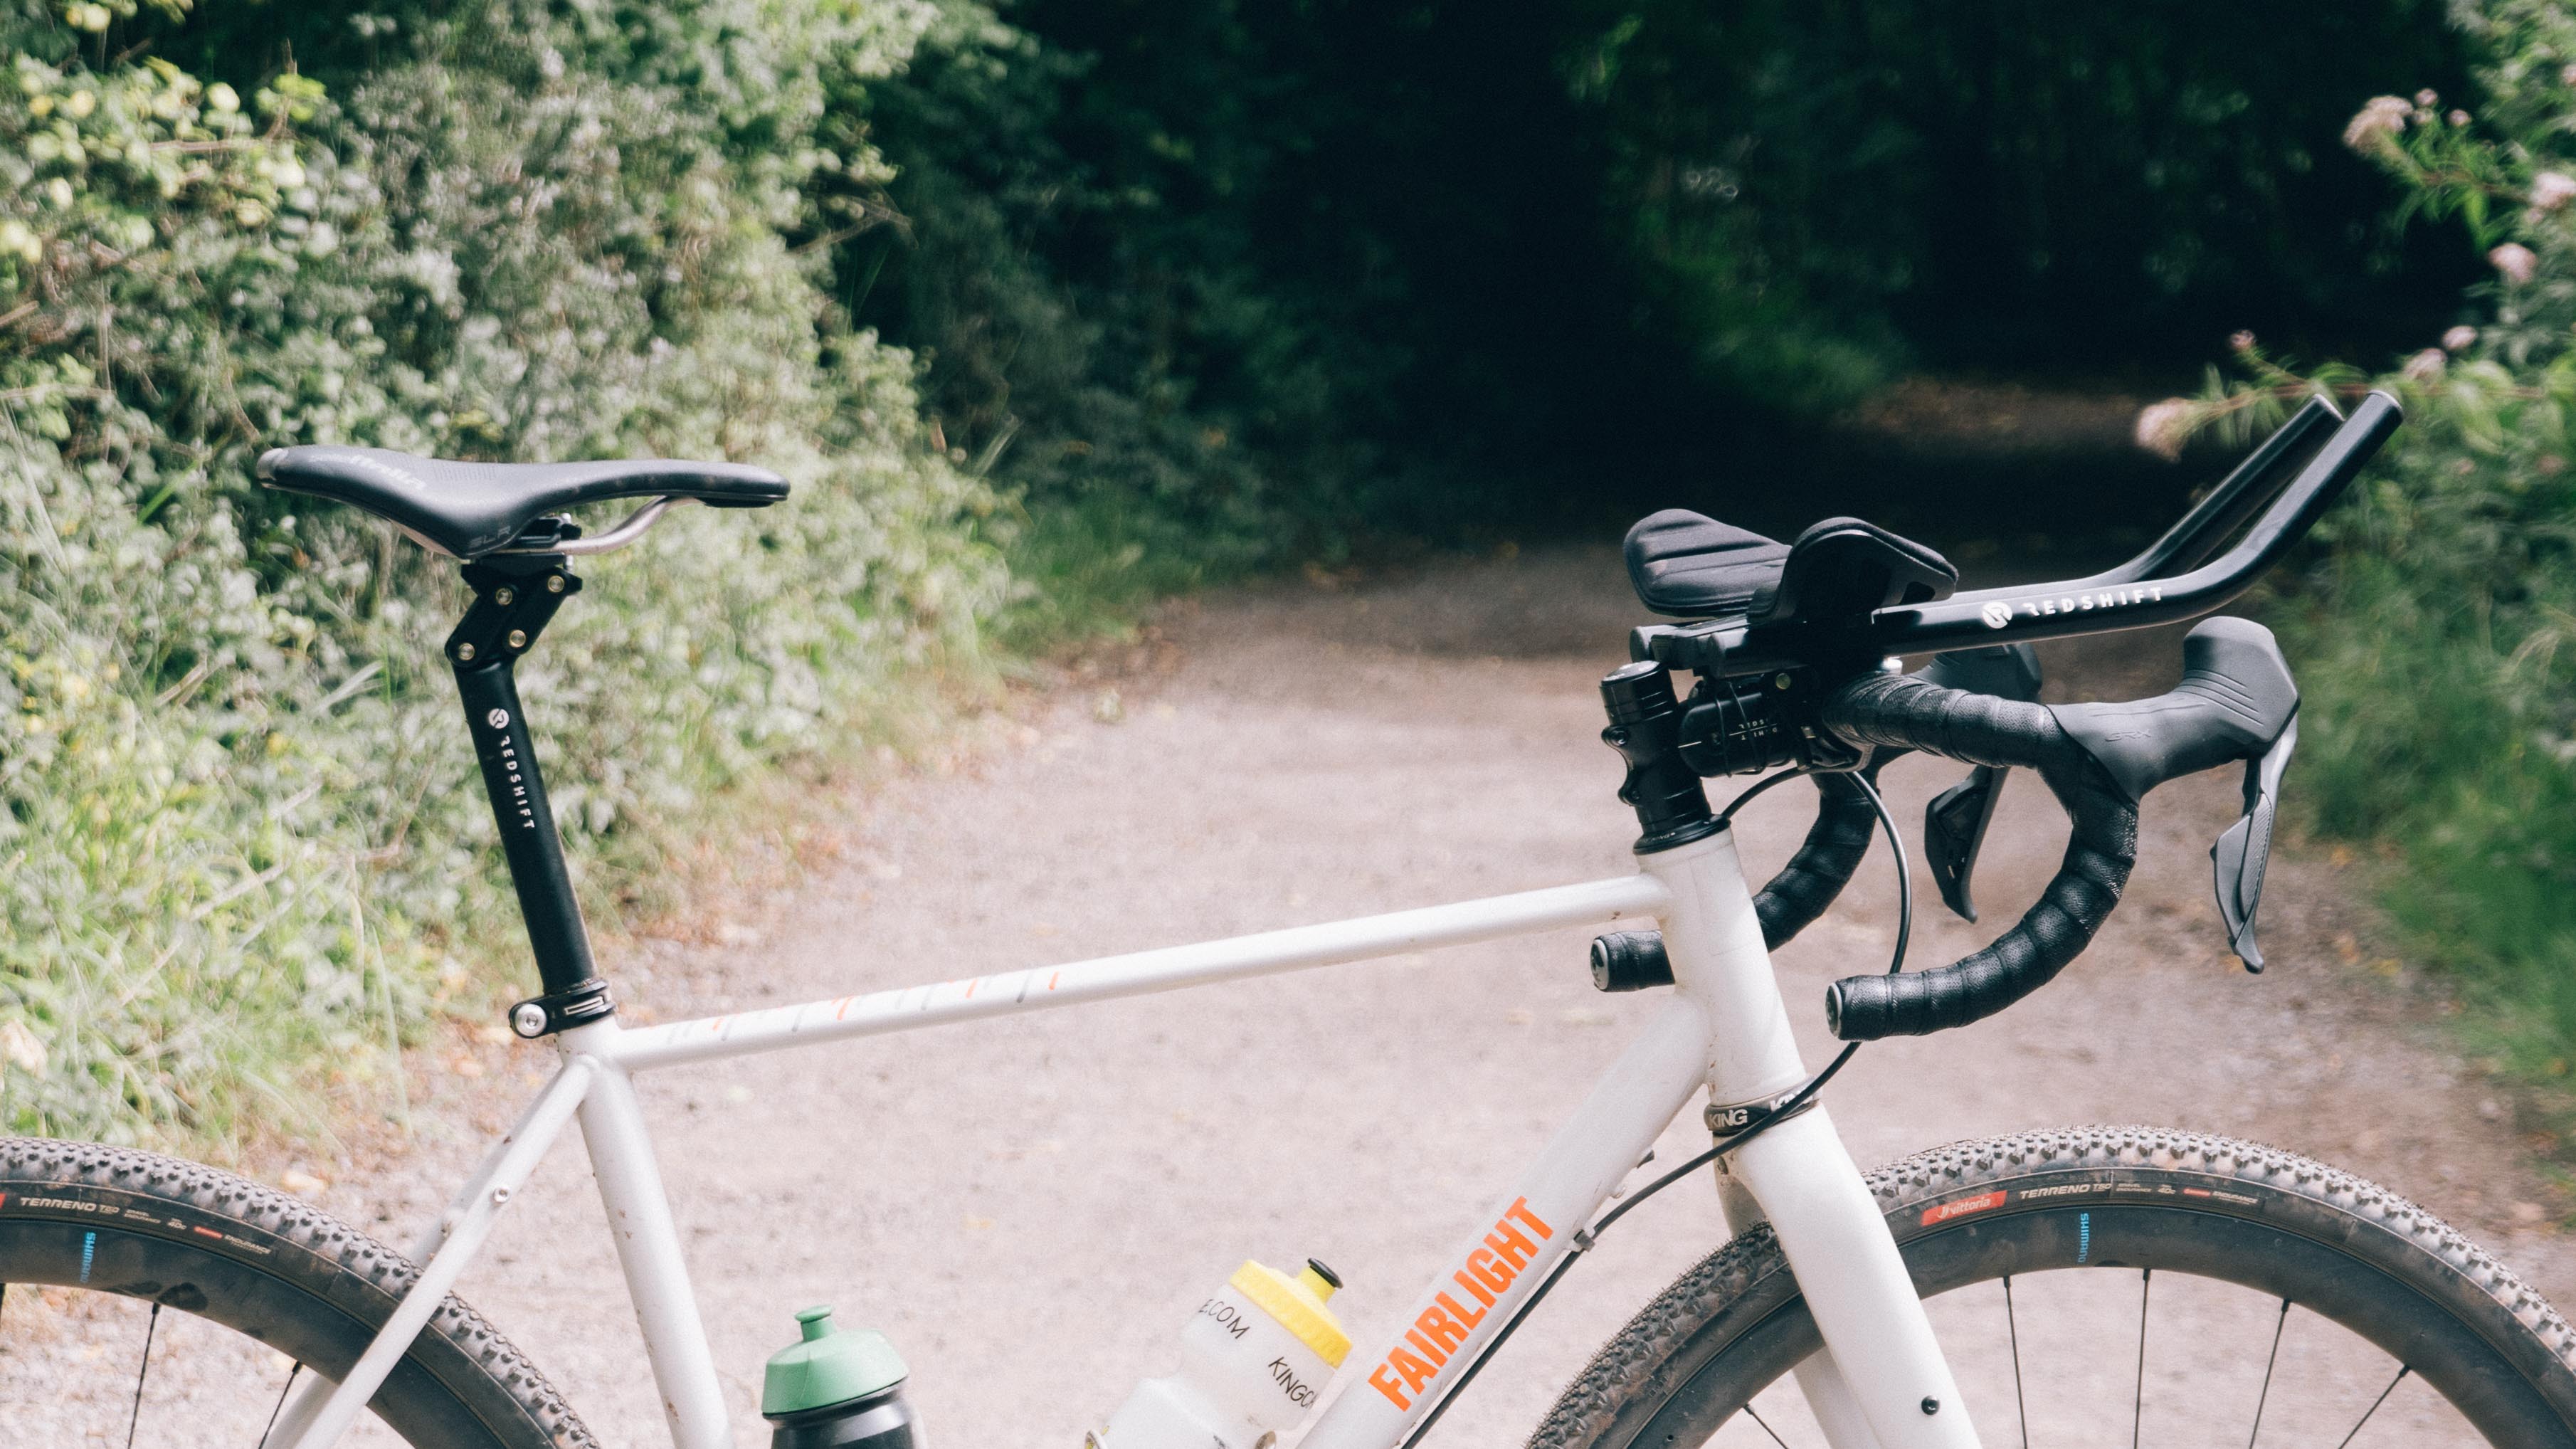
Redshift has carved out a niche for itself making, generally speaking, quite niche products. There are riser drop bars for those who need a taller stack than can be achieved normally, pedals with inbuilt lights, flared gravel bars with an inbuilt snack pouch, and extra long bar tape for those who like their bars wiiiiiiide. Here, though, I have three products that individually bring something to the table but collectively add up to something much greater. It all started as I was curating a ‘bikes of the Transcontinental Race’ tech gallery, and noticed a lot of the bikes were running a Redshift suspension stem, presumably to add comfort but also control while in aero bars over broken road and gravel.
To test out how effective this actually is as a system I called in a ShockStop suspension stem (the normal, non ‘pro’ version), as well as a set of the brand’s quick-release aero bars and a dual-position seatpost, which allows one to shift one’s saddle forward and upward on the fly to more comfortably use aero bars without being too stretched out.
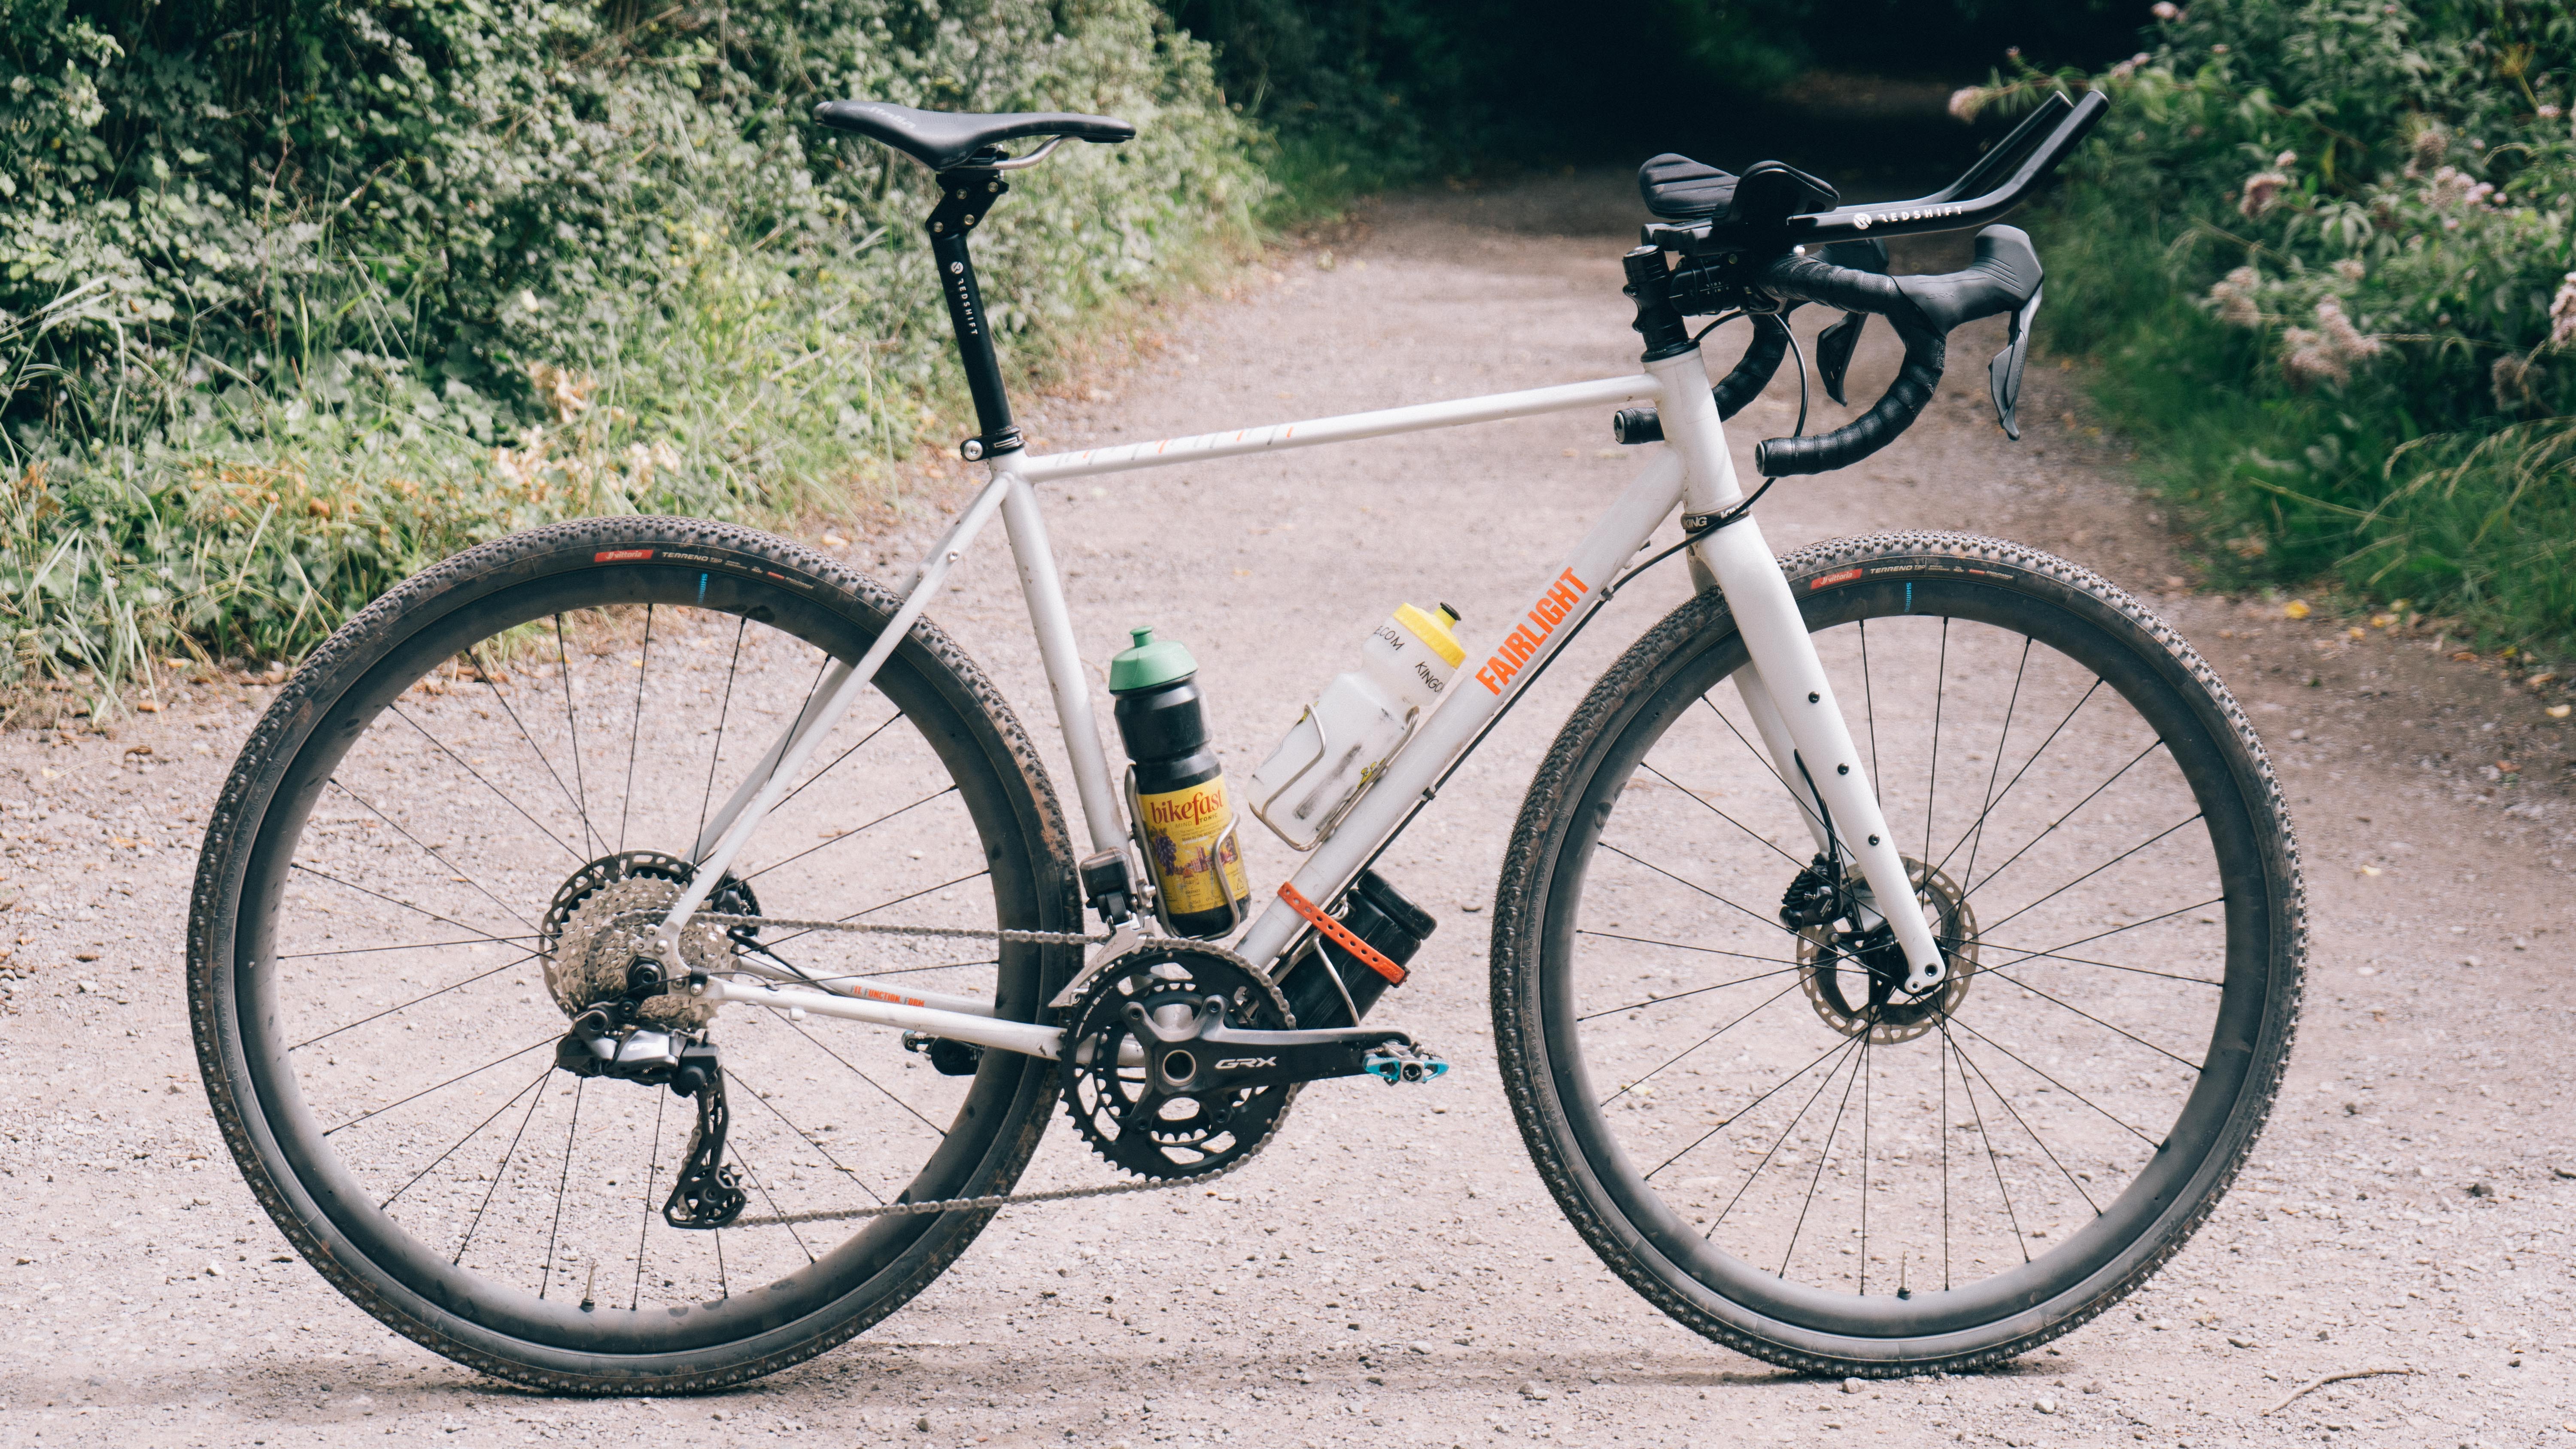
While the brand markets the aero bars and dual-position seatpost more as a triathlon setup, I wanted to see how it would fare more for the gravelly, ultra-endurance enthusiasts out there, so I fitted the trio of parts to my long-term Fairlight Secan test bike and bedded in for some long days in the saddle.
Design and Aesthetics
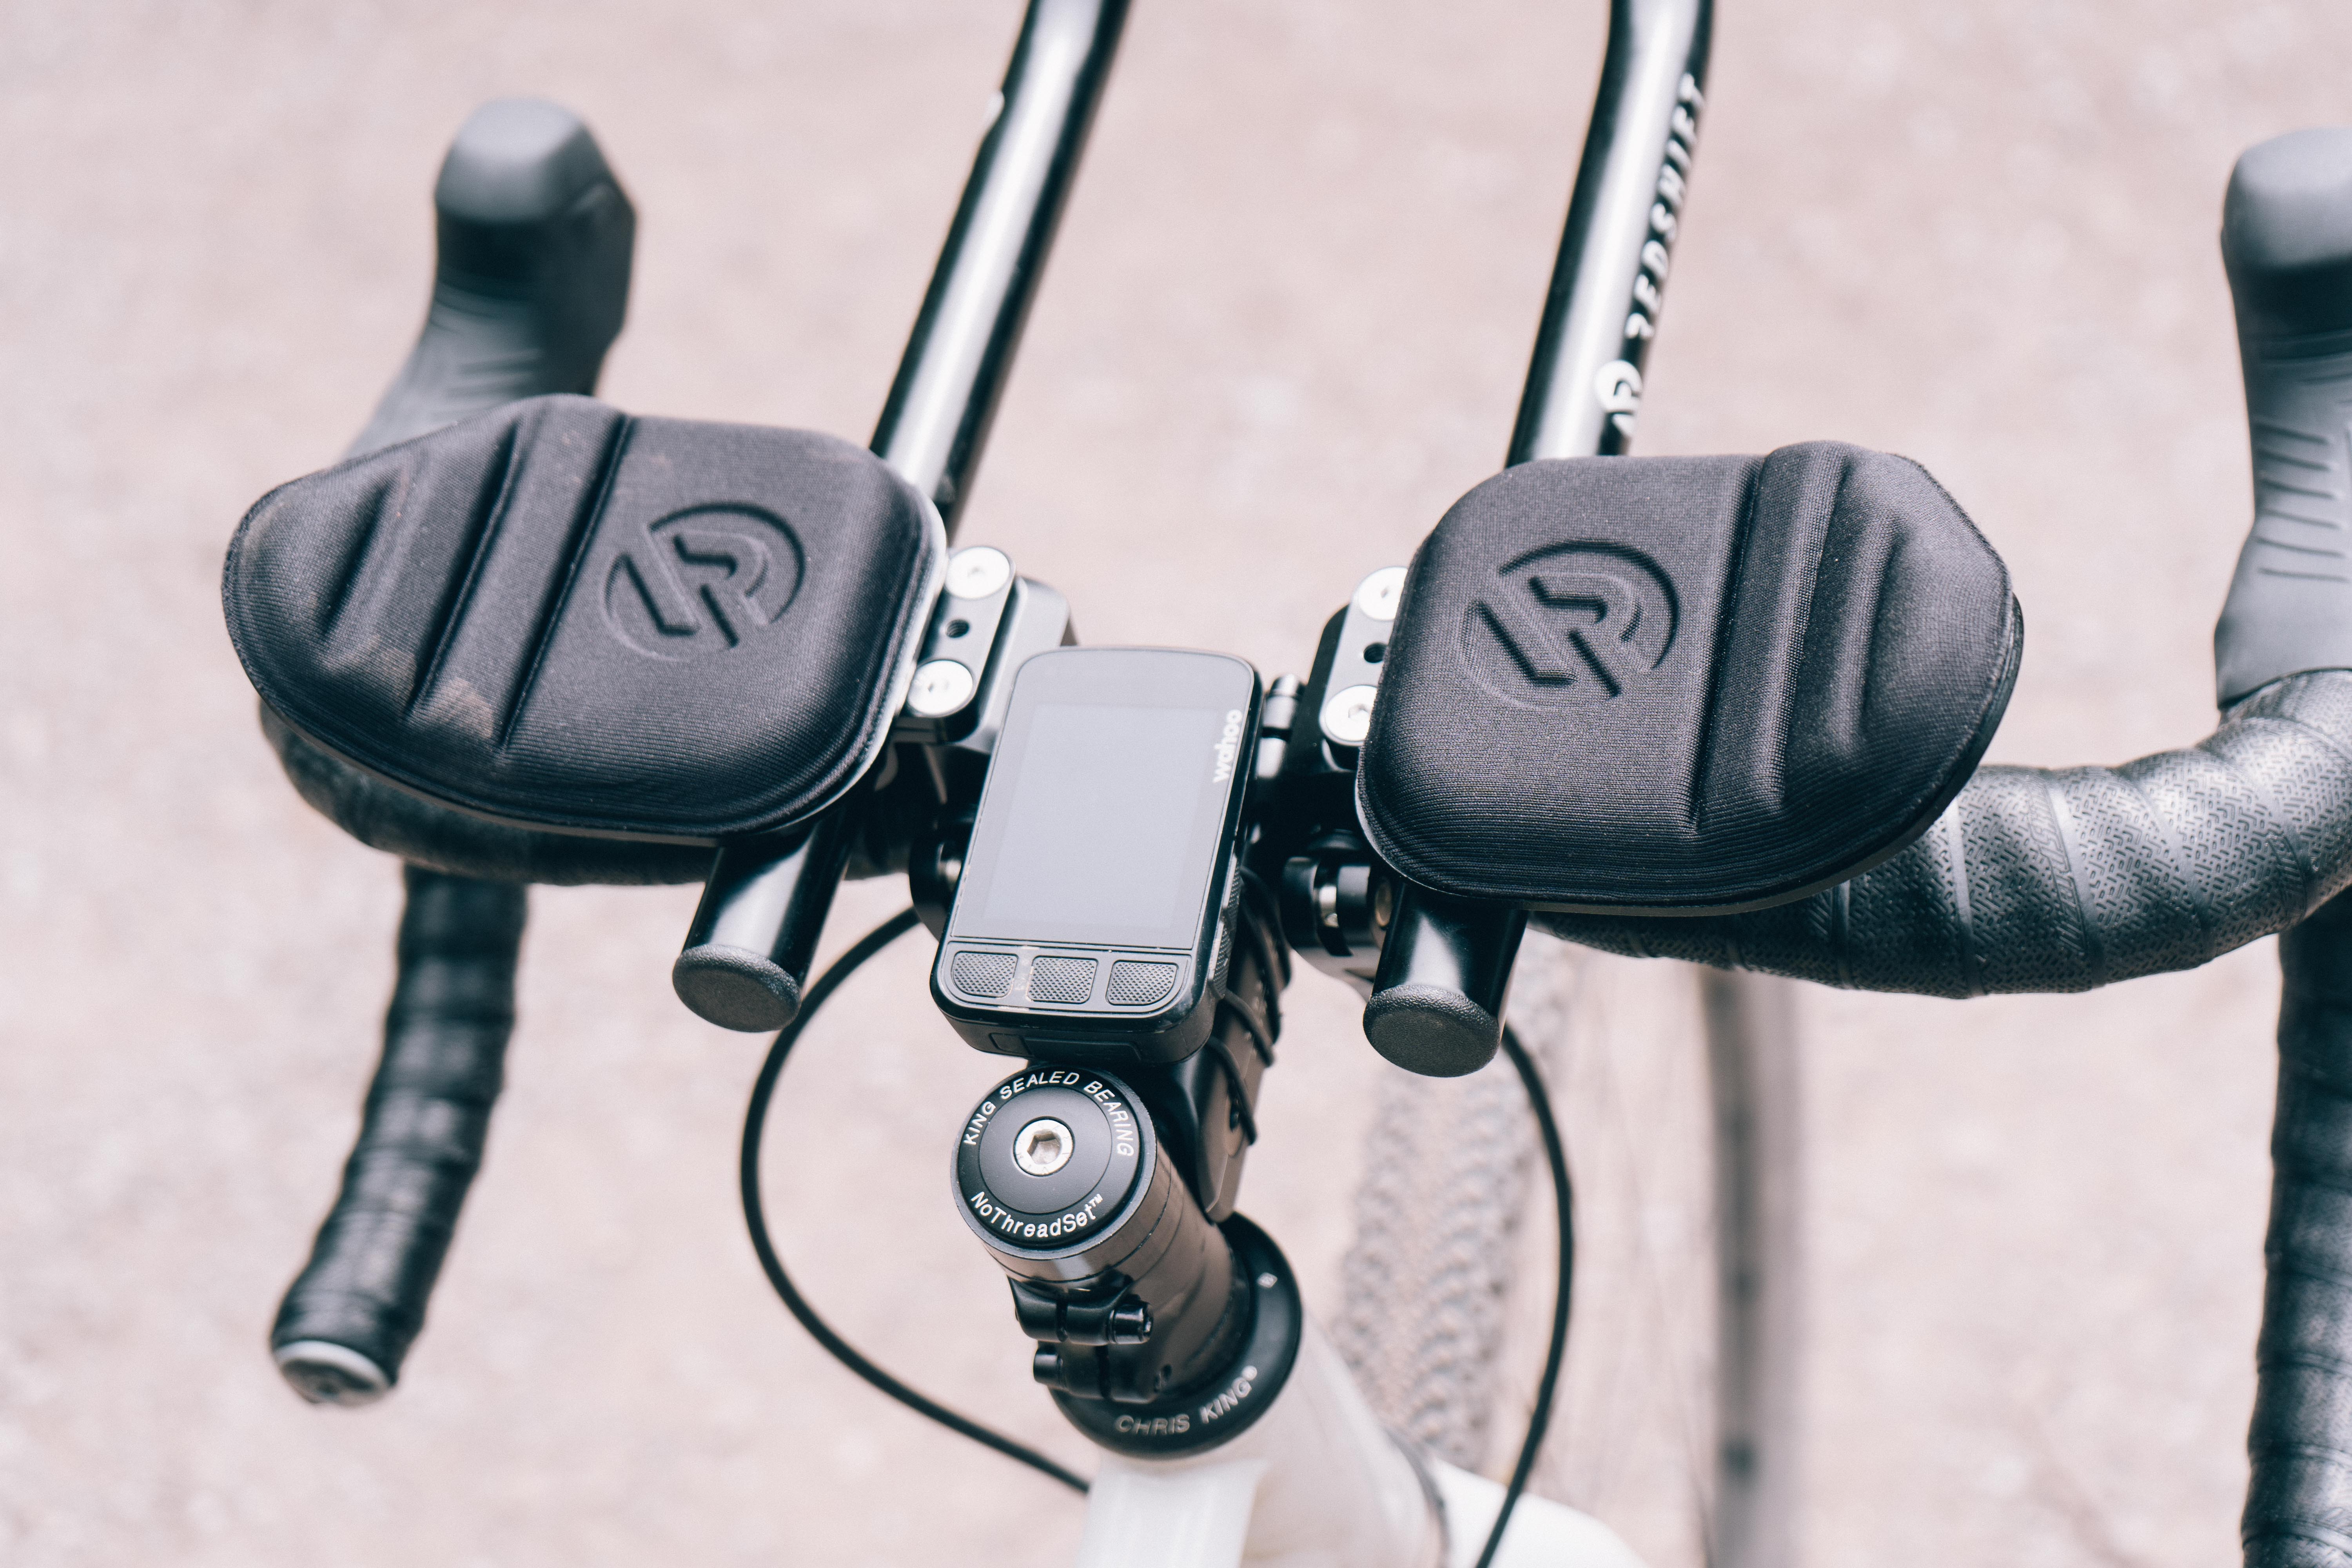
Beginning with the most simple of the three, the quick-release aero bars, things are relatively bog standard here besides the more novel mounting system, which I’ll get to shortly. You get a pair of round cross-section extensions (L-bend or S-bend - I went for L) which can easily be moved fore/aft in their mounts and rotate to find your ideal position. A pair of forearm rests sits above the bar clamp, and these can be adjusted in and out thanks to a series of mounting points beneath them. Riser blocks and shims are available if you want to add up to 3cm of stack or fit them to different bar diameters, but these are sold separately.
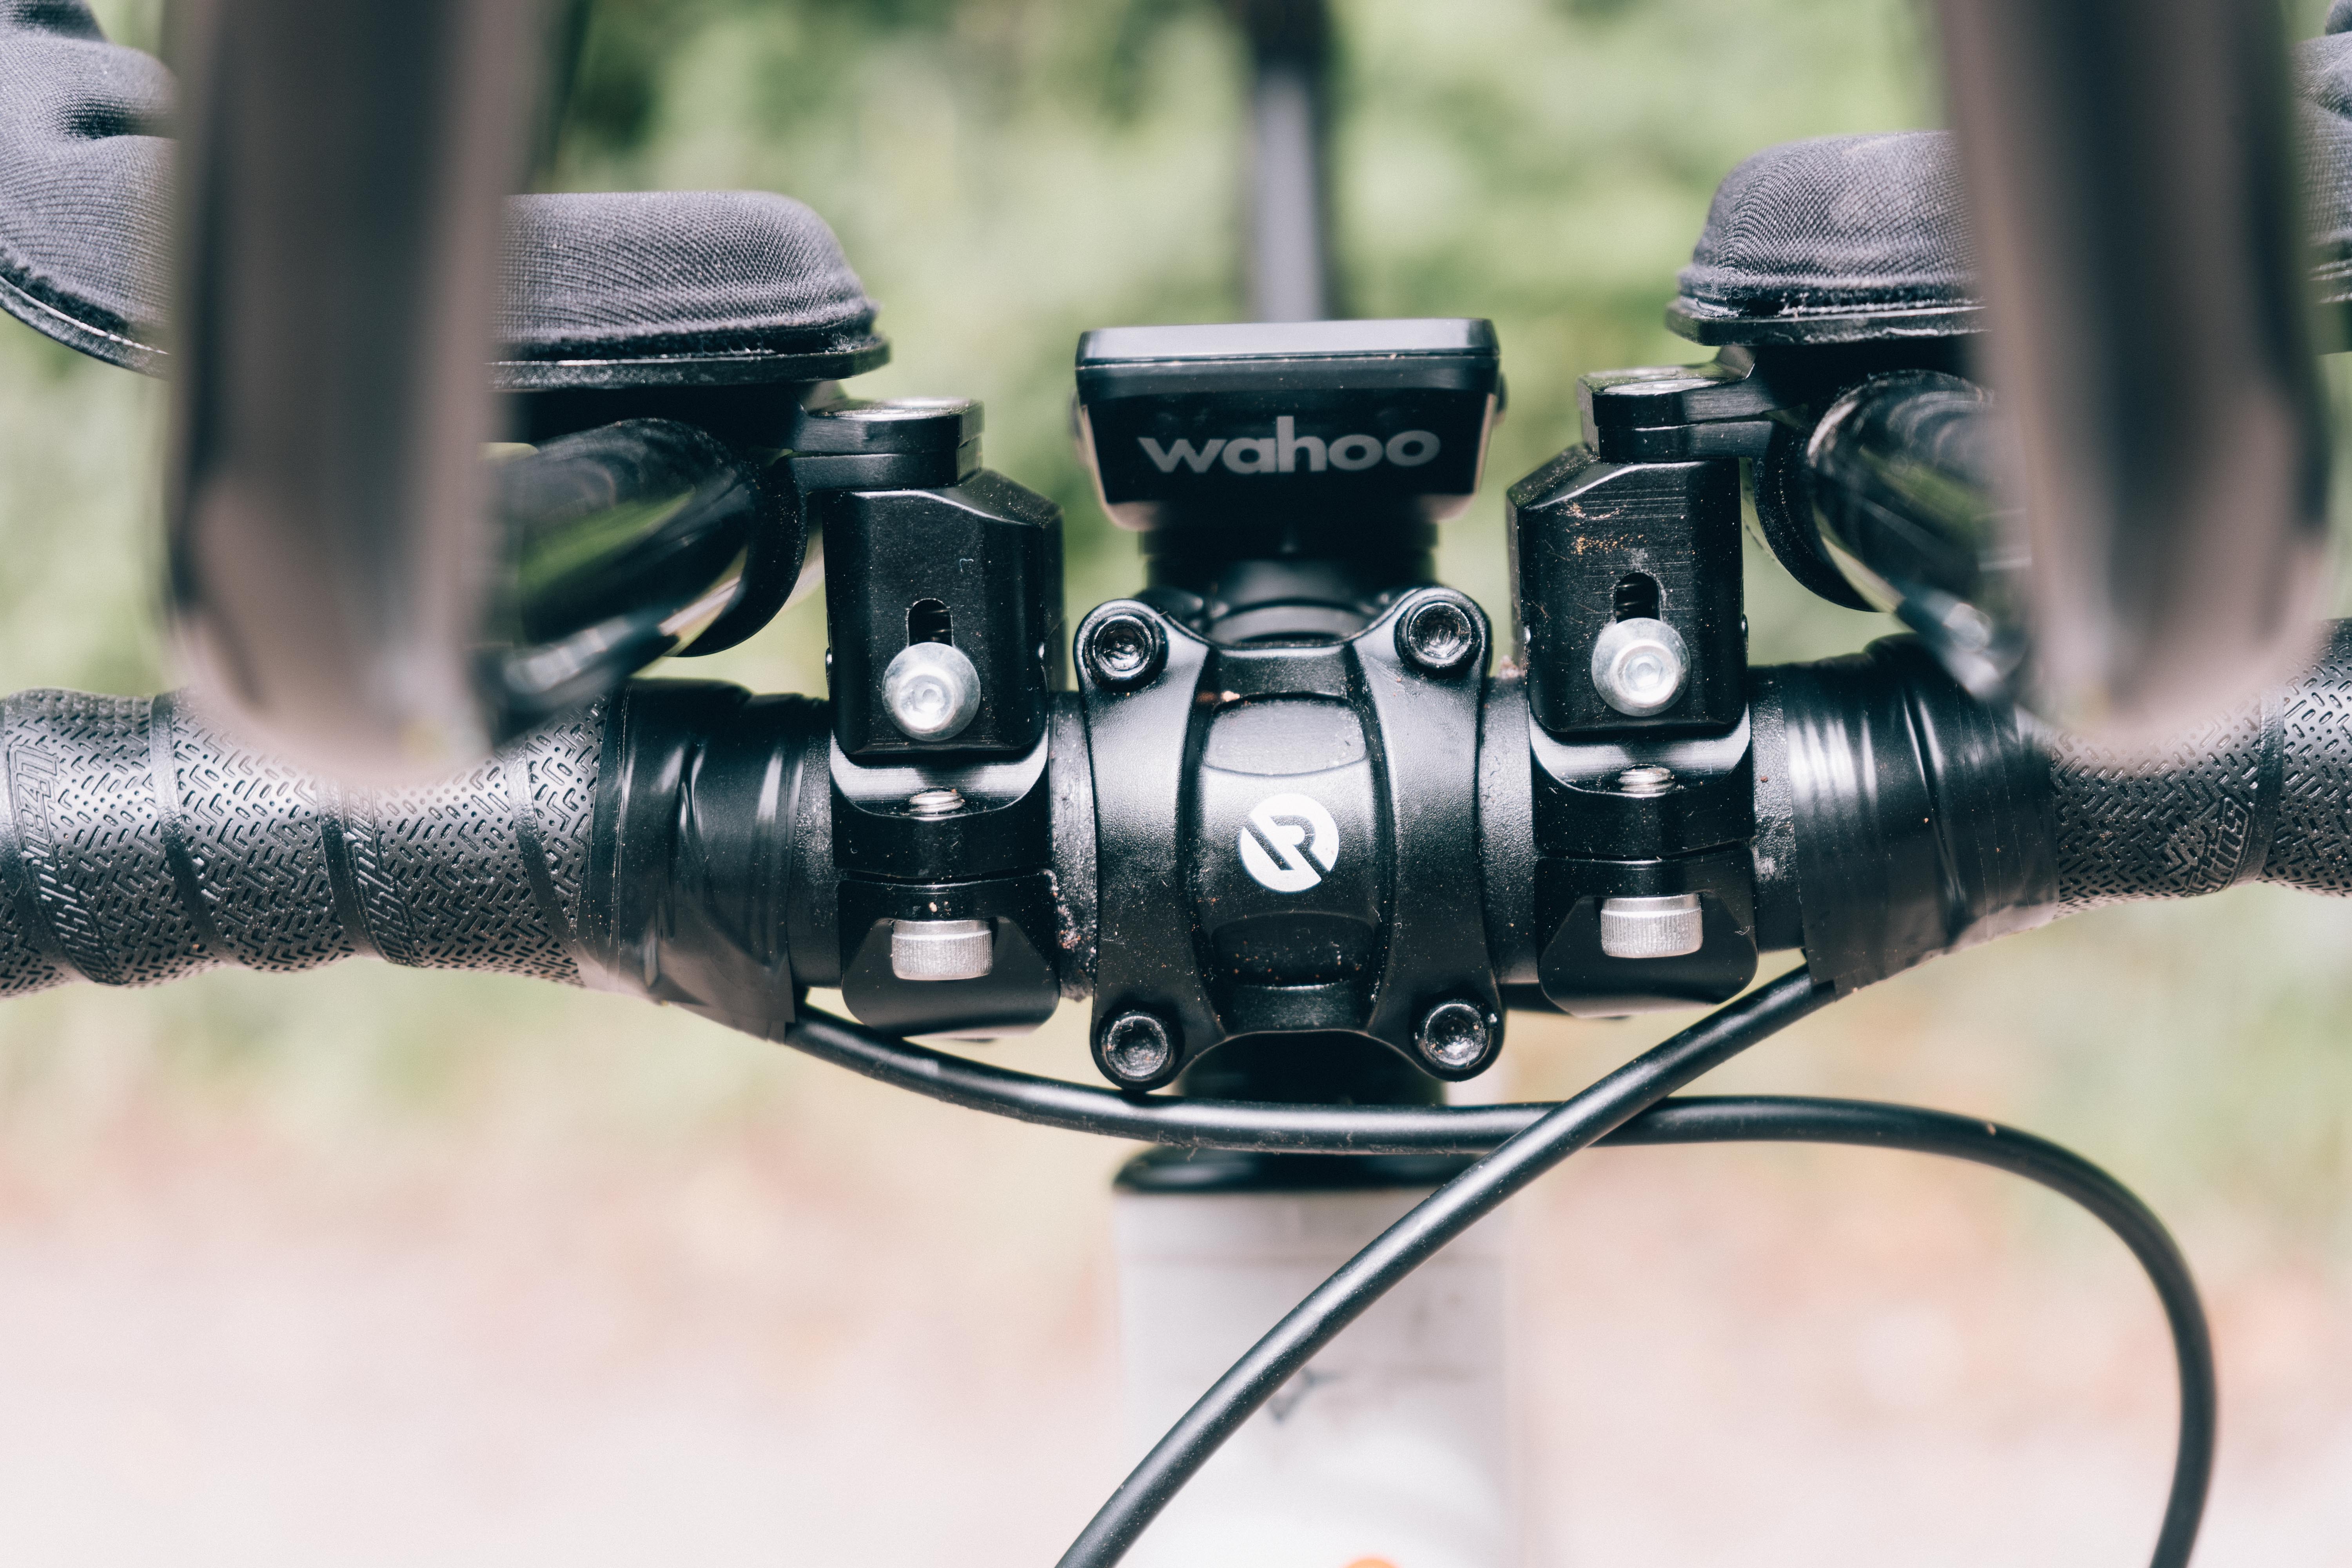
The mounting mechanism that makes this 'quick release’ relies on a pair of permanent on-bar clamps that are bolted securely with hex bolts, and then the actual extensions mount to these clamps by way of a shaped groove and what is effectively a quick-release skewer as you’d find on older bike wheels. Tighten the lever up and you’re good to go, though in my experience there is still a little play, but there is a hex key socket at the end of the screw meaning you can crank them tighter to do them up.
Remember, received wisdom is that unless your carbon bars say they are rated for clip on bars then it's best to assume they aren't. While it wasn't anything I'd necessarily worry about with an alloy bar, the fit of the brackets wasn't perfect and it did feel like I had to do them up overly tight to achieve a secure fit, something I'd never do with a carbon bar - even one rated for aero bars.
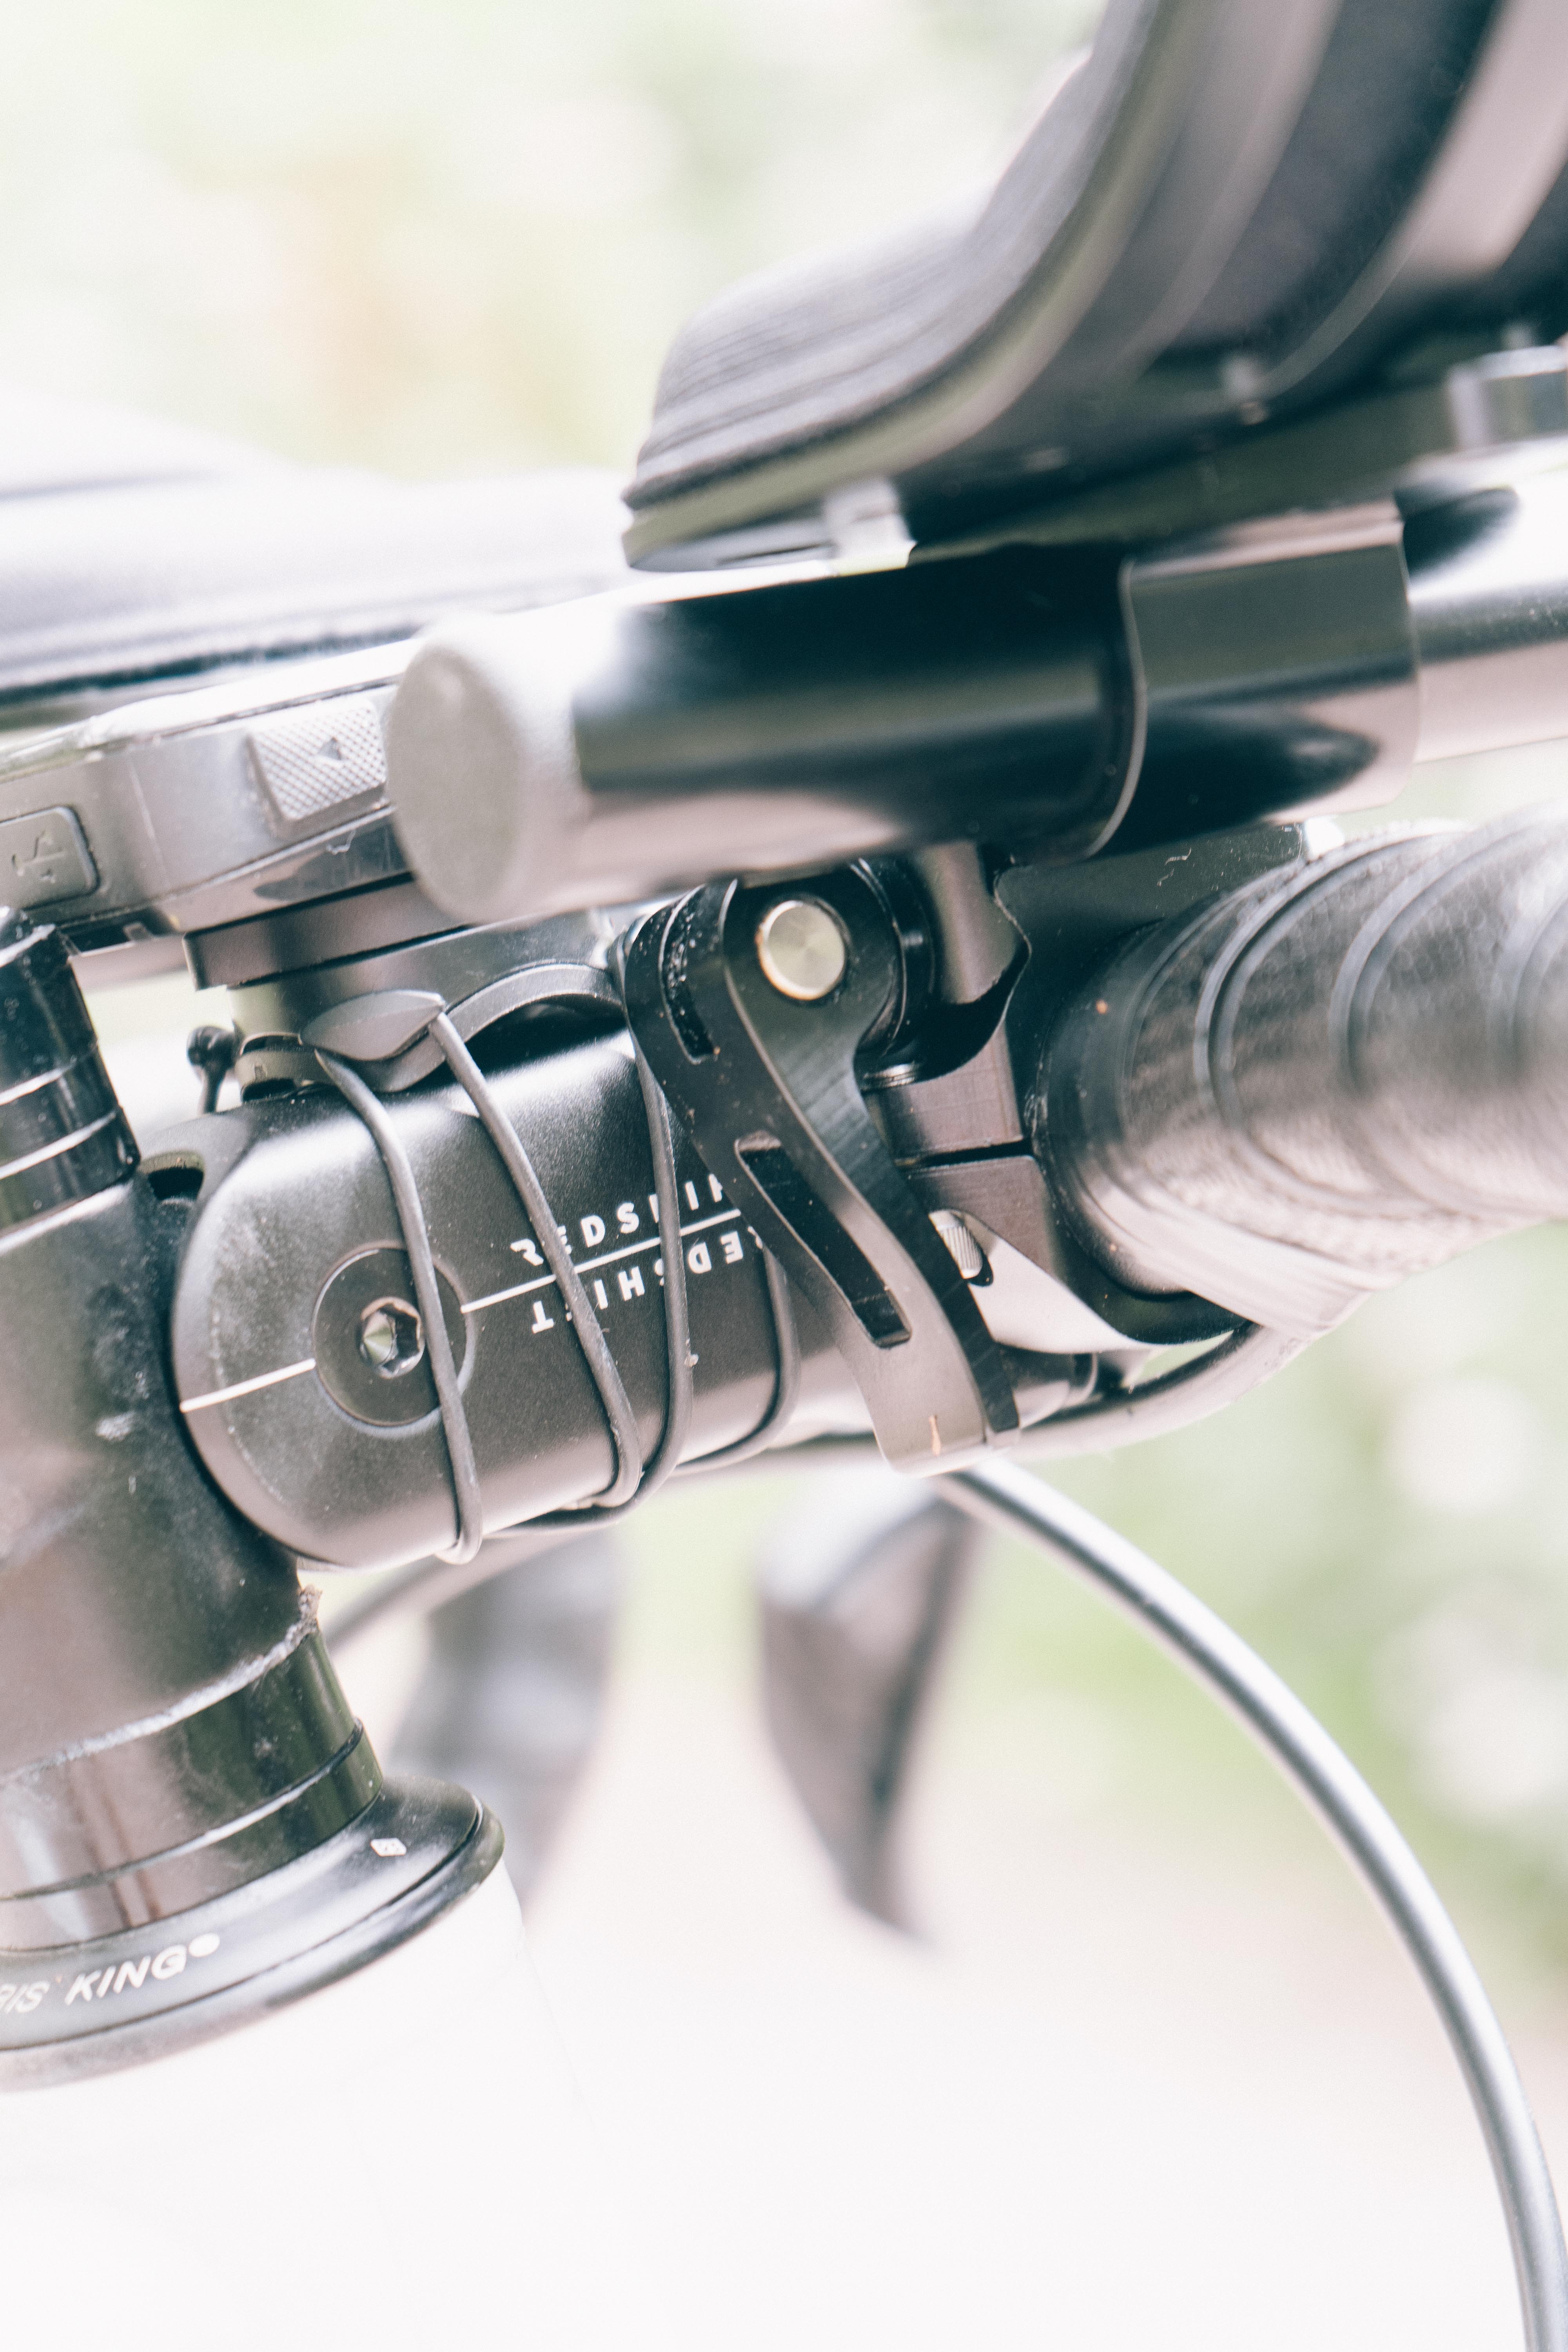
Onto the stem, then. Mechanically the thing is pretty simple, and easy enough to fit. It does come out-the-box setup (oddly, in my view), with a positive rise, but all you have to do is take the faceplate off and flip the internals around and you’re back to a normal negative rise stem. Basically the stem is a hinge, pivoting just in front of the steerer tube, and modulated by a single or pair of elastomers that get wedged into the body with a preload bolt. If you want it firmer you just pop in a harder elastomer, or the opposite for a more plush ride. Very few moving parts, and relatively easy to install if you read the instructions.
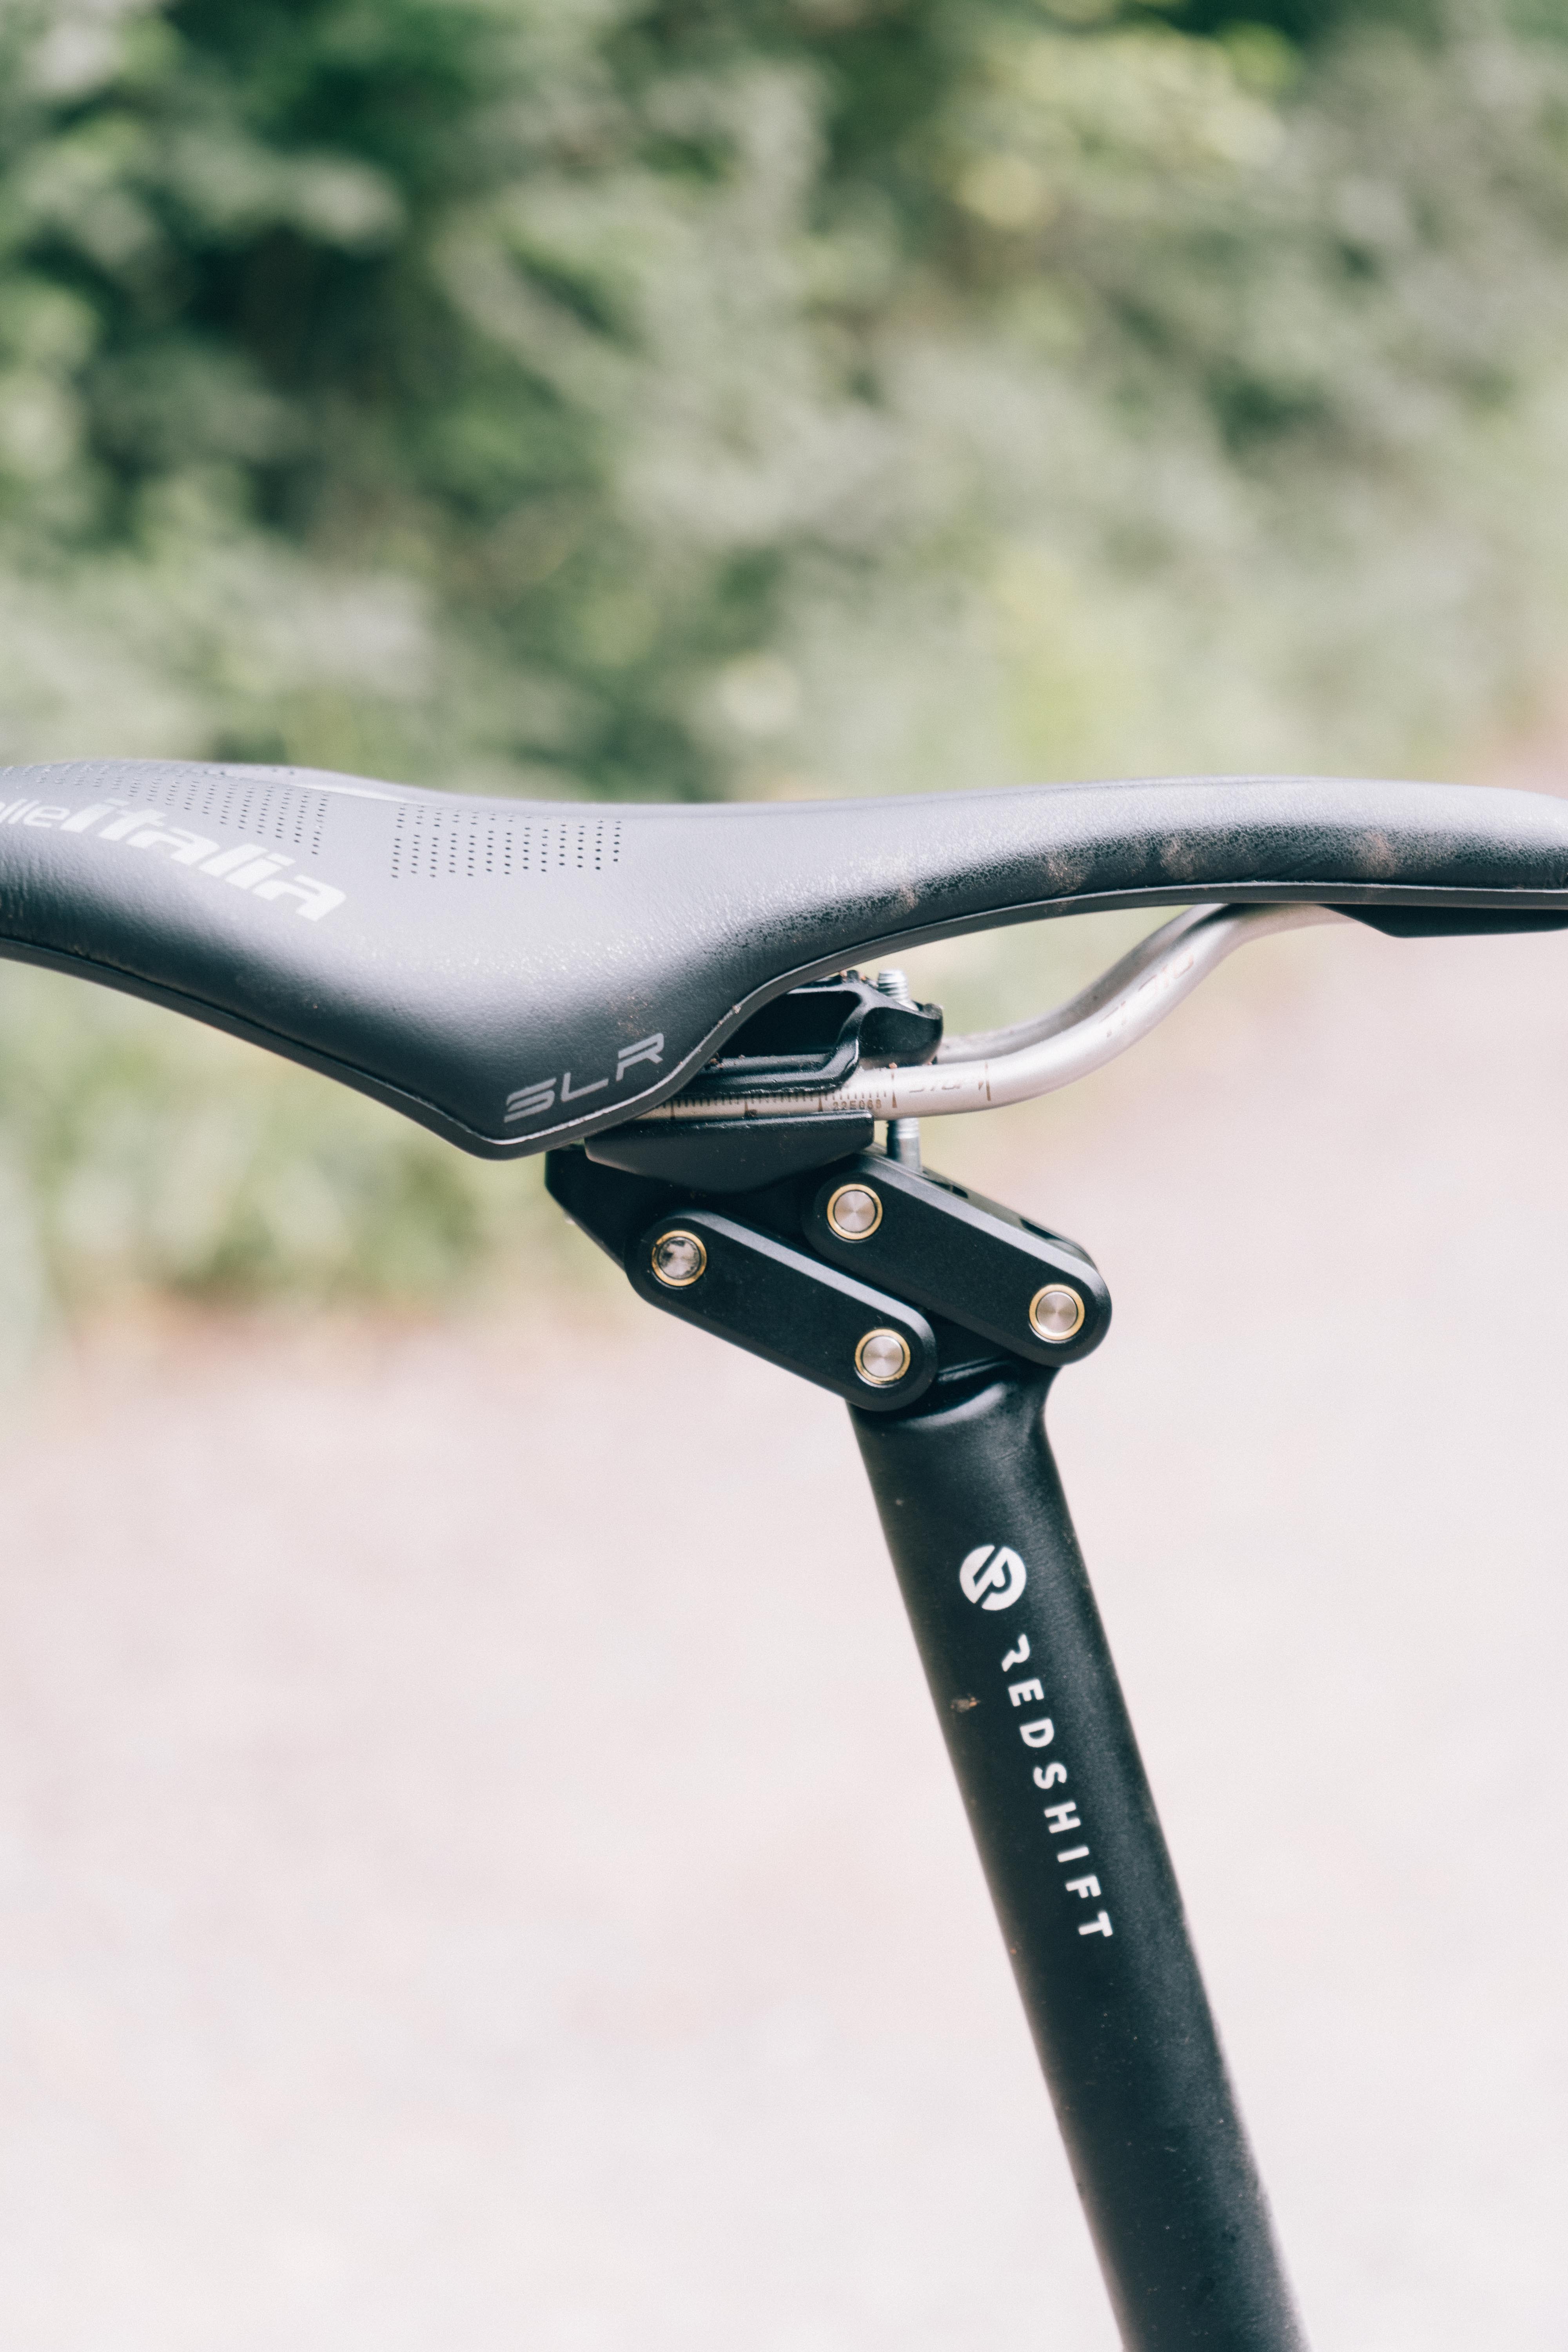
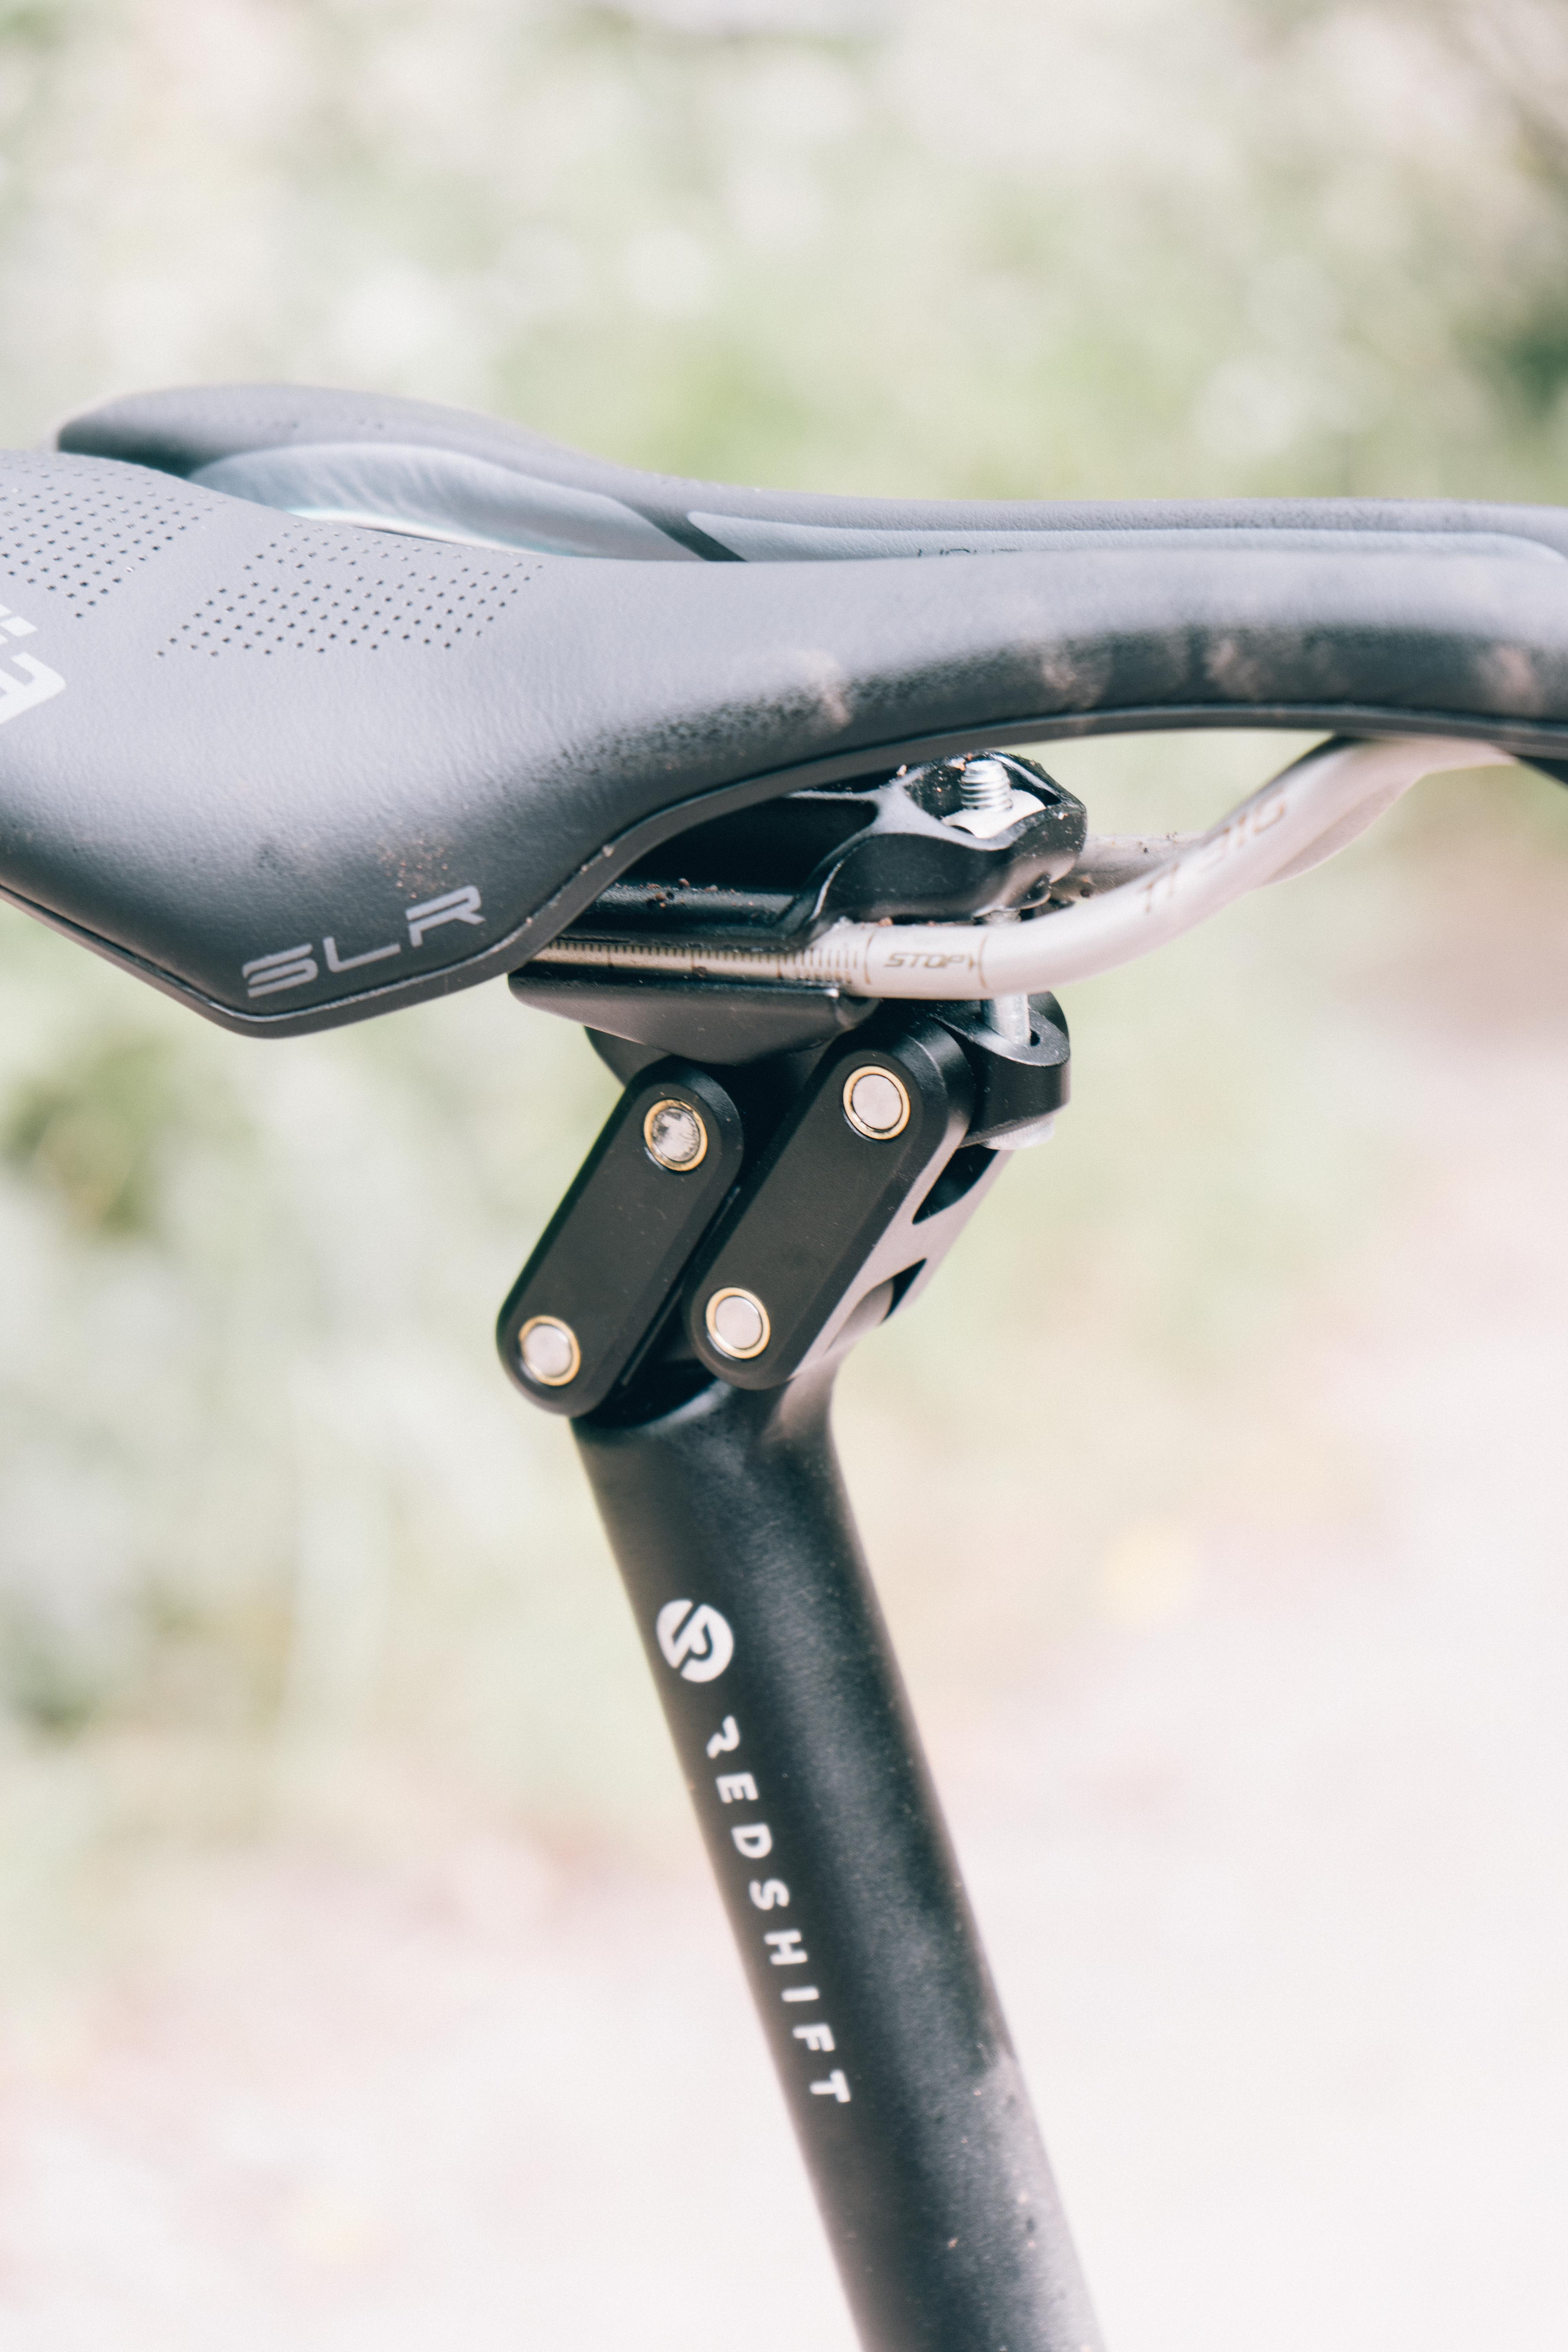
The seatpost is going to turn heads, there’s no two ways about it. It is pretty ugly, but again it’s a very simple mechanical object. The seat clamp is mounted to the top of a parallelogram that initially sits rearward with a setback of 16mm, and is held firmly in place with magnets (and your body weight). Flip the head forward and your saddle moves 50mm further forward, and a small amount upward to maintain the same saddle height - moving the saddle only forward would effectively lower your saddle height.
Performance
Again, let’s get the aero bars out of the way first as they’re the most simple. They are fine. The quick-release clamp is novel, if a little ugly, but it does actually mean you can remove and install a set of aero bars in a repeatable position in a matter of seconds. If you’re swapping from triathlon to road riding all the time then they probably do make sense, but leaving the clamps on even without the bars still removes a load of real estate for lights, computer mounts etc. I was able to get a decently comfortable position, and they were very easy to set up, but I think out of the three of them these are the ones that’d be the easiest to swap out for another pair from another manufacturer if you wanted something more aero.
There’s nothing wrong with them at all necessarily, but you’re paying for the quick-release system, and if you aren’t going to quickly release them regularly then you can save a bunch and get a similar pair of permanently mounted ones somewhere else, or some more aero, lighter ones. Once they were on I just left them on. Sure, you miss out on being able to ride in the tops, but other than that having a set of aero bars on your bike isn’t that great a hardship, and with an ultra racing viewpoint, if you’re training for or racing one then you’re likely to just have them on your bike all the time anyway.
The ShockStop stem is a funny one. The suspension feel is a little like having an underinflated front tyre when riding in the hoods, and there is absolutely no rebound damping, so the harder you bump down the faster you’ll come back up. It does, in the hoods, do a decent job of taking the chatter out of broken surfaces and light gravel, but on really lumpy terrain I found it would spring back up so hard that it would bang into the hard-stop. The other issue is that if you ride in the drops a lot, either generally but especially for lumpy descents, you get no suspension at all, as the way the forces act you’re effectively rotating the bars rearwards as you press down, acting against the way the stem wants to move. A parallelogram system should work better in this regard, though I have yet to try one out. It does also rotate the wrists forward as it sags, but in reality this isn’t something that proved overly annoying. There is, naturally, a bit of bob when climbing out of the saddle, and no lockout, but once you remind yourself that you haven’t got a flat for the umpteenth time it’s also not something that’s overly troubling.
Now, I didn’t like the stem on its own, but I can absolutely see why I saw so many bikes fitted with one for the Transcontinental. Aero bars over anything but smooth tarmac can be scary, even with gravel-volume tyres, but add in the ShockStop stem and things are improved immeasurably. I could happily stay in the skis on tame gravel, over potholes, over tree roots, and all manner of obstacles that would ordinarily see me have to get out and back onto the hoods. If you’re fitting a bike out with aero bars for anything other than an actual time trial, or even for a time trial, and want a little more piece of mind then this really is something worth considering. Redshift has recently launched a 55mm and 70mm option that use a slightly different mechanism, meaning that 55-120mm lengths are catered for, which opens up the system to shorter riders too.
Finally, the seatpost. This falls bang smack in the middle of the category labelled “if it looks stupid but it works, it ain’t stupid”. Yes, it’s ugly, and yes it works amazingly well. Set the saddle up in the rearward position at your normal saddle height and setback and it feels like a normal seatpost. There’s no chatter, no rattle, no movement at all, and you don’t even have to look at it, which is an added bonus. Hit a nice flat section and decide you want to get into the skis? Simply grab the nose of the saddle from between your legs and lift up and the whole thing releases and shifts into the aero position with ease and a satisfying clunk. Here it’s a world of difference from just using aero bars, and puts far less strain on your lower back.
When it’s time to get out of the skis it’s even easier. Simply clench your inner thighs together and you can hop the saddle back into its rearward position basically instantly. One thing to watch out for is that if, while in the skis, you want to move back in your saddle, it’s best to lift your bottom off the saddle and move it back rather than trying to slide, as a couple of times I accidentally flipped the post back into its normal position with a surprising clunk.
One added benefit that isn’t shouted about in the marketing material is that the seatpost will also make your gravel bike a far more adept climber. Steepening the seat angle as it does meant I could stay seated on steep climbs where I’d ordinarily have to get out of the saddle and risk losing traction. So good was it in this regard that, if you’re regularly tackling techy climbs, it’s almost worth considering as a standalone product here. It’s also Di2 battery-friendly, which a lot of unusual seatposts (mostly suspension and dropper ones) aren't.
Value
As a series of standalone products the value proposition isn’t all that great. I actually think for what you pay the aerobars don’t represent a great value proposition given you can get similar ones for half the price if you forego the quick release.
The seatpost and stem on the other hand I think, provided you are actually using them with aero bars, add enough in terms of performance to more than justify their cost. They are specialist bits of kit, and while I wouldn’t necessarily buy the suspension stem on its own, as a part of the system it works excellently.
Verdict
Greater than the sum of its parts, is the short version. The aero bars worked fine but I didn’t find the quick-release aspect of them overly useful. The suspension stem has its drawbacks as a standalone item, but when used in conjunction with aero bars (these or any others) and the dual-position seatpost you create a system that allows you to stay aero and be more comfortable over far rougher terrain than would be possible with a nominally ‘normal’ setup. Specialist kit, slightly niche, but for its intended purpose it mostly works very well indeed.
Tech Specs
- Price (stem): £189.99 / $189.99 / €219.99
- Price (aero bars): £199.99 / $199.99 / €229.99
- Price (seatpost): £199.99 / $199.99 / €229.99
- Weight: 400g (seatpost), 290g (110mm stem), 650g (bars)


