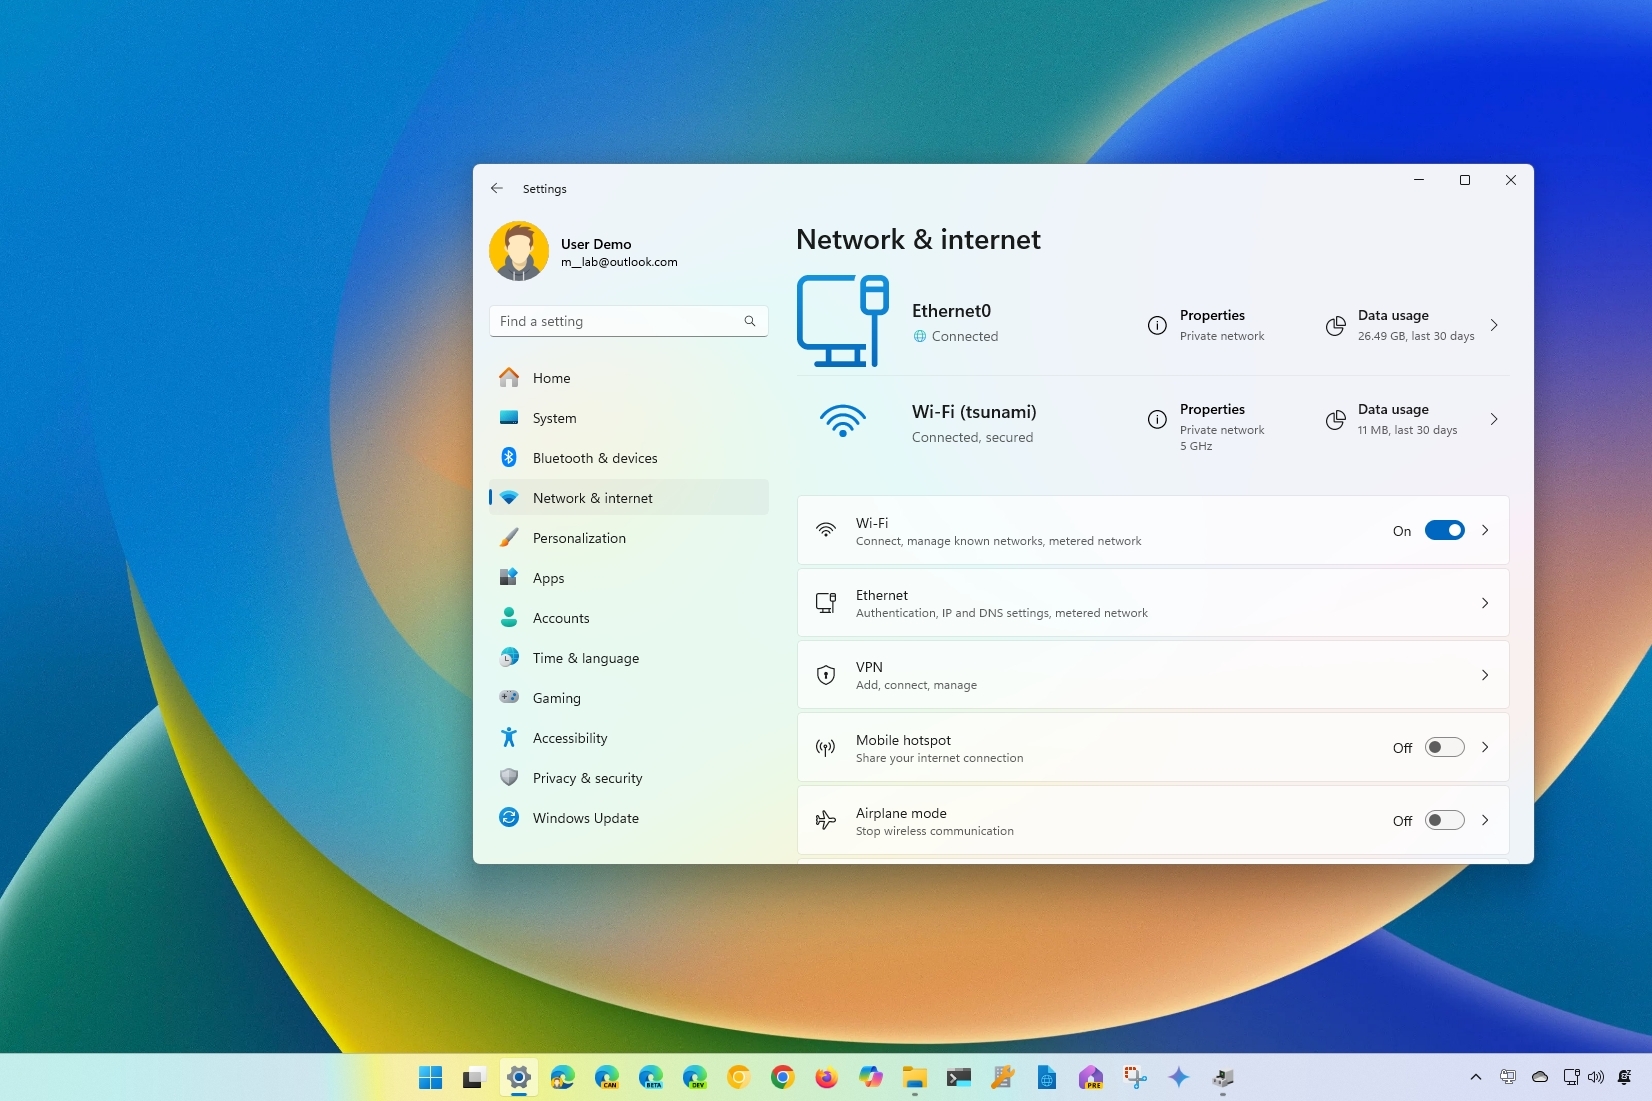
Although Windows 11 can detect and configure network adapters automatically, you may still need to perform additional steps to connect to a wireless network, enable specific features, review configurations, and troubleshoot problems.
In previous versions, you needed to use Control Panel to manage most aspects of Wi-Fi and Ethernet adapters. However, on Windows 11, you can now configure the majority of the networking settings and features from the "Network & internet" section. For example, you can now enable or disable network adapters and configure DNS over HTTPS to improve security. It's a lot easier to set a static or dynamic IP address, configure data limits, reset the adapters to fix most problems, and more.
In this how-to guide, you will learn the different ways to manage network adapter settings through the Settings app.
How to enable or disable network adapter on Windows 11
To enable or disable a network adapter, use these steps:
- Open Settings.
- Click on Network & internet.
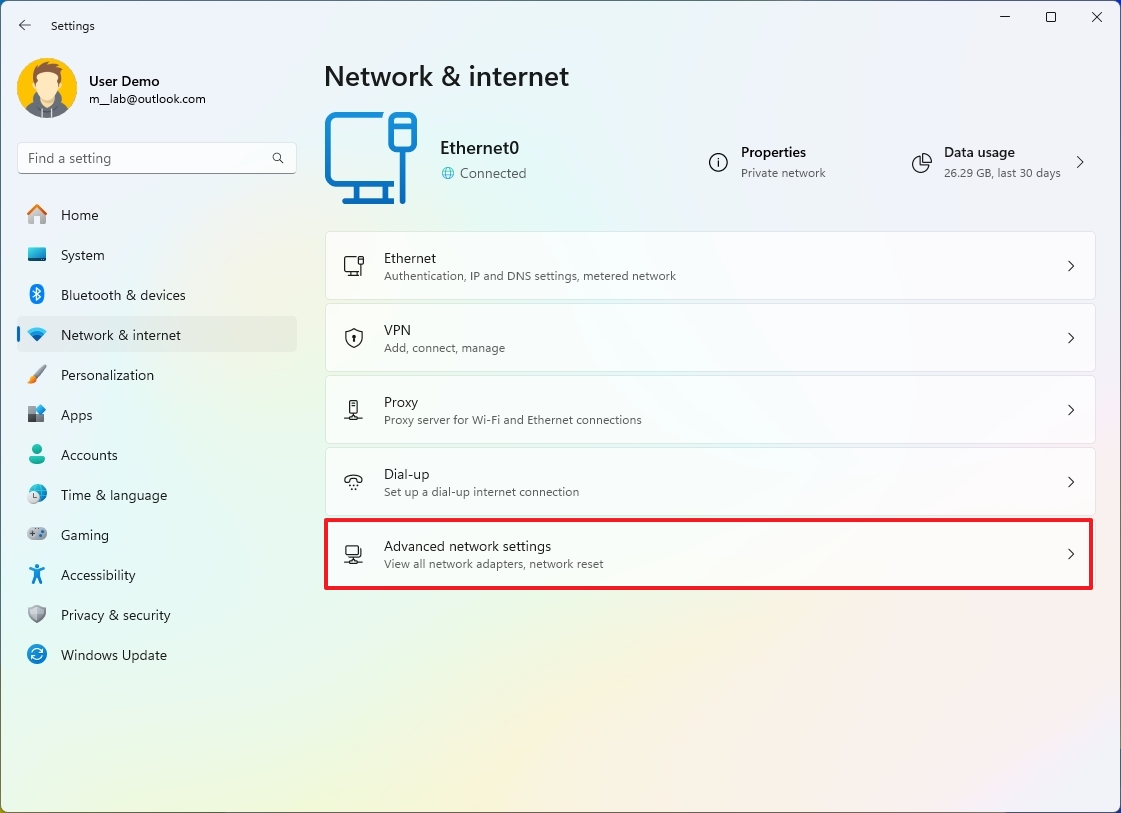
- Click the Advanced network settings page on the right side.
- Click the Disable button to turn off the network adapter under the "Network adapters" section.
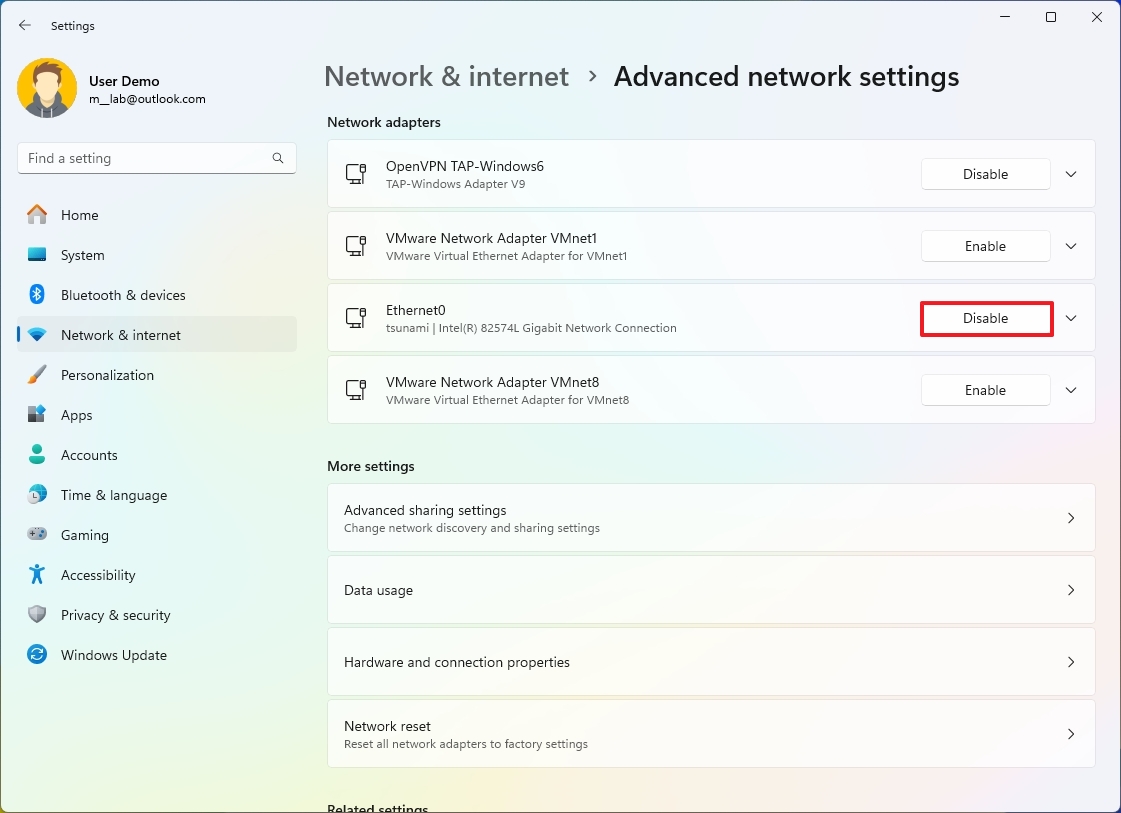
- Click the Enable button to turn on the network adapter under the "Network adapters" section.
Once you complete the steps, the adapter will disable and no longer be available for the system. The adapter will again be available to provide networking functionalities if you enable the option.
How to change network profiles on Windows 11
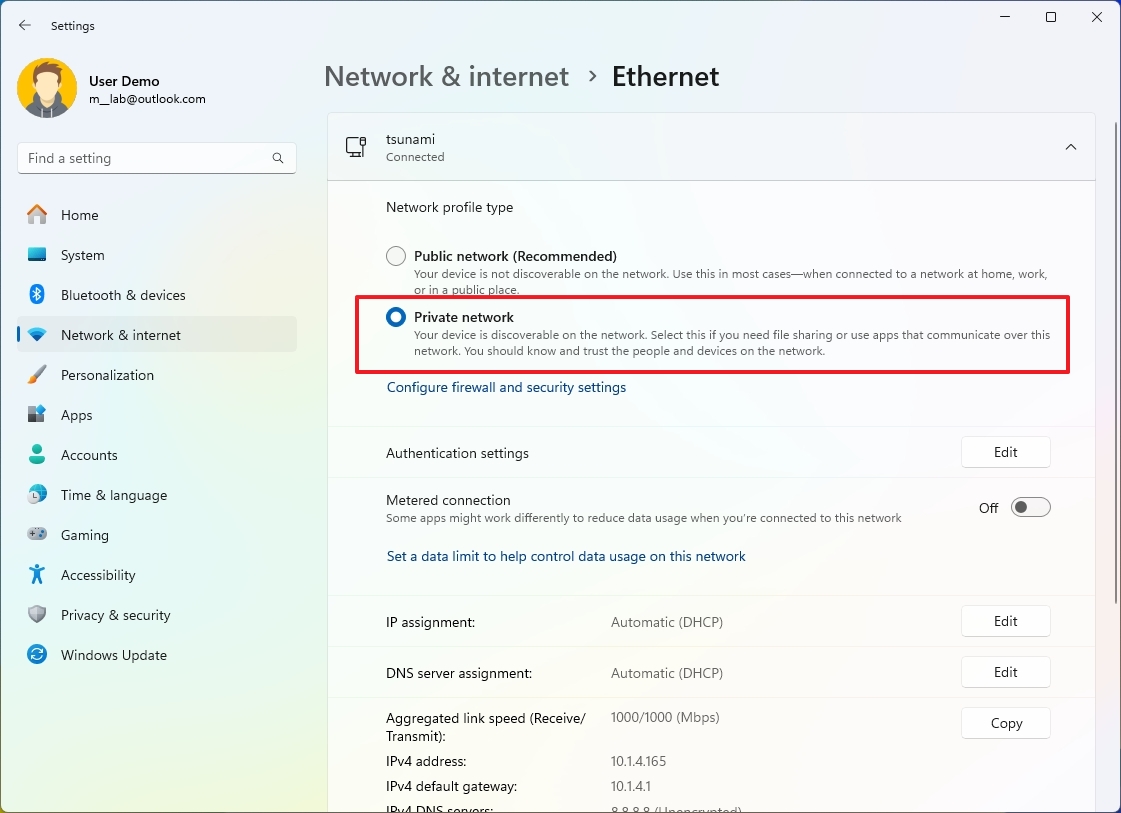
On Windows 11, changing the network profile type allows you to increase the networking security and make it easier to share files and other services with another computer in the network.
Ethernet connection
To make a network connection public or private, use these steps:
- Open Settings.
- Click on Network & internet.
- Click the Ethernet page on the right side.
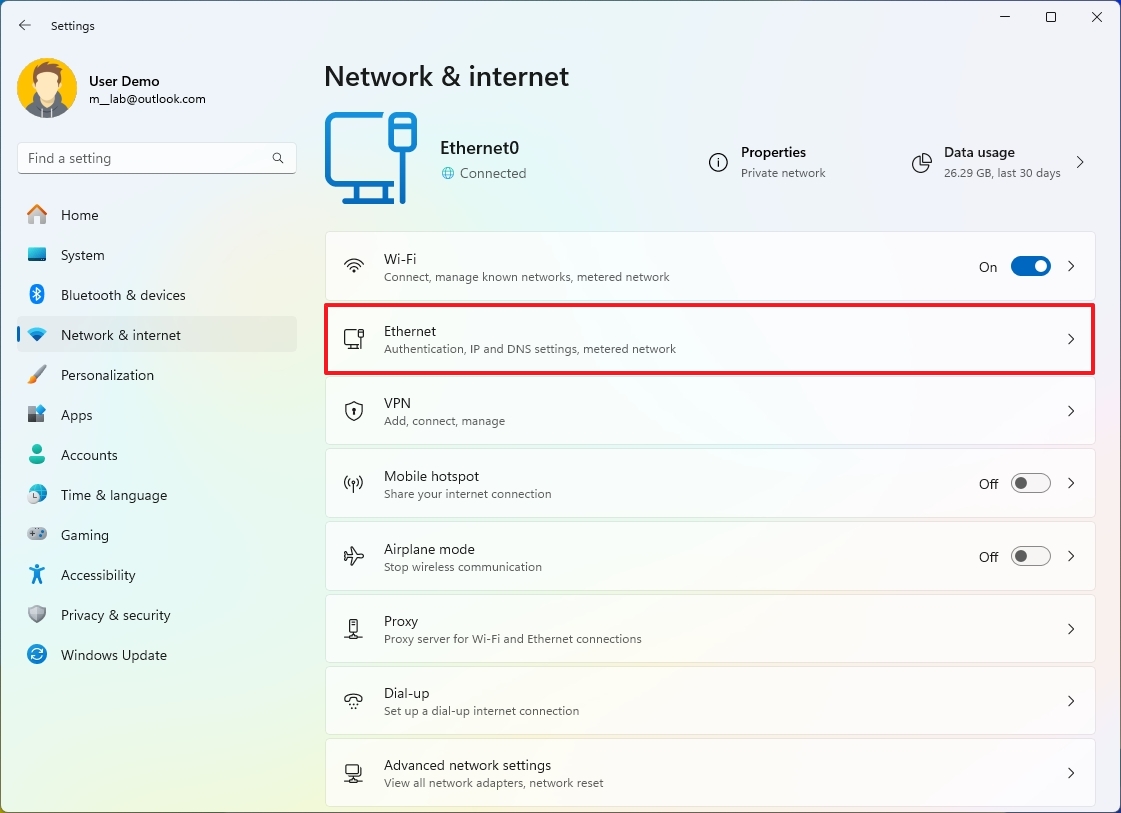
- Select the profile type under the "Network profile type" section:
Wi-Fi connection
To change the network profile type for a Wi-Fi connection, use these steps:
- Open Settings.
- Click on Network & internet.
- Click the Wi-Fi page on the right side.
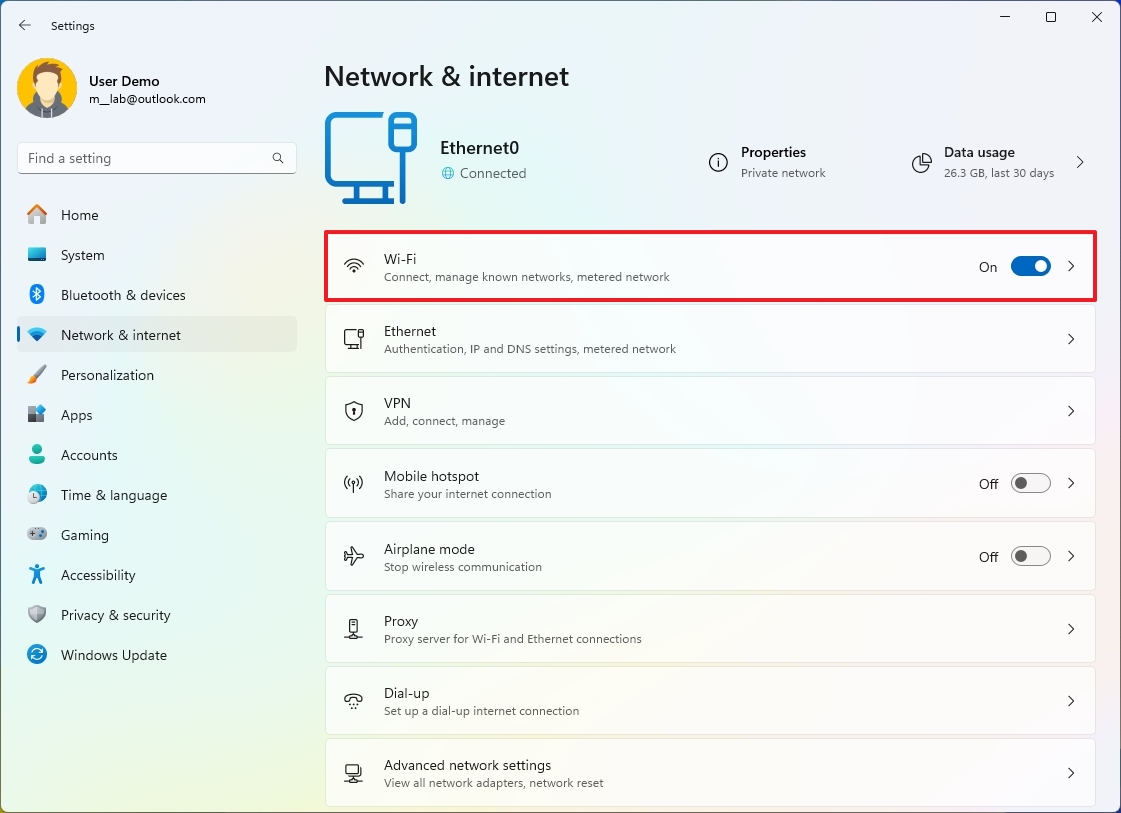
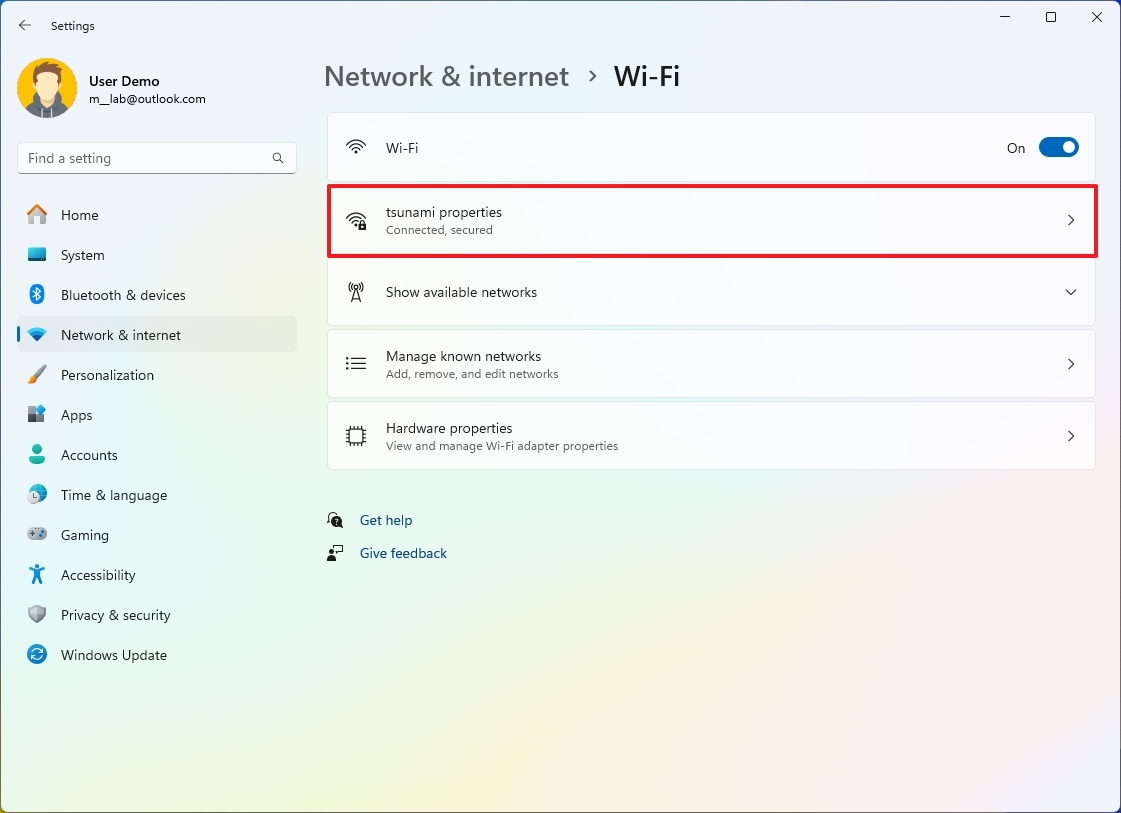
- Click the connection properties setting.
- Quick note: The device must be already connected to the network to see the option
- Select the profile type under the "Network profile type" section:
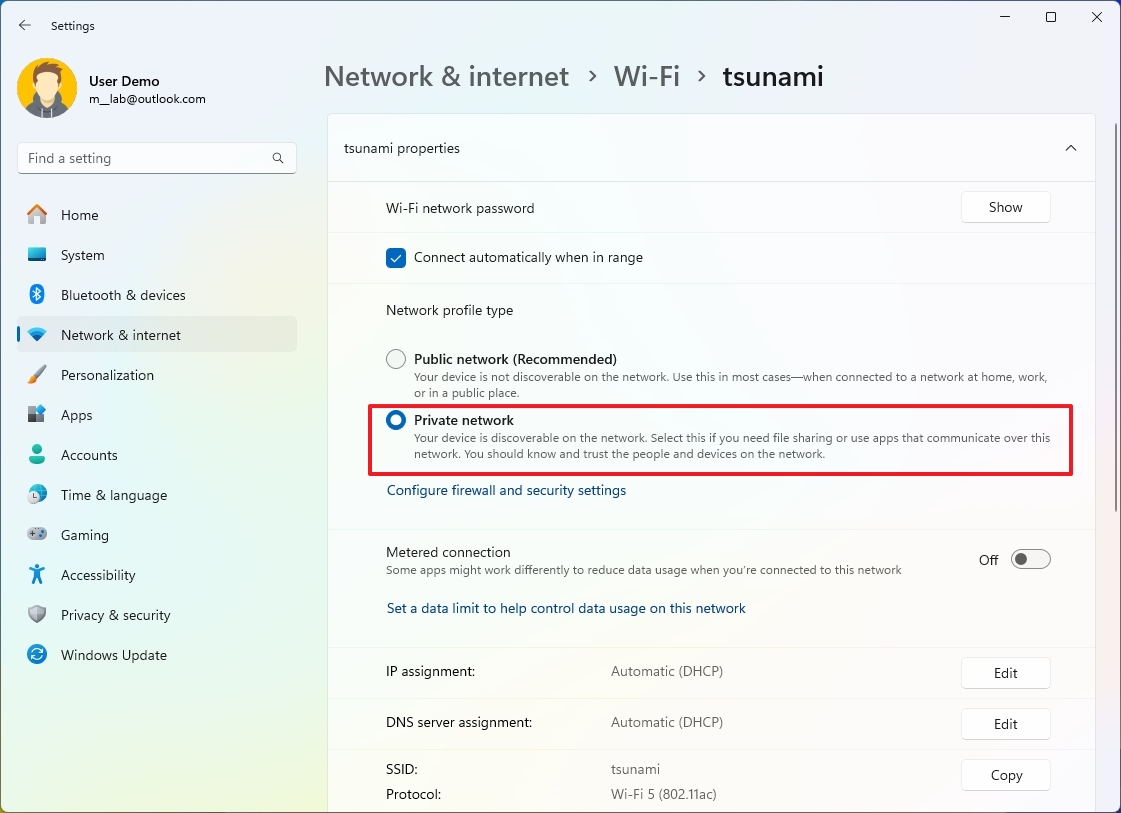
After you complete the steps, depending on the profile you selected, the device will not be discoverable or be visible to other devices to access files and other services.
How to make network connection metered on Windows 11
A metered connection reduces the background data usage of Windows 11 and apps to prevent going over a limited data plan, such as on mobile hotspot plans that only offer a few gigabytes of data.
Ethernet connection
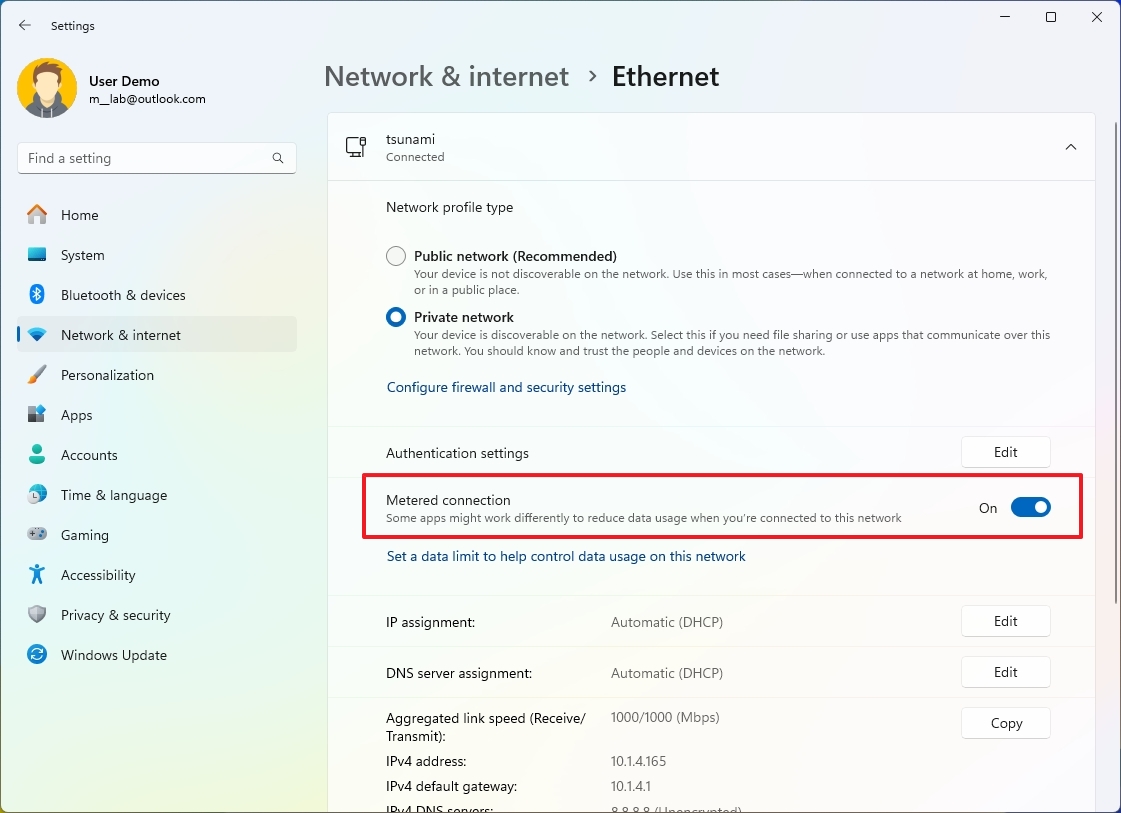
To make an Ethernet connection metered on Windows 11, use these steps:
- Open Settings.
- Click on Network & internet.
- Click the Ethernet page on the right side.

- Turn on the Metered connection toggle switch.
Wi-Fi connection
To make a Wi-Fi connection metered, use these steps:
- Open Settings.
- Click on Network & internet.
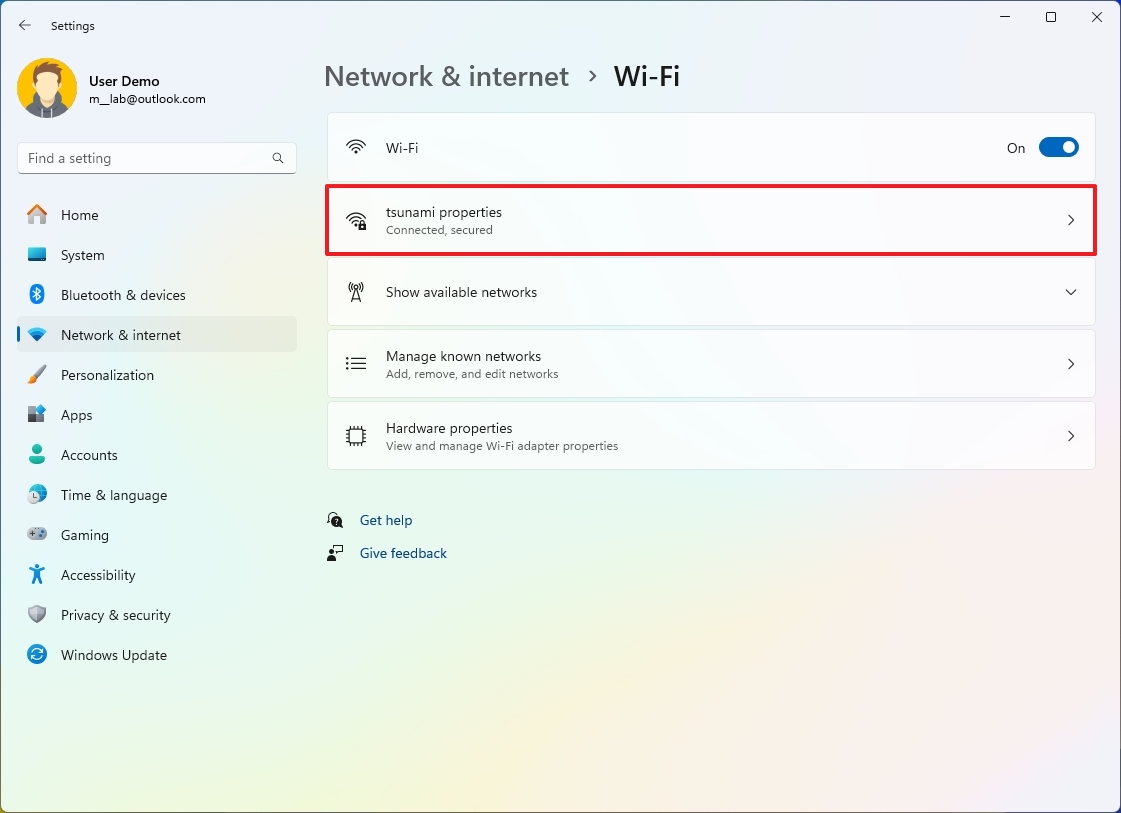
- Click the Wi-Fi page on the right side.

- Click the connection properties setting.
- Turn on the Metered connection toggle switch.
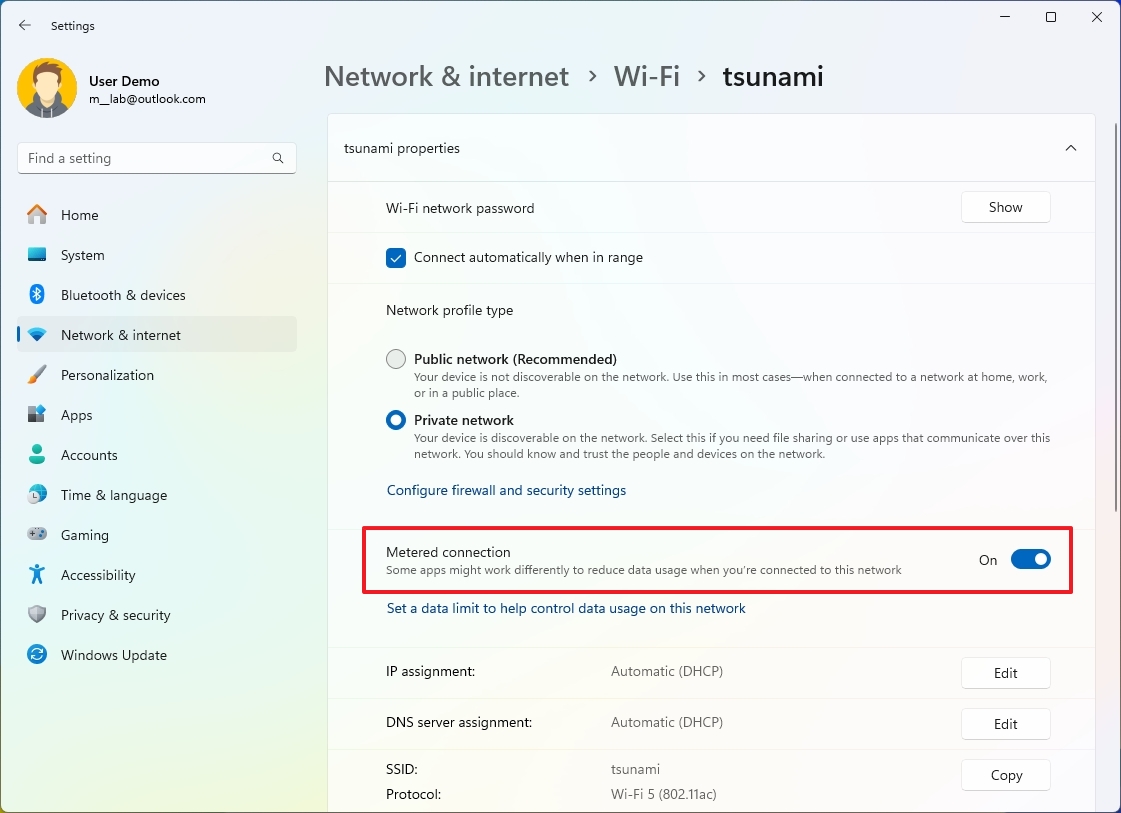
Once you complete the steps, the system and apps will use less data. For example, the operating system won't download cumulative or feature updates, and some features like OneDrive won't sync files to the cloud, and apps won't download updates.
The settings will only apply to the current connection. If you connect to a different network, you must reconfigure the feature as needed.
If you want to disable the feature, you can follow the same steps, but in step 5, turn off the "Metering connection" option.
How to manage known wireless networks on Windows 11
On Windows 11, you can also provision Wi-Fi configurations to make connections easier. You can also delete those connections you no longer use for better management.
Add new Wi-Fi network
To provision a new wireless connection, use these steps:
- Open Settings.
- Click on Network & internet.
- Click the Wi-Fi page on the right side.

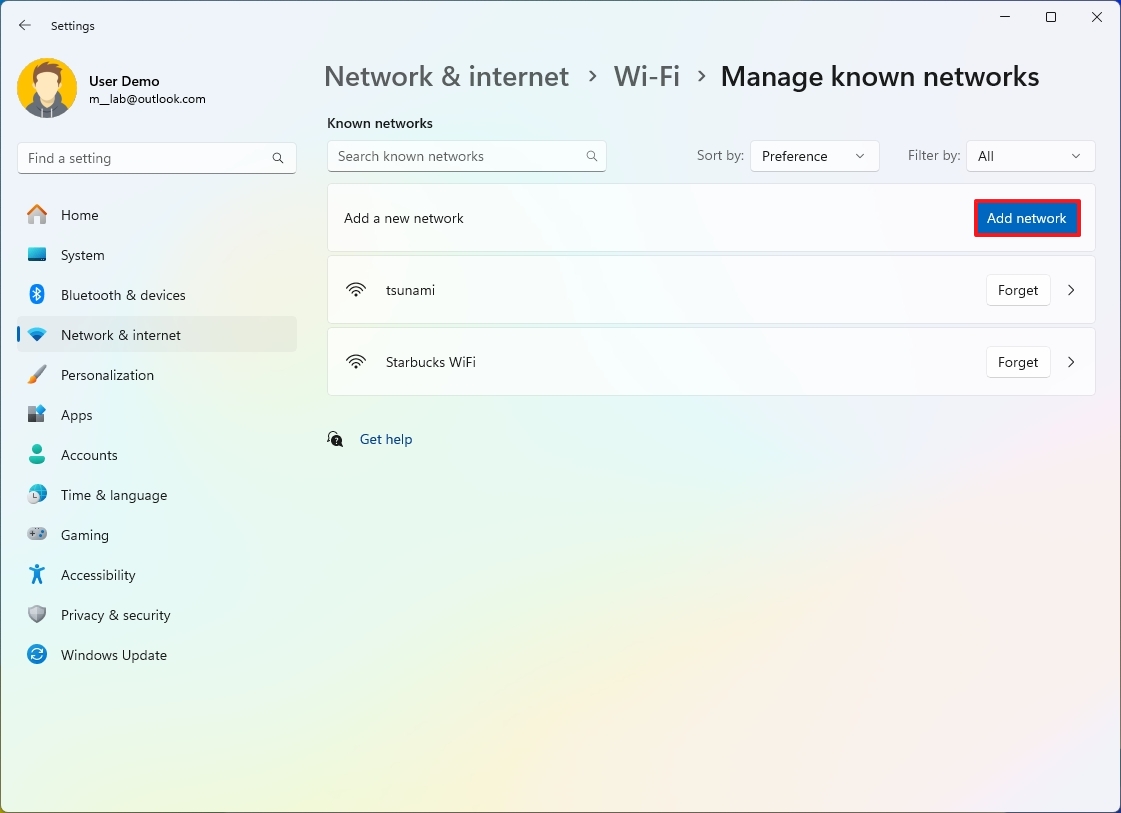
- Click the "Manage known networks" setting.
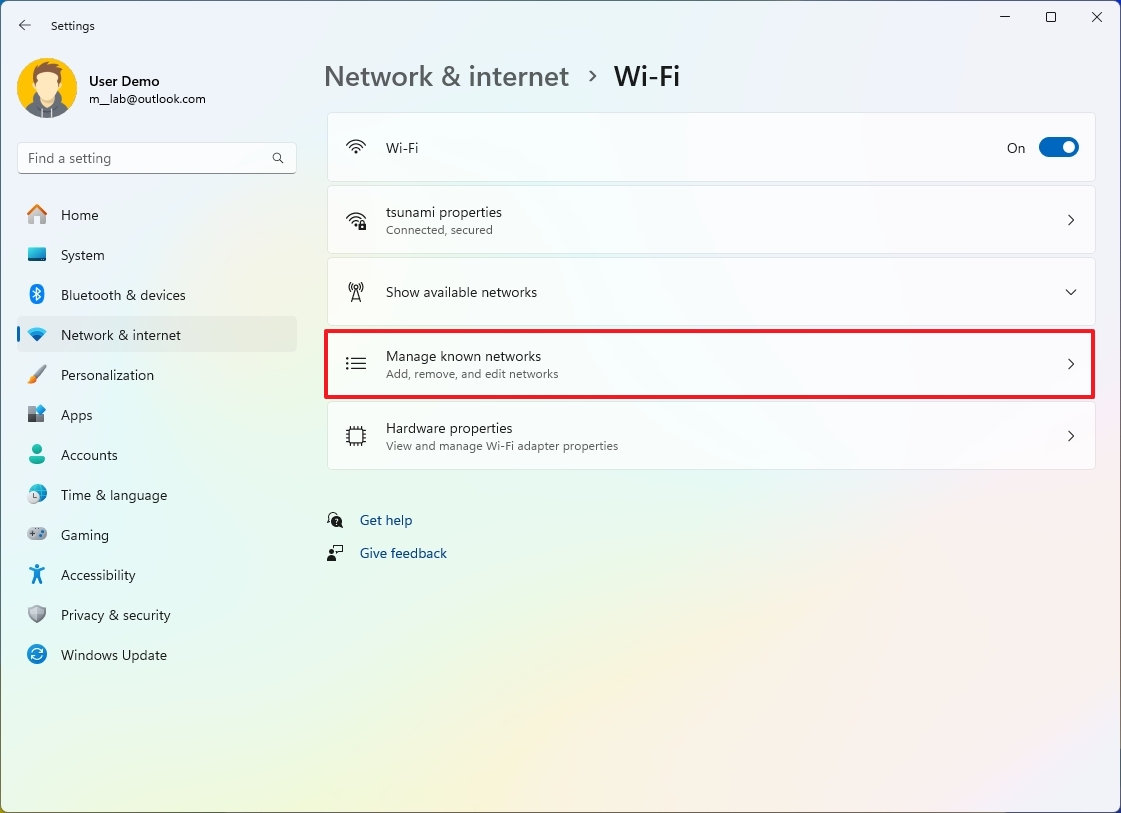
- Click the Add network button.
- Confirm the wireless network name.
- Use the "Security type" setting and select the security authentication method.
- Quick note: This security feature is usually configured on the router or access point. Typically, it would be the "WPA2-Personal AES" option.
- Use the Security key setting and confirm the security key (sometimes referred to as "Wi-Fi password").
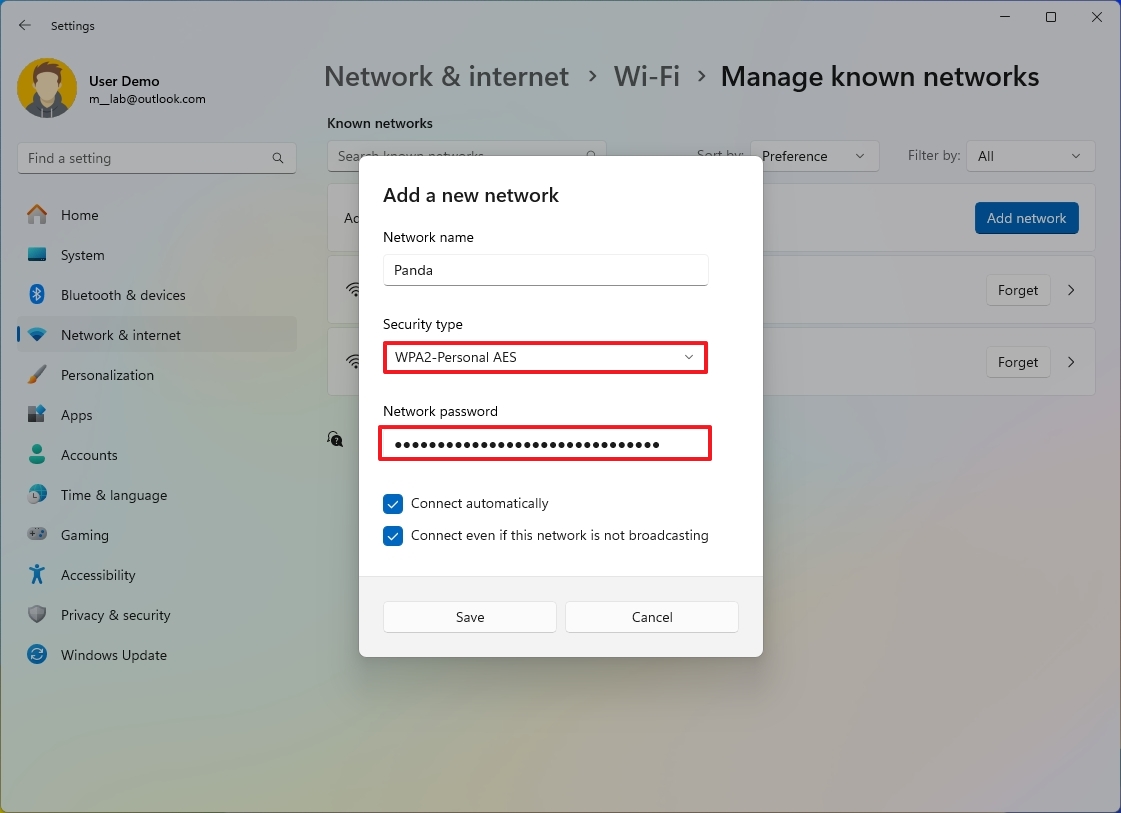
- (Optional) Check the Connect automatically option if you want to automatically connect to the wireless network when it is in range.
- (Optional) Check the "Connect even if this network is not broadcasting" option.
- Quick note: Usually, you can choose the network to connect because it's broadcasting its presence to all devices. However, sometimes, administrators choose not to broadcast the network to remain hidden. This option will let you connect to the wireless network, whether it's broadcasting or not.
- Click the Save button.
After you complete the steps, the network configuration will be applied to the device, and when the access point is within range, the computer will connect automatically without additional steps:
Remove existing Wi-Fi network
To delete a Wi-Fi connection from Windows 11, use these steps:
- Open Settings.
- Click on Network & internet.
- Click the Wi-Fi page on the right side.

- Click the "Manage known networks" setting.

- Click the Forget button for the network you want to remove.
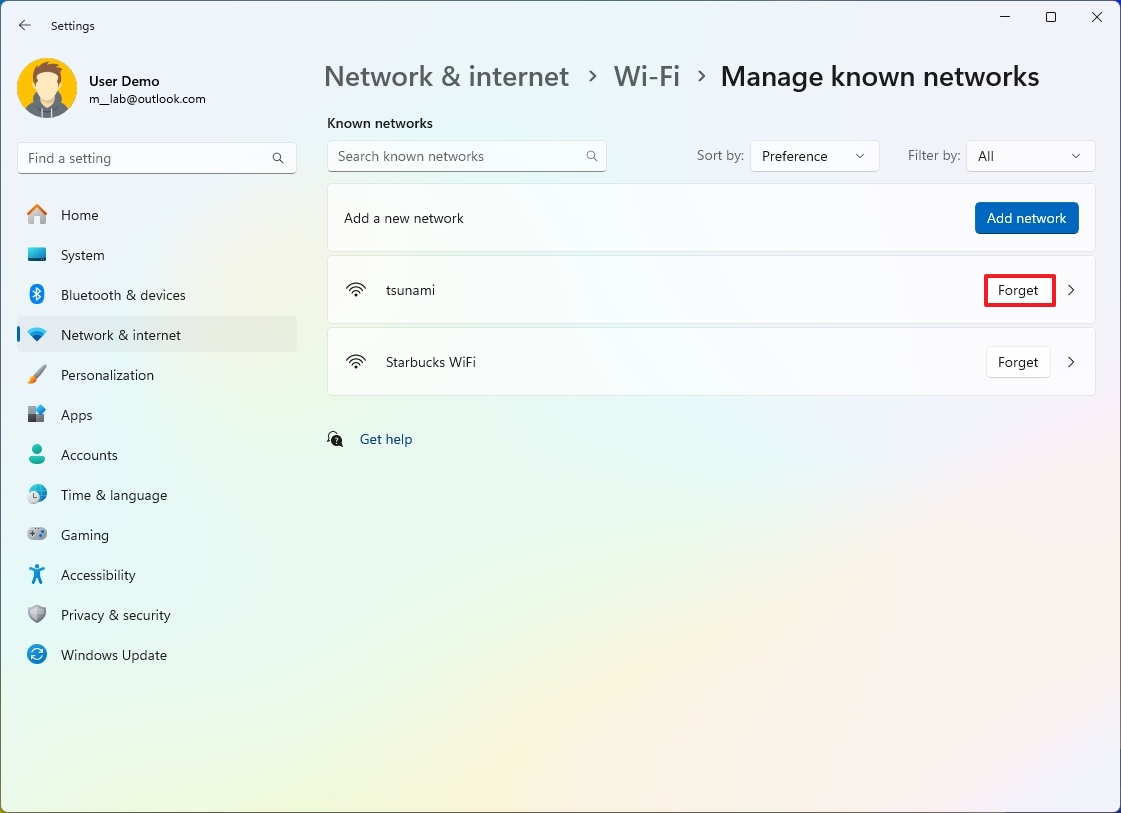
Once you complete the steps, the network configuration will no longer be available on the device.
How to connect to wireless network on Windows 11
To connect a computer to a wireless access point, use these steps:
- Open Settings.
- Click on Network & internet.
- Click the Wi-Fi page on the right side.

- Click the "Show available networks" setting.
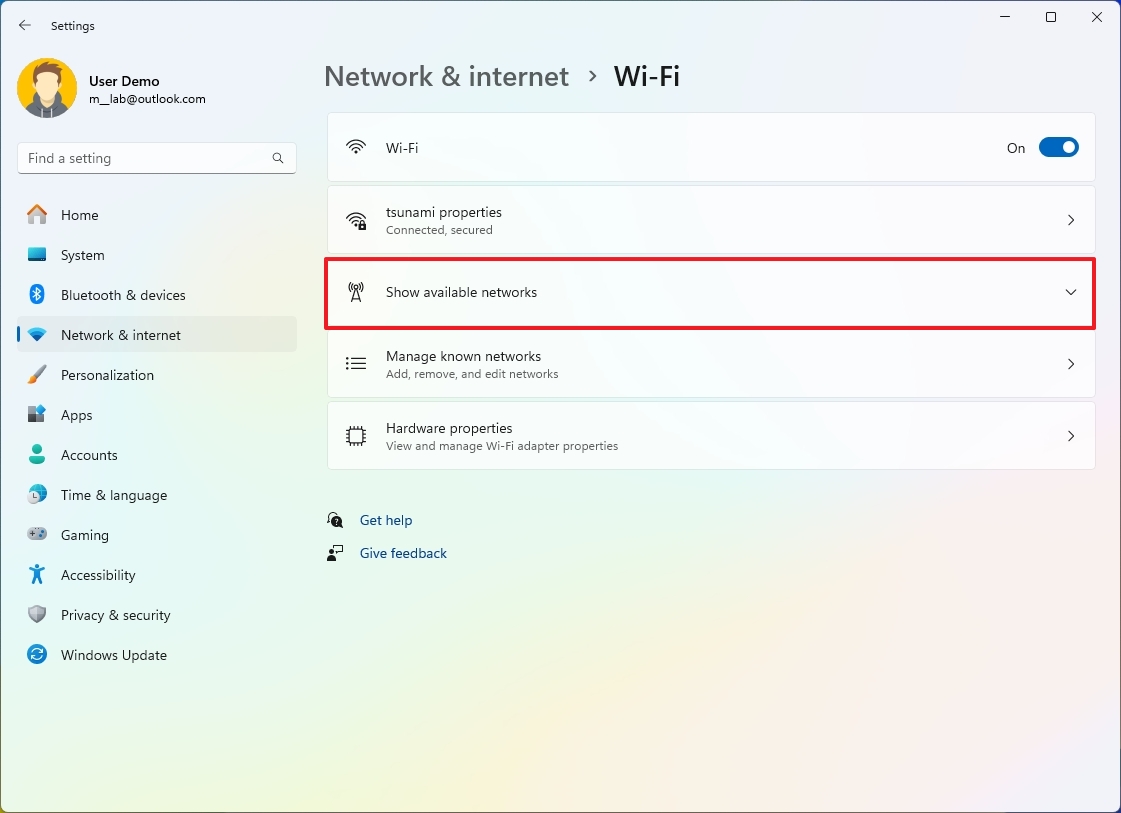
- Select the Wi-Fi network.
- (Optional) Check the Connect automatically option.
- Click the Connect button.
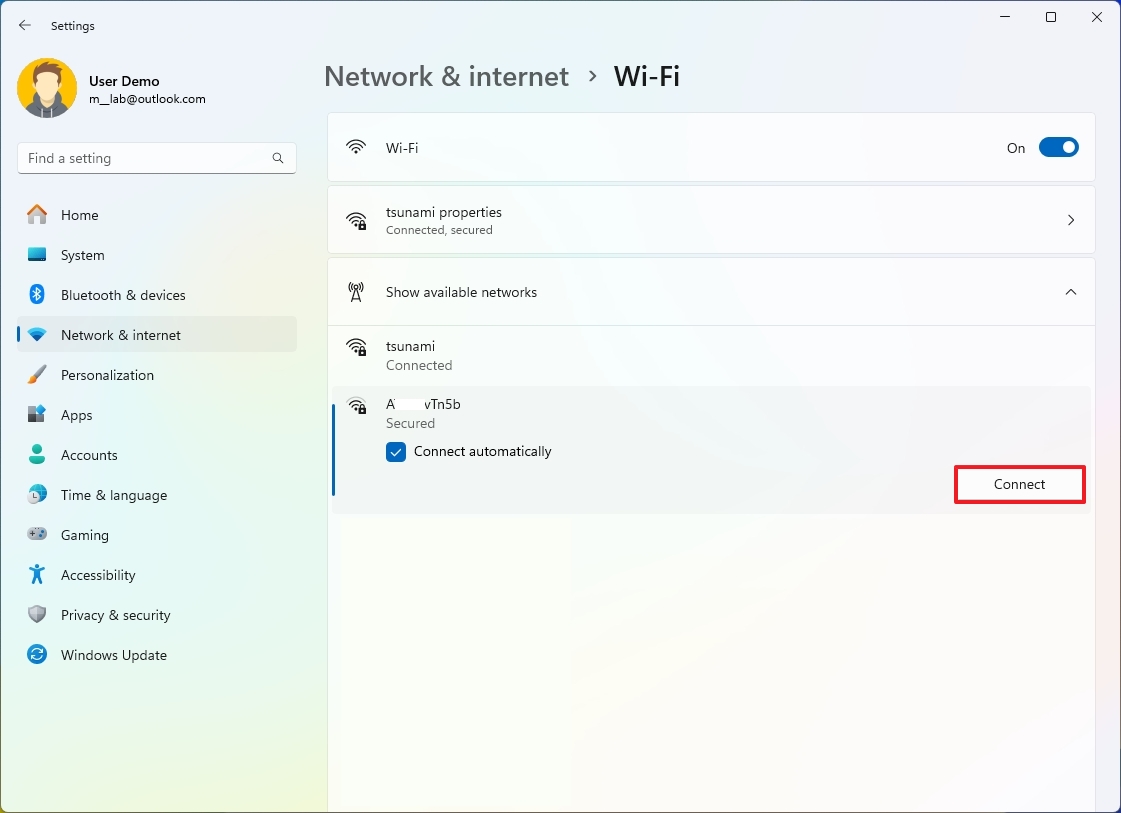
- Confirm the security key (Wi-Fi password).
- Click the Next button.
Alternatively, you can also connect to the wireless network through the network icon in the Taskbar.
How to view wireless networks on Windows 11
To view the Wi-Fi networks in range, use these steps:
- Open Settings.
- Click on Network & internet.
- Click the Wi-Fi page on the right side.

- Click the "Show available networks" setting.

After you complete the steps, you will see a list of the access points within range.
How to share wireless network password on Windows 11
On Windows 11 version 24H2 and higher releases, you can only view the password for an active wireless connection, but you can also share the credentials with other devices using a QR Code.
To share an active wireless connection password, use these steps:
- Open Settings.
- Click on Network & internet.
- Click the Wi-Fi page on the right side.

- Click the properties option for the network connection.

- Click the Show button in the "Wi-Fi network password" setting.
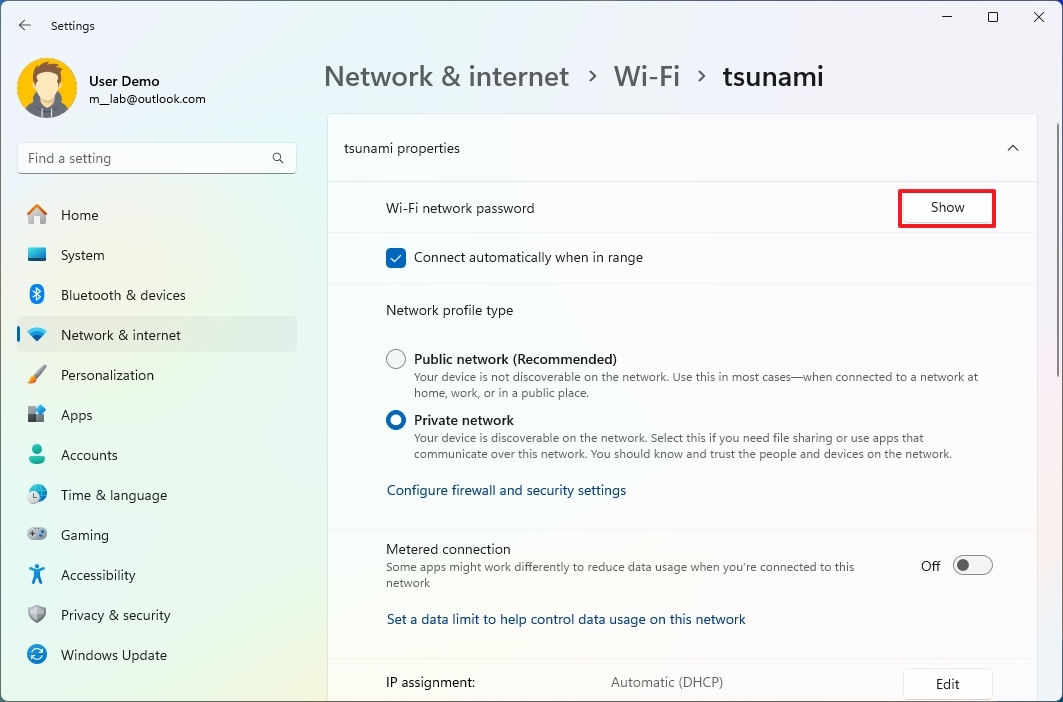
- Confirm the wireless connection password.
- Open the camera app on your phone or another Windows computer and scan the QR Code with the information.
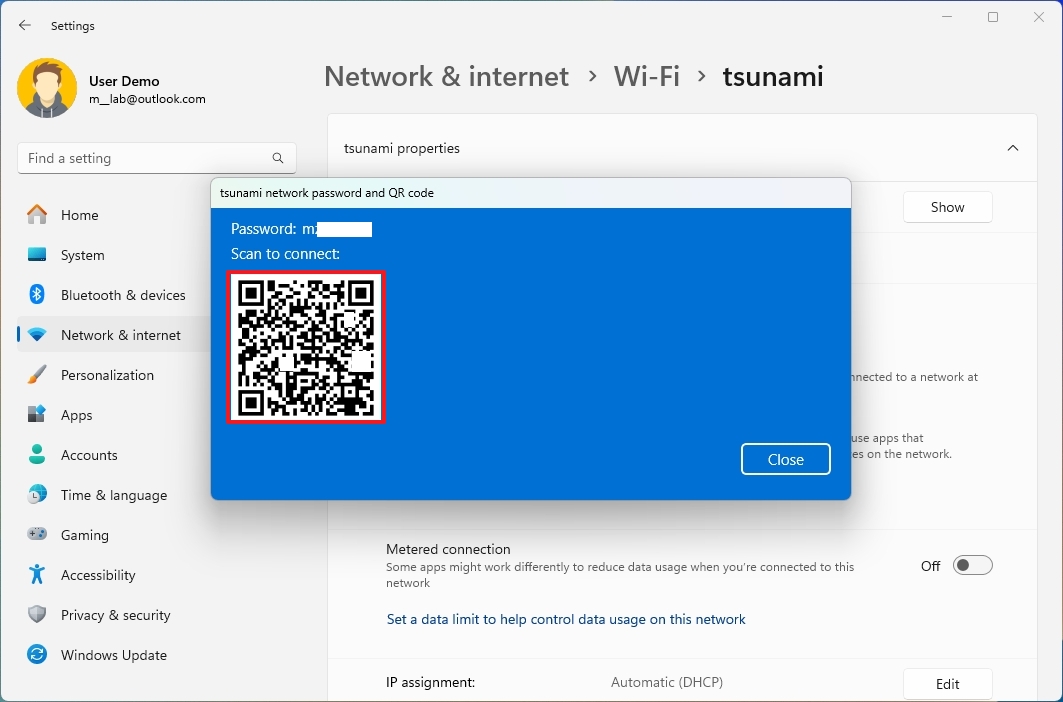
Once you complete the steps, the device will be able to connect without extra configuration.
How to enable or disable wireless connection on Windows 11
To disable or enable wireless connectivity on Windows 11, use these steps:
- Open Settings.
- Click on Network & internet.
- Click the Wi-Fi page on the right side.

- Turn off the Wi-Fi toggle switch.
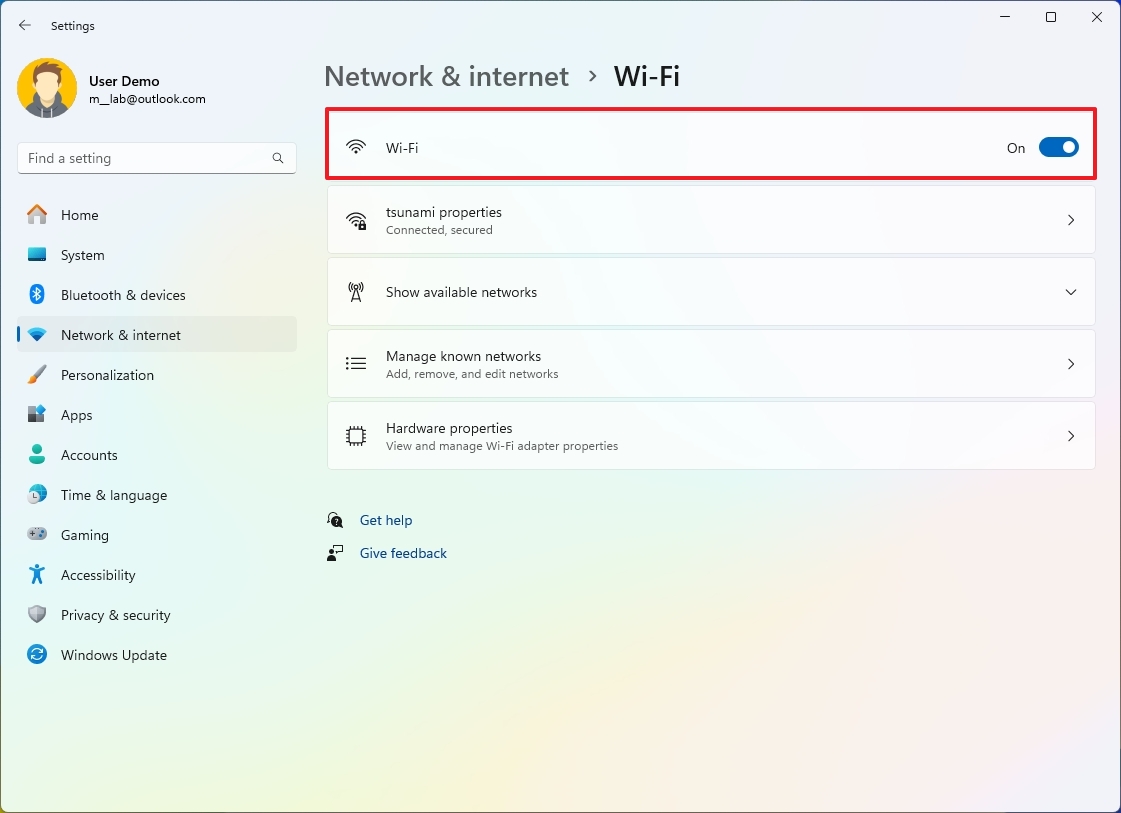
- (Optional) Use the "Turn Wi-Fi back on" setting and select the Manually option to keep the wireless off until you decide to turn it back on. Or use the times (1 or 4 hours or 1 day) to allow the system to reconnect automatically on schedule.
Once you complete the steps, the wireless radios will turn off and connections will not form, but the adapter will continue to be available in the adapter.
How to configure DNS over HTTPS on Windows 11
On Windows 11, DNS over HTTPS (DoH) is a network protocol to encrypt Domain Name System (DNS) queries using the standard Hypertext Transfer Protocol Secure (HTTPS) protocol to safeguard DNS queries, which results in improved security and privacy browsing the internet.
Ethernet connection with DOH
To enable DoH on Windows 11, use these steps:
- Open Settings.
- Click on Network & internet.
- Click the Ethernet page on the right side.

- Click the Edit button for the "DNS server assignment" setting.
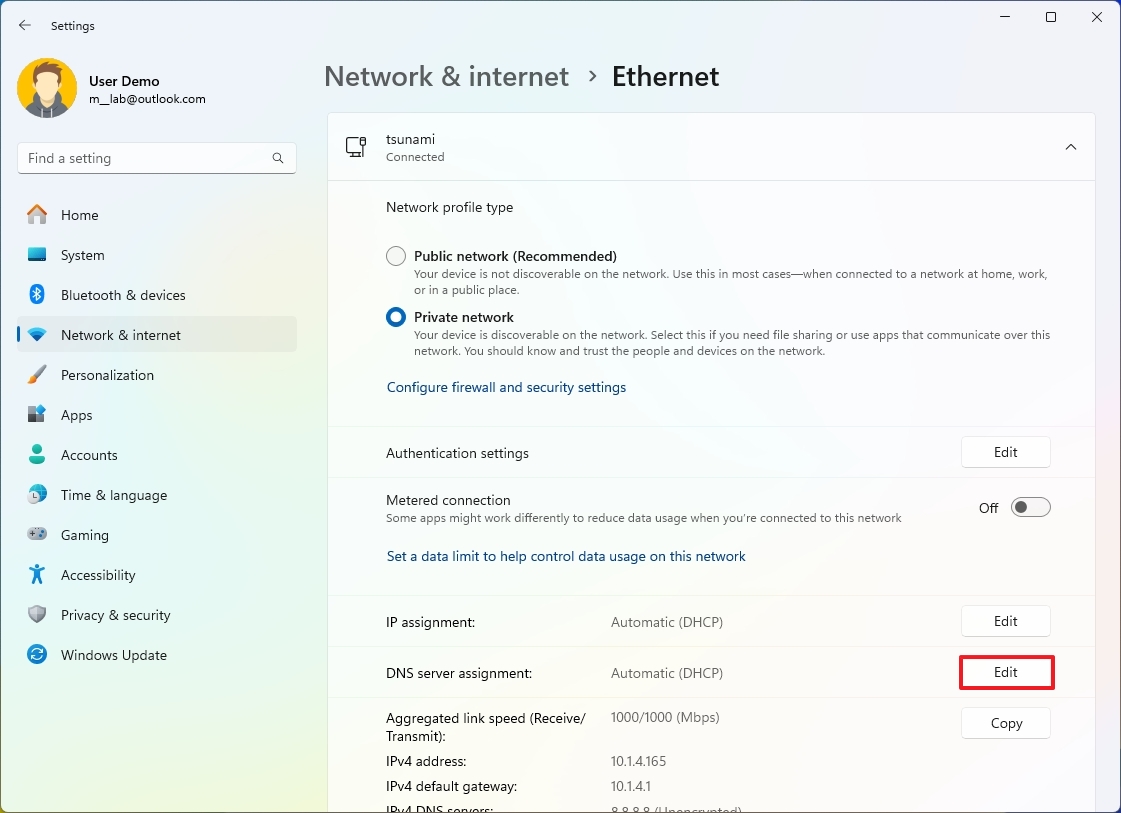
- Select the Manual option.
- Turn on the IPv4 toggle switch.
- Specify the IP address of the server that supports DOH in the "Preferred DNS" setting.
- Choose the "On (automatic template)" option from the "DNS over HTTPS" setting.
- (Optional) Turn on the "Fallback to plaintext" toggle switch to continue sending DNS requests unencrypted if the encryption stops working.
- Quick note: You can learn more about this feature on this Microsoft support website.
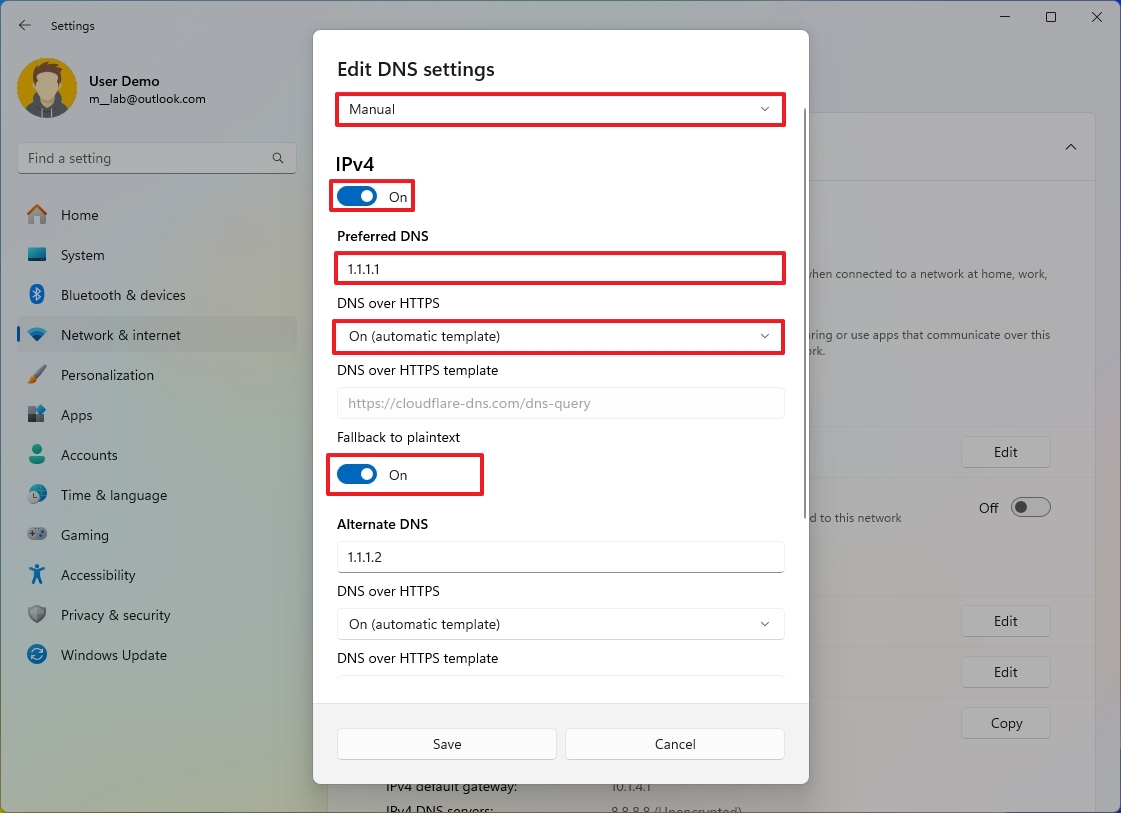
- (Optional) Specify the IP address of the secondary address to use with DNS over HTTPS in the "Alternate DNS" setting.
- Choose the "On (automatic template)" option from the "DNS over HTTPS" setting.
- (Optional) Turn on the "Fallback to plaintext" toggle switch to continue sending DNS requests unencrypted if the encryption stops working.
- (Optional) Turn on the IPv6 toggle switch.
- Specify the IP version 6 address of the server offering DNS over HTTPS in the "Preferred DNS" setting.
- Choose the "On (automatic template)" option from the "DNS over HTTPS" setting.
- (Optional) Turn on the "Fallback to plaintext" toggle switch to continue sending DNS requests unencrypted if the encryption stops working.
- (Optional) Specify the IP version 6 address of the secondary address to use with DNS encryption in the "Alternate DNS" setting.
- Choose the "On (automatic template)" option from the "DNS over HTTPS" setting.
- (Optional) Turn on the "Fallback to plaintext" toggle switch to continue sending DNS requests unencrypted if the encryption stops working.
- Click the Save option.
After you complete the steps, the DNS queries will be sent encrypted over the internet.
Confirm DNS encryption
To confirm if the connection is encrypted, use these steps:
- Open Settings.
- Click on Network & internet.
- Click the Ethernet page on the right side.

- In the IPv4 DNS servers property, you should now see the new address and the Encrypted status.
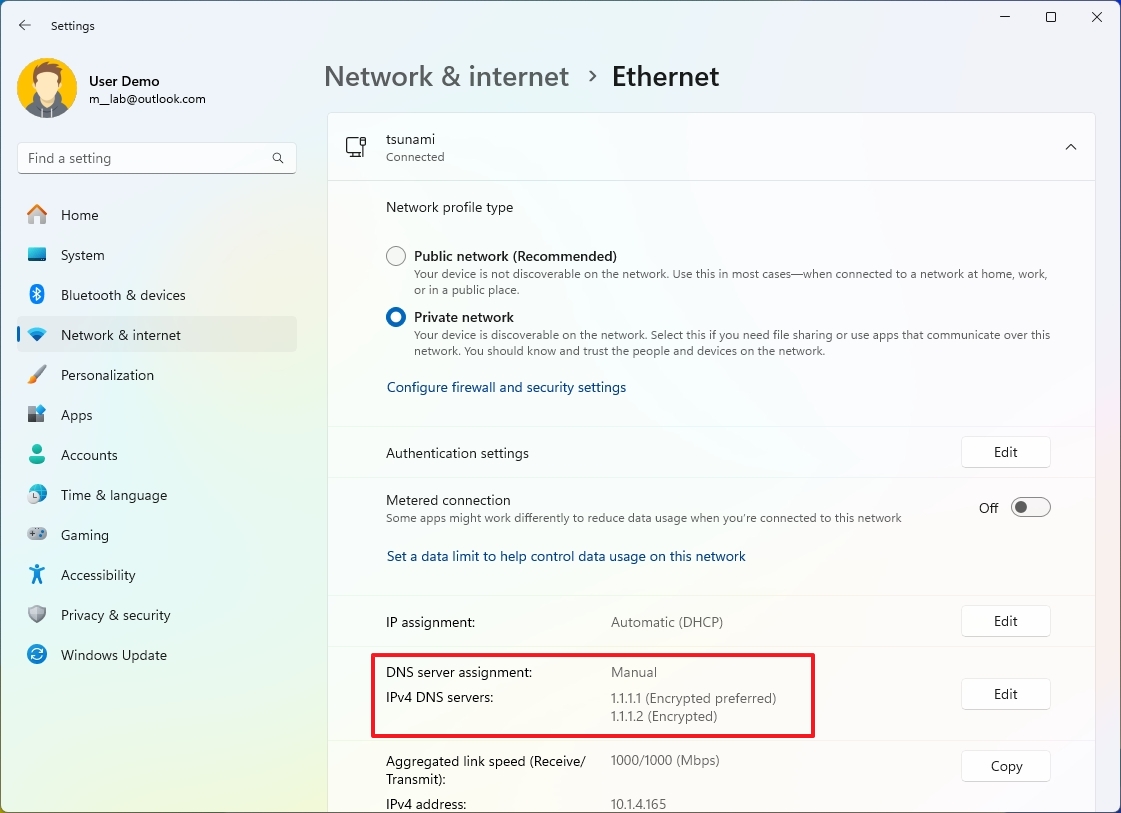
- In the IPv6 DNS servers property, you should now see the new address and the Encrypted status (if applicable).
Once you complete the steps, if you see the "Encrypted" (or "Encrypted preferred") status, DNS over HTTPS will work as expected.
Wi-Fi connection with DOH
To configure DOH for a wireless connection, use these steps:
- Open Settings.
- Click on Network & internet.
- Click the Wi-Fi page on the right side.

- Click the Hardware properties setting.
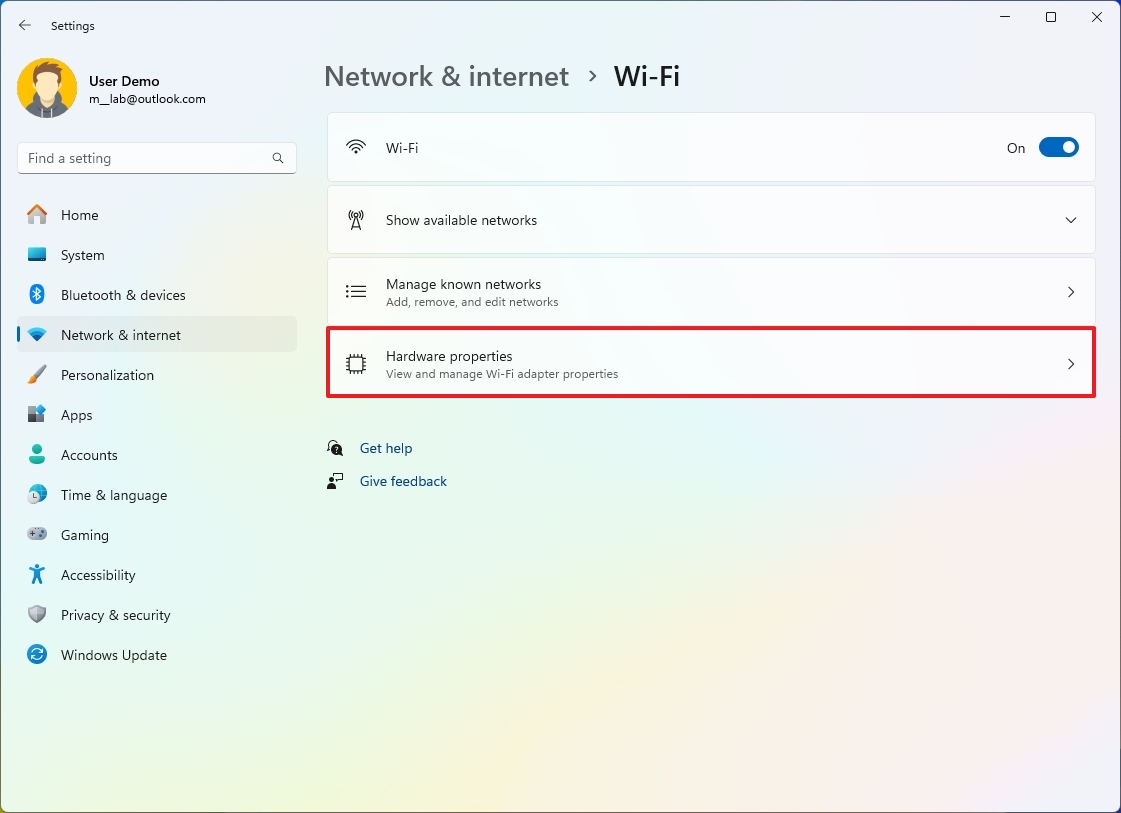
- Click the Edit button for the "DNS server assignment" setting.
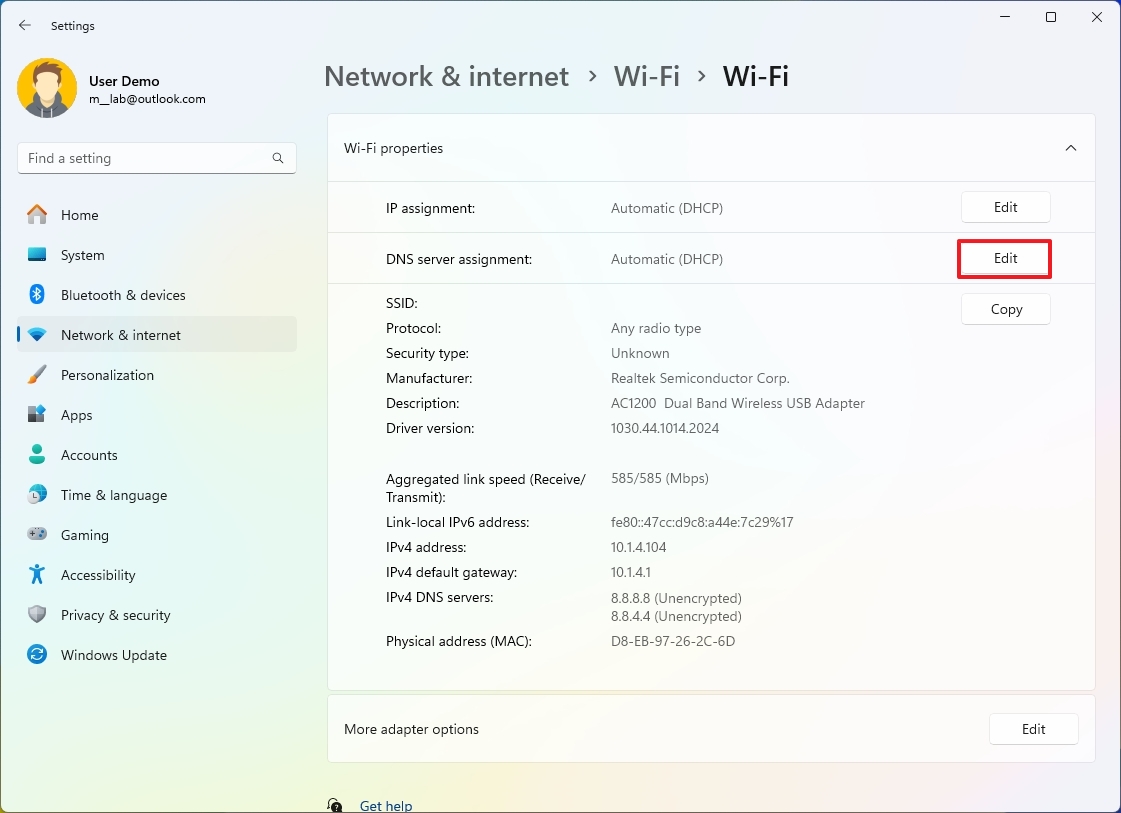
- Select the Manual option.
- Turn on the IPv4 toggle switch.
- Specify the IP address of the server that supports DOH in the "Preferred DNS" setting.
- Choose the "On (automatic template)" option from the "DNS over HTTPS" setting.
- (Optional) Turn on the "Fallback to plaintext" toggle switch to continue sending DNS requests unencrypted if the encryption stops working.
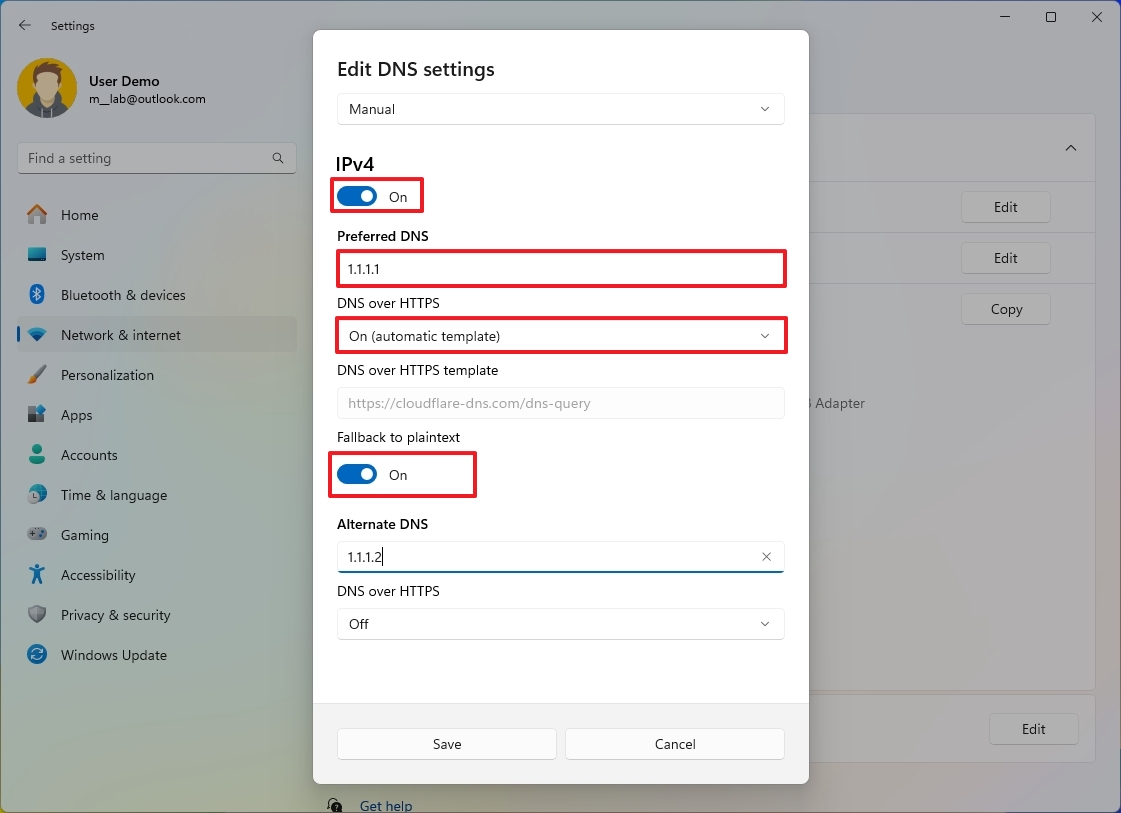
- (Optional) Specify the IP address of the secondary address to use with DNS over HTTPS in the "Alternate DNS" setting.
- Choose the "On (automatic template)" option from the "DNS over HTTPS" setting.
- (Optional) Turn on the "Fallback to plaintext" toggle switch to continue sending DNS requests unencrypted if the encryption stops working.
- (Optional) Turn on the IPv6 toggle switch.
- Specify the IP version 6 address of the server offering DNS over HTTPS in the "Preferred DNS" setting.
- Choose the "On (automatic template)" option from the "DNS over HTTPS" setting.
- (Optional) Turn on the "Fallback to plaintext" toggle switch to continue sending DNS requests unencrypted if the encryption stops working.
- (Optional) Specify the IP version 6 address of the secondary address to use with DNS encryption in the "Alternate DNS" setting.
- Choose the "On (automatic template)" option from the "DNS over HTTPS" setting.
- (Optional) Turn on the "Fallback to plaintext" toggle switch to continue sending DNS requests unencrypted if the encryption stops working.
- Click the Save option.
After you complete the steps, the wireless connection will transmit Domain Name System queries using the HTTPS protocol.
Confirm DNS encryption
- Open Settings.
- Click on Network & internet.
- Click the Wi-Fi page on the right side.

- Click the Hardware properties setting.

- In the IPv4 DNS servers property, you should now see the new address and the Encrypted status.
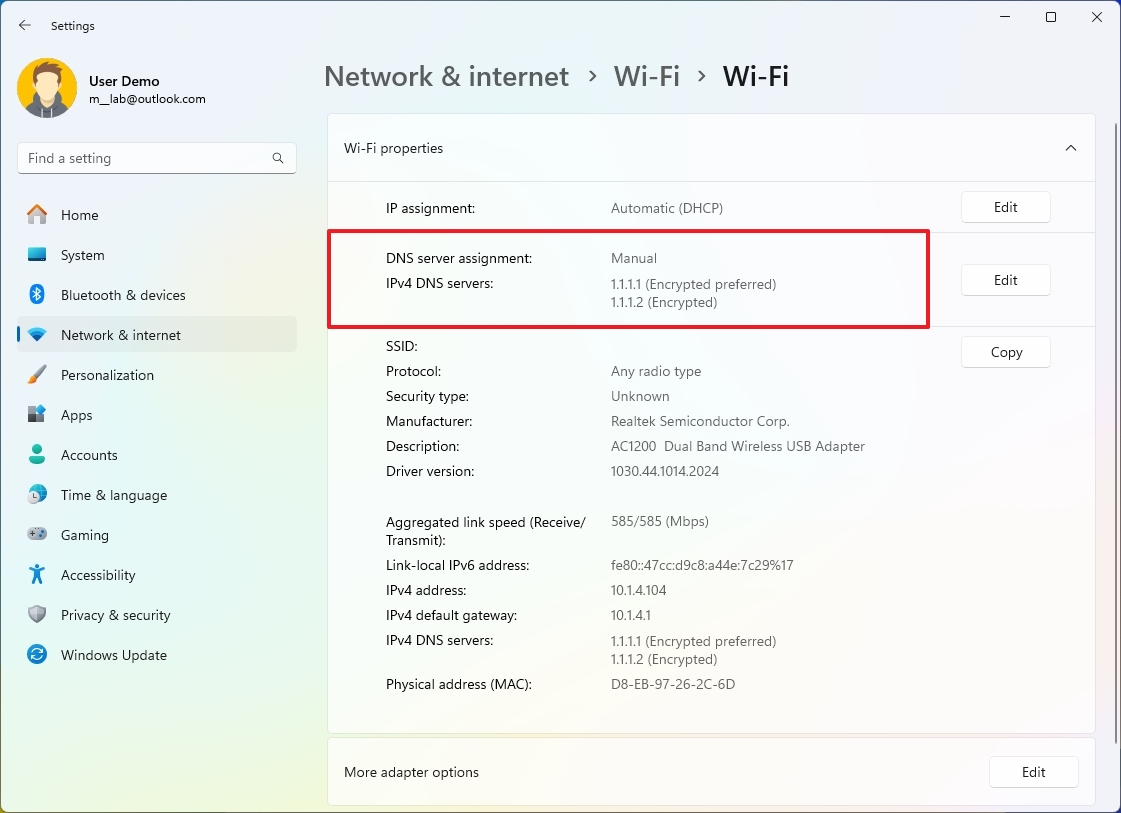
- In the IPv6 DNS servers property, you should now see the new address and the Encrypted status (if applicable).
Once you complete the steps, if you see the "Encrypted" (or "Encrypted preferred") status, then it means DoH is working on Windows 11.
How to configure static IP address on Windows 11
If a computer serves files, media content, and printers over the work, it should use a static Transfer Control Protocol Internet Protocol (TCP/IP) configuration instead of a dynamic configuration.
The reason is that a dynamic network configuration assigned by the Dynamic Host Configuration Protocol (DHCP) server can always change. When it does, other devices in the network won't be able to access the network resources (if they use the IP address). On the other hand, a static IP configuration doesn't change, allowing the service to always be reachable.
Ethernet static settings
To set a static IP address configuration to an Ethernet adapter, use these steps:
- Open Settings.
- Click on Network & internet.
- Click the Ethernet page on the right side.

- Click the Edit button for the "IP assignment" setting.
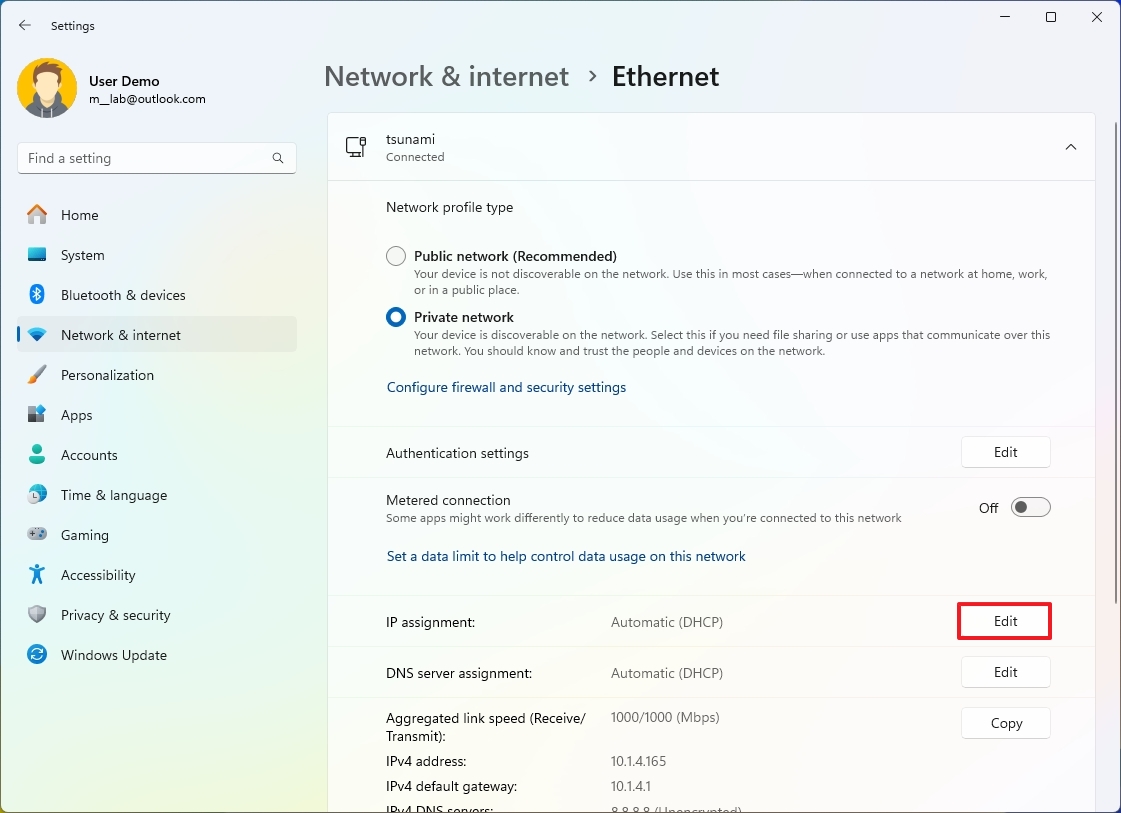
- Select the Manual option.
- Turn on the IPv4 toggle switch.
- Specify the IP version 4 to assign the computer in the "IP address" setting.
- Quick tip: The IP address should be within the network range, and it should be an address outside of the DHCP scope to avoid possible conflicts. For instance, if the network is in the 10.1.4.0 network and the DHCP assigns an address in the 10.1.4.10 through 10.1.4.100 range, a suitable static address could be 10.1.4.22.
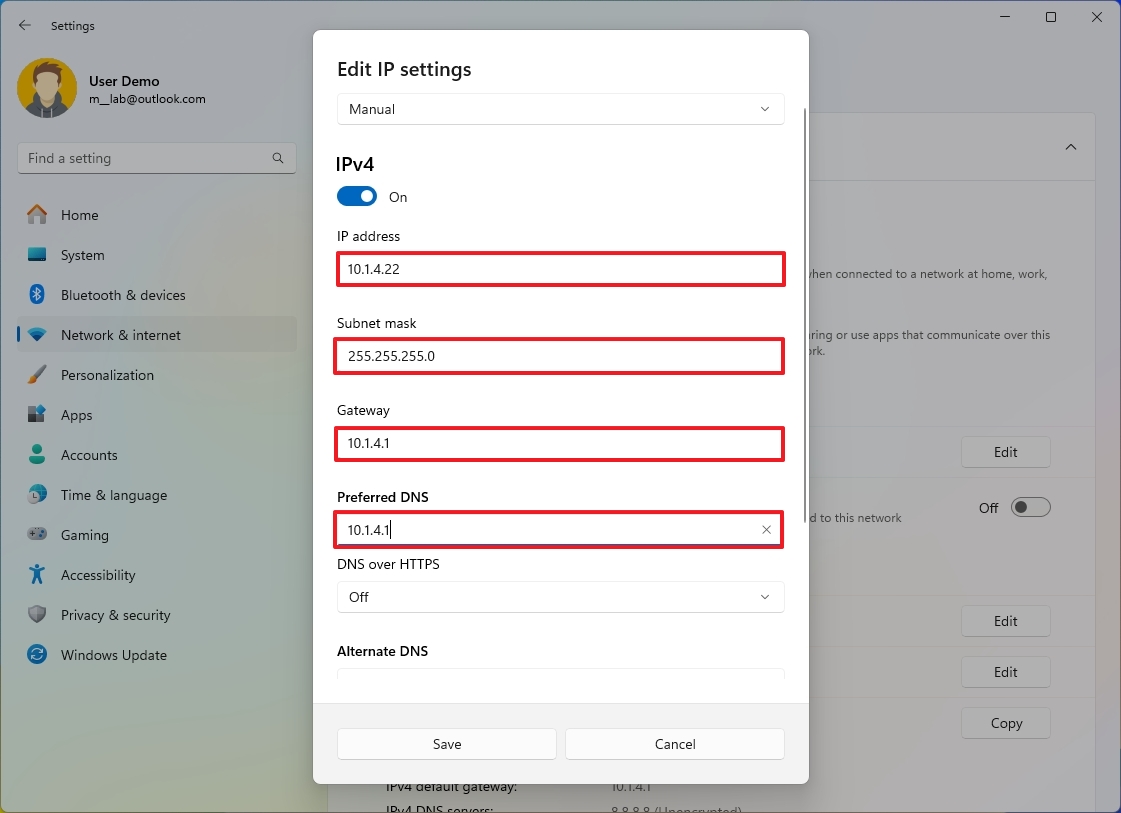
- In the "Subnet mask" setting, specify the network mask — for example, 255.255.255.0.
- Quick note: If you are configuring the settings on a home or office network, the subnet mask is typically 255.255.255.0. However, it might be different if you are in a business environment.
- In the "Gateway" setting, specify the gateway address (usually the router address) — for example, 10.1.4.1.
- In the "Preferred DNS" setting, specify the network DNS address (usually the router address in home and office networks) – for example, 10.1.4.1.
- In the "DNS over HTTPS" setting, select the Off option.
- (Optional) In the "Alternate DNS" setting, specify a secondary DNS address that will be used in case the system can't find the correct route with the primary address.
- In the "DNS over HTTPS" setting, select the Off option.
- Click the Save button.
After you complete the steps, the computer will start using the new static network configuration.
Wi-Fi static settings
To configure a static TCP/IP configuration for a wireless adapter, use these steps:
- Open Settings.
- Click on Network & internet.
- Click the Wi-Fi page on the right side.

- Click the Hardware properties setting.

- Click the Edit button for the "IP assignment" setting.
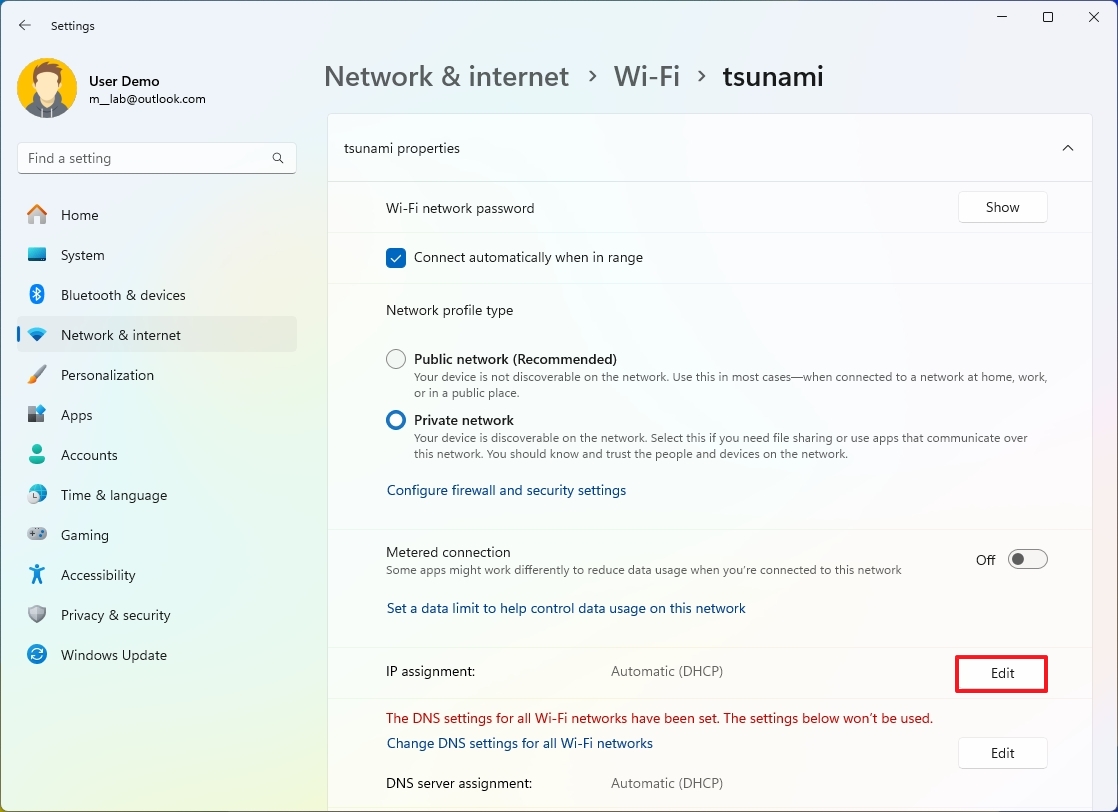
- Select the Manual option.
- Turn on the IPv4 toggle switch.
- In the "IP address" setting, specify the IP version 4 to assign the computer. For example, 10.1.4.23.
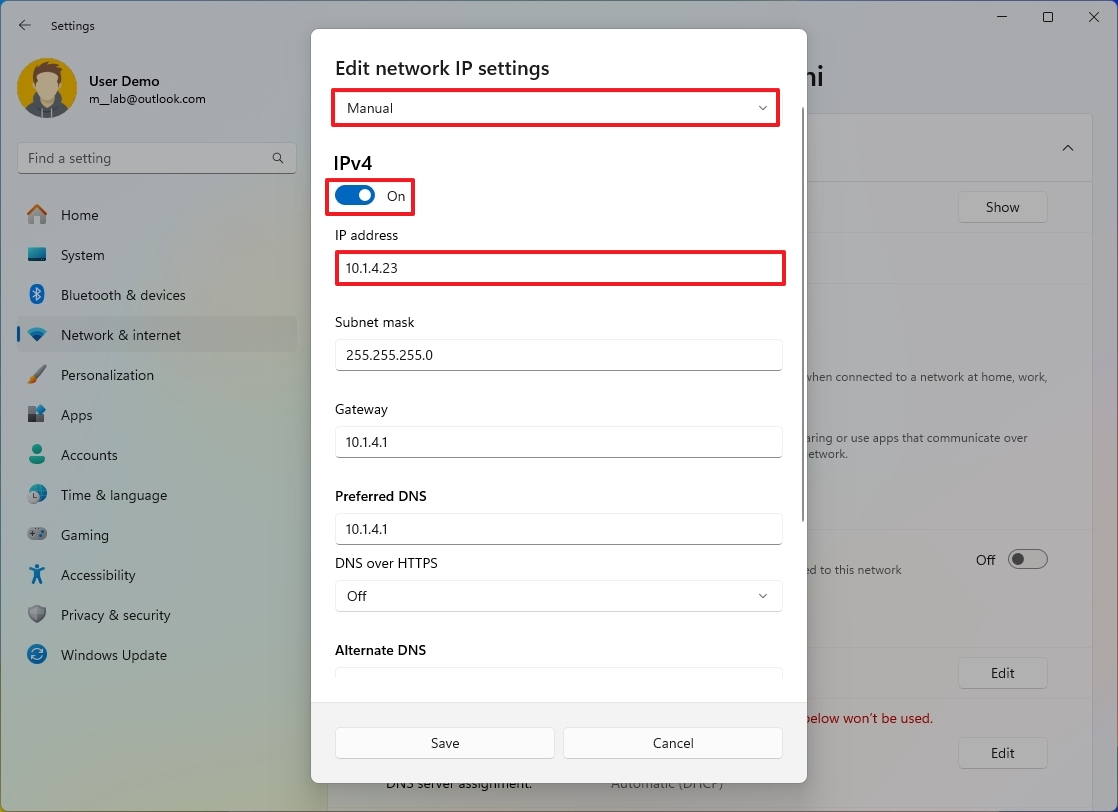
- In the "Subnet mask" setting, specify the network mask — for example, 255.255.255.0.
- In the "Gateway" setting, specify the gateway address (usually the router address) — for example, 10.1.4.1.
- In the "Preferred DNS" setting, specify the network DNS address (usually the router address in home and office networks) – for example, 10.1.4.1.
- In the "DNS over HTTPS" setting, select the Off option.
- (Optional) In the "Alternate DNS" setting, specify a secondary DNS address that will be used in case the system can't find the correct route with the primary address.
- In the "DNS over HTTPS" setting, select the Off option.
- Click the Save button.
Once you complete the steps, the wireless adapter will start using the new static IP address configuration.
I'm focusing this guide on IP version 4, but you can also refer to these steps to set up an IP version 6 configuration if your network supports it. You only need to turn on the IPv6 option in step 7 and provide the IPv6 addresses according to your network configuration.
How to configure dynamic IP address on Windows 11
If you have a computer with a static IP address, you can also change its configuration to allow the device to receive the network settings through the local Dynamic Host Configuration Protocol (DHCP) server.
Ethernet dynamic settings
To change the IP address of an Ethernet adapter from static to dynamic, use these steps:
- Open Settings.
- Click on Network & internet.
- Click the Ethernet page on the right side.

- Click the Edit button for the "IP assignment" setting.

- Select the Automatic (DHCP) option.
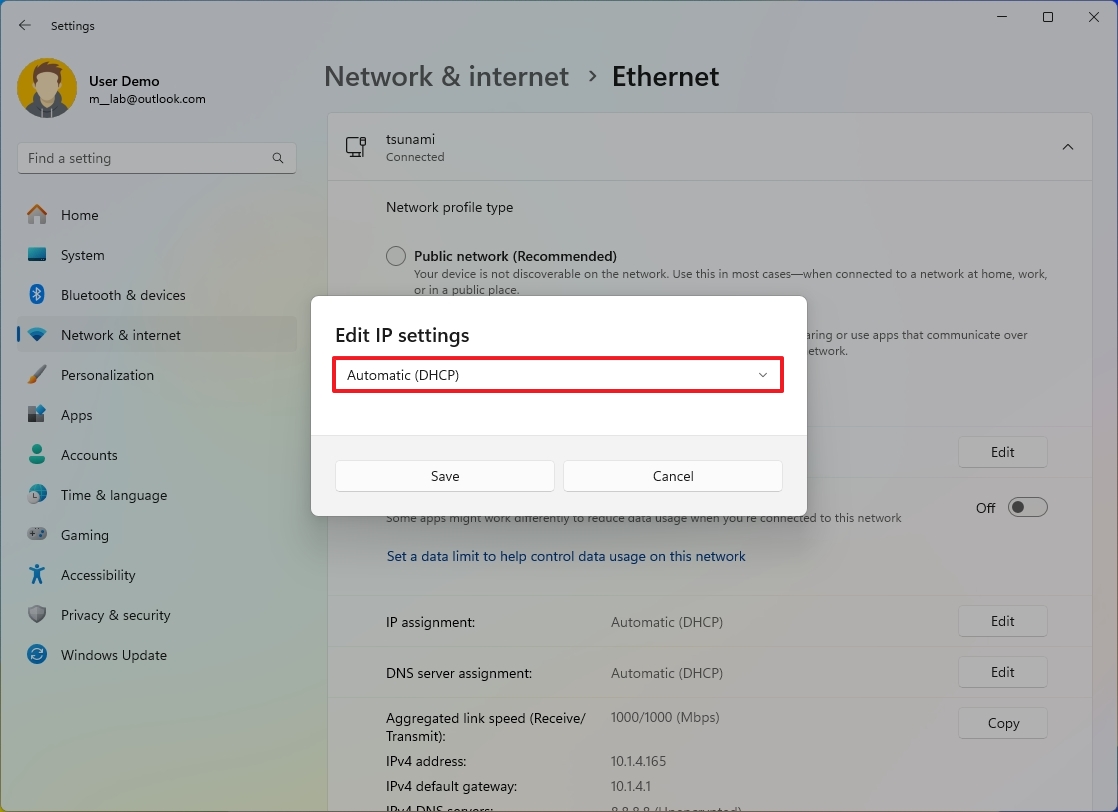
- Click the Save button.
Wi-Fi static settings
To set a dynamic IP address for a wireless adapter, use these steps:
- Open Settings.
- Click on Network & internet.
- Click the Wi-Fi page on the right side.

- Click the Hardware properties setting.

- Click the Edit button for the "IP assignment" setting.

- Select the Automatic (DHCP) option.
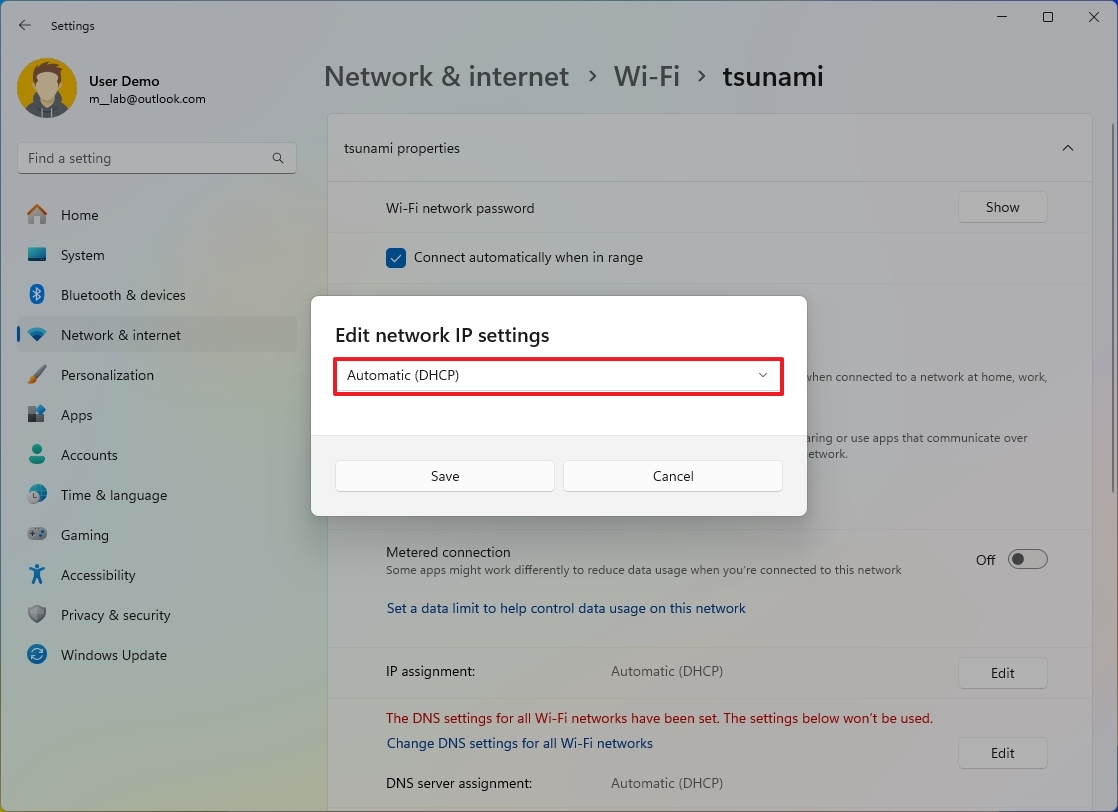
- Click the Save button.
After you complete the steps, the Ethernet or Wi-Fi adapter will configure its IP address automatically through its Dynamic Host Configuration Protocol (DHCP) server.
How to configure network data limits on Windows 11
Windows 11 also allows you to set data limits for a specific network adapter. As you approach the limit, the system will send you a warning to help you stay within it.
To configure the data limit on Windows 11, use these steps:
- Open Settings.
- Click on Network & internet.
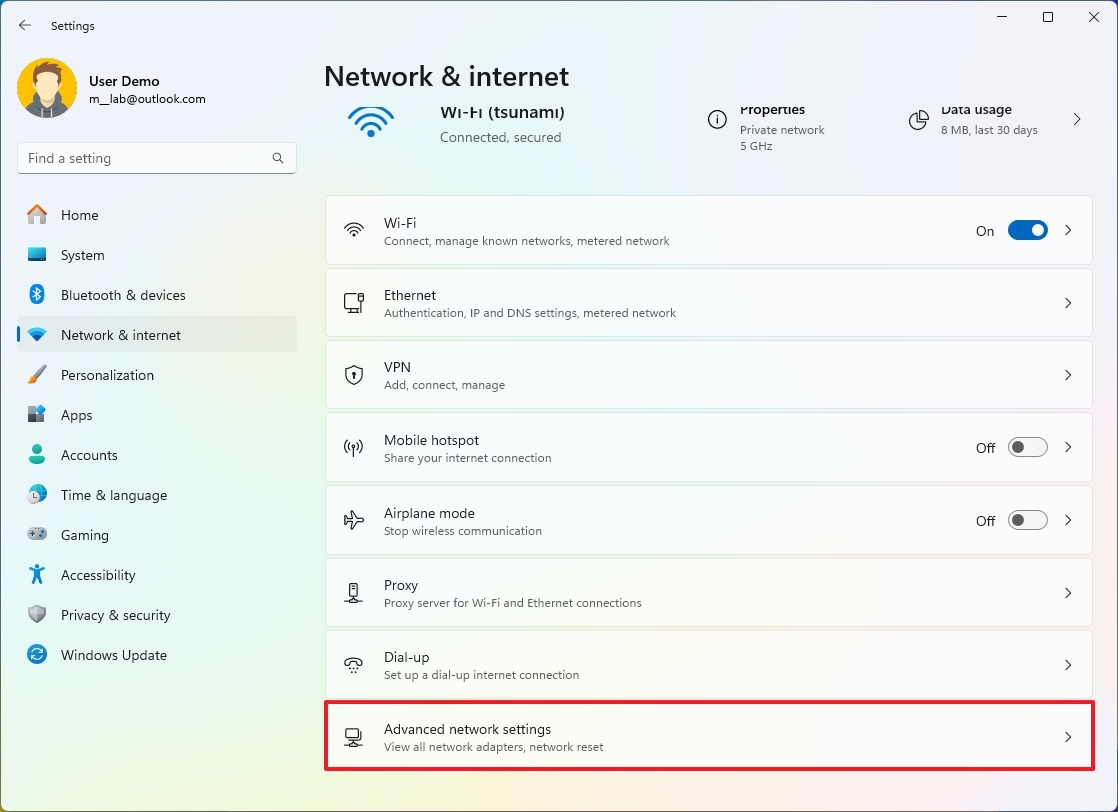
- Click the Advanced network settings page on the right side.
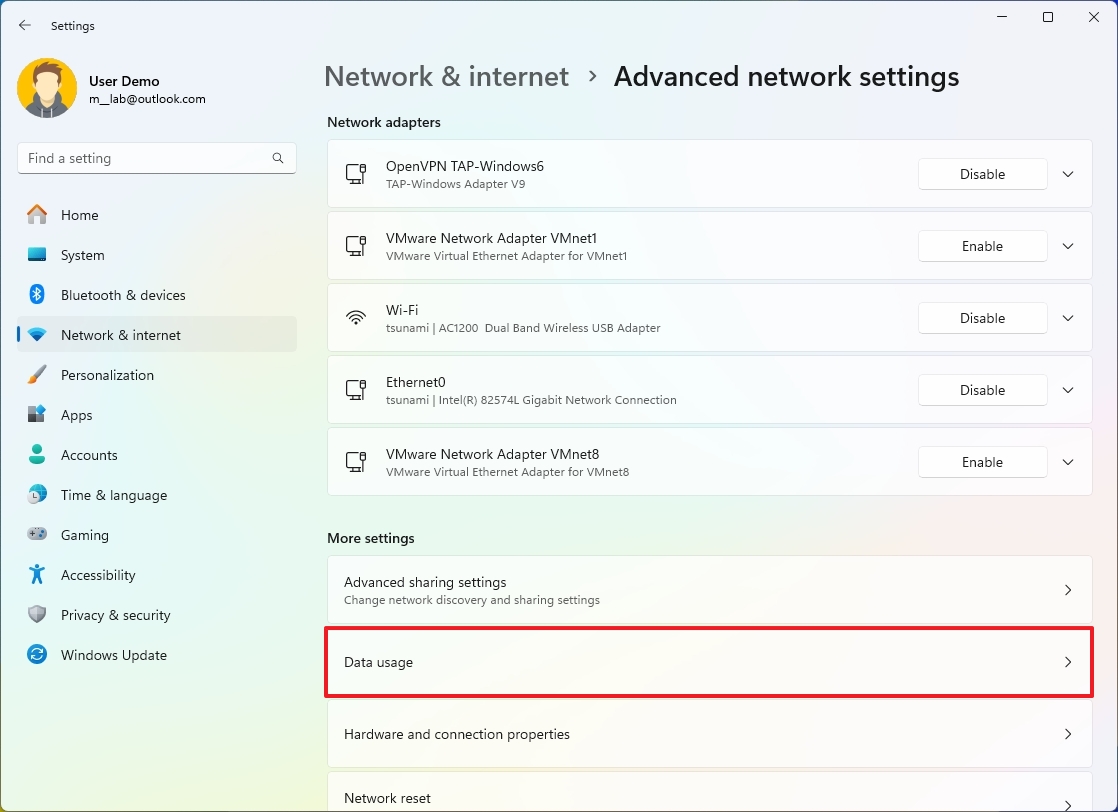
- Click the Data usage setting under the "More settings" section.
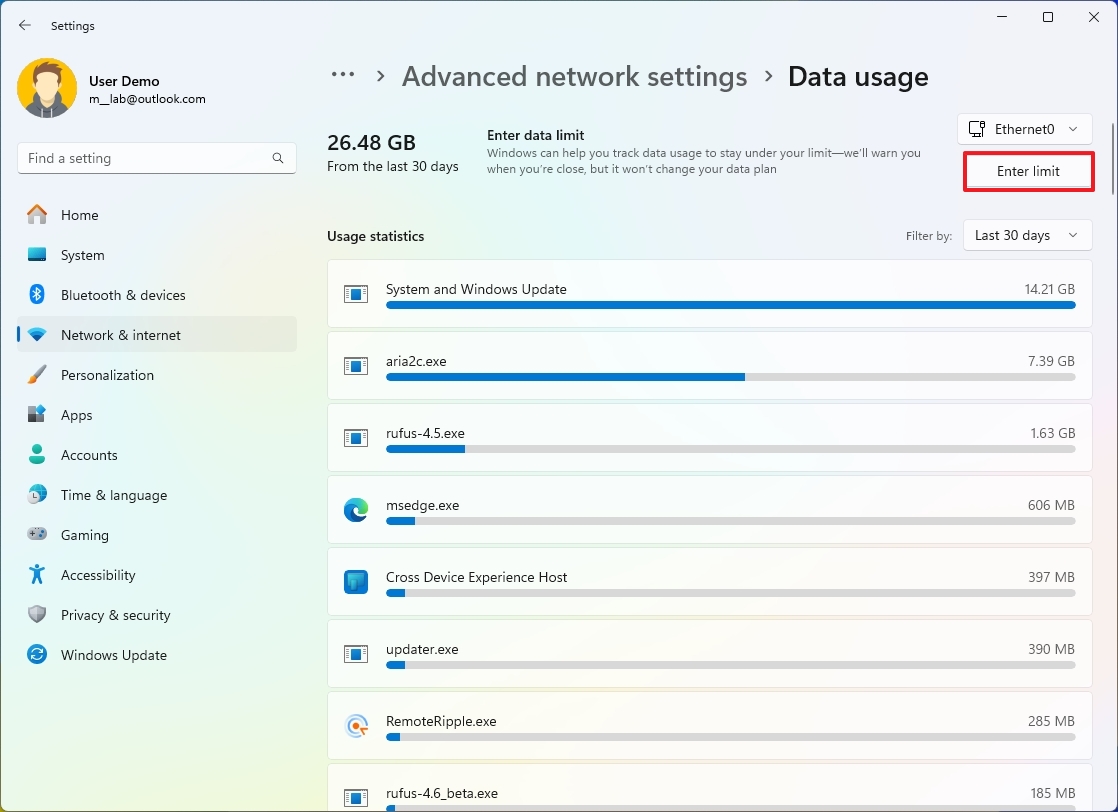
- Click the Enter limit button.
- Select the limit type, including "Daily," "Weekly," "One time," or "Unlimited."
- Specify the reset time, depending on your previous selection.
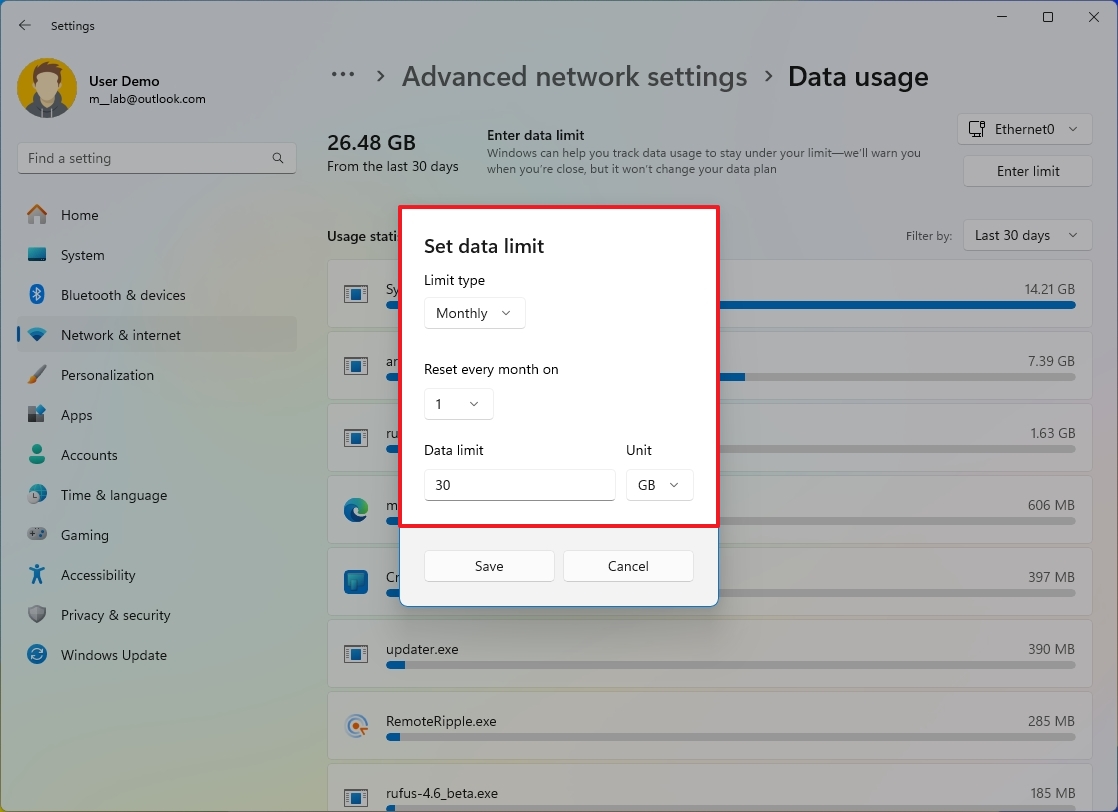
- In the "Data limit" setting, specify the data allowance.
- Confirm the data unit, including megabytes (MB) or gigabytes (GB).
- Click the Save button.
Once you complete the steps, Windows 11 will notify you when the limit is getting closer to help you stay under the data limit.
How to reset network adapter on Windows 11
When your laptop or desktop computer has connectivity issues, the reset feature will remove and install all the network adapters and reset all the configurations to their defaults to fix the most common problems.
To reset all the network adapter configurations, use these steps:
- Open Settings.
- Click on Network & internet.
- Click the Advanced network settings page on the right side.

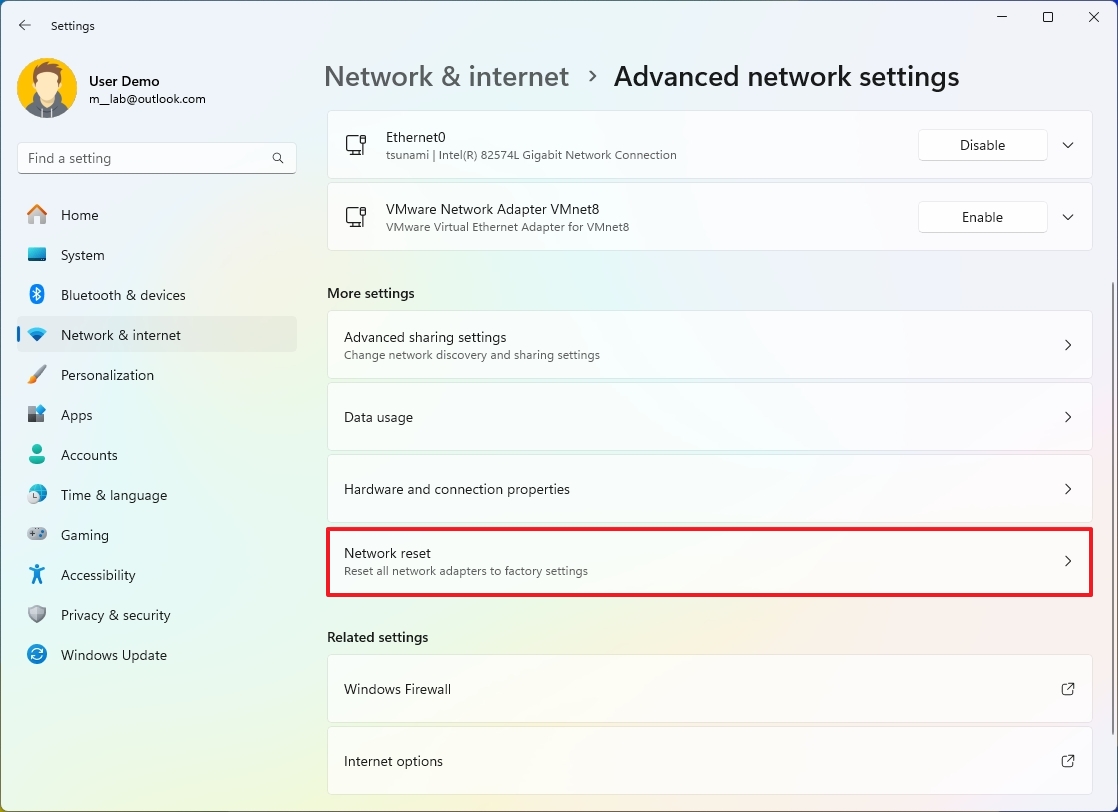
- Click the Network reset setting.
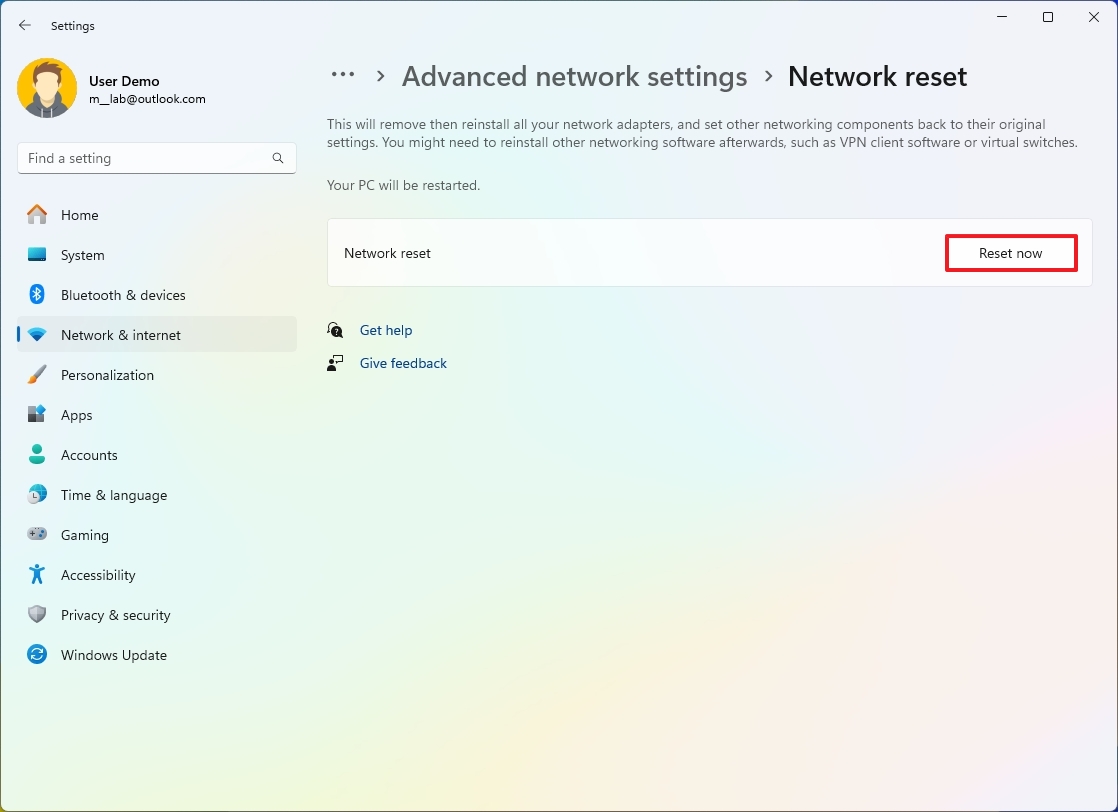
- Click the Reset now button.
- Click the Yes button.
After you complete the steps, the feature will remove and reinstall all the network adapters and will reset all the configurations to their defaults to fix any problems. If you also had a wireless connection, you may need to re-enter the authentication to connect to the network.
How to view network data usage on Windows 11
To view data usage per network adapter and apps on Windows 11, use these steps:
- Open Settings.
- Click on Network & internet.
- Click the Advanced network settings page on the right side.

- Click the Data usage setting under the "More settings" section.

- Review the device data usage.
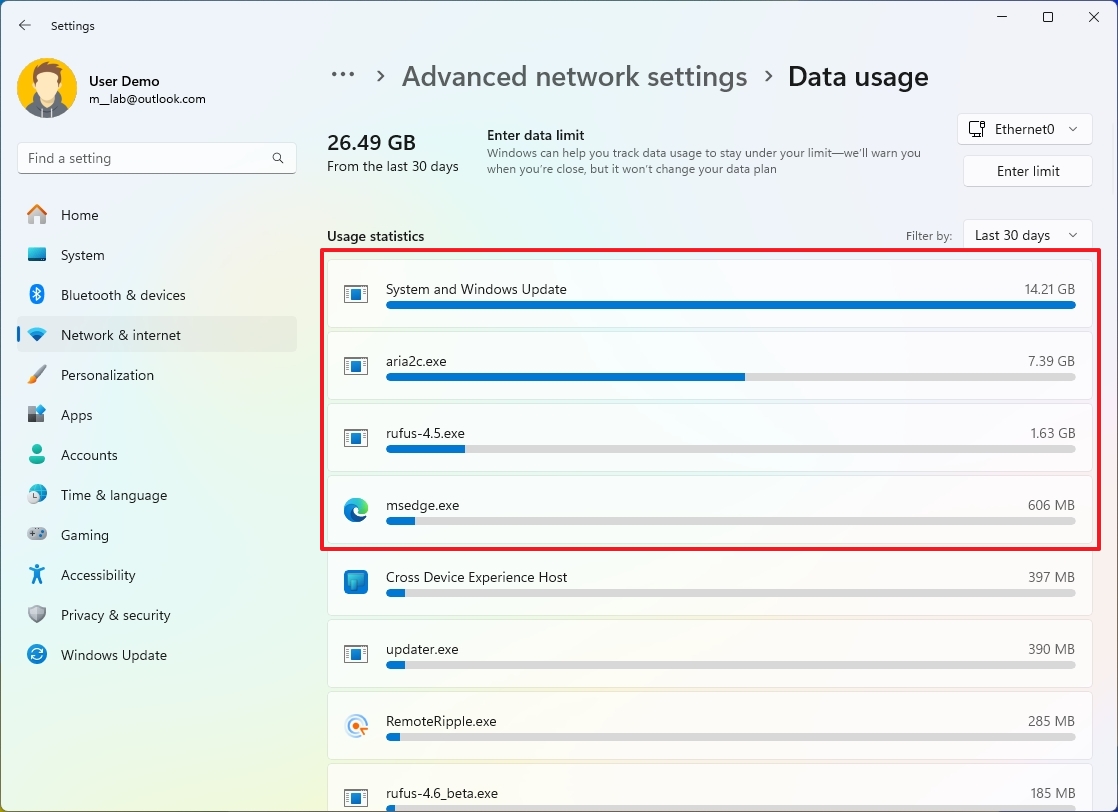
Once you complete the steps, you will better understand the network data usage on your device.
How to view network adapter properties on Windows 11
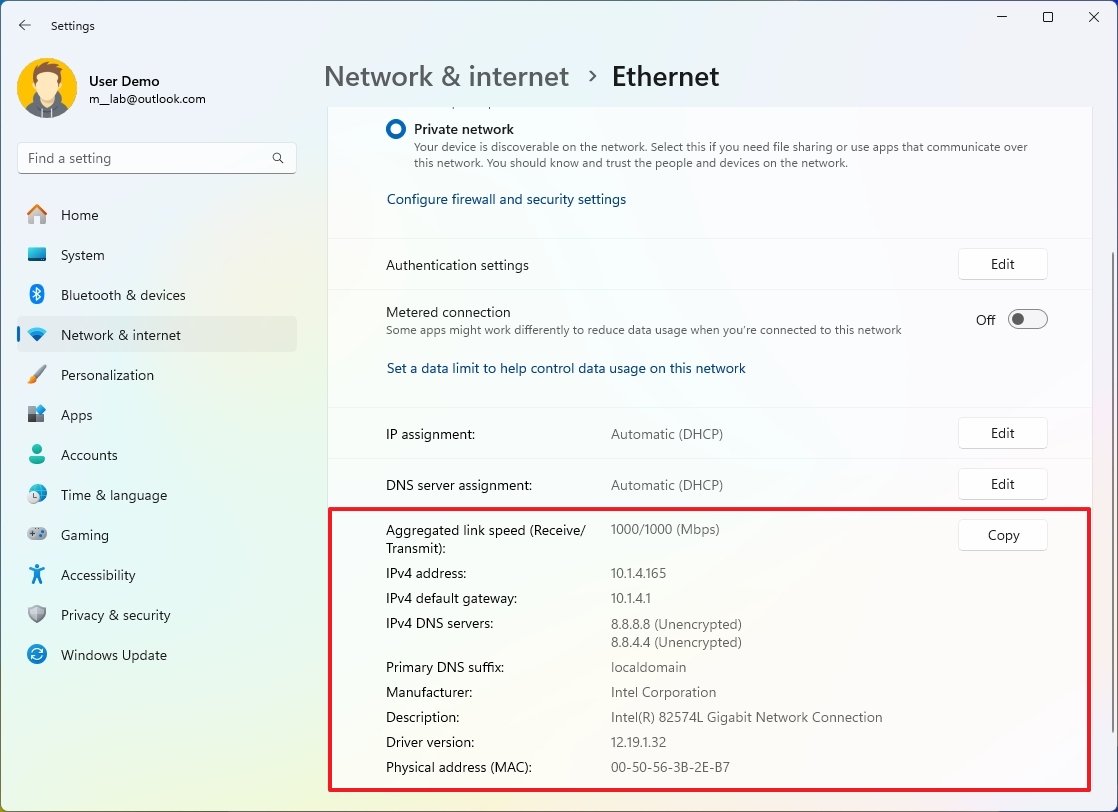
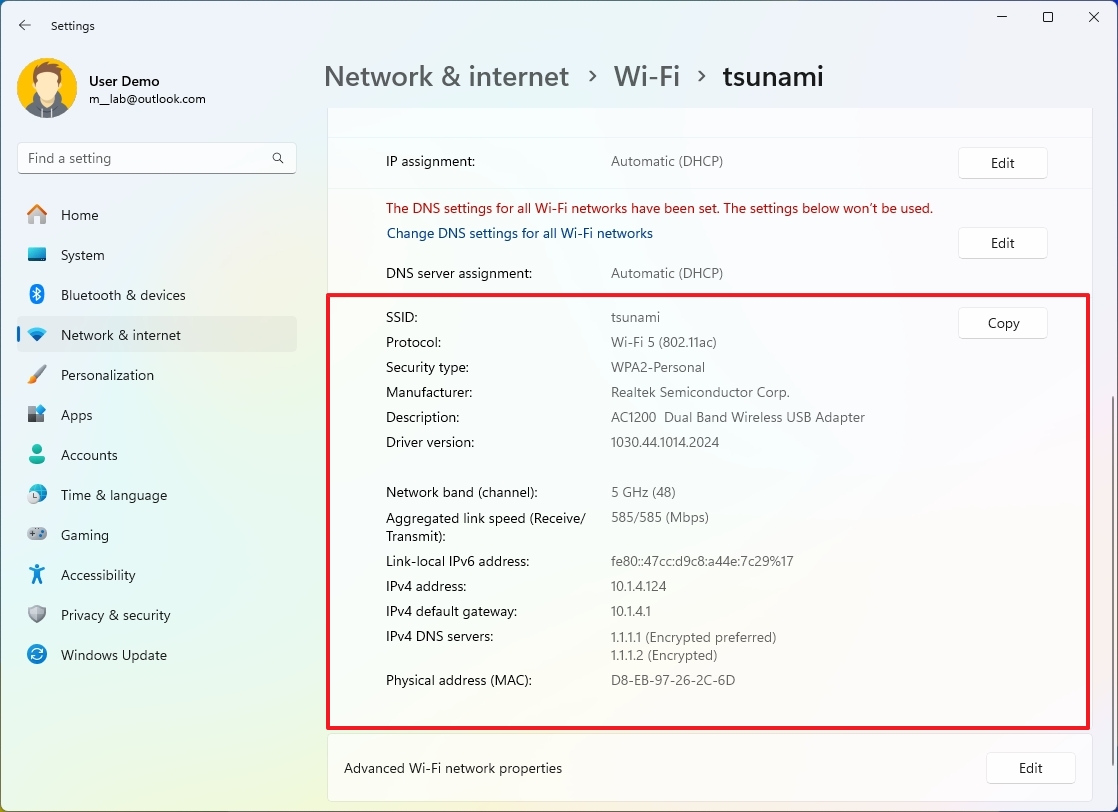
On Windows 11, you can find the network configuration information within the adapter's properties or through the Advanced network settings page.
Ethernet properties
To find out the IP address and other network settings of the Ethernet adapter, use these steps:
- Open Settings.
- Click on Network & internet.
- Click the Ethernet page on the right side.

- Confirm the networking settings at the bottom of the page.
Wi-Fi properties
To determine the properties of the wireless adapter, use these steps:
- Open Settings.
- Click on Network & internet.
- Click the Wi-Fi page on the right side.

- Click the Hardware properties setting.

- Confirm the networking settings at the bottom of the page.
Ethernet and Wi-Fi properties
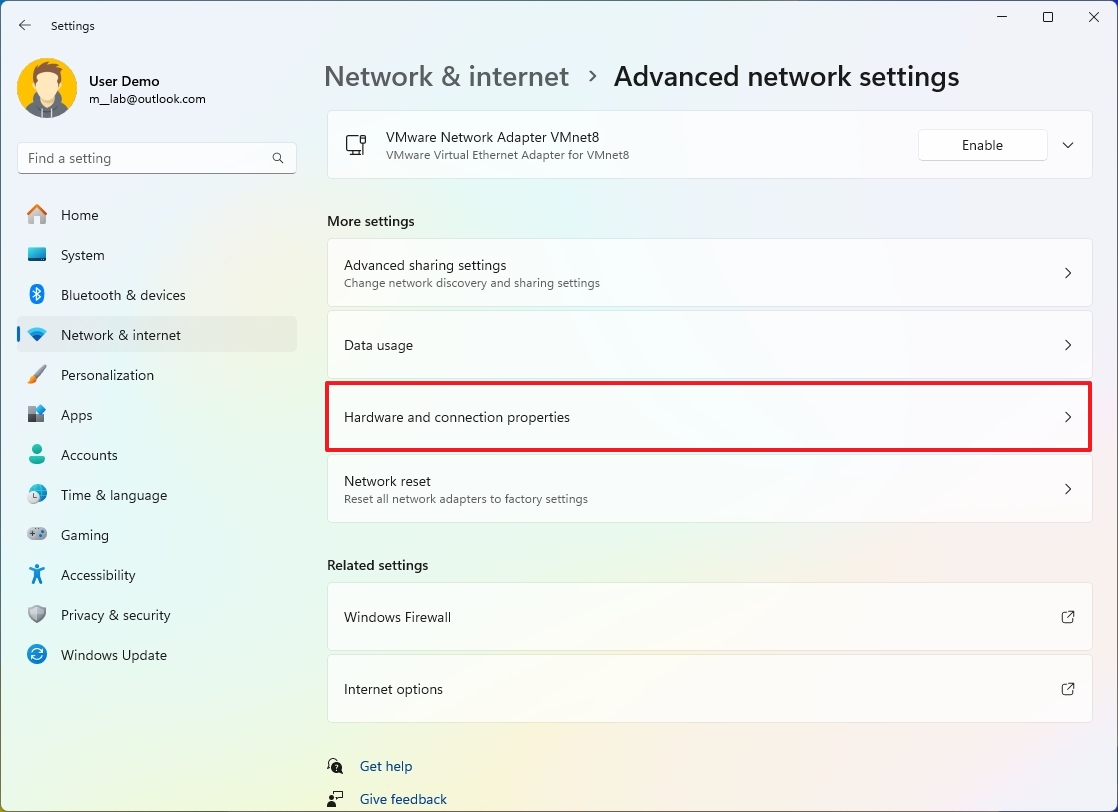
To view the network information for the adapters installed on Windows 11, use steps:
- Open Settings.
- Click on Network & internet.
- Click the Advanced network settings page on the right side.

- Click the "Hardware and connection properties" setting.
- Confirm the networking settings at the bottom of the page.
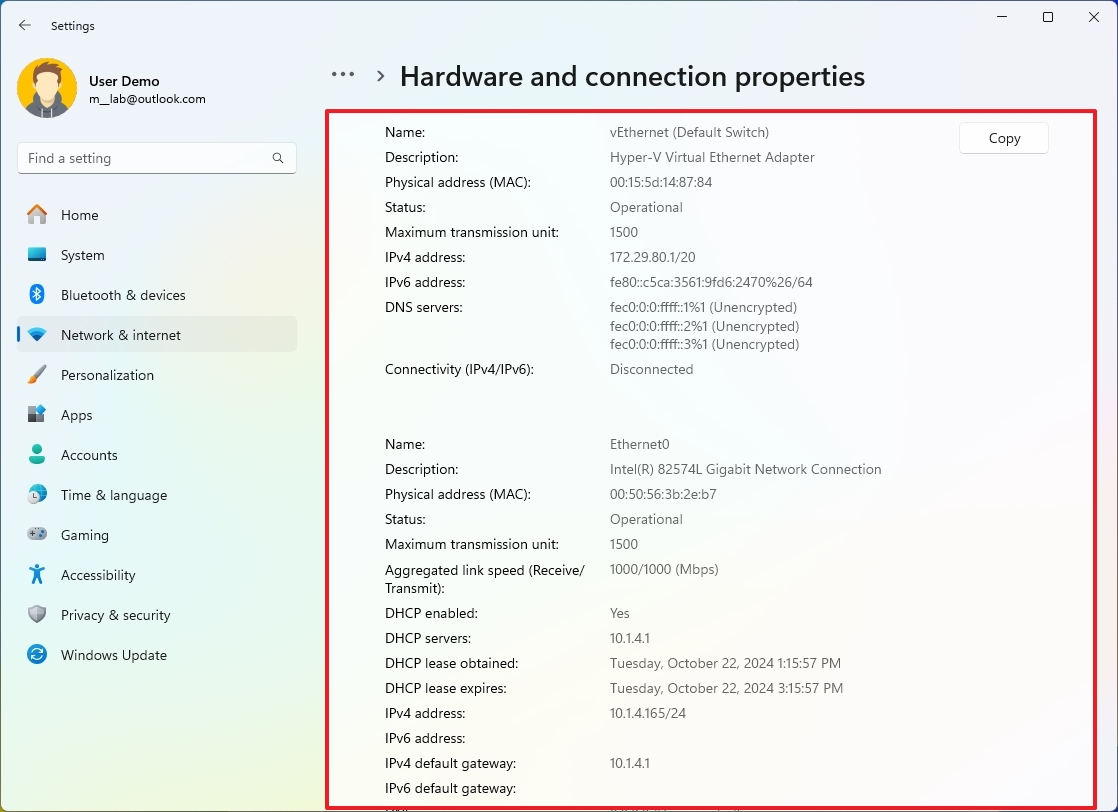
After you complete the steps, you will be able to determine many networking configurations, such as link speed, IPv4 and IPv6 addresses, DNS server, driver version and manufacturer, MAC address, and more.
How to access network advanced properties on Windows 11
Although the Settings app still doesn't include elements to fully configure a network connection, it does have an option to access the advanced properties through Control Panel.
To access the advanced network properties through the Settings app, use these steps:
- Open Settings.
- Click on Network & internet.
- Click the Advanced network settings page on the right side.

- Select the Ethernet or Wi-Fi adapter from the "Network adapters" list.
- (Optional) Confirm networking information, such as media state, bytes sent and received, link speed, and uptime for the adapter.
- Click the Edit button in the "More adapter options" setting.
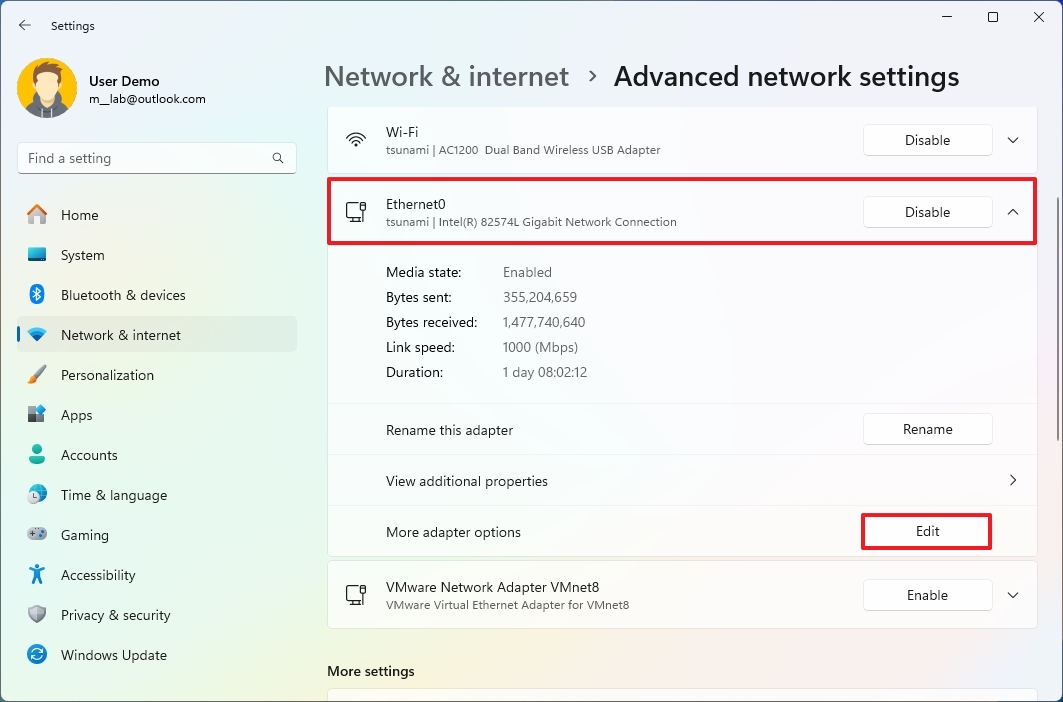
Once you complete the steps, you will have access to the legacy "Networking" and "Sharing" settings. In this experience, you can, among other things, turn protocols like IPv4 and IPv6 on or off, configure QoS, and other protocols. You can also also configure the internet sharing feature from the "Sharing" tab.
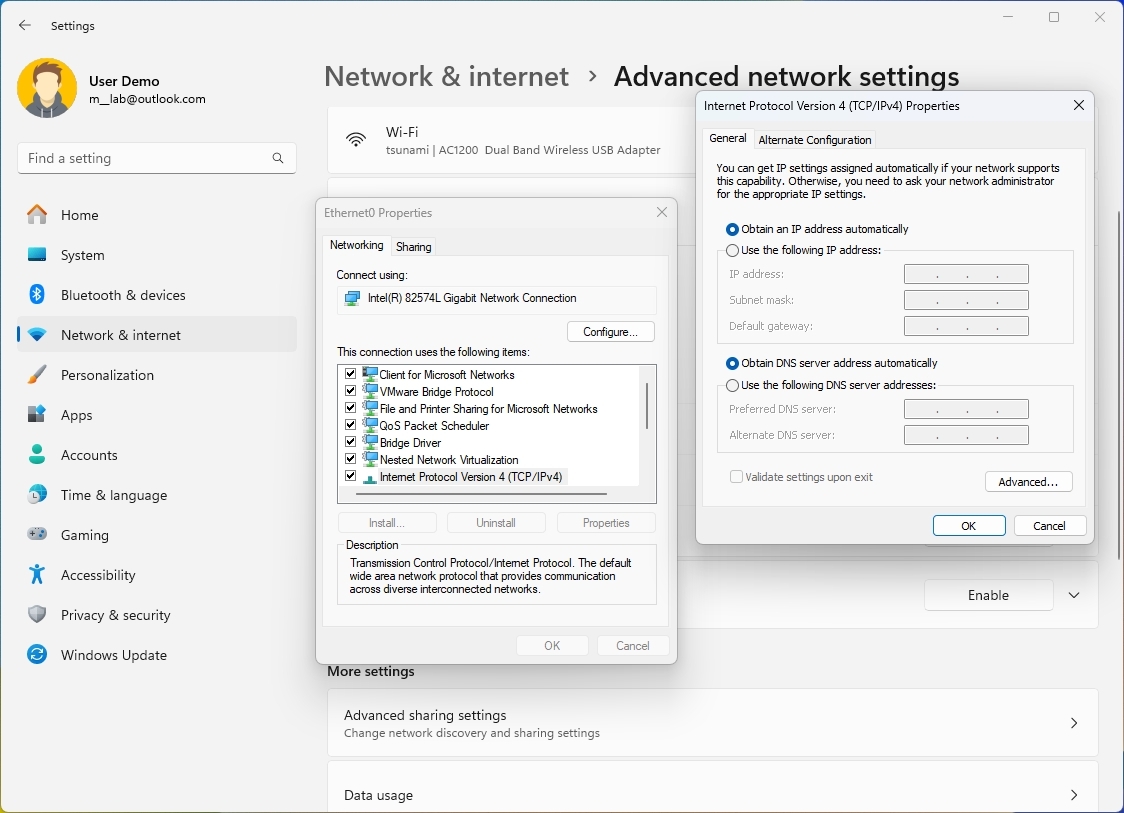
The "Configure" button will give you access to the hardware settings to configure specific advanced settings for the adapter, power management settings, and you can even manage various aspects of the driver.
How to rename a network adapters on Windows 11
If you want to change the network adapter name, you can do this directly from the networks settings.
To rename a network adapter, use these steps:
- Open Settings.
- Click on Network & internet.
- Click the Advanced network settings page on the right side.

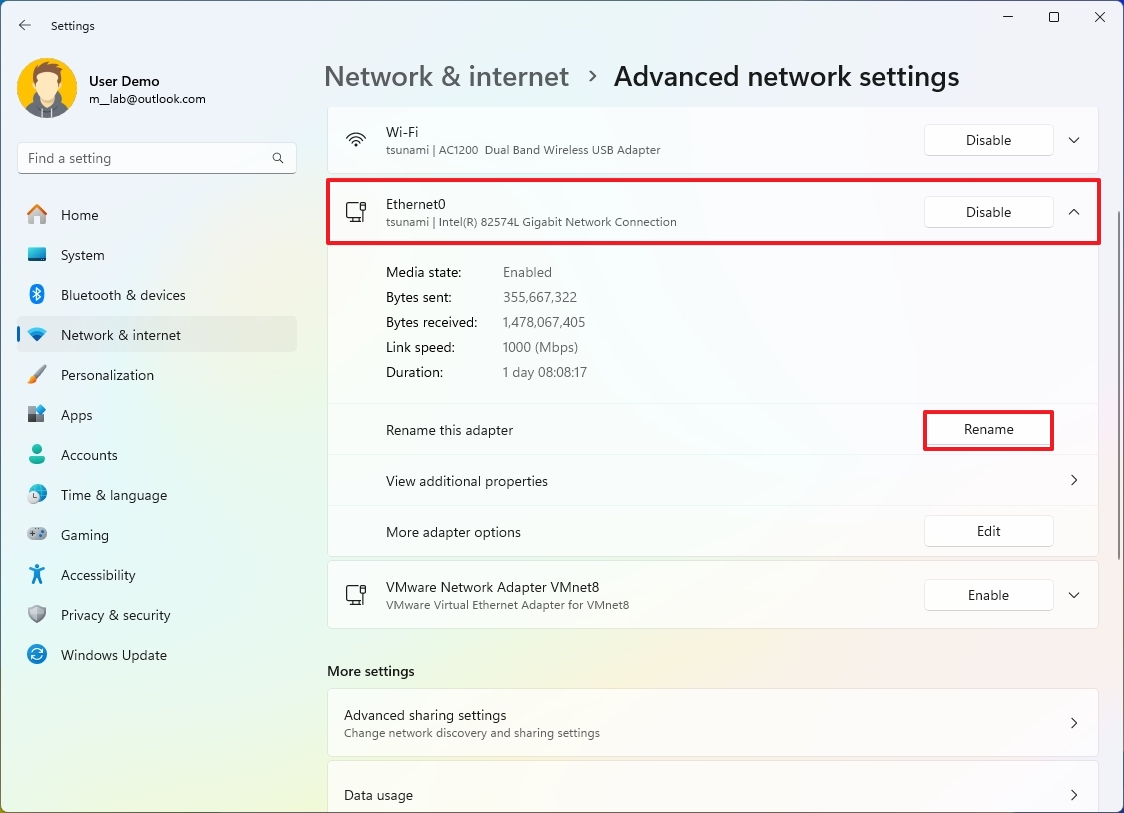
- Select the Ethernet or Wi-Fi adapter from the "Network adapters" list.
- Click the Rename button.
- Confirm the new name of the adapter.
- Click the Save button.
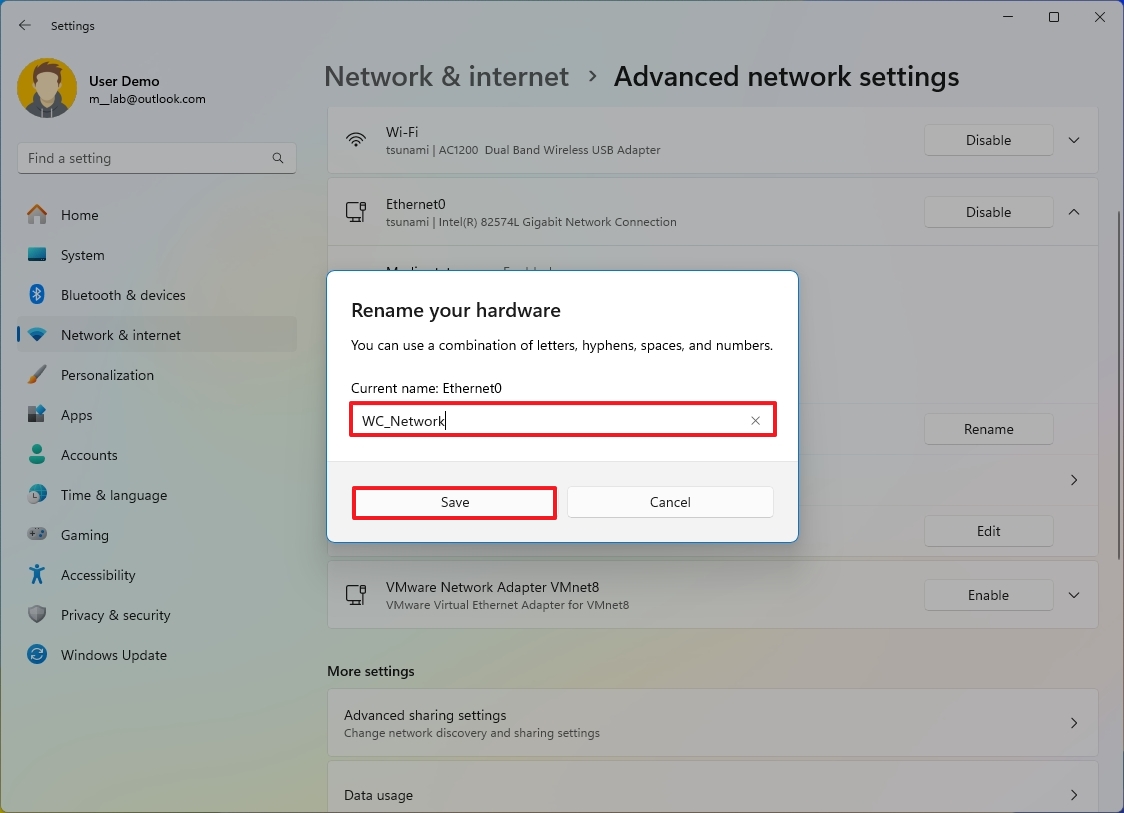
After you complete the steps, the network adapter will reflect the new name.
More resources
For more helpful articles, coverage, and answers to common questions about Windows 10 and Windows 11, visit the following resources:


