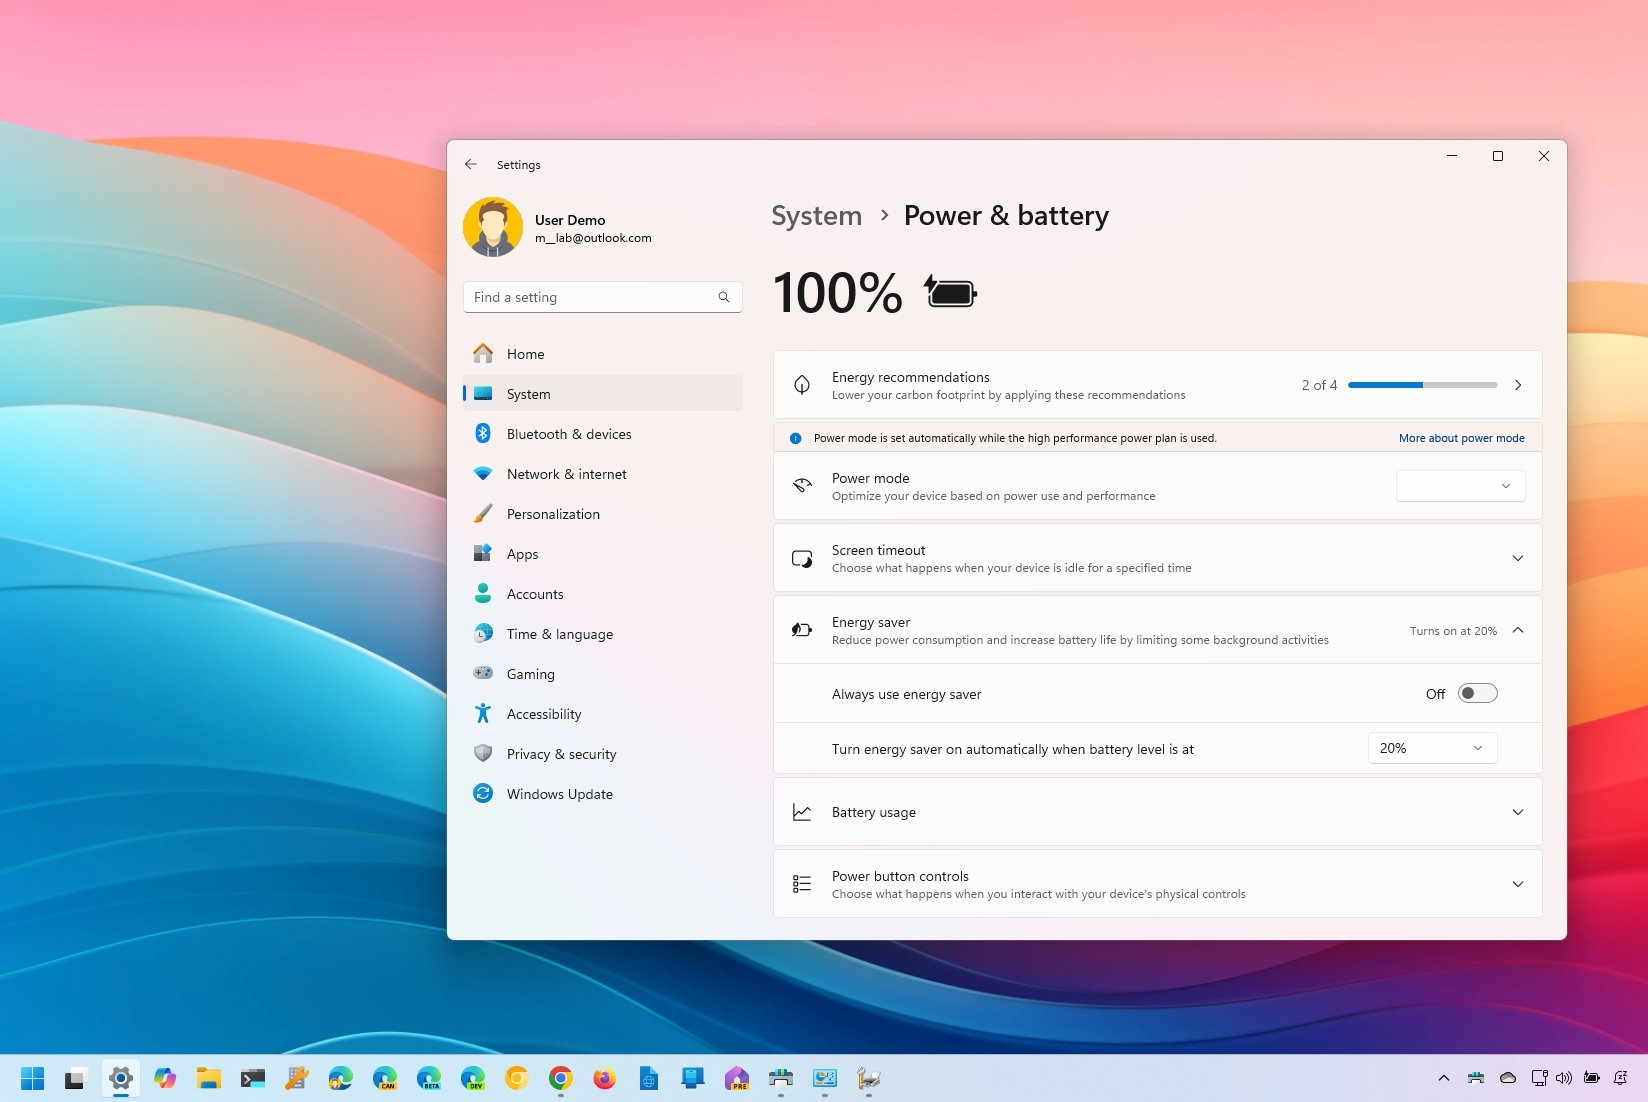
On Windows 11, running low on battery when you are actively using the device can be a frustrating situation, even more, if there's not a power outlet nearby, but there are many ways to make the most of a single charge, and in this guide, we'll show you how.
For example, you can enable battery savers to disable features and visual effects that can negatively affect battery life. You can tweak the power settings to shorten when the screen should turn off and when the computer should enter sleep mode to preserve energy. You can enable hibernation to save the current session with your running applications onto the hard drive to shut down the system and extend the device's battery life. It's also possible to troubleshoot and fix common battery drain problems automatically and control many other features.
This guide will walk you through the best tips to extend the battery life on your Windows 11 laptop as much as possible.
How to enable battery saver on Windows 11
On Windows 11, depending on the version installed on your computer, you find the power-saving feature with different names, including Battery Saver or Energy Saver. The biggest difference between Battery Saver and Energy Saver is that the new mode saves energy for devices with and without batteries.
Configure battery saver on version 23H2
To enable battery saver to extend your laptop battery life on Windows 11, use these steps:
- Open Settings.
- Click on System.
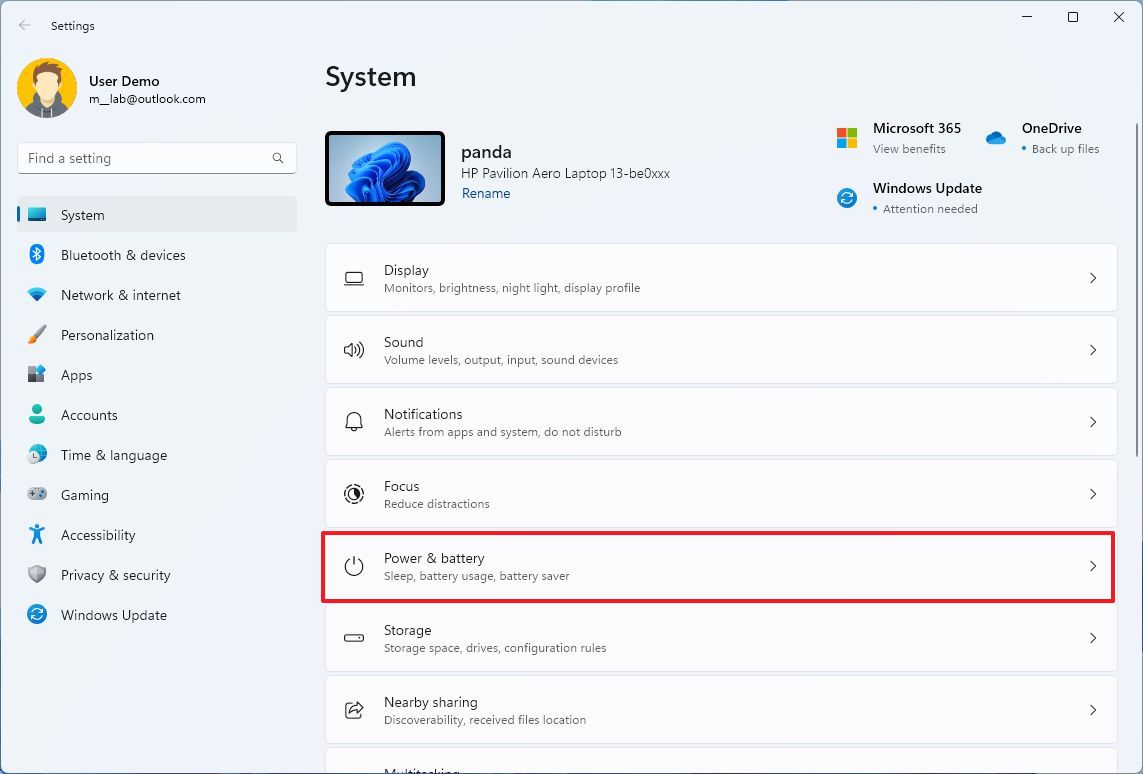
- Click the Power & battery page on the right side.
- Under the "Battery" section, click the Turn on now button.
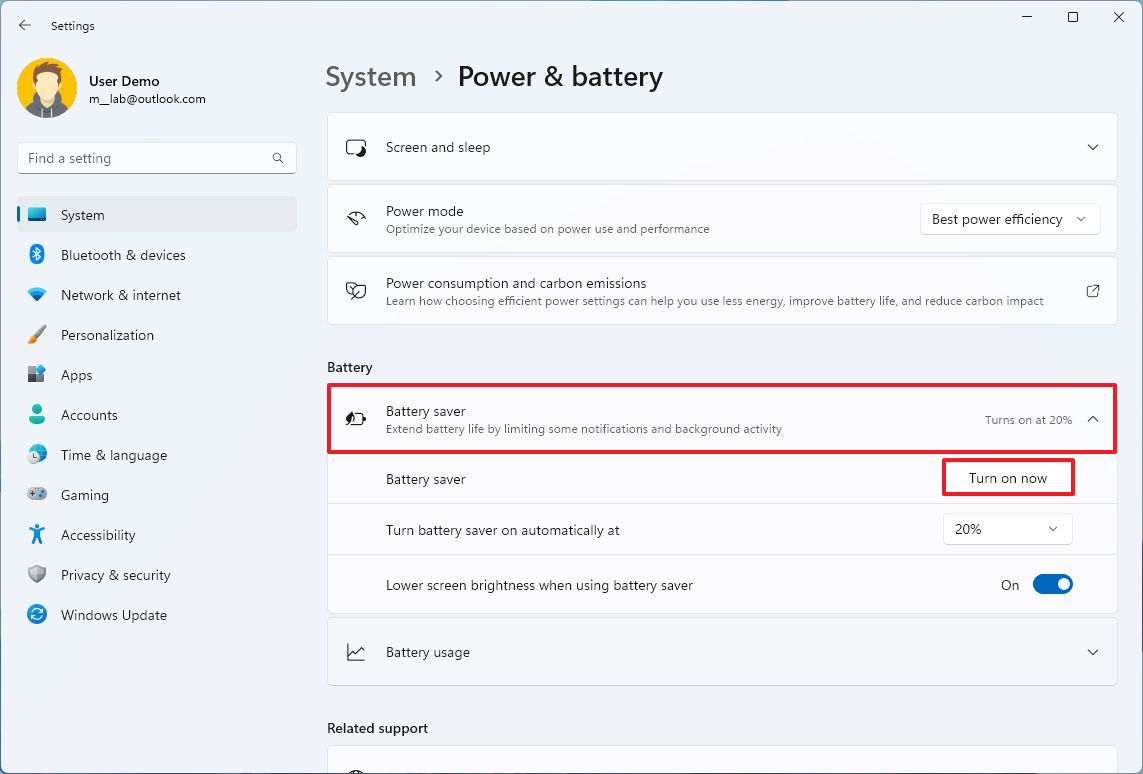
- (Optional) Choose the battery percentage before automatically turning the battery saver feature.
- (Optional) Turn on the "Lower screen brightness when using battery saver" toggle switch.
Once you complete the steps, the battery saver feature will turn off features that may use a lot of power, such as background activity, file and email syncing, and fancy visual effects. In addition, the screen brightness will dim to improve battery life on Windows 11.
Configure energy saver on version 24H2
To configure the Energy Saver feature on version 24H2 and higher releases, use these steps:
- Open Settings.
- Click on System.
- Click the Power & battery page on the right side.
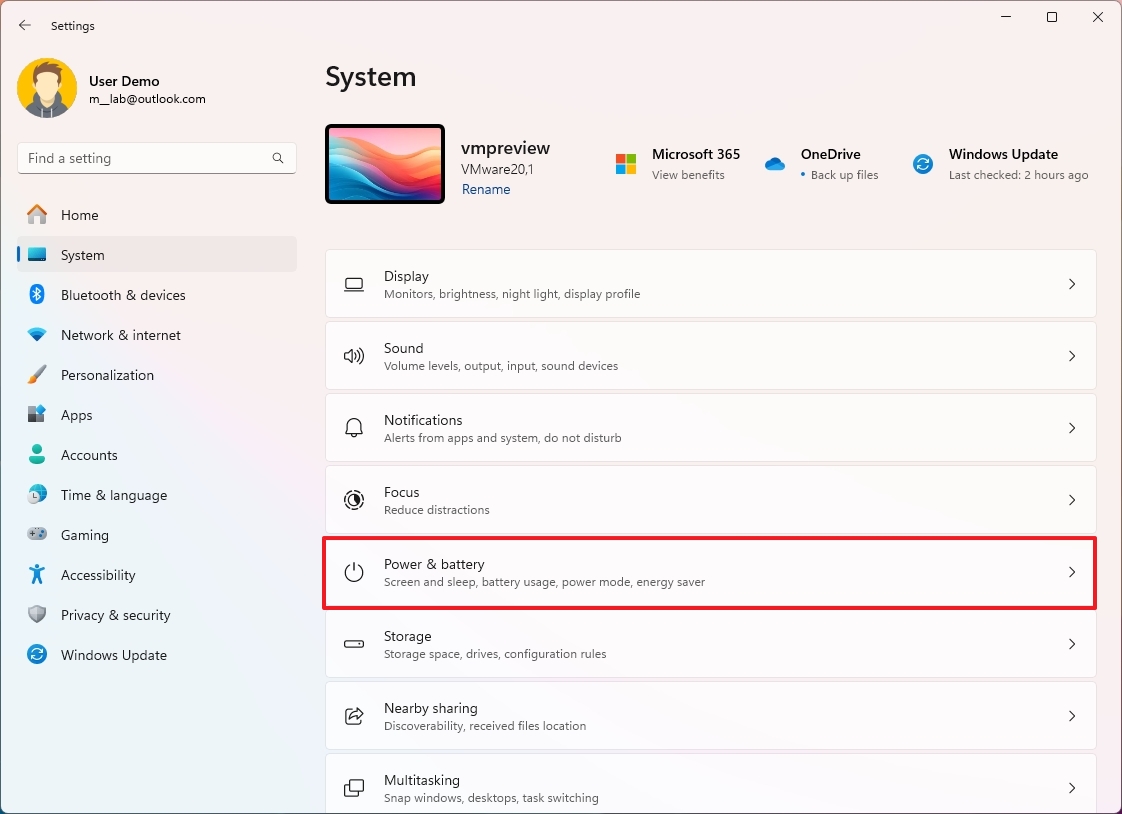
- Click the Energy Saver setting.
- (Option 1) Turn on the "Always use energy saver" toggle switch to enable and maintain the feature running on your computer.
- (Option 2) Choose the battery percentage before automatically turning the Energy Saver feature.
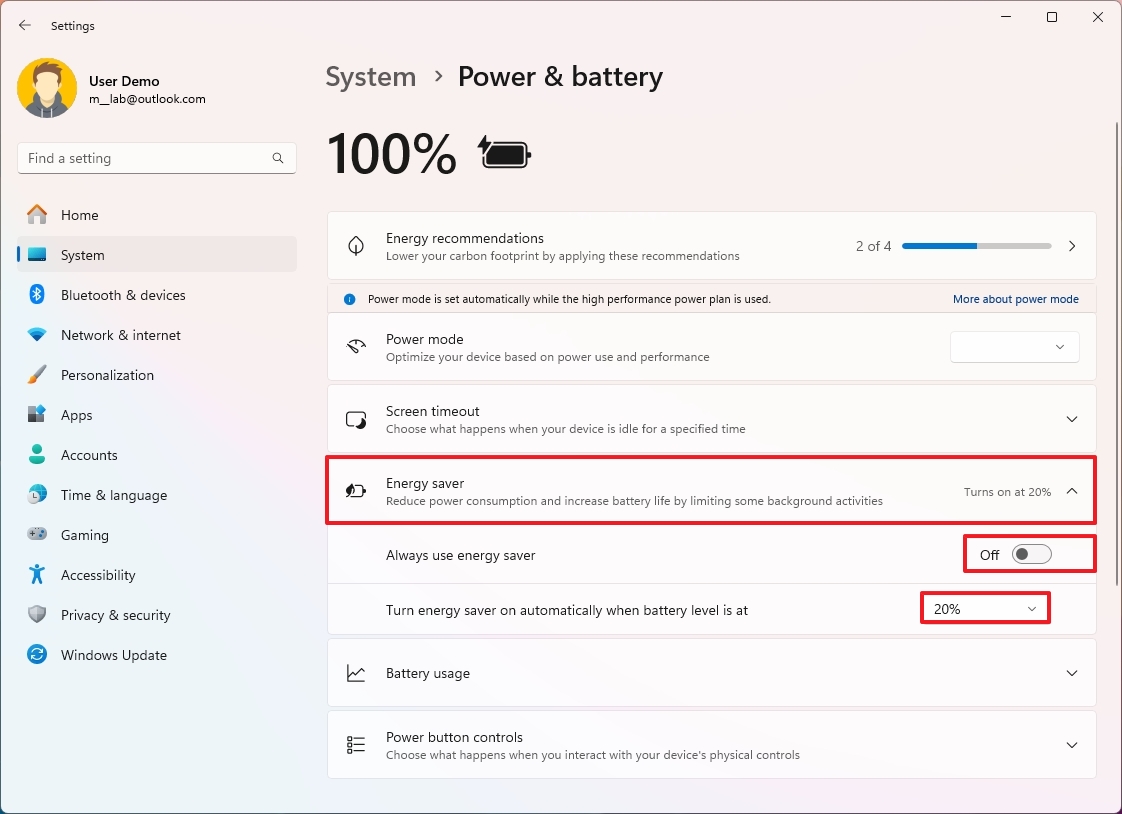
- (Optional) Turn on the "Lower screen brightness when using energy saver" toggle switch (if applicable).
After you complete the steps, the power-saving feature will turn on according to your configuration. The effect will be similar to the legacy "Battery Saver" mode.
How to set when inactive display turns off on Windows 11
The display timeout settings differ depending on your operating system version.
Change inactive display on version 23H2
To reduce the time when a display should turn off automatically on version 23H2 or earlier releases, use these steps:
- Open Settings.
- Click on System.
- Click the Power & battery page on the right side.

- Under the "Power" section, click the Screen and sleep setting.
- Reduce the number of minutes before turning off the display while on battery power using the "On battery power, turn off my screen after" setting.
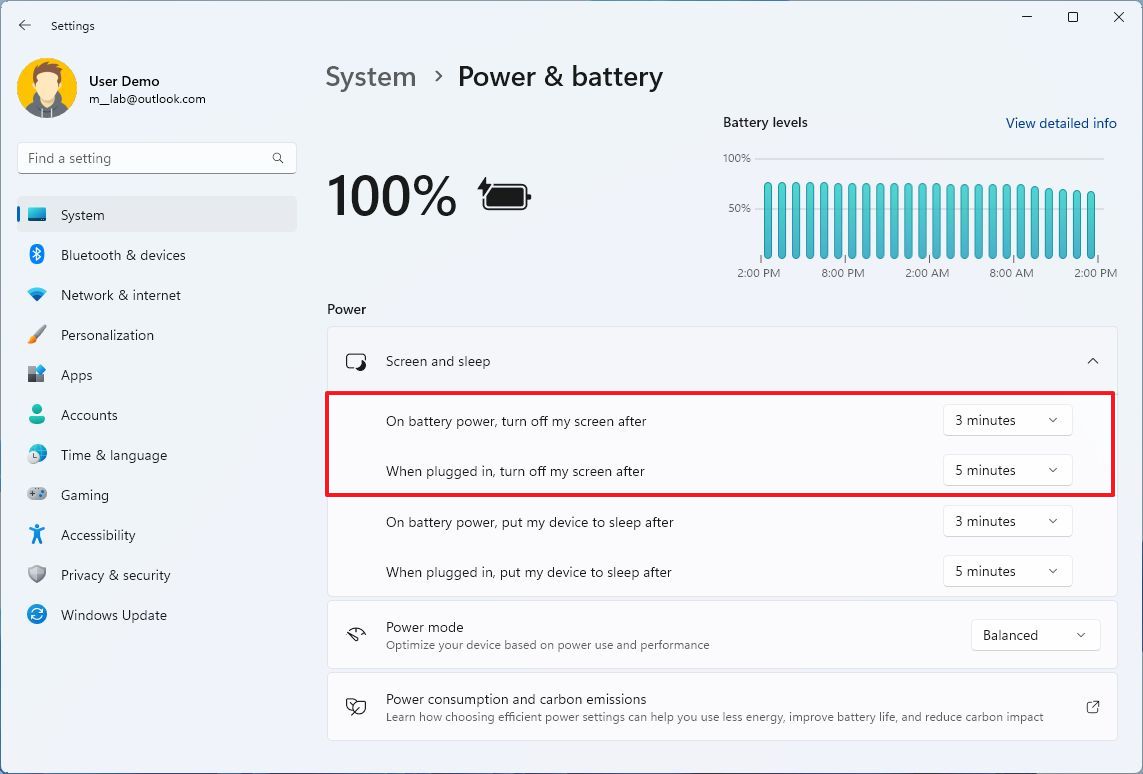
After you complete the steps, the display will automatically turn off when you specify to save power.
Change inactive display on version 24H2
To change the time when a display should turn off automatically on version 24H2, use these steps:
- Open Settings.
- Click on System.
- Click the Power & battery page on the right side.

- Click the "Screen, sleep, & hibernate timeouts" setting.
- Use the "Turn my screen off after" setting under the "On battery" section to reduce the number of minutes before turning off the display while on battery power.
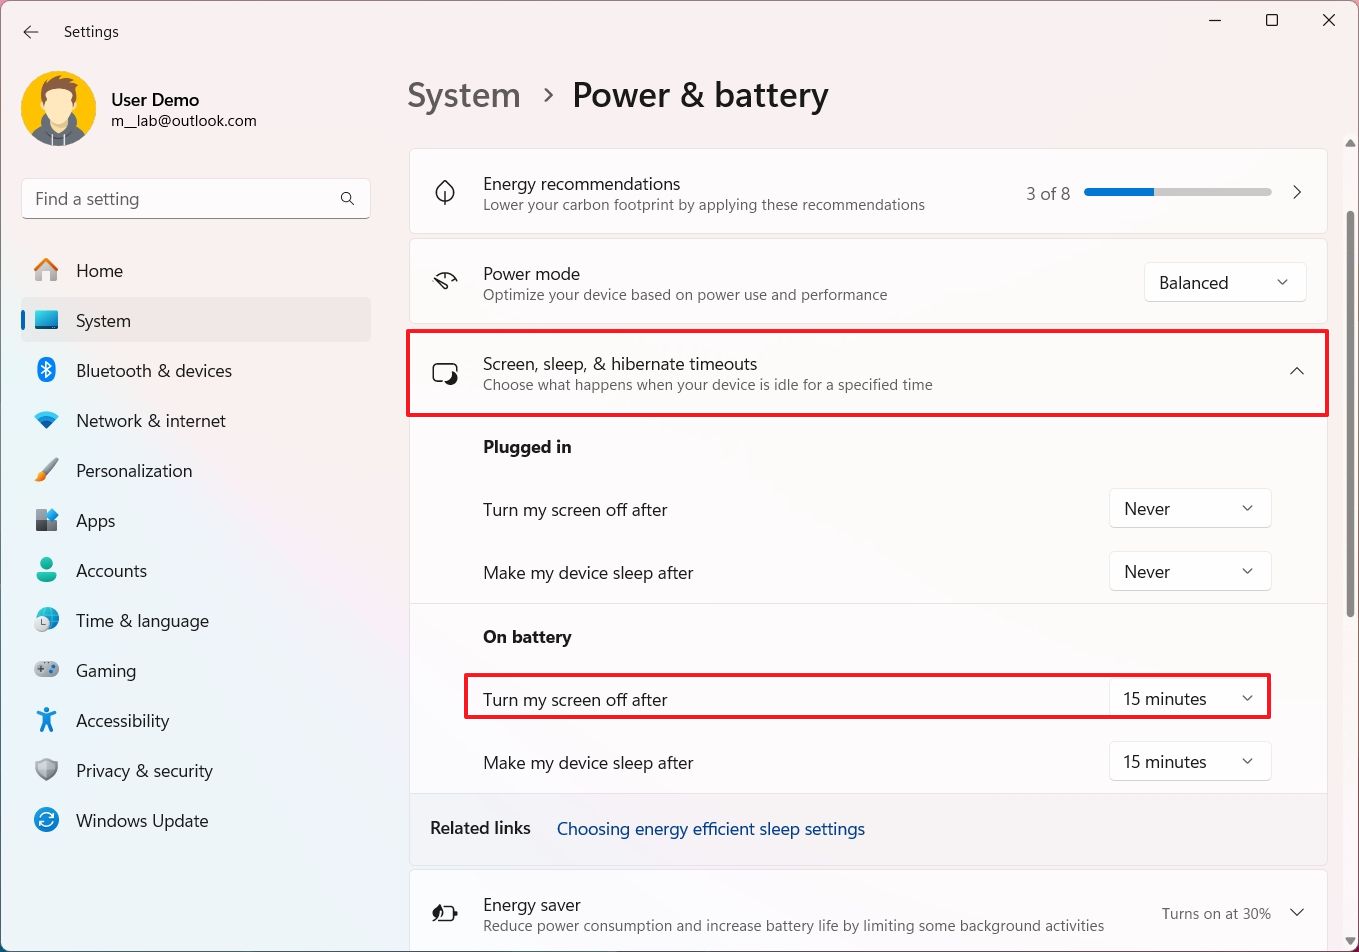
Once you complete the steps, the screen will turn off automatically according to your configuration.
How to set when computer should sleep on Windows 11
Settings a timer to send the computer to sleep can help improve battery life, but the configuration will be slightly different, depending on whether you have version 23H2 or 24H2.
Change sleep timer on version 23H2
To reduce the time when a computer should enter sleep mode to save battery, use these steps:
- Open Settings.
- Click on System.
- Click the Power & battery page on the right side.

- Under the "Power" section, click the Screen and sleep setting.
- Reduce the number of minutes before turning off the display while on battery power using the "On battery power, put my device to sleep after" setting.
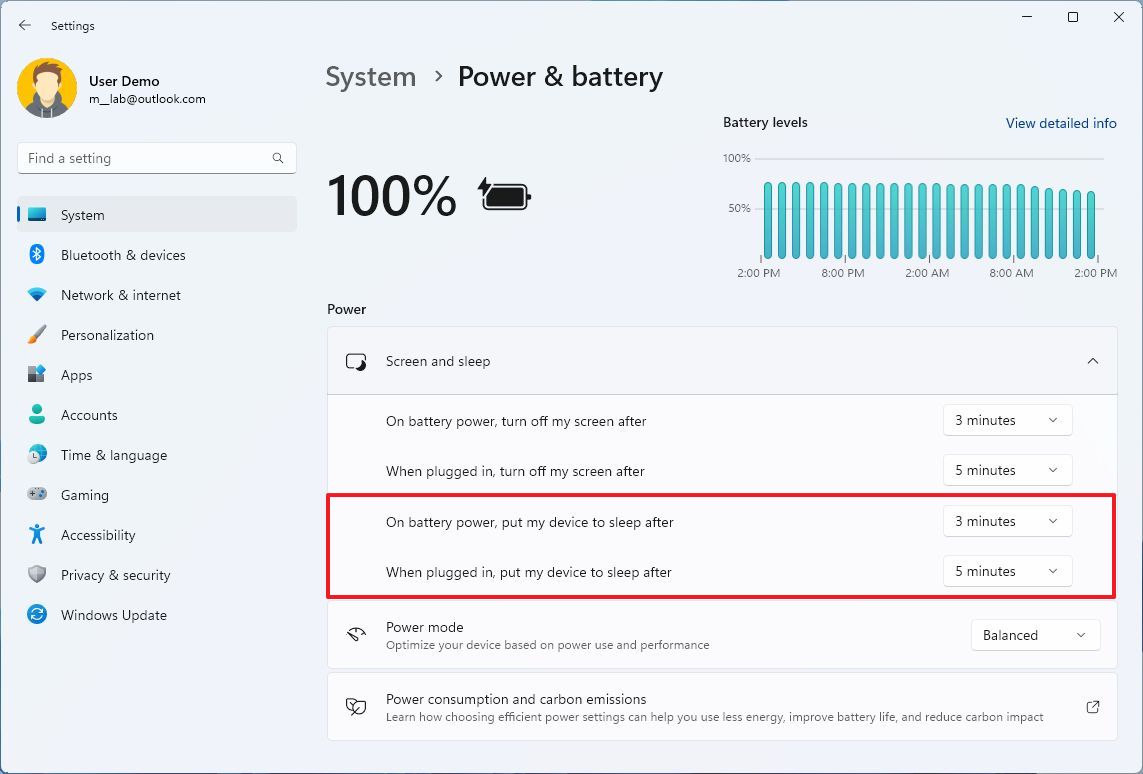
Once you complete the steps, the laptop will enter into sleep mode after the time of inactivity you specified to conserve battery life.
Change sleep timer on version 24H2
To change the time when a device should sleep to save battery, use these steps:
- Open Settings.
- Click on System.
- Click the Power & battery page on the right side.

- Click the "Screen, sleep, & hibernate timeouts" setting.
- Reduce the number of minutes before the device goes to sleep with the "Make my device sleep after" setting under the "On battery" section.
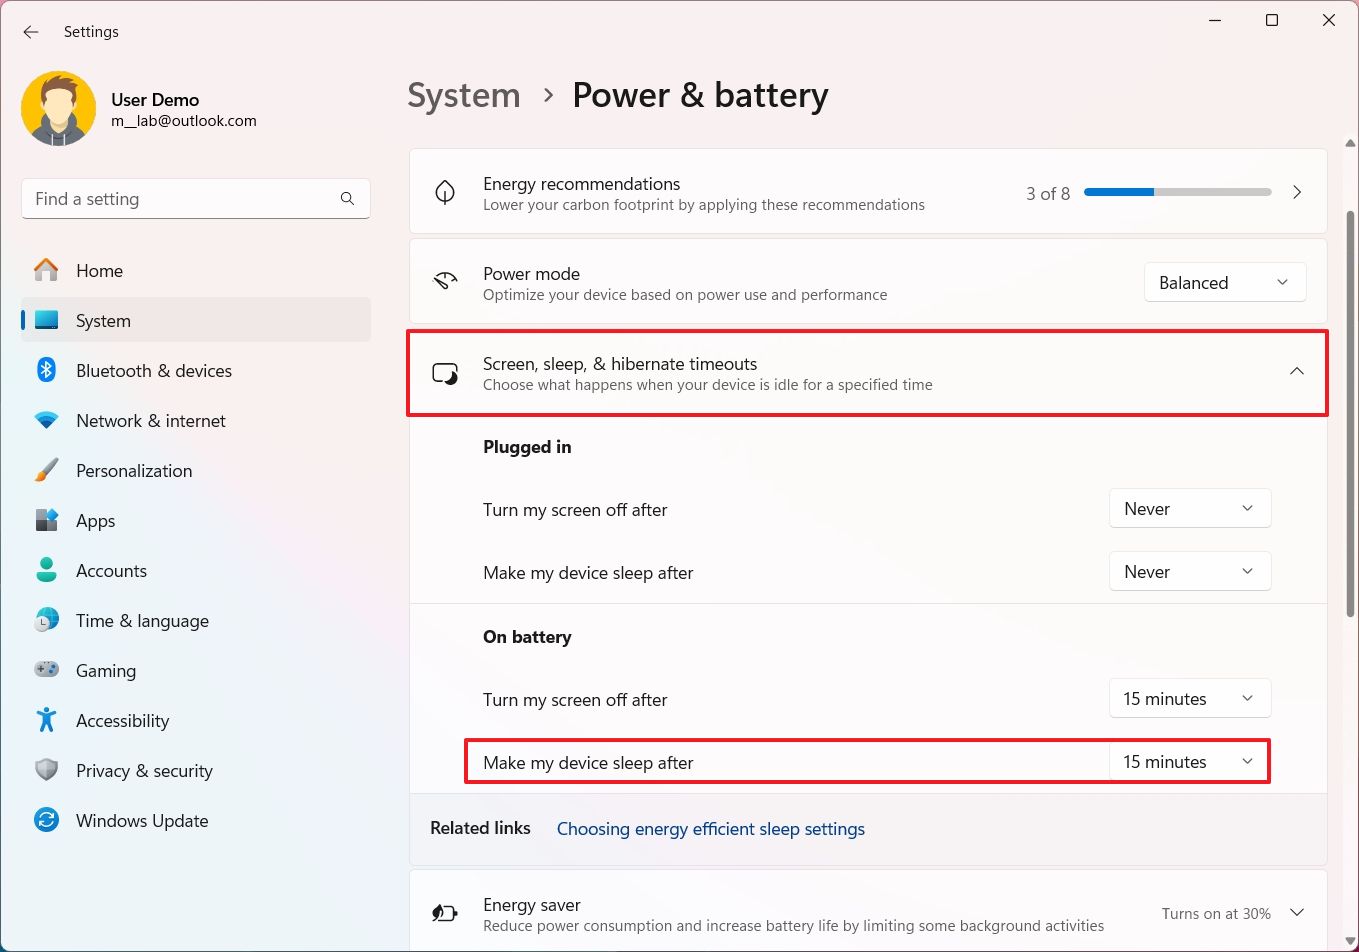
After completing the steps, the laptop will enter sleep mode at the specified time.
How to change power mode on Windows 11
Changing the power mode is similar on any version of Windows 11.
To change the power mode to favor battery life, use these steps:
- Open Settings.
- Click on System.
- Click the Power & battery page on the right side.

- Under the "Power" section, choose the "Best power efficiency" option using the "Power mode" setting.
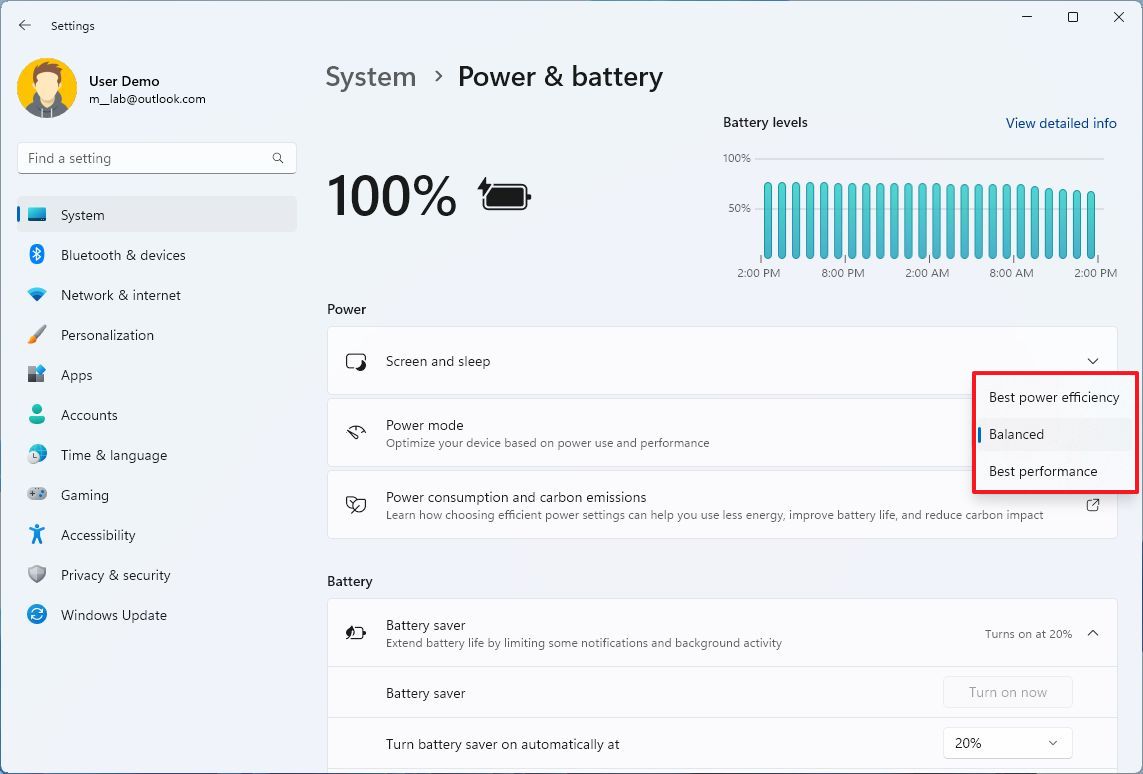
After you complete the steps, the system will implement policies to favor battery life rather than performance.
How to sleep laptop when the lid closes on Windows 11
Although you can always use the power options from the Start menu, you can also customize the system to Sleep or Hibernate as you close the laptop's lid to help you conserve battery.
Customize lid close action on version 23H2
To change what closing the lid does on Windows 11, use these steps:
- Open Control Panel.
- Click on Hardware and Sound.
- Click on Power Options.
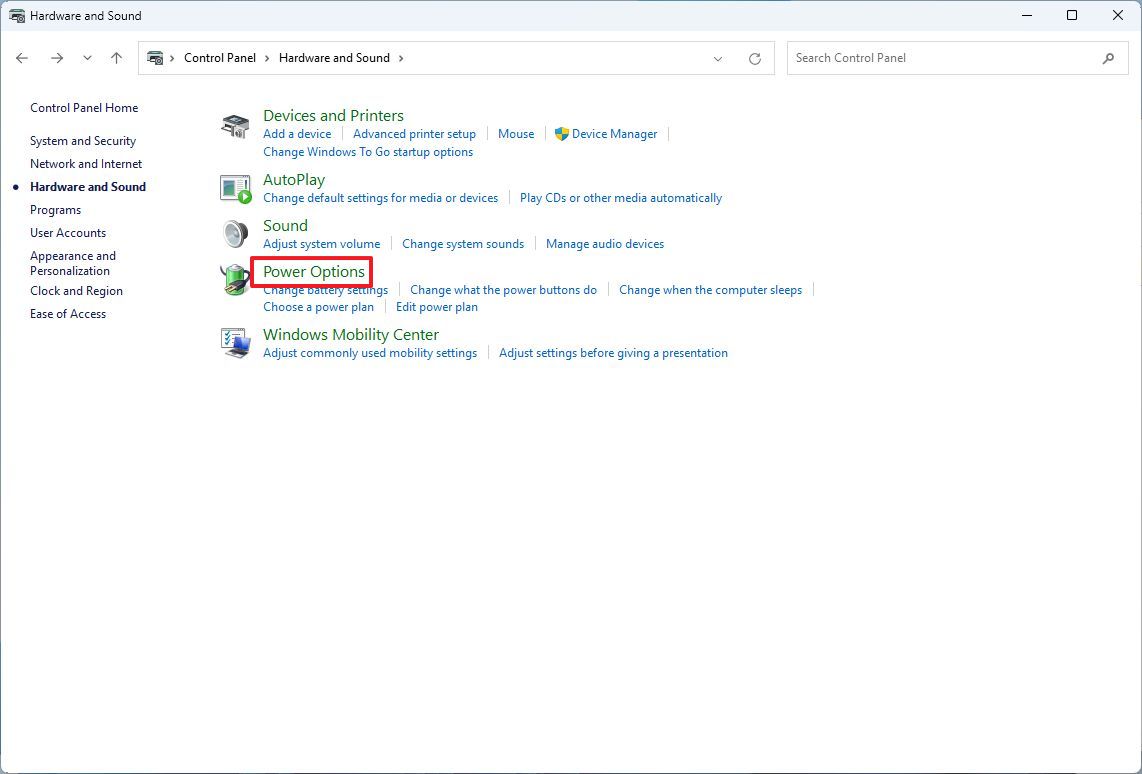
- Click the "Choose what closing the lid does" option in the left pane.
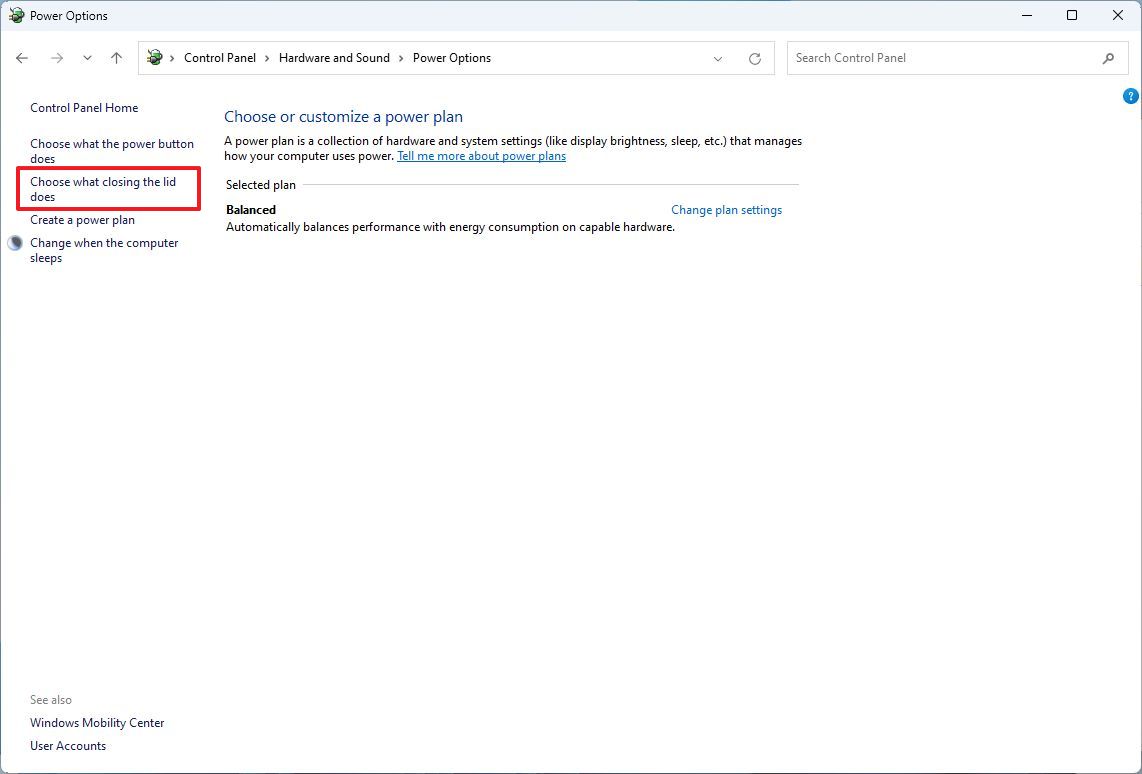
- Under the "On battery" section, use the "When I close the lid" setting and choose the Sleep or Hibernate (recommended) option.
- (Optional) Under the "Plugged in" section, use the "When I close the lid" setting and choose the Sleep or Hibernate (recommended) option.
- Click the Save changes button.
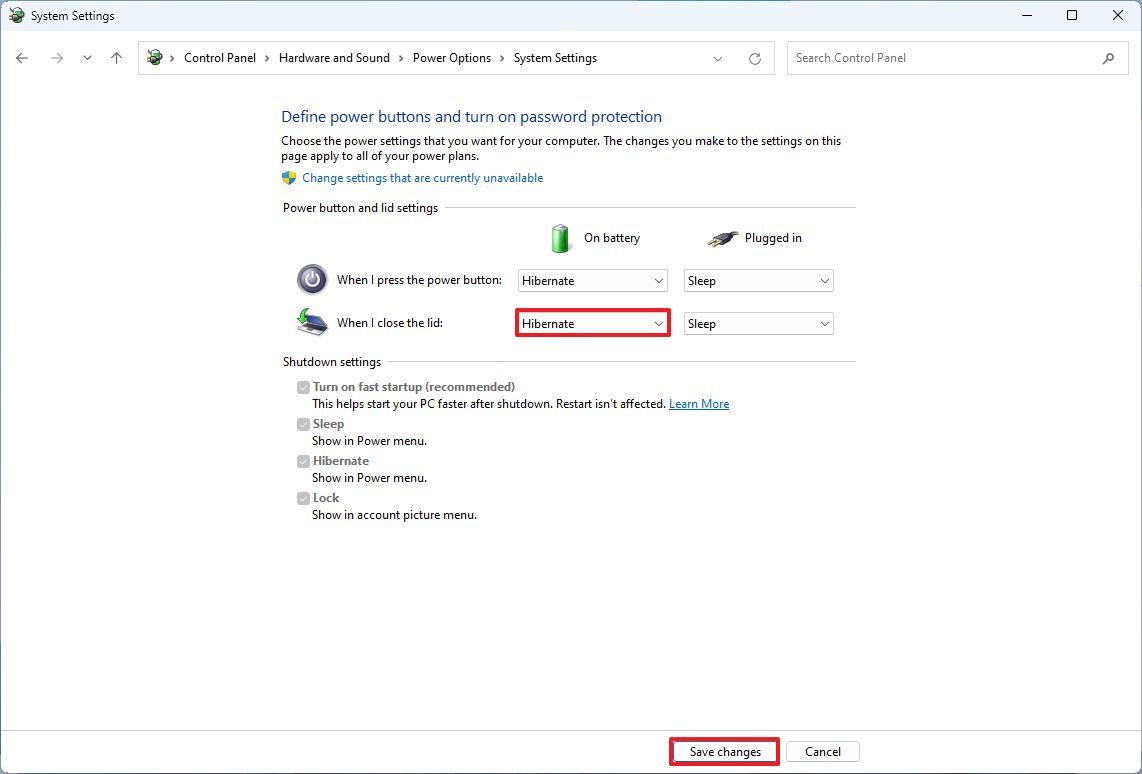
After you complete the steps, the next time you close the lid, the laptop will go into the sleep mode you selected to extend battery life.
This page also allows you to control the action of the power button. Depending on your preferences, you can set it to sleep or hibernate (recommended) the computer.
The "Hibernate" option will only be available if you have previously enabled the feature on Windows 11.
Customize lid close action on version 24H2
To change what closing the lid does on Windows 11 version 24H2, use these steps:
- Open Settings.
- Click on System.
- Click the Power & battery page on the right side.

- Click the "Lid & power button controls" setting.
- Under the "On battery" section, use the "Closing the lid will make my PC" setting and choose the Sleep or Hibernate (recommended) option.
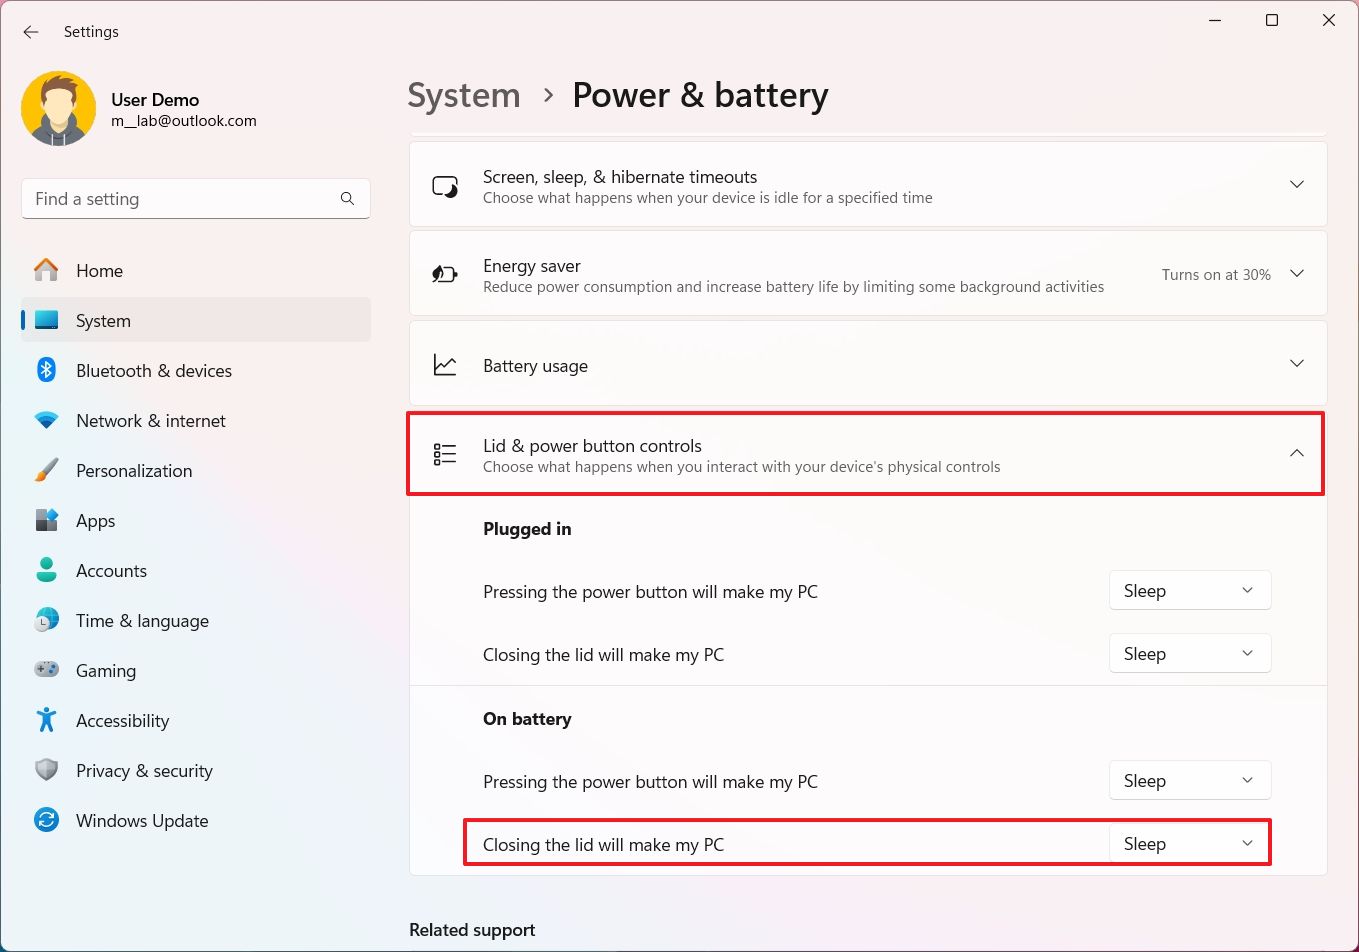
- (Optional) Under the "Plugged in" section, use the "Closing the lid will make my PC" setting and choose the Sleep or Hibernate (recommended) option.
Once you complete the steps, the laptop will go into the power-saving mode you selected when you close the lid.
How to change video playback settings on Windows 11
On Windows 11 version 24H2 or 23H2, you can change the video playback settings to help preserve the battery regardless of the version of the operating system.
To optimize battery life for video playback, use these steps:
- Open Settings.
- Click on Apps.
- Click the Video playback page on the right side.
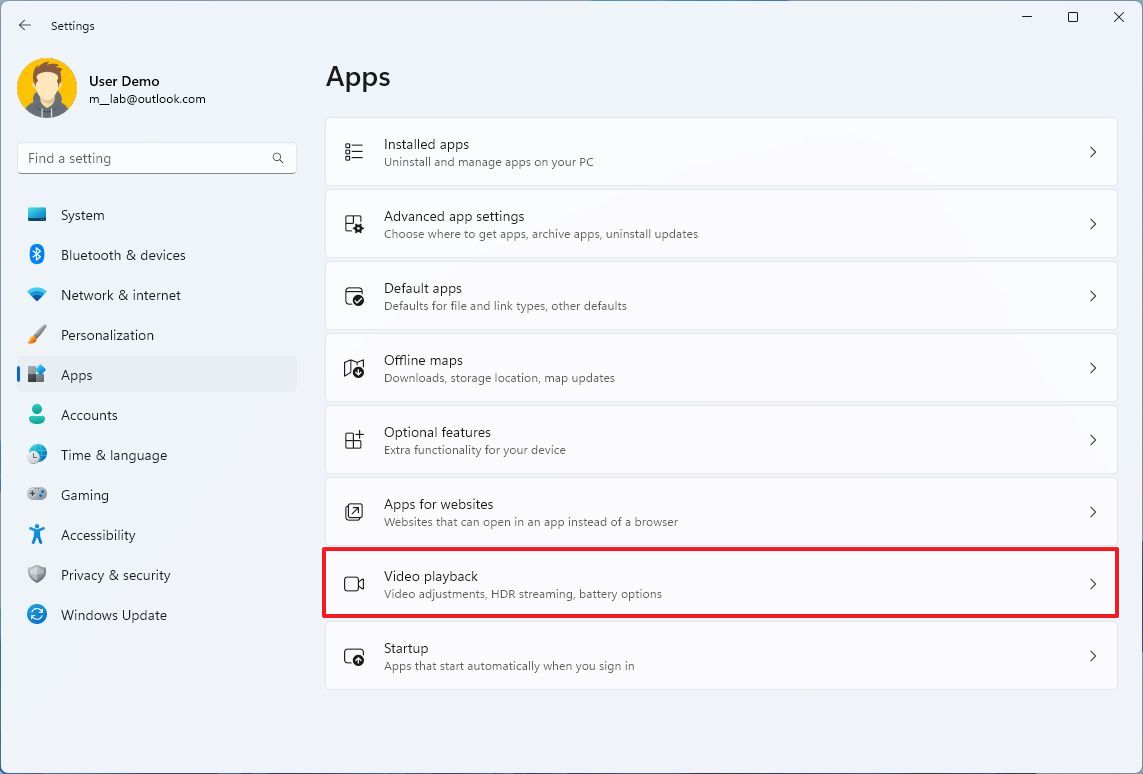
- Select the "Optimize for battery life" option using the "Battery options" setting.
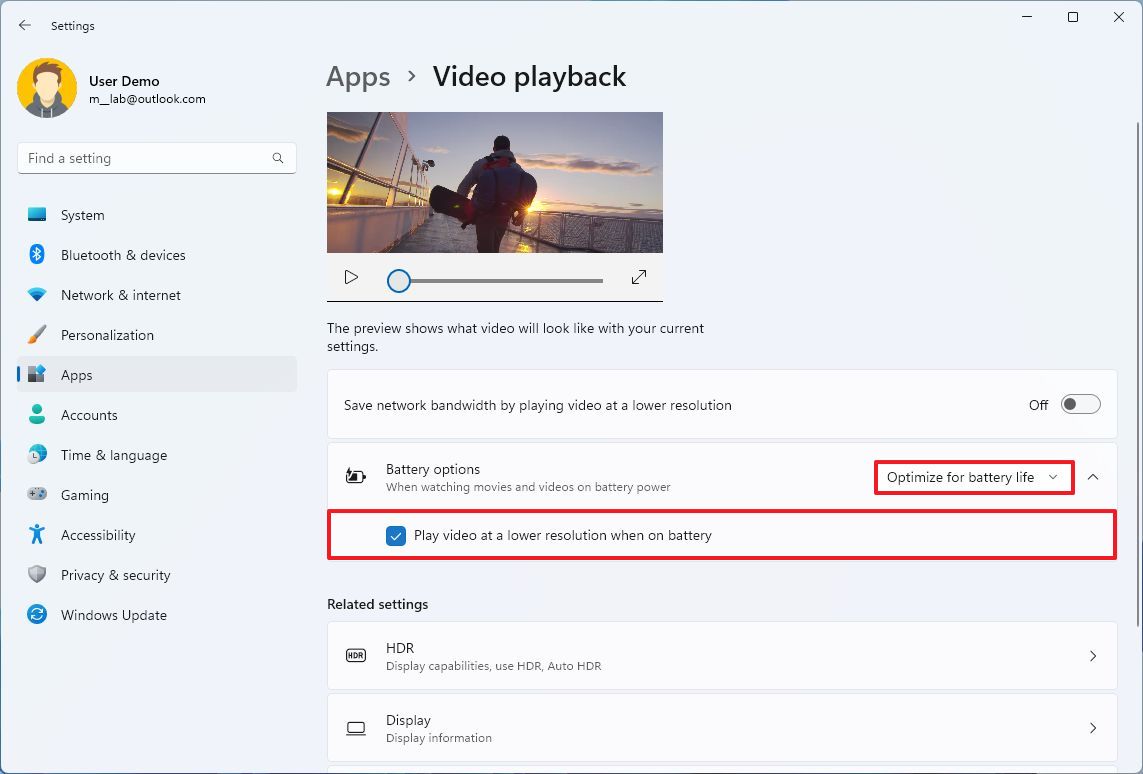
- Check the "Play video at a lower resolution when on battery" option.
Once you complete the steps, the video playback settings will be optimized to preserve battery life on the computer.
How to disable apps at startup on Windows 11
To prevent apps from running at startup to minimize battery drain on any version of Windows 11, use these steps:
- Open Settings.
- Click on Apps.
- Click the Startup page on the right side.
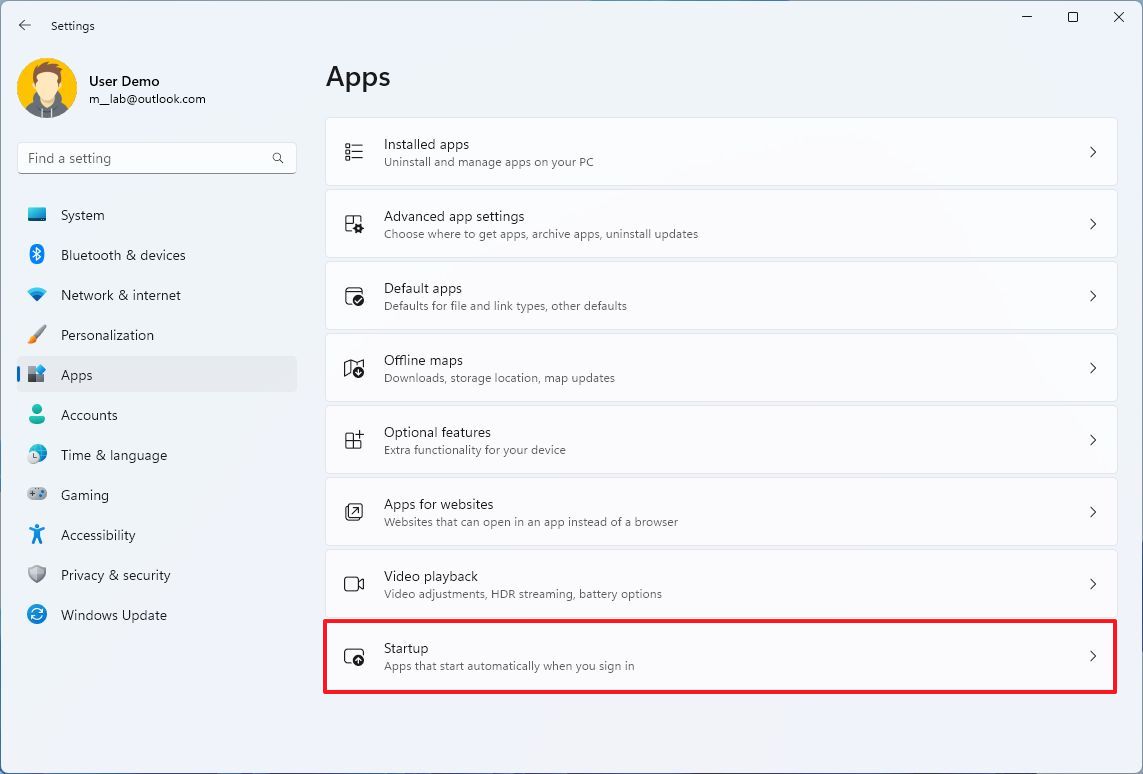
- Turn off all the unnecessary apps (leave enabled only the essential apps).
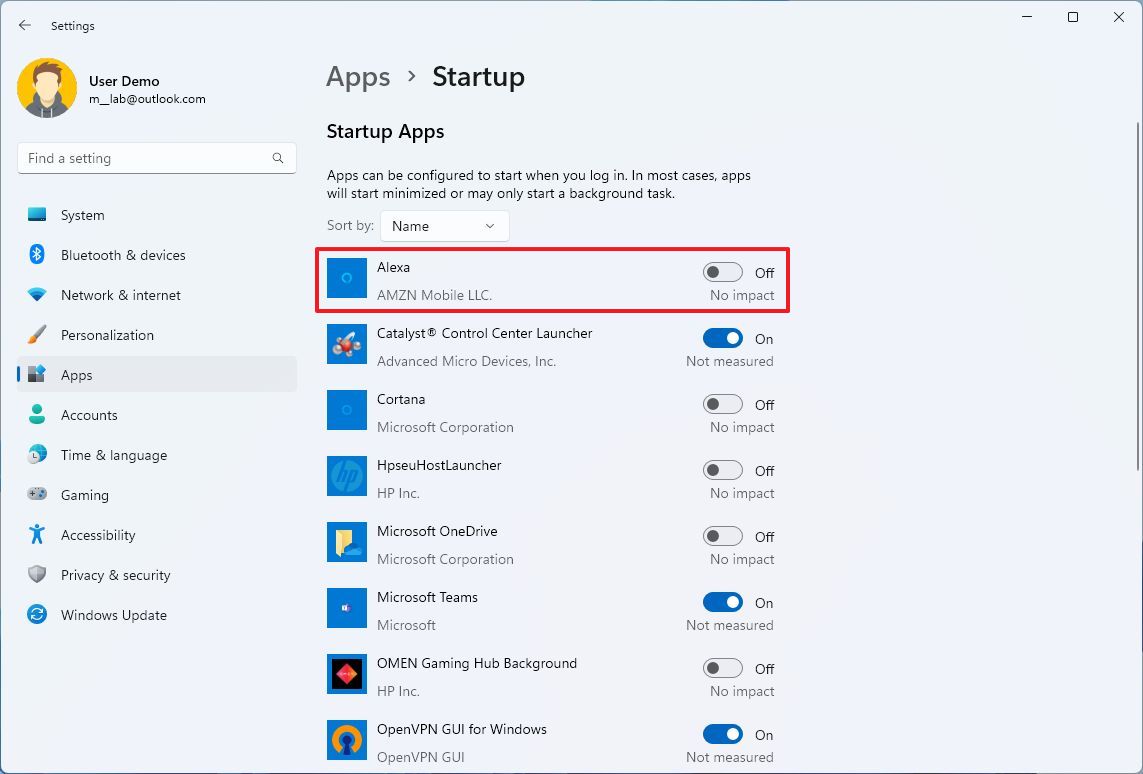
- Restart the computer
After you complete the steps, the computer will no longer launch additional programs at startup that could waste system resources that can negatively affect the battery experience.
How to turn off wireless adapter on Windows 11
If a task doesn't require an internet connection, you could disable the wireless communication to extend the laptop's battery life further.
To disable Wi-Fi communication to extend battery life on Windows 11, use these steps:
- Open Settings.
- Click on Network & internet.
- Turn off the Wi-Fi toggle switch.
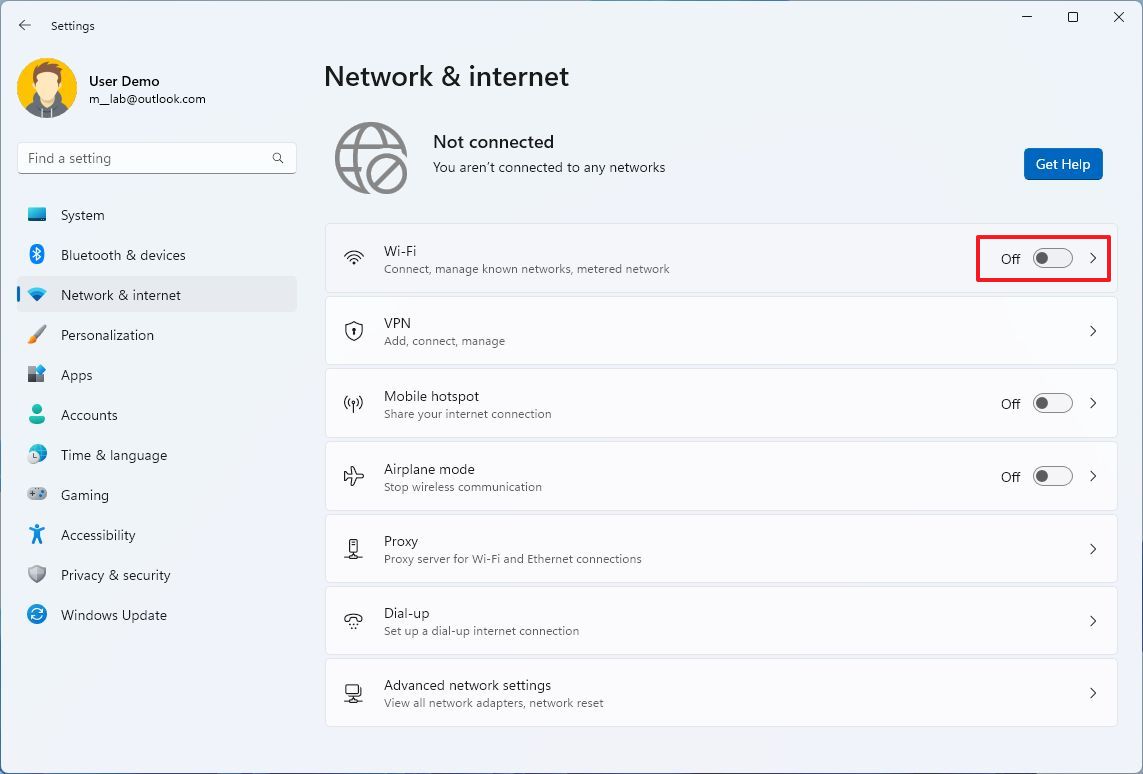
Once you complete the steps, the computer will disable the wireless communication to reduce battery drainage.
Alternatively, you can use the "Windows key + A" keyboard shortcut and click the Wi-Fi button to disable wireless communication.
How to disable Bluetooth on Windows 11
Like mobile phones, Bluetooth can also help drain the battery faster. If you disable the adapter, you can help improve the computer's battery life on any version of Windows 11.
To disable Bluetooth to preserve battery life, use these steps:
- Open Settings.
- Click on Bluetooth & devices.
- Turn off the Bluetooth toggle switch.
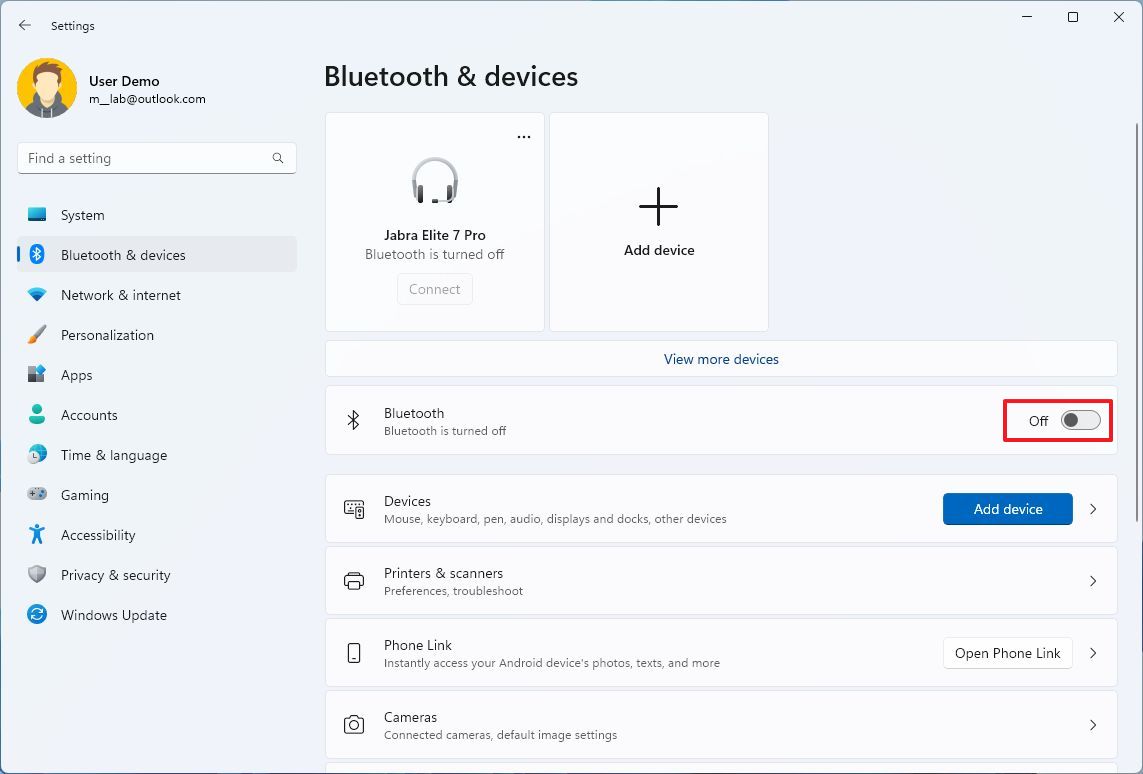
After you complete the steps, the device will pause Bluetooth connections to improve battery life.
Alternatively, you can use the "Windows key + A" keyboard shortcut and click the Bluetooth button to disable wireless communication.
How to turn on Airplane mode on Windows 11
Although you can manually disable Bluetooth, Wi-Fi, and other wireless communications individually, you can turn off all these signals automatically by turning on Airplane mode.
To turn on Airplane mode to save battery life on Windows 11 (version 23H2 or 24H2), use these steps:
- Open Settings.
- Click on Network & internet.
- Turn on the Airplane mode toggle switch.
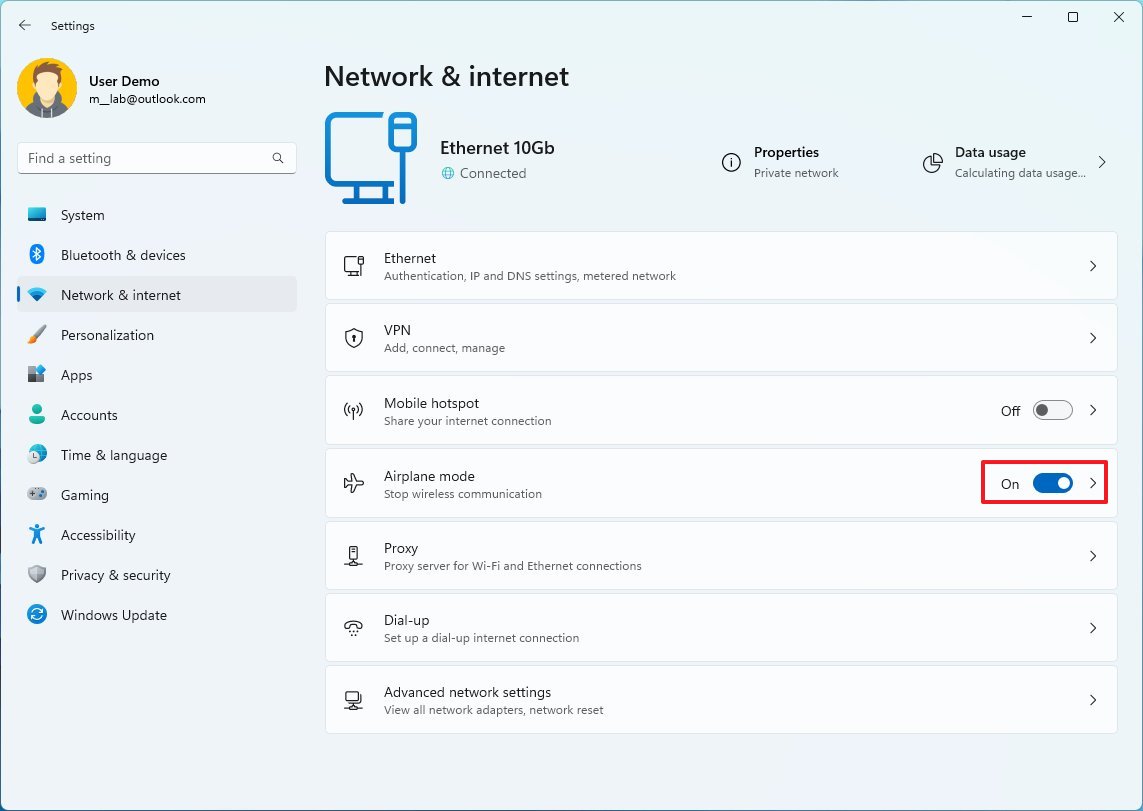
Alternatively, you can click the network icon in the Taskbar System Tray (Windows key + A shortcut) and click the Airplane mode button.
When Airplane mode is enabled, all wireless communications will be disabled, resulting in less power being utilized, expanding the battery life of the device.
How to switch to dark theme on Windows 11
When you use dark color mode and dark wallpaper on Windows 11, the display won't use as much energy to drive the pixels on the screen. As a result, using this color mode can help save battery life.
To set the dark theme on Windows 11 (version 24H2 or 23H2), use these steps:
- Open Settings
- Click on Personalization.
- Click the Themes page on the right side.
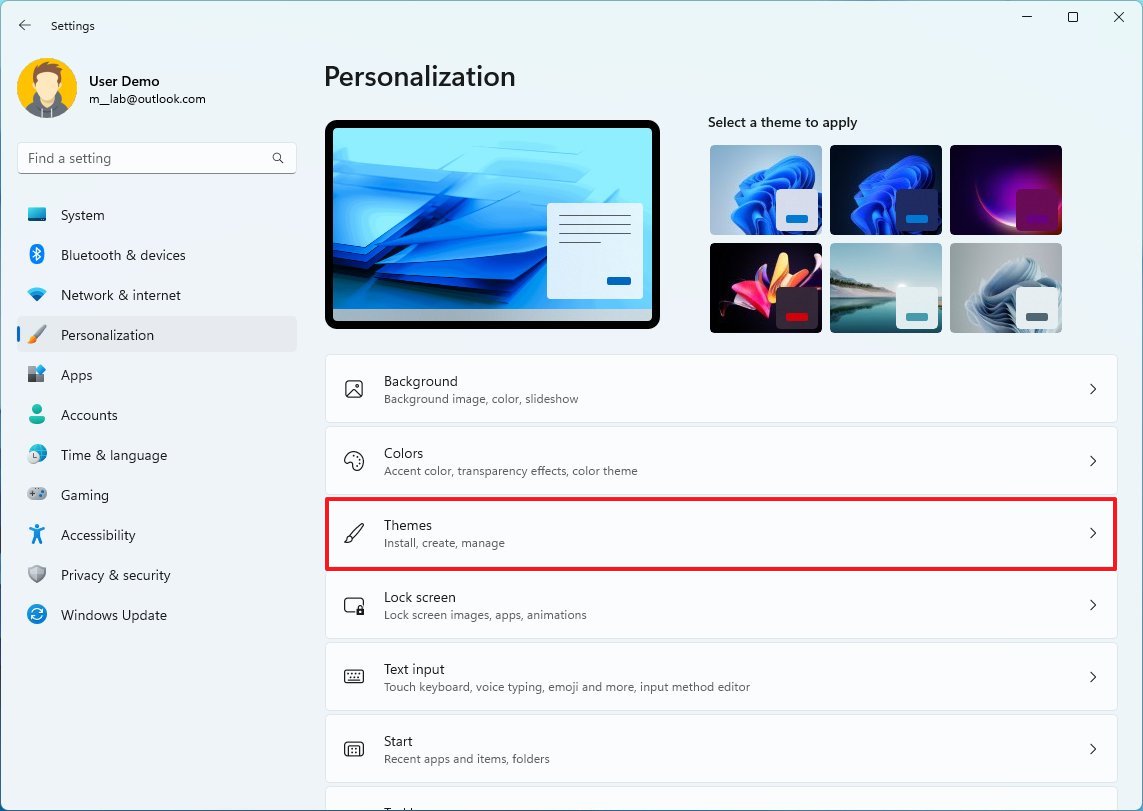
- Select the Windows (dark) theme.
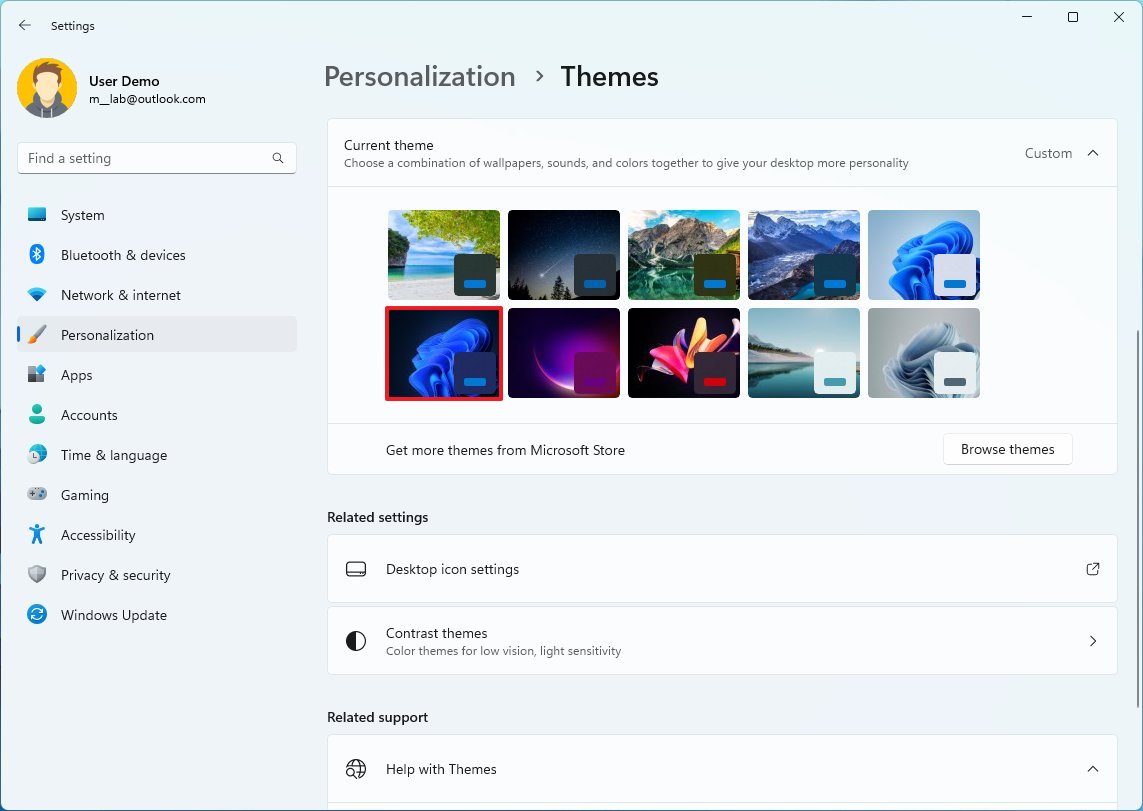
Once you complete the steps, the desktop will include the dark version of Bloom wallpaper for Windows 11, and the Taskbar, Start menu, and supported apps will switch to the dark color mode.
How to enable power usage during indexing on Windows 11
To minimize Windows Search battery usage, use these steps:
- Open Settings.
- Click on Privacy & security.
- Click the Searching Windows page on the right side.
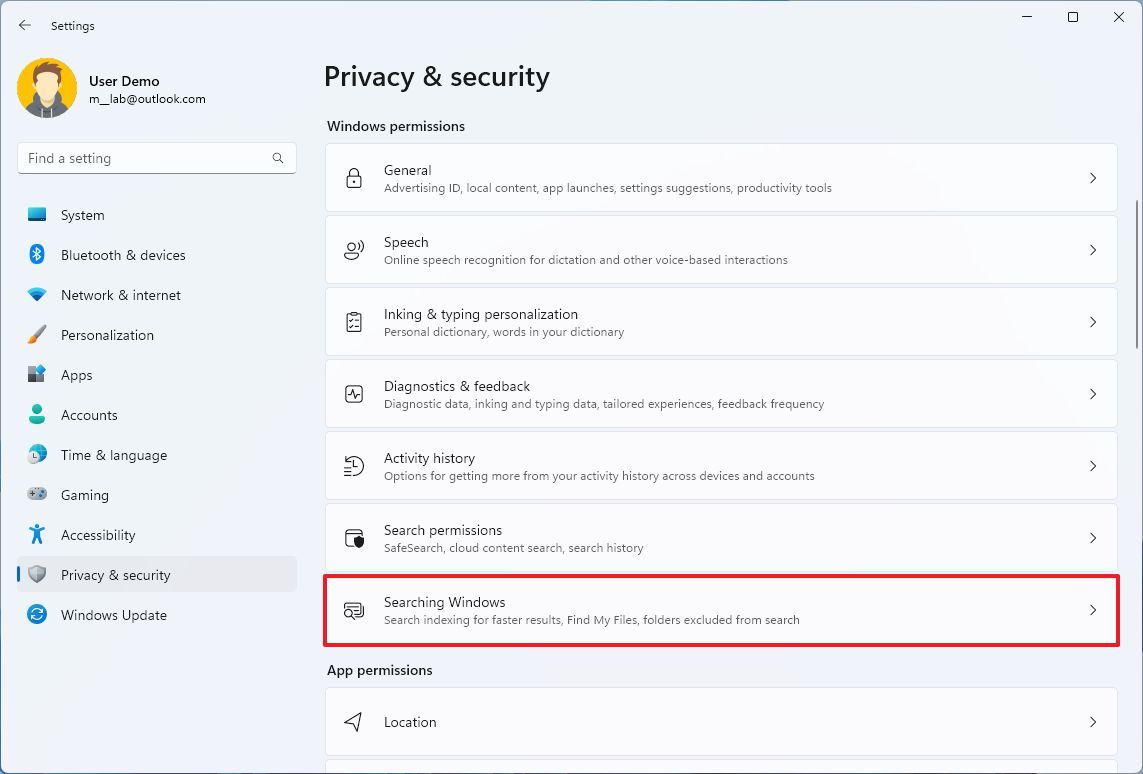
- Turn on the "Respect power settings when indexing" toggle switch.
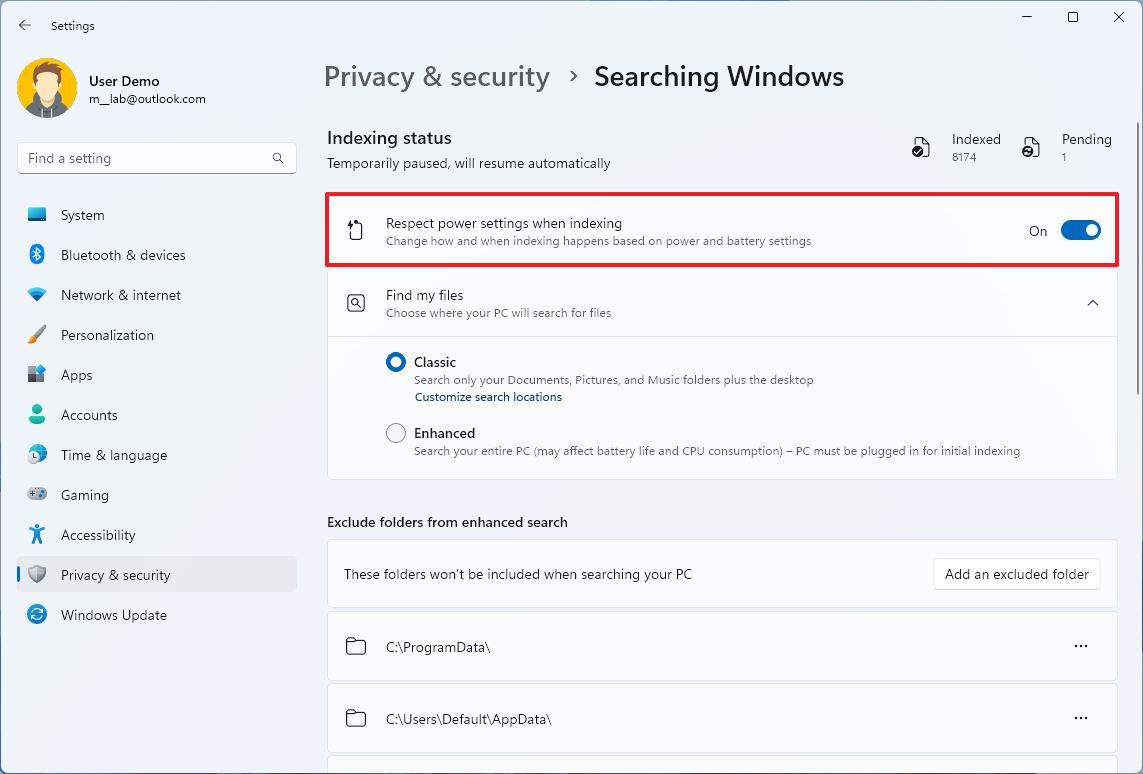
Once you complete the steps, Windows 11 will temporarily throttle or pause search and updates to the index database to extend battery life while on battery power.
This option is no longer available on Windows 11 version 24H2 and higher releases.
How to disable animation effects on Windows 11
Windows 11 (version 24H2 and older releases) has visual effects, such as minimizing, opening, closing, and maximizing windows, actions in the Taskbar, and more, to make the experience smoother. The only problem is that these effects require additional computing resources that can drain the laptop's battery. However, you can disable these effects to save some battery and make the experience feel a little faster in the process.
To disable the Windows 11 animation effects, use these steps:
- Open Settings.
- Click on Accessibility.
- Click the Visual effects page on the right side.
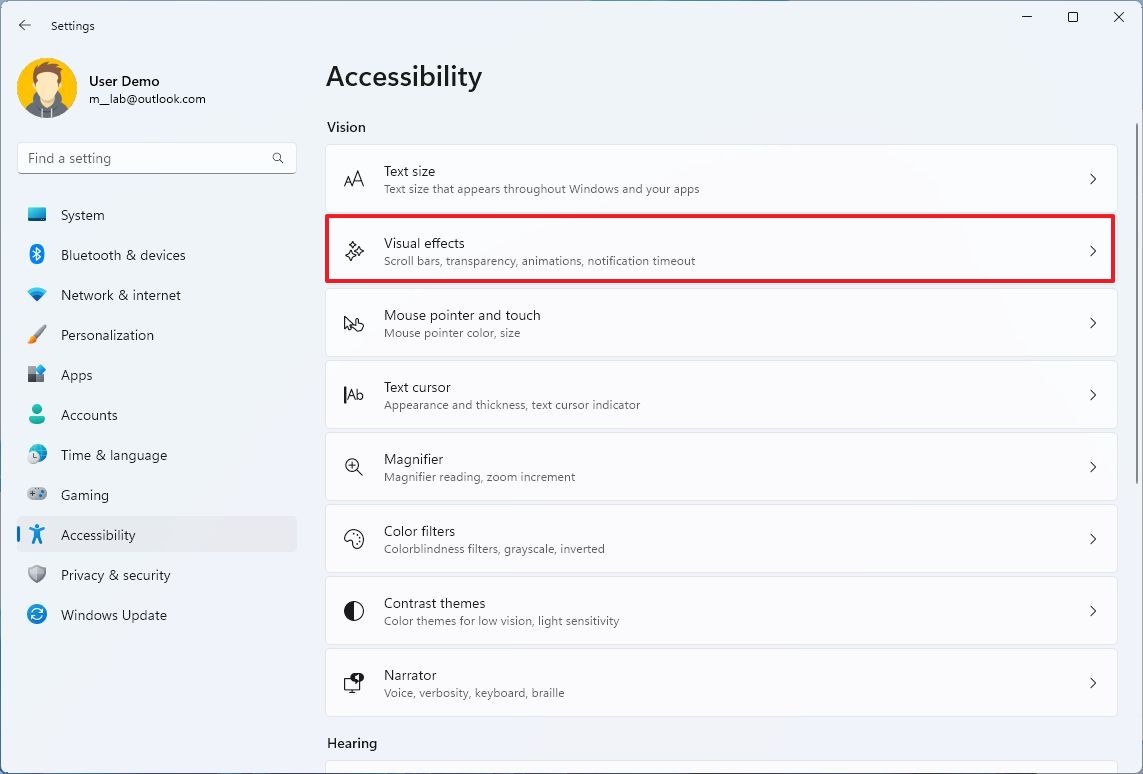
- Turn off the Animation effects toggle switch.
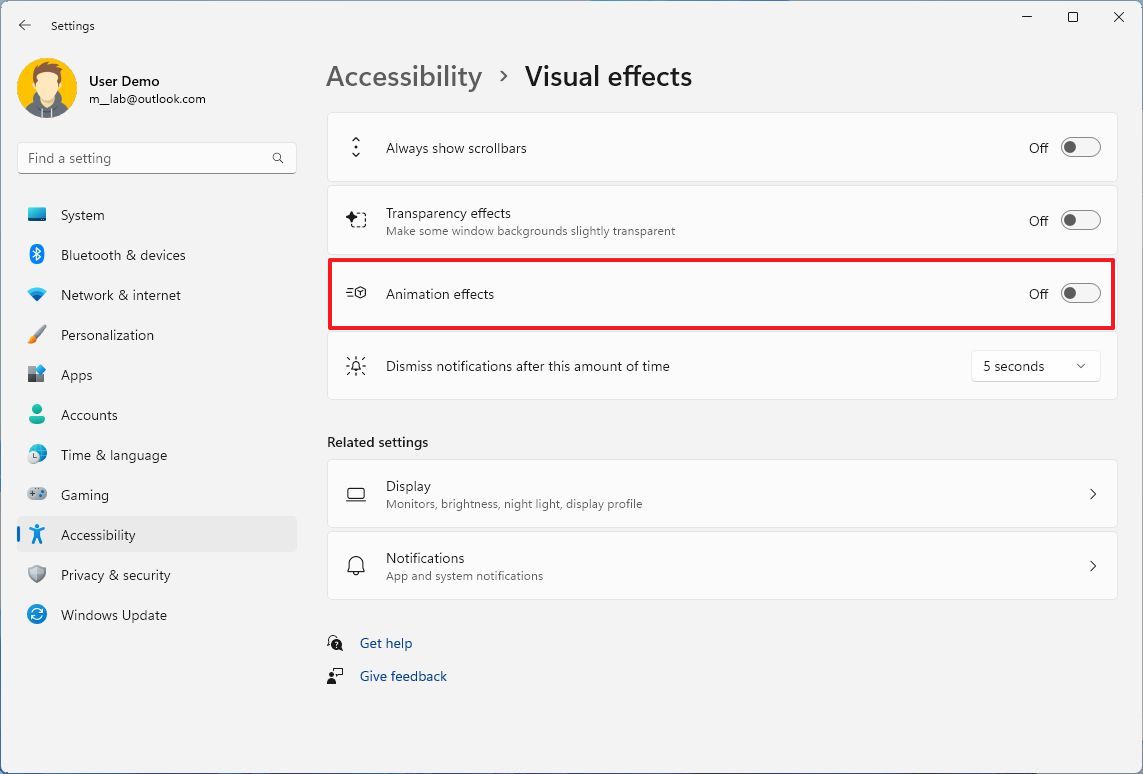
- Turn off the Transparency effects toggle switch.
Once you complete the steps, the system won't need to use additional resources to play visual effects, improving battery life.
How to lower brightness on Windows 11
To lower the brightness settings to save battery life on Windows 11 (version 24H2 and 23H2), use these steps:
- Open Settings.
- Click on System.
- Turn on the Display toggle switch.
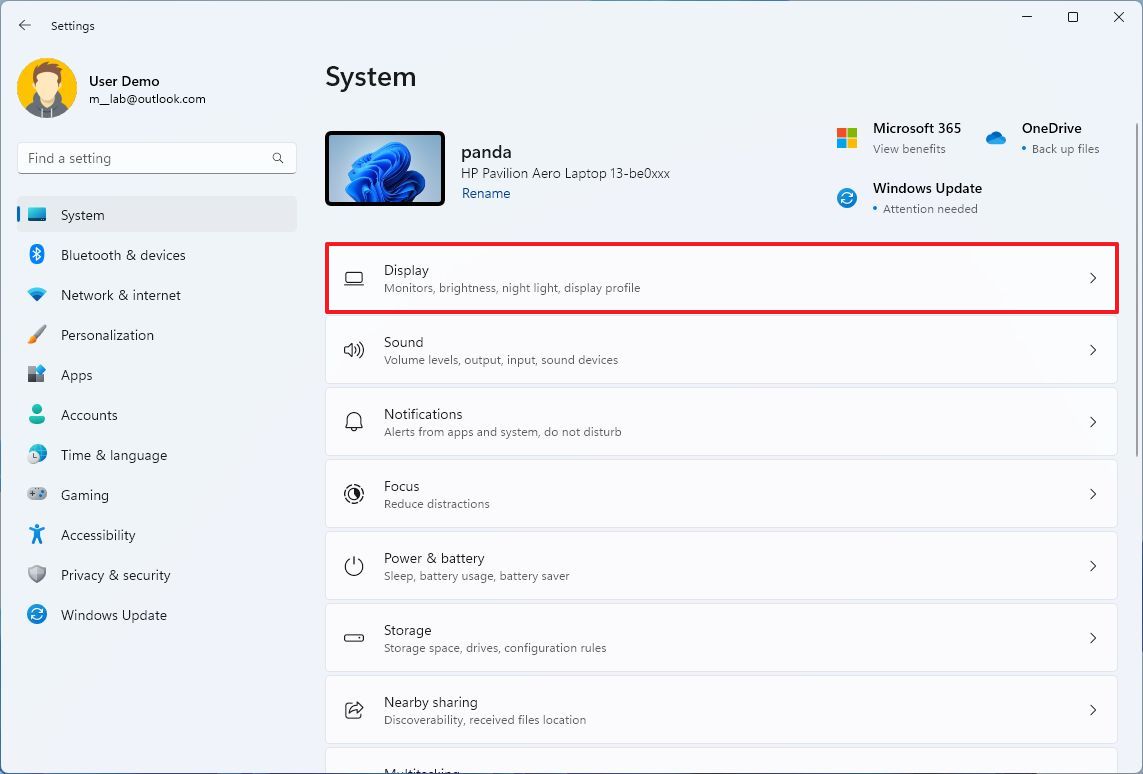
- Under the "Brightness & color" section, click the Brightness setting.
- Use the slider to control the light intensity of the display.
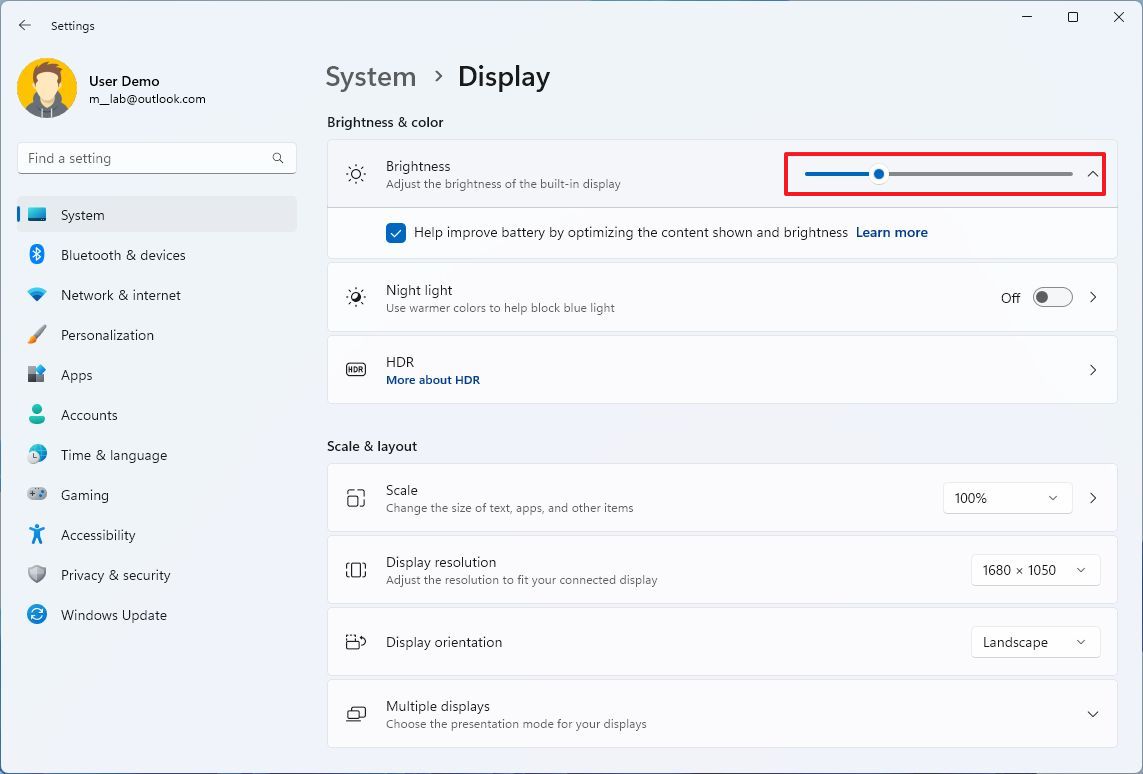
- Check the "Help improve battery by optimizing the content shown and brightness" option to let the system manage image quality in favor of battery life.
After completing the steps, the display will lower its brightness to reduce power consumption and battery usage.
How to enable Dynamic Refresh Rate on Windows 11
Dynamic Refresh Rate (DRR) is a feature that automatically lowers the device's refresh rate to save battery life. When using this feature, you will be trading off-screen quality, but it'll help to preserve battery life.
The feature is only available on displays with 120Hz or higher refresh rates. Also, the steps will be slightly different depending on the version of Windows 11.
Change refresh settings on version 23H2
To enable Dynamic Refresh Rate on Windows 11, use these steps:
- Open Settings.
- Click on System.
- Click the Display page on the right side.

- Under the "Related settings" section, click the Advanced display setting.
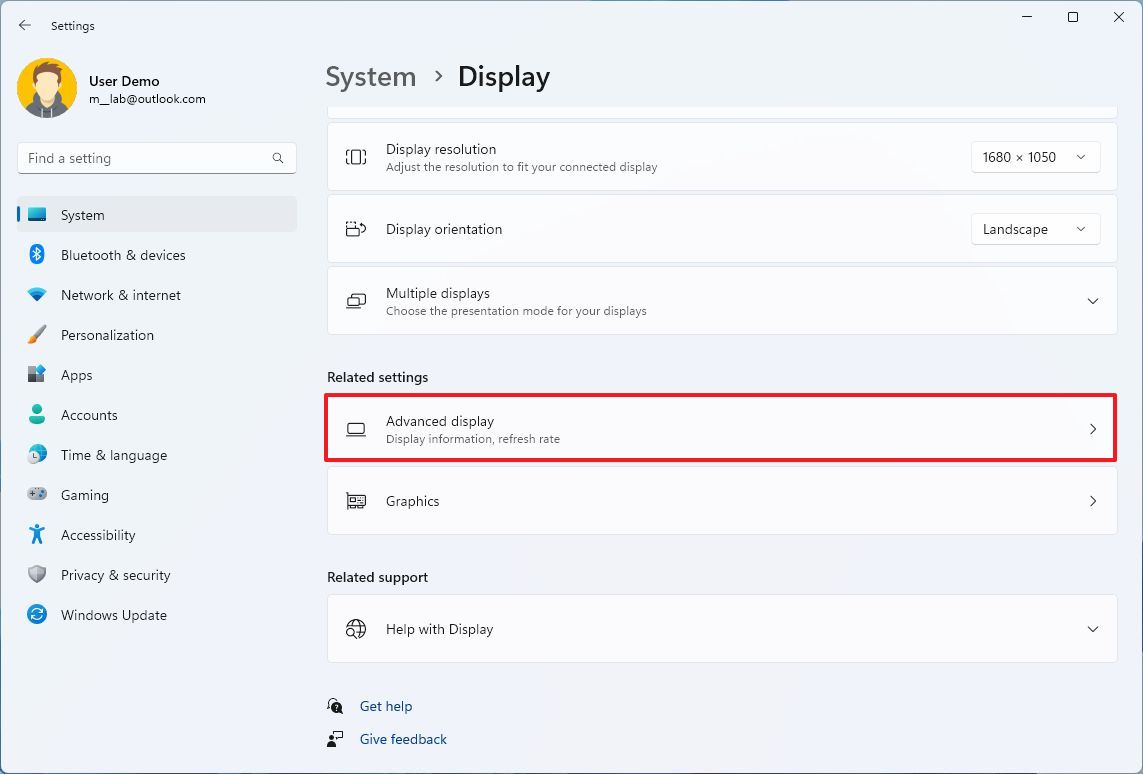
- Select the Dynamic option using the "Choose a refresh rate" setting.
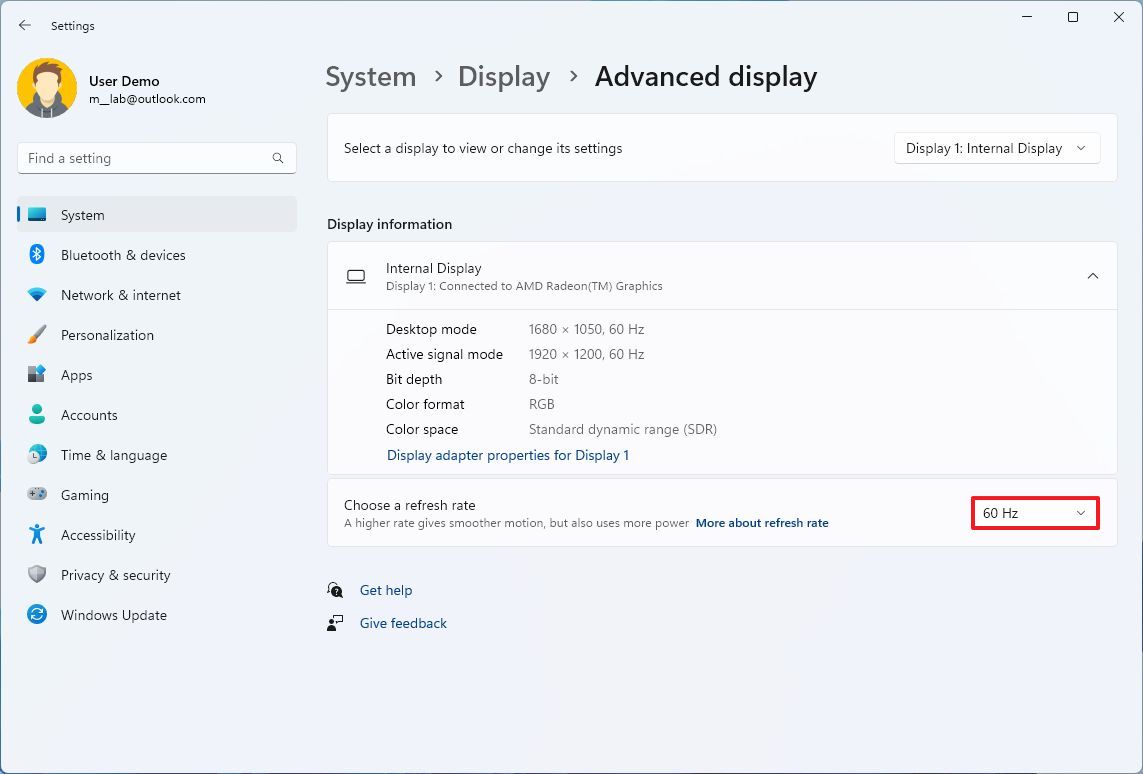
- (Optional) Use Select the 60 Hz option using the "Choose a refresh rate" setting on displays of 120Hz or higher refresh rates.
Once you complete the steps, the device will automatically lower the display refresh rate when a higher rate isn't necessary to save power.
Change refresh settings on version 24H2
To enable Dynamic Refresh Rate on Windows 11 version 24H2, use these steps:
- Open Settings.
- Click on System.
- Click the Display page on the right side.
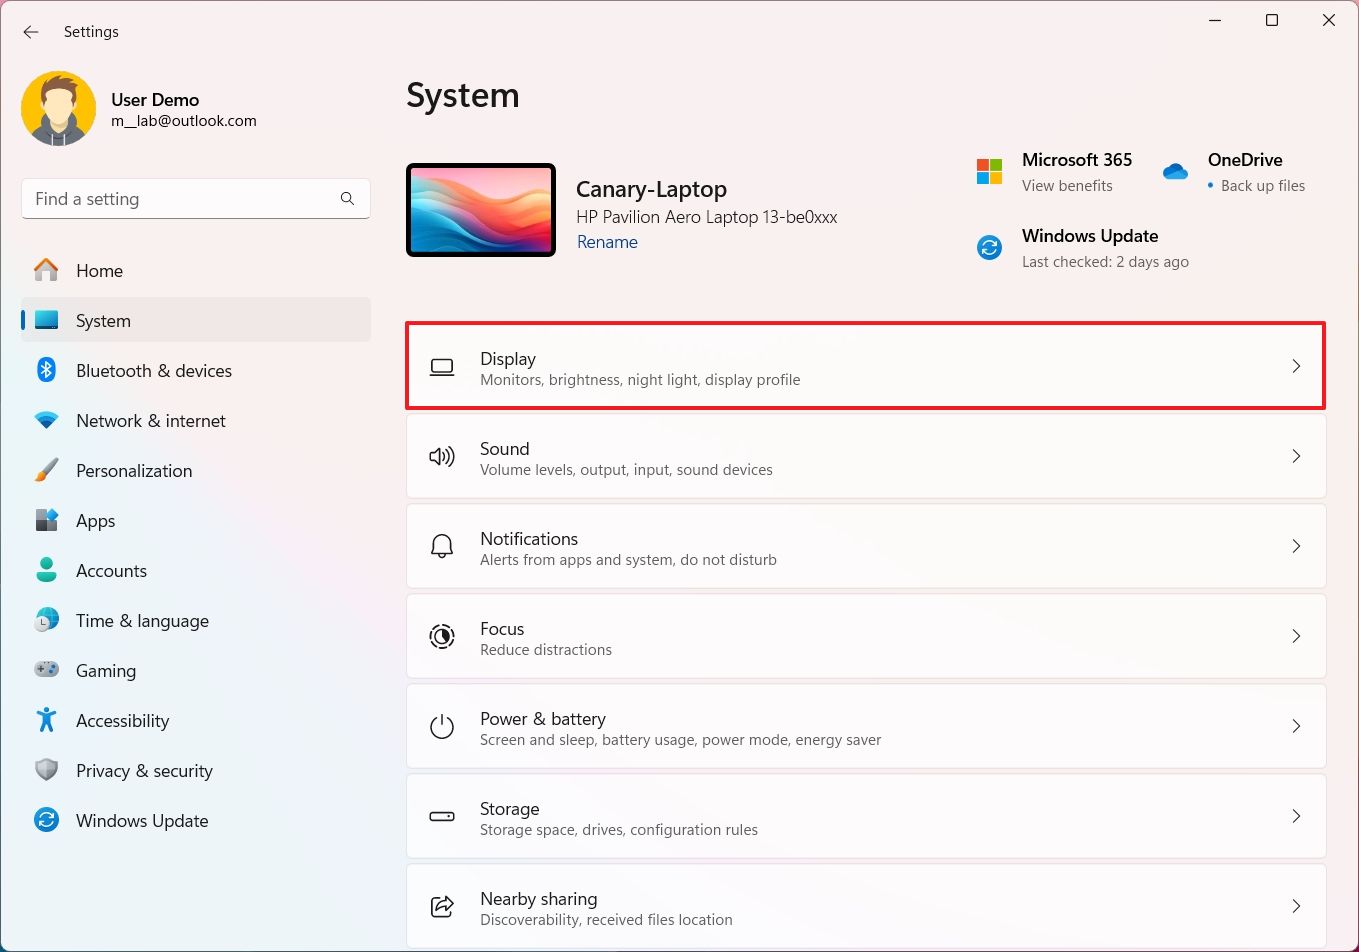
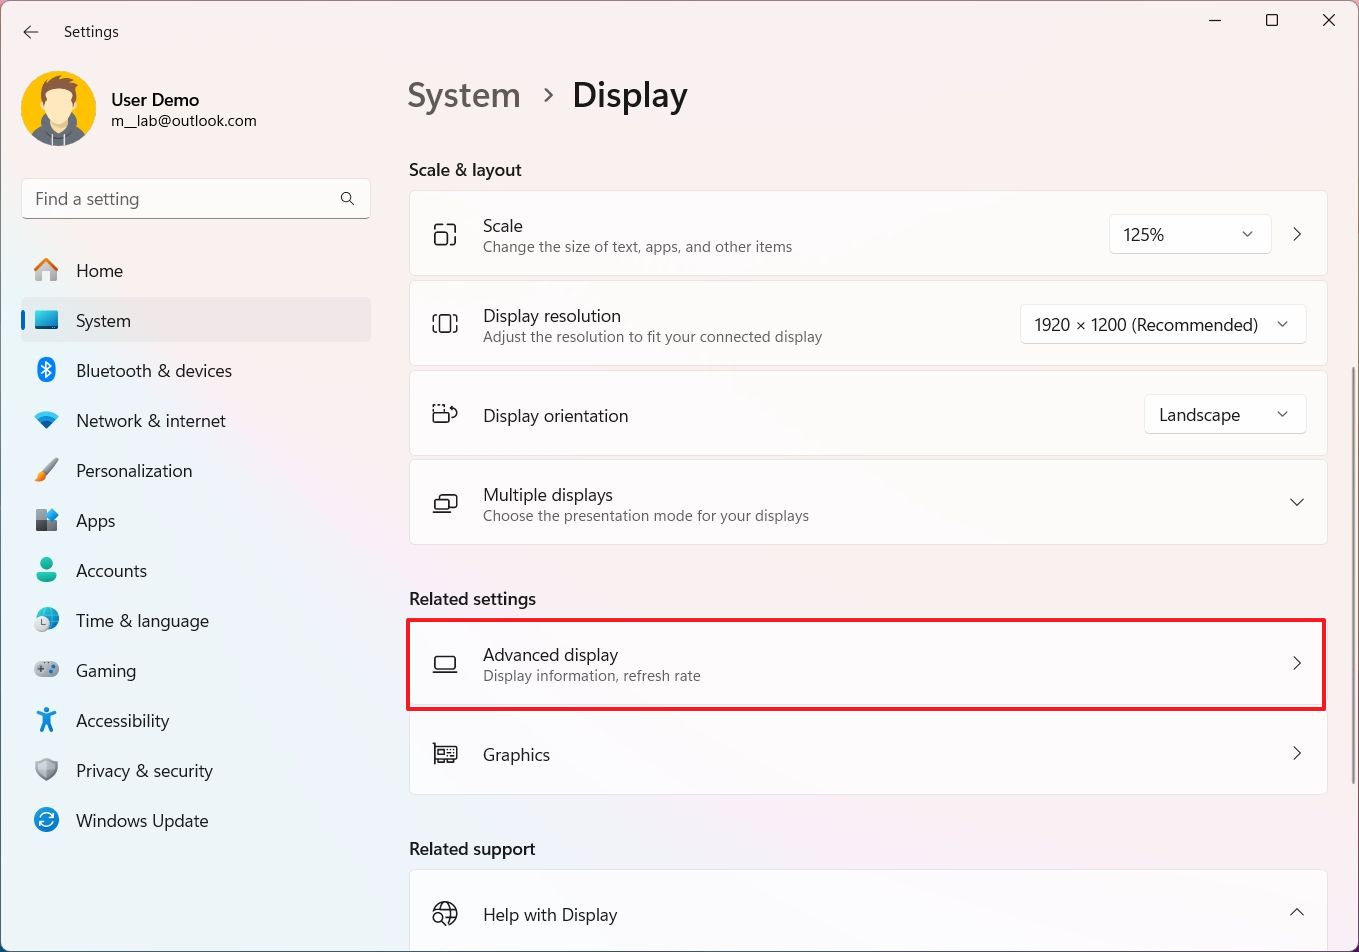
- Click the Advanced display setting under the "Related settings" section.
- Turn on the "Dynamic refresh rate" toggle switch.
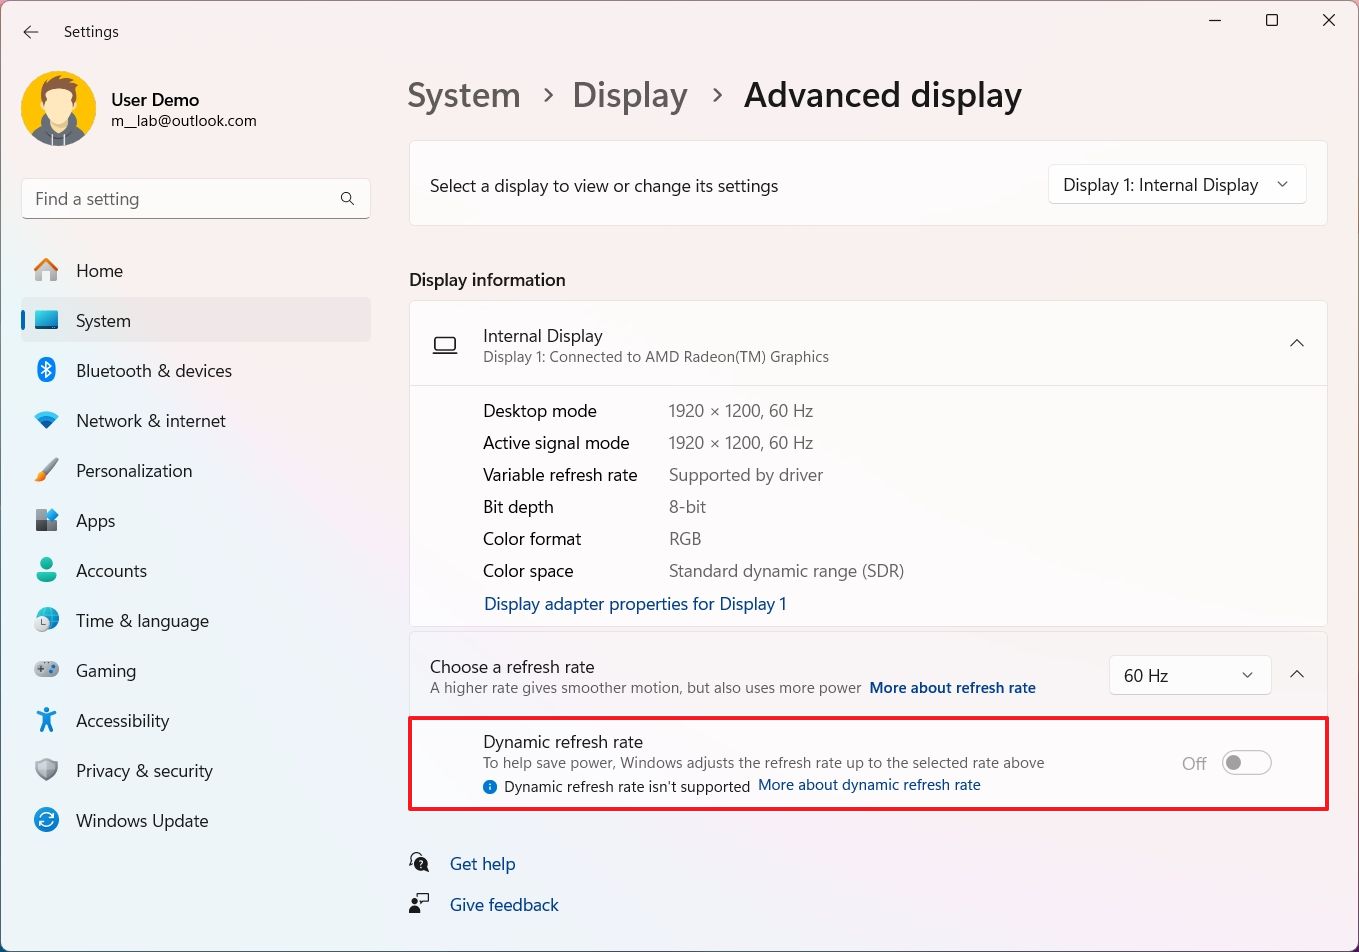
After you complete the steps, the laptop will automatically lower the display refresh rate when a higher rate isn't necessary.
How to choose graphics card per application on Windows 11
If you want to preserve battery life as much as possible, you can change the system settings so that the applications use the less powerful graphics card. Of course, this only works on a system with two or more graphics cards.
These settings will also be slightly different depending on the Windows version installed on the computer.
Configure graphics card for apps on version 23H2
To configure an app to use the less powerful GPU on Windows 11, use these steps:
- Open Settings.
- Click on System.
- Click the Display page on the right side.
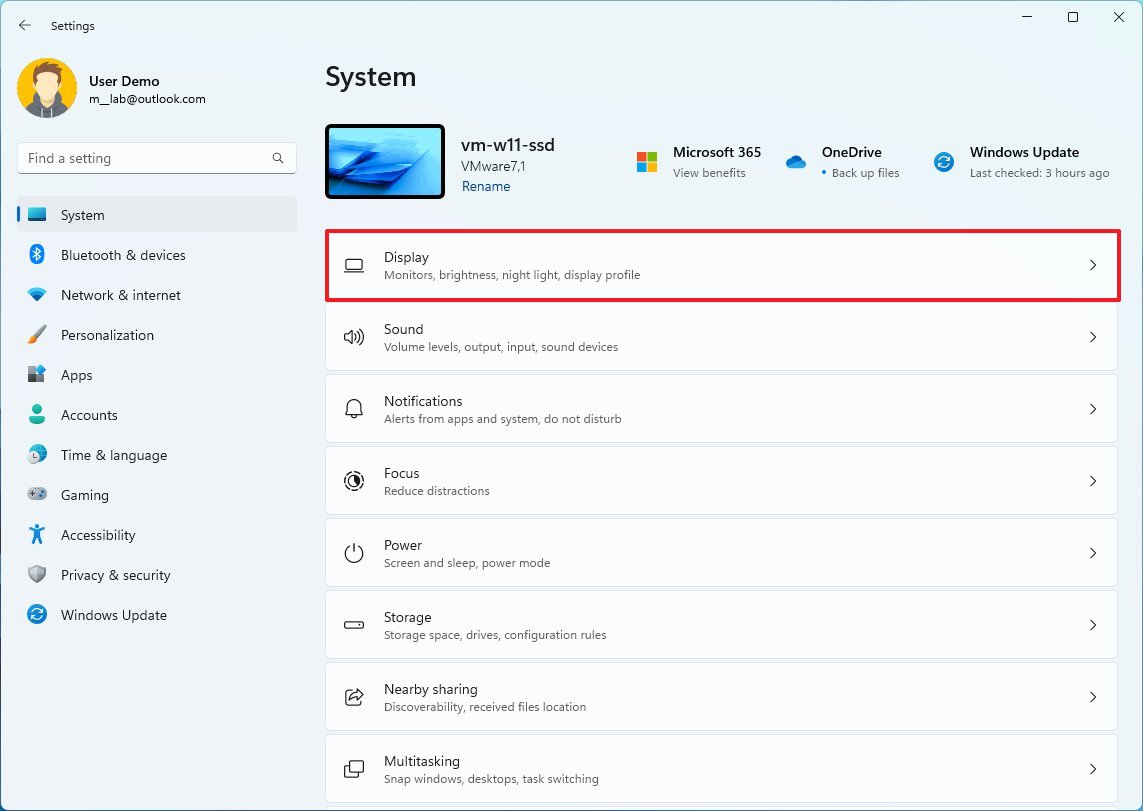
- Under the "Related settings" section, click the Graphics settings.
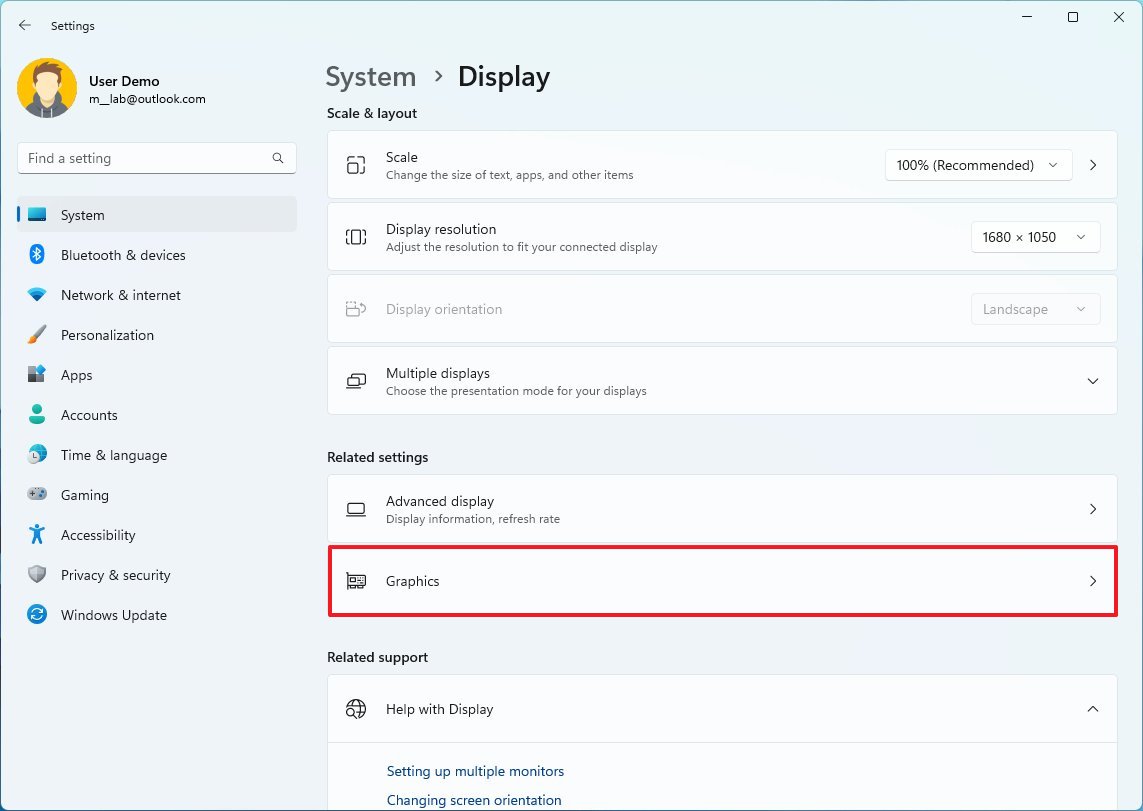
- Select the app and click the Options button.
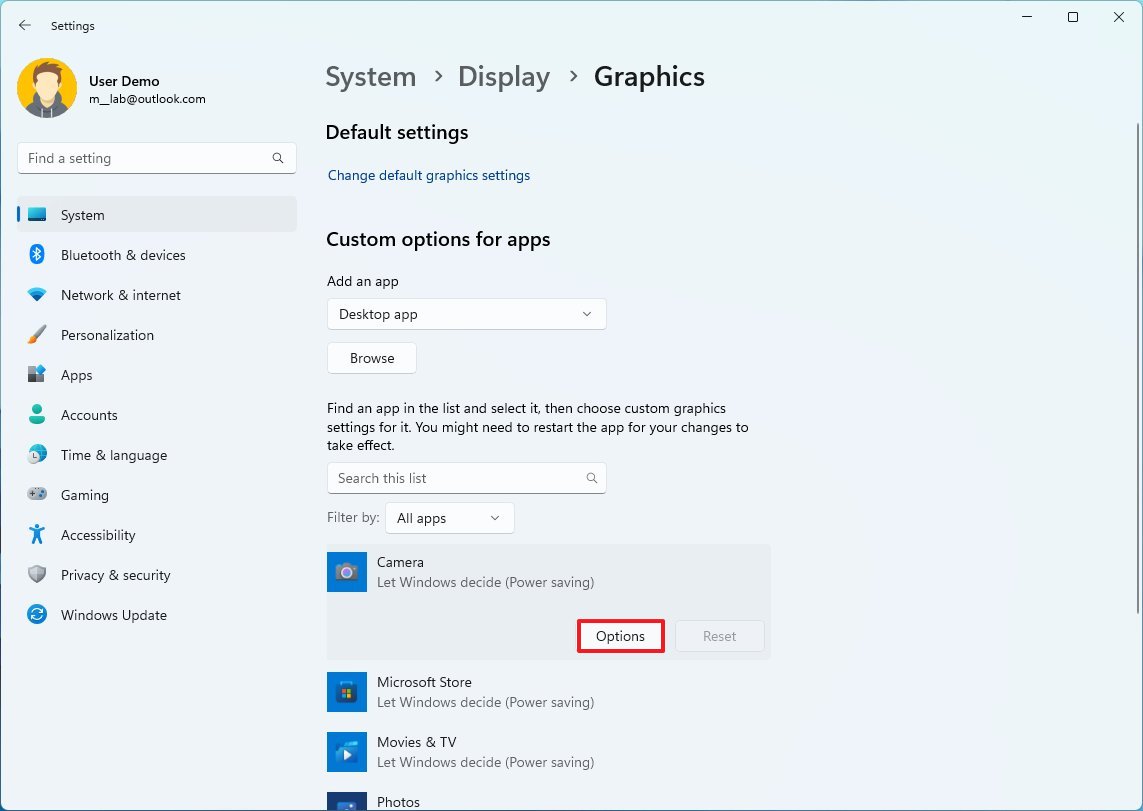
- Quick tip: If the app isn't on the list, use the "Add an app" settings to add it.
- Choose the Power saving graphics card.
- Click the Save button.
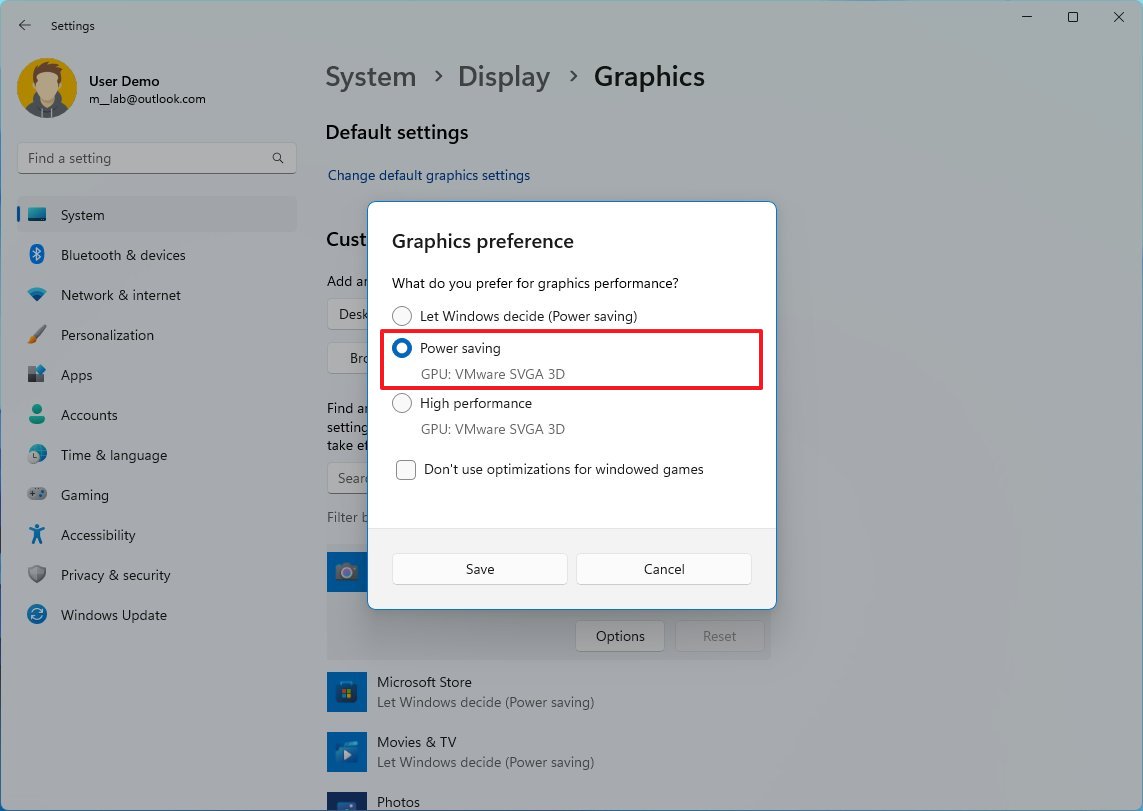
Once you complete the steps, the application will use the less powerful graphics card to preserve battery life.
Configure graphics card for apps on version 24H2
To configure an app to use the less powerful GPU on version 24H2, use these steps:
- Open Settings.
- Click on System.
- Click the Display page on the right side.

- Click the Graphics setting under the "Related settings" section.
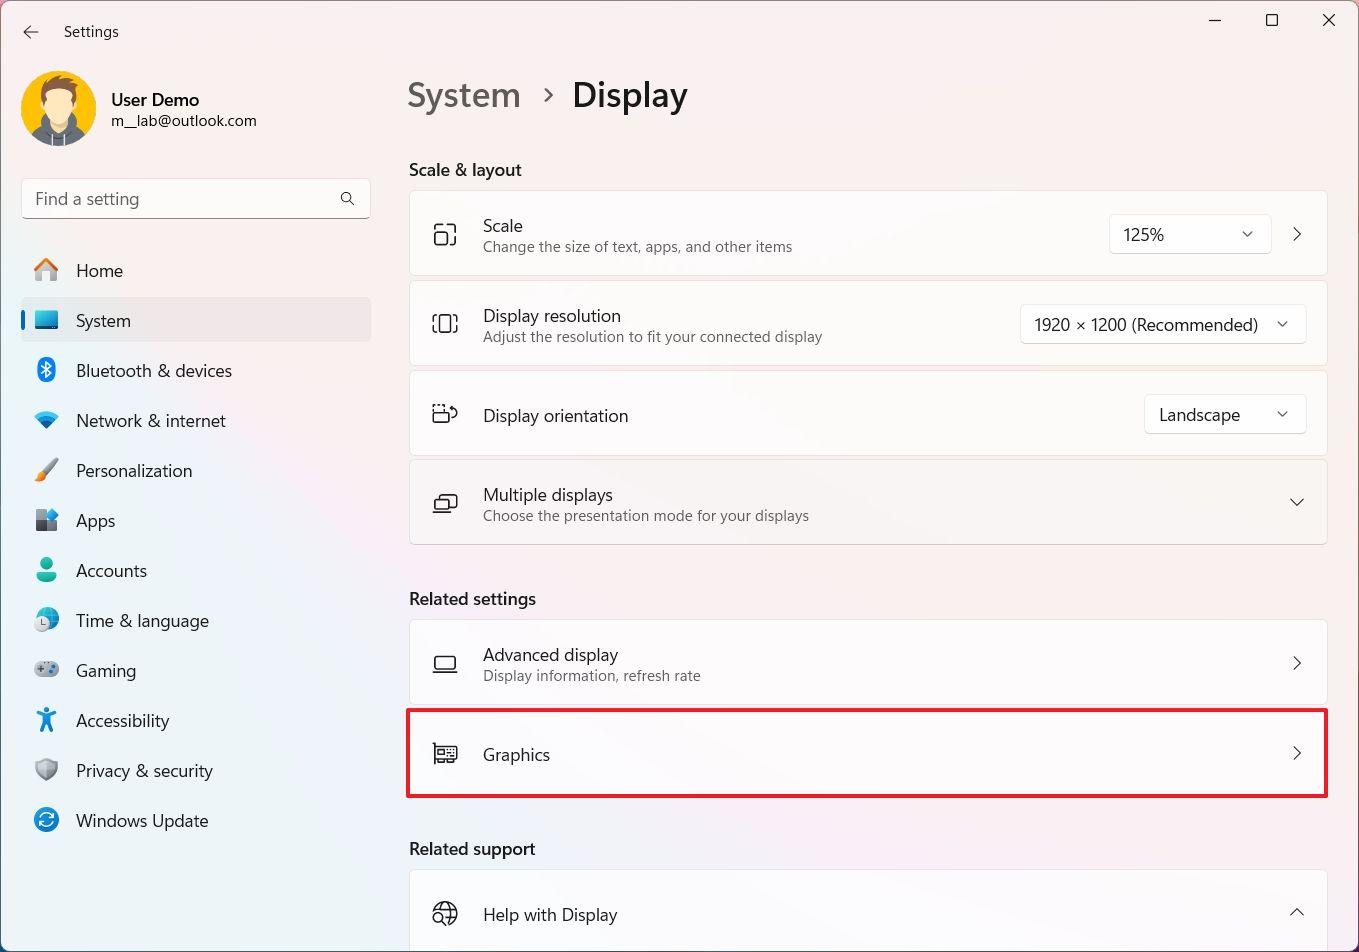
- Click the "Add desktop app" or "Add Microsoft Store app" button, depending on the app you want to change.
- Select the app from the list.
- Click on the app added to the list to open its settings.
- Choose the Power saving graphics card.
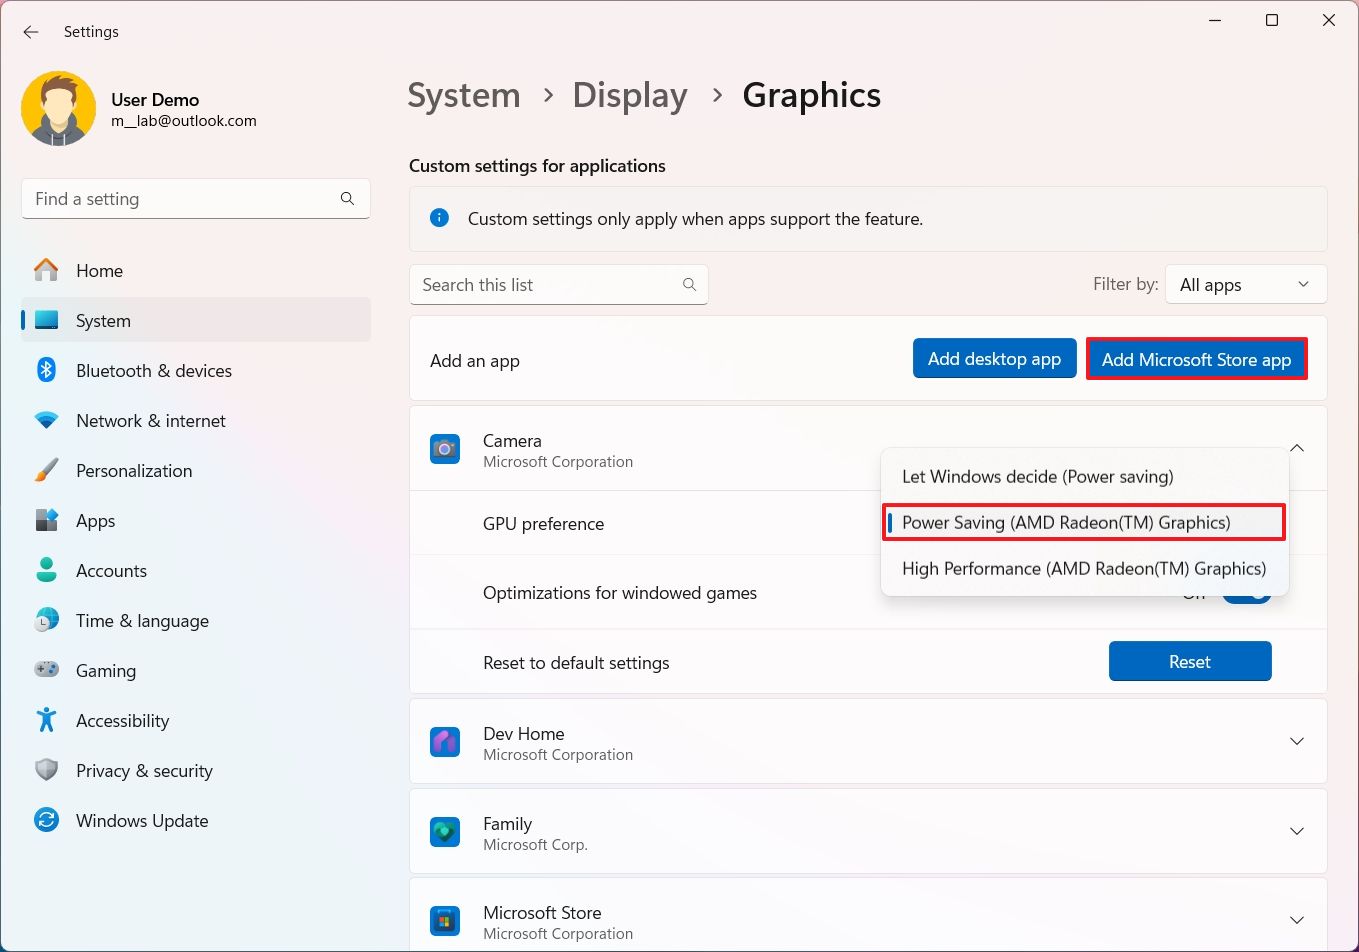
After you complete the steps, the app will use the less powerful graphics card to preserve energy on the device.
How to enable hibernation on Windows 11
On Windows 11 versions 24H2, 23H2, and 21H2, hibernation is a feature that saves the contents loaded into memory onto the hard drive, allowing you to turn off the computer to preserve the battery without losing your session. The next time you turn off the computer, the previous session will load, allowing you to pick up where you left off.
To enable hibernation on Windows 11, use these steps:
- Open Start.
- Search for Command Prompt, right-click the top result, and select the Run as administrator option.
- Type the following command to confirm the hibernation status and press Enter: powercfg /availablesleepstates
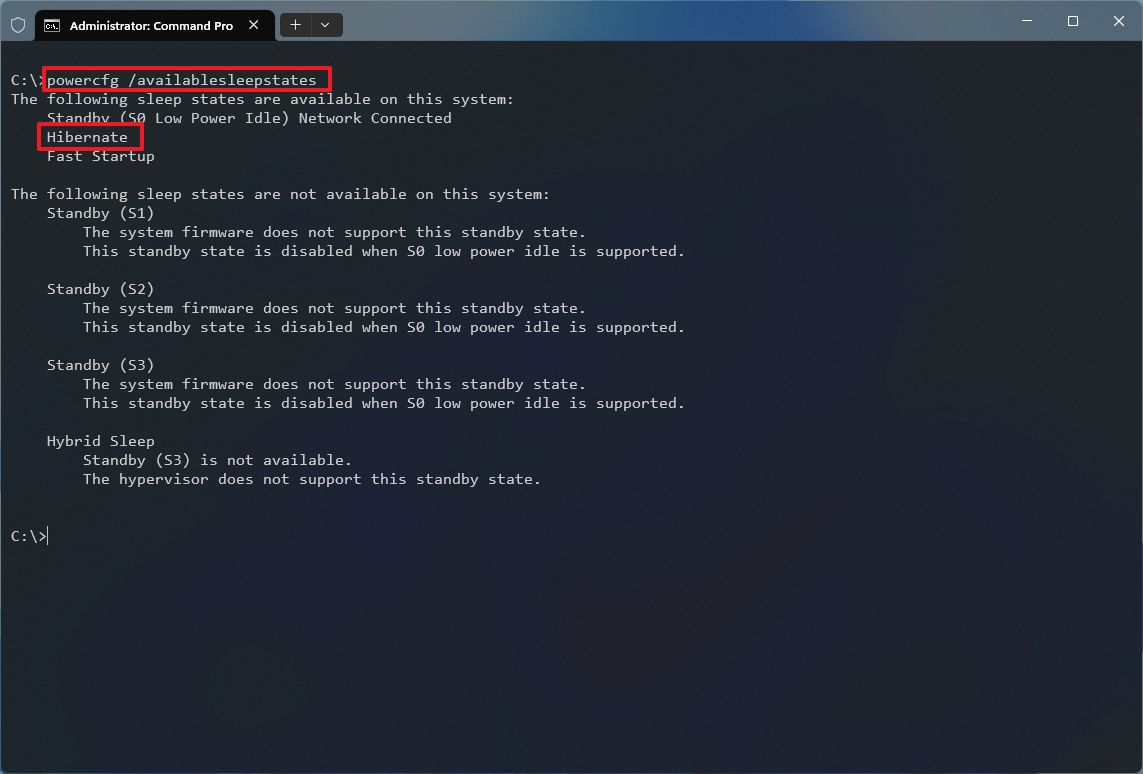
- Confirm whether Hibernate appears disabled.
- Type the following command to enable Windows 11 Hibernate feature and press Enter: powercfg /hibernate on
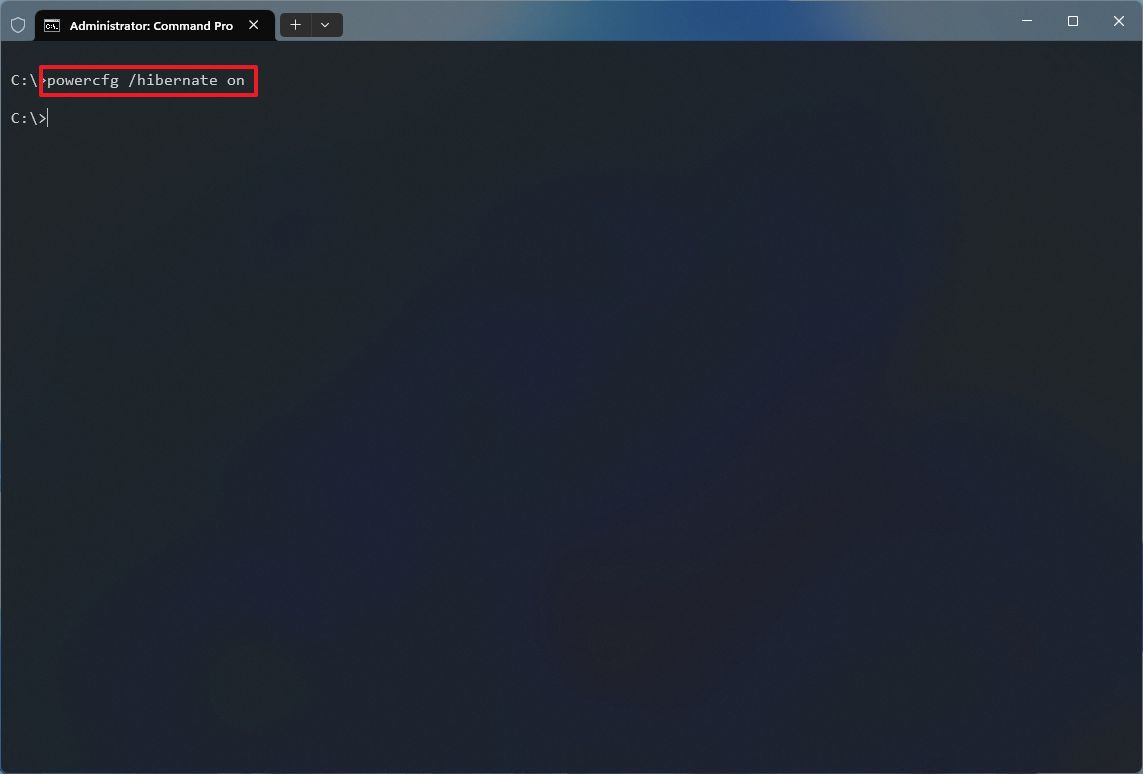
Once you complete the steps, hibernation will be enabled on the computer.
The feature isn't supported on all system configurations. If you can't enable hibernation, there could be several reasons. For example, the graphics card driver does not support the power state, and you need to update the video driver to fix the problem.
If the computer uses hybrid sleep on Windows 11, you must disable the feature before turning on hibernation.
In the case that hibernation is supported but not enabled on the Unified Extensible Firmware Interface (UEFI), you may need to access the motherboard firmware to update the settings.
If the feature isn't supported because of the hardware configuration, you won't be able to enable the feature.
How to control app battery usage on Windows 11
If you suspect that one or more apps are draining the battery fast, you can use the power settings to identify the apps using the most battery and change their settings to prevent them from running in the background to conserve power.
These instructions apply to all supported versions of Windows 11.
View apps battery usage
To view the battery usage history on Windows 11, use these steps:
- Open Settings.
- Click on System.
- Click the Power & battery page on the right side.

- Under the "Battery" section, click on Battery usage to open the settings.
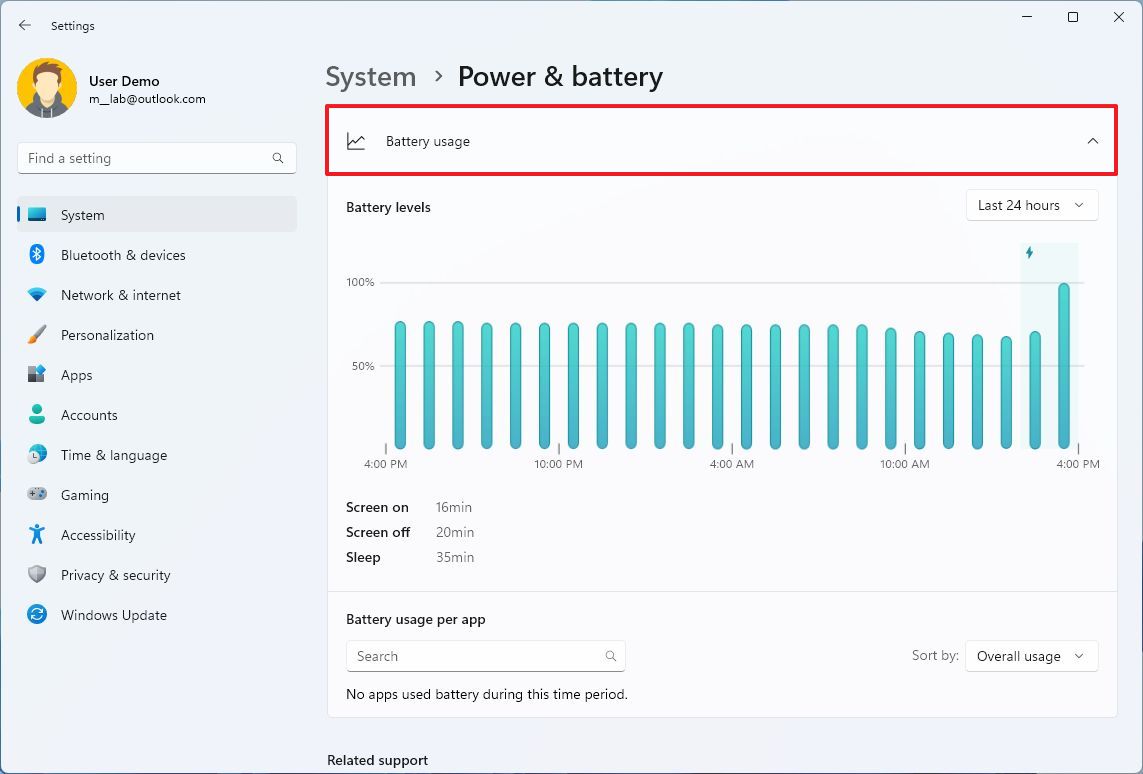
While in this view, you can see the device's battery usage to find out the apps using the most energy.
Manage apps background activities
To change apps background activities to improve battery life, use these steps:
- Open Settings.
- Click on System.
- Click the Power & battery page on the right side.

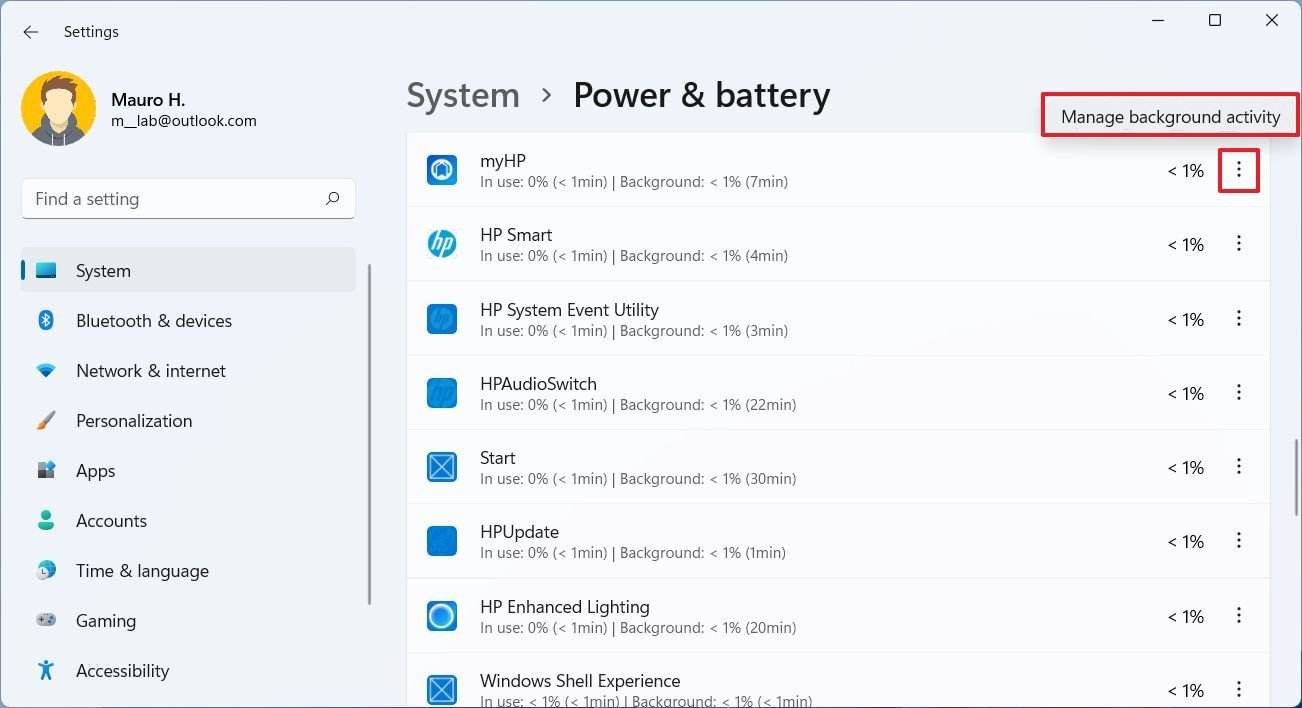
- Under the "Battery usage" section, select the app, click the menu (three-dotted) button, and select the Manage background activity option.
- Quick note: You can only change the power settings for apps you acquired from the Microsoft Store. If you have a traditional desktop app, you will need to edit the power settings from the application (if applicable).
- Under the "Background apps permissions" setting, choose the Never option. Or select the Power optimized (if applicable).
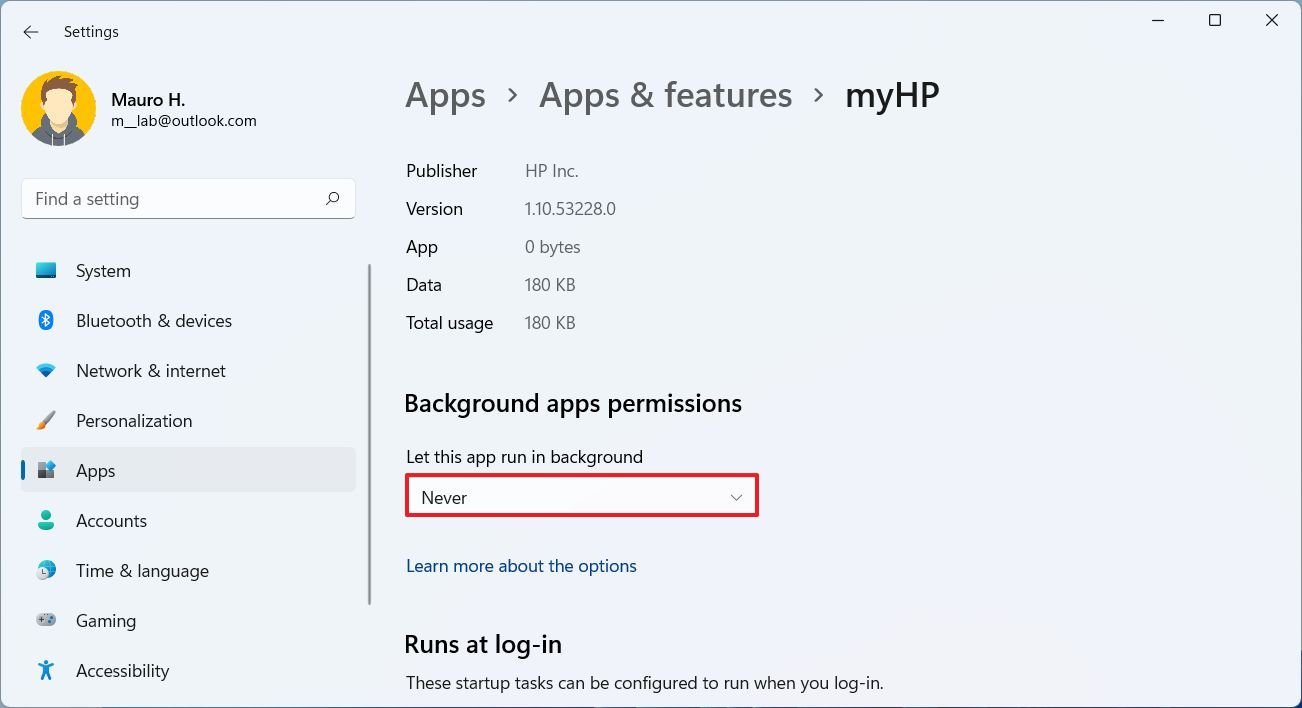
Alternatively, you can go to Settings > Apps & features, select the app, click the menu (three-dotted) button, click on Advanced options, and then change the "Background apps permissions" setting.
How to fix power problems to improve battery life on Windows 11
To fix power-related issues to extend battery life on Windows 11, use these steps:
- Open Settings.
- Click on System.
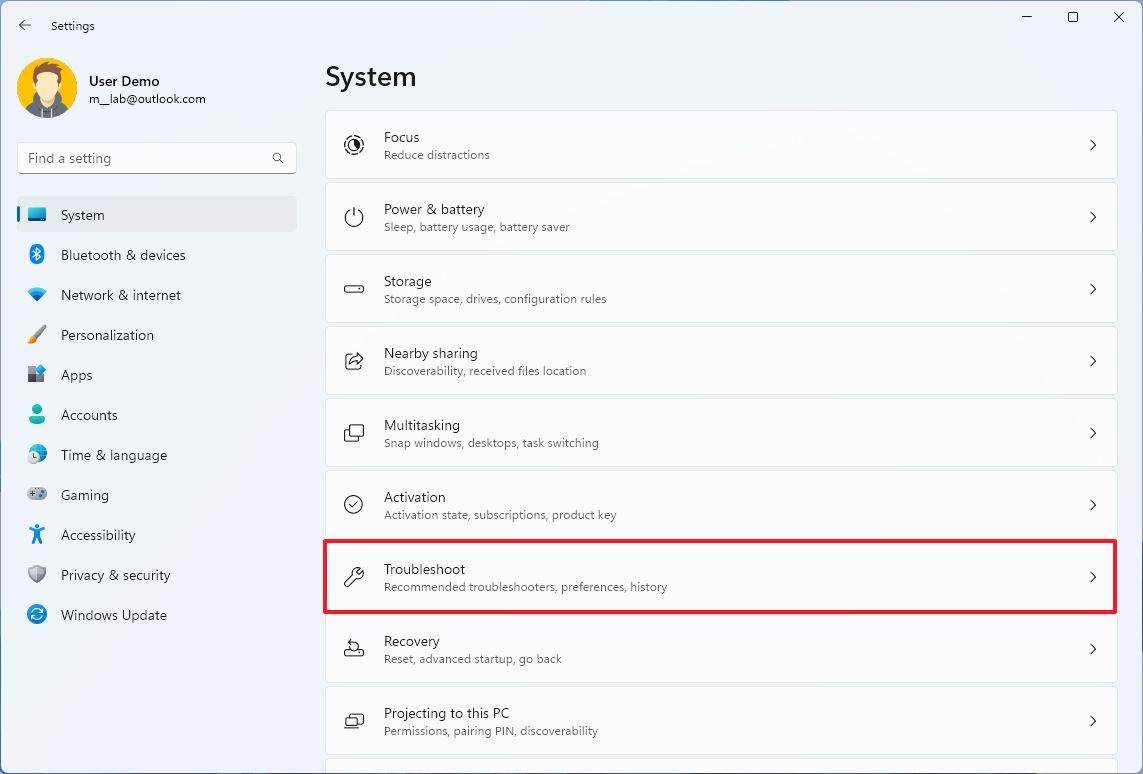
- Click the Troubleshoot page on the right side.
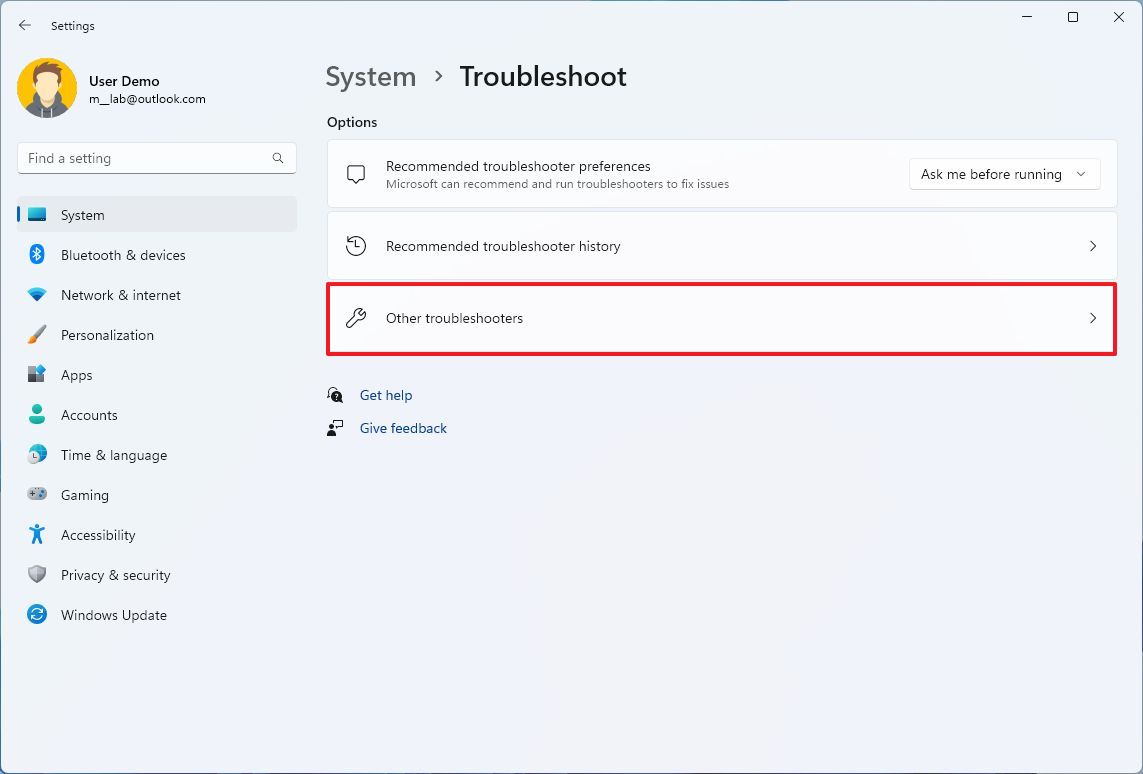
- Click the Other troubleshooters setting.
- Under the "Other" section, click the Run button for the "Power" troubleshooter.
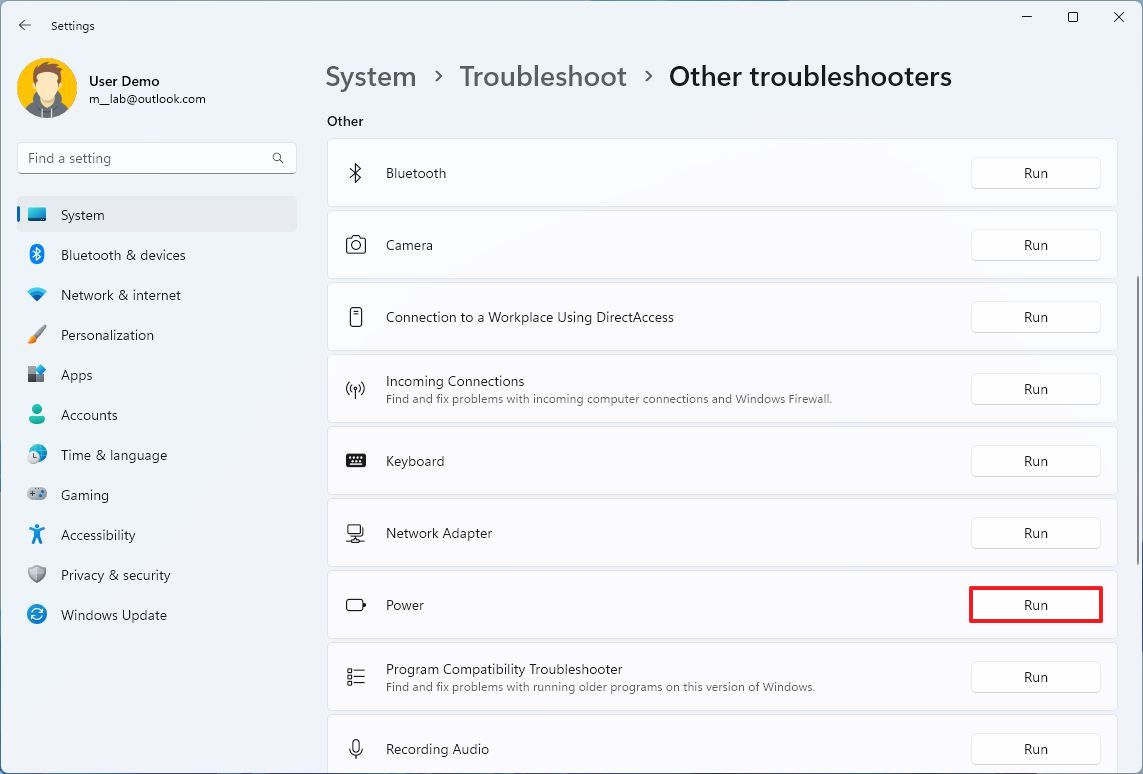
- Continue with the on-screen directions (if applicable).
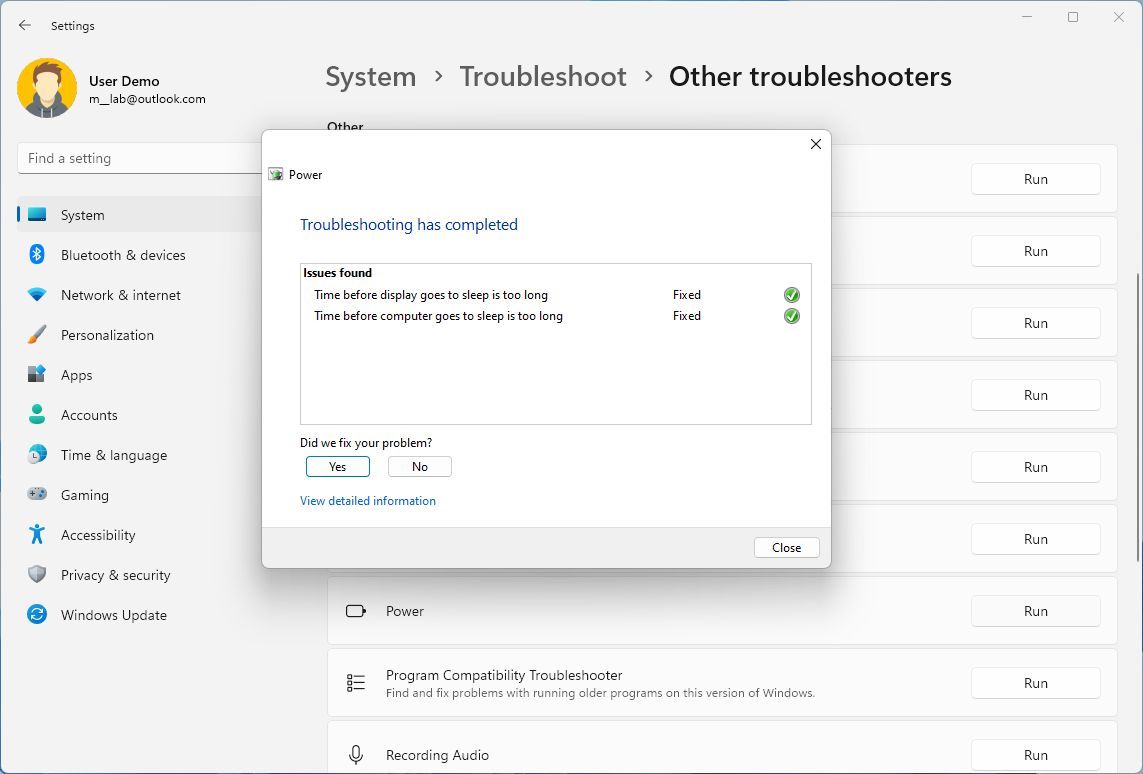
- Click the Close button.
Once you complete the steps, the troubleshooter will scan and apply common fixes to improve battery life on Windows 11 (as necessary).
It's important to note that this feature may not be available on some devices.
How to remove viruses affecting battery life on Windows 11
A virus or any other type of malware can also decrease battery life. If you think that your computer is infected, you may be able to resolve this problem by doing a virus scan with Microsoft Defender Antivirus.
If you have a third-party antivirus, you will need to refer to the software documentation for the steps to perform a full malware scan.
To perform a full virus scan on Windows 11, use these steps:
- Open Start.
- Search for Windows Security.
- Click on Virus & threat protection.
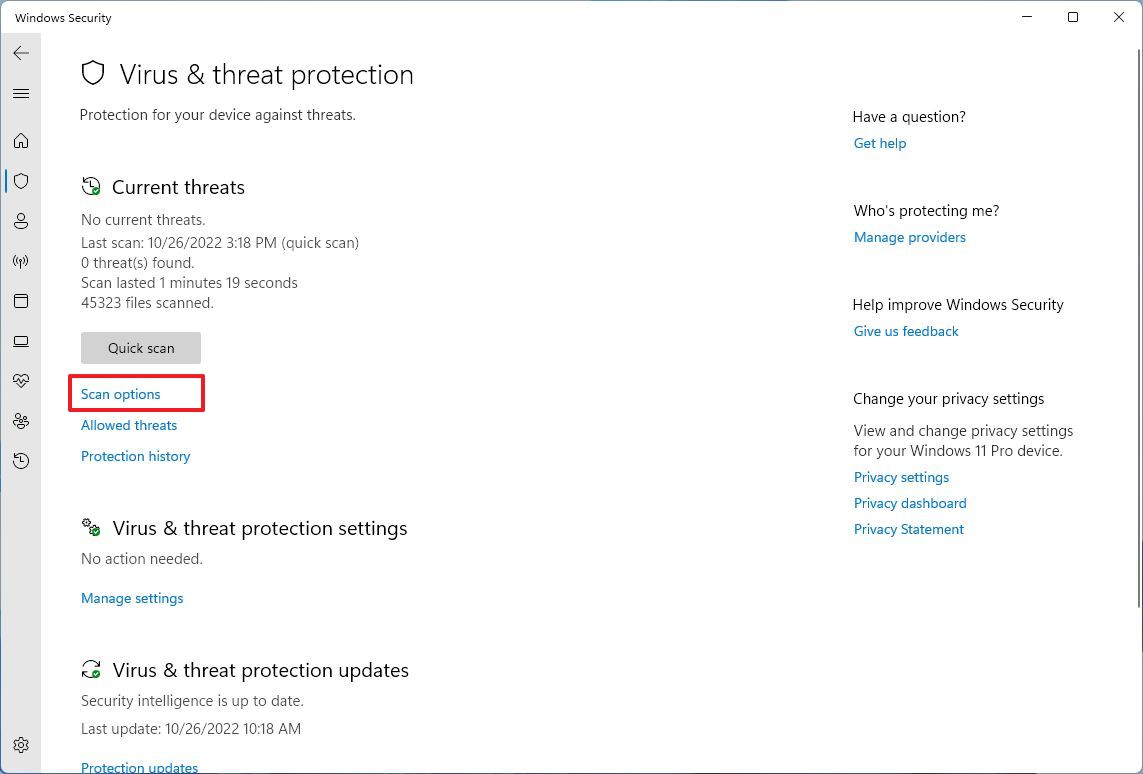
- Under the "Current threats" section, click on Scan options.
- Select the Full scan option.
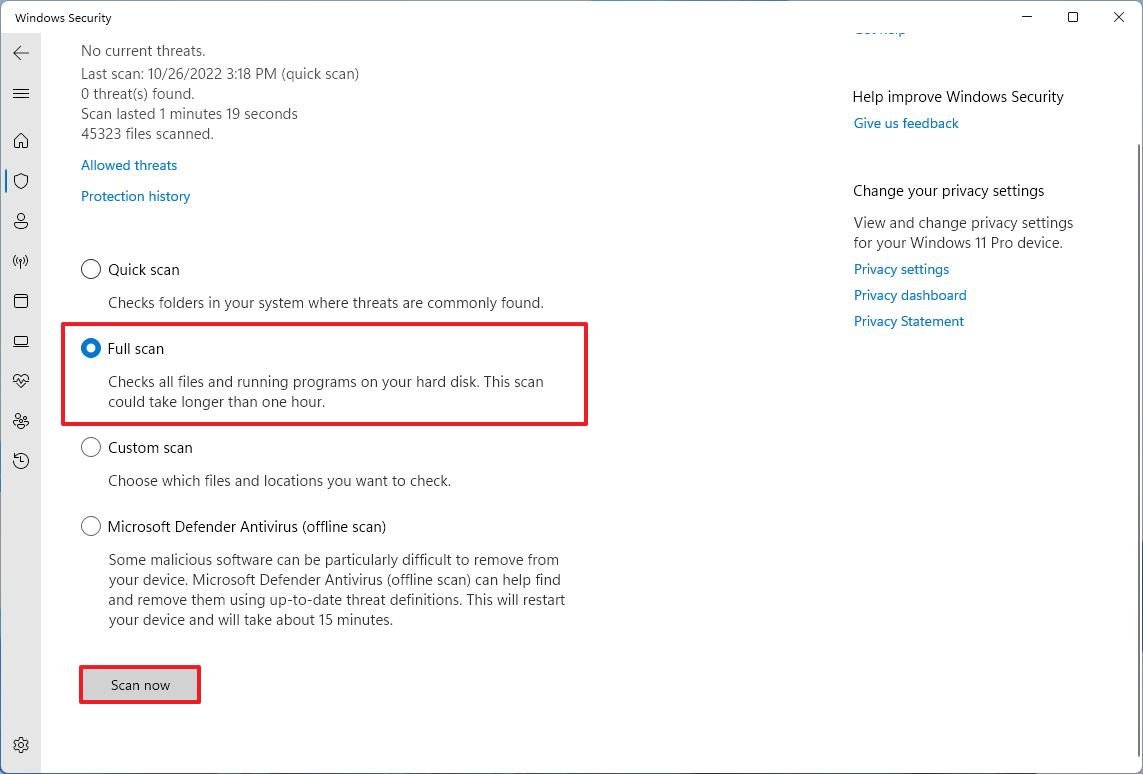
- Click the Scan now button.
After you complete the steps, the antivirus will scan and remove any virus that may negatively affect the experience and battery life.
When nothing seems to improve the device's battery life, and this is a software-related problem, you may want to consider resetting the device to its factory default settings or performing a clean installation of Windows 11.
How to apply energy recommendations on Windows 11
Whether you have a device running Windows 11 version 24H2 or 23H2, you can also use the "Energy recommendations" settings to change the power settings to save energy according to the Microsoft guidelines.
To apply energy recommendations on your computer, use these steps:
- Open Settings.
- Click on System.
- Click the Power & battery page on the right side.

- Click the "Energy recommendations" setting.
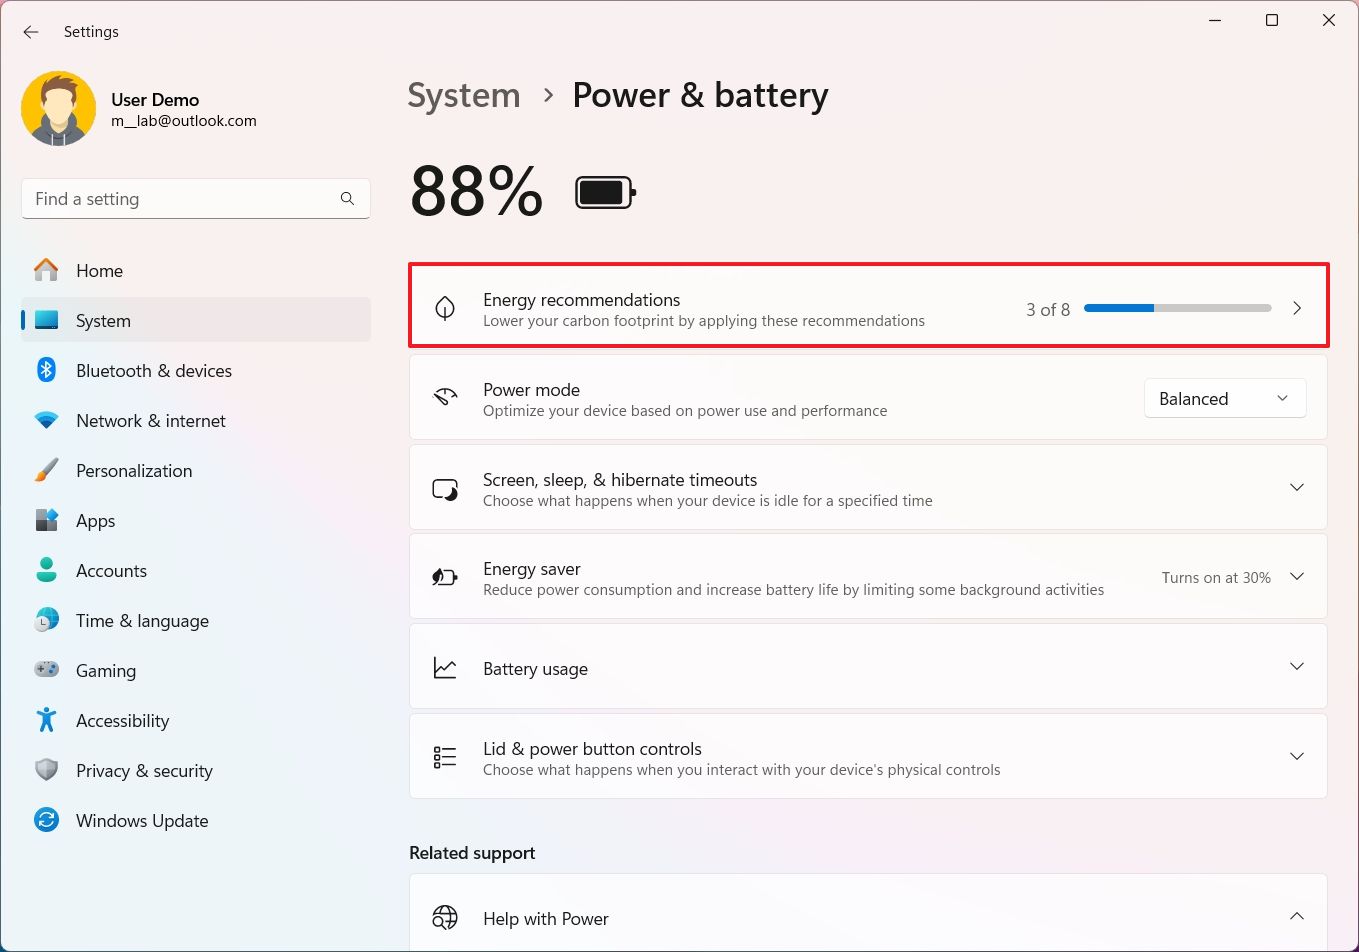
- (Option 1) Click the Apply button for the available suggestions (as you see fit).
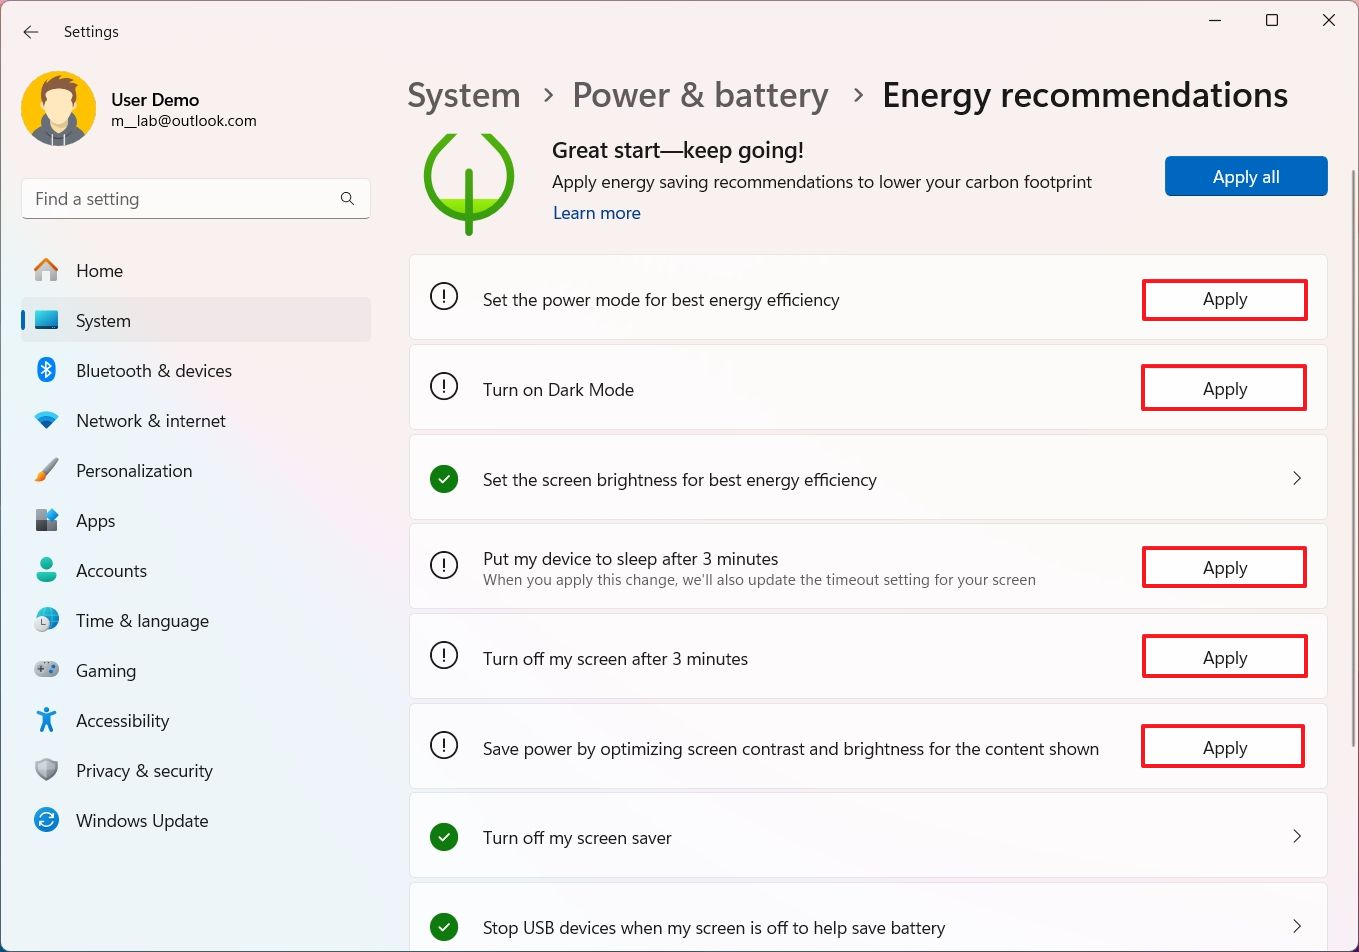
- (Option 2) Click the Apply all button to allows the system to apply all the available suggestions.
Once you complete the steps, the new settings will apply to reduce the energy consumption, which will directly help to reduce your carbon footprint.
The available options will depend on the features available on your computer, but usually, the system will suggest to set the energy mode to be more efficient, enable dark mode, reduce brightness, change the sleep timers, disable screen saver, and stopping USB devices when the screen is off to saver energy.
More resources
For more helpful articles, coverage, and answers to common questions about Windows 10 and Windows 11, visit the following resources:

