Making a 3D character based on a concept is a classic way for artists to learn new tools and upgrade their skills, but creating your own design from scratch is even more challenging for stepping up your art style. To help you get a handle on that process, let me show you how I create a unique character.
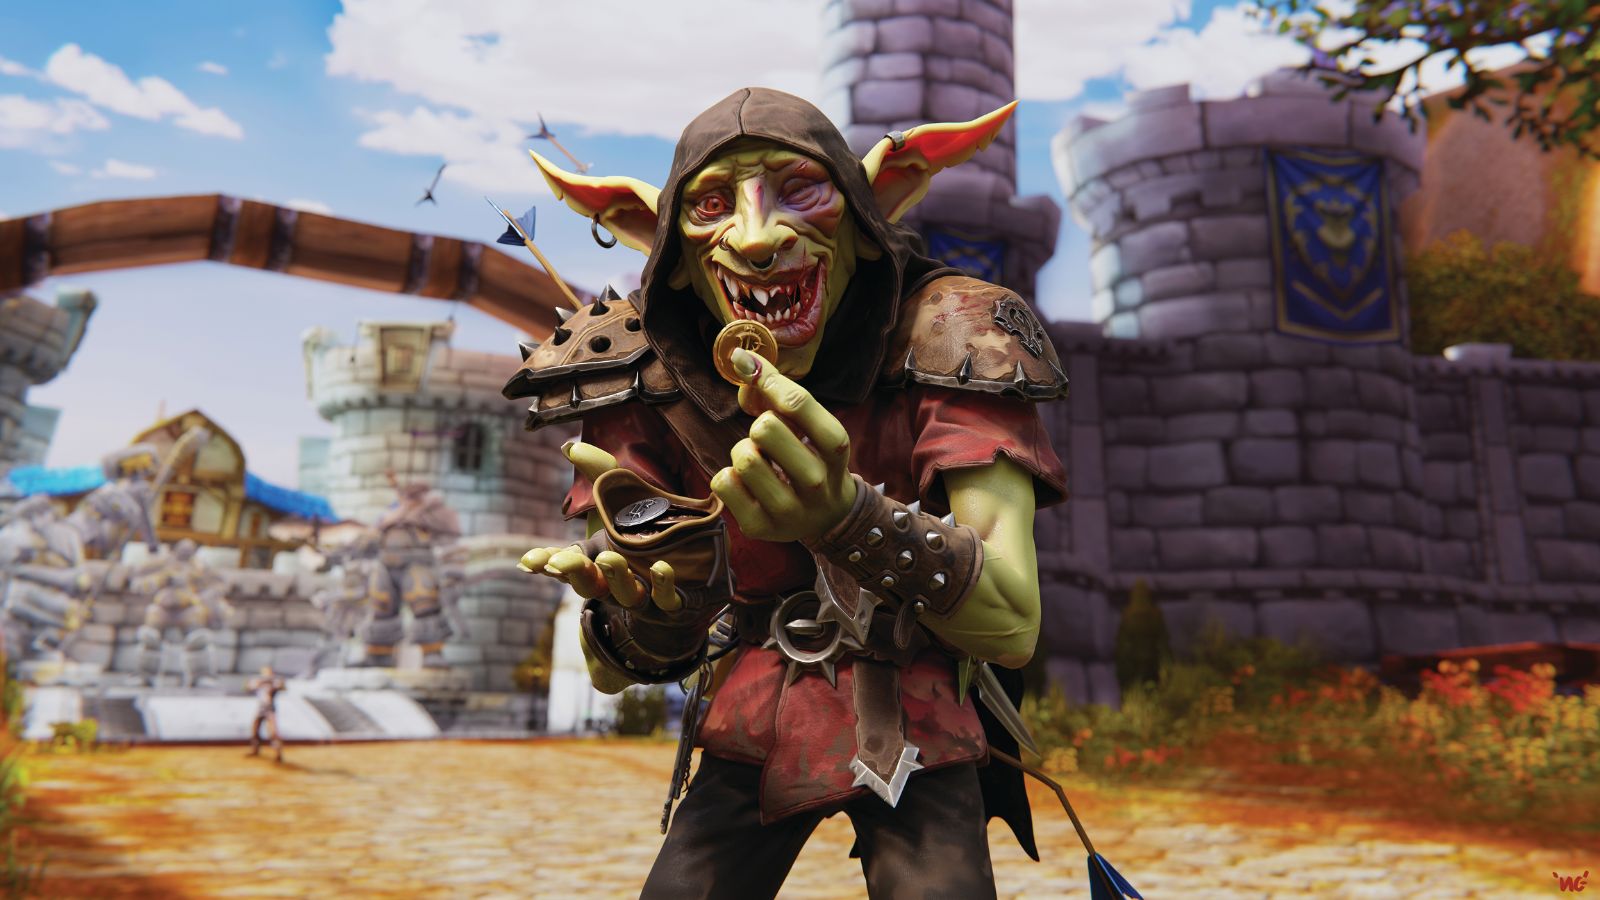
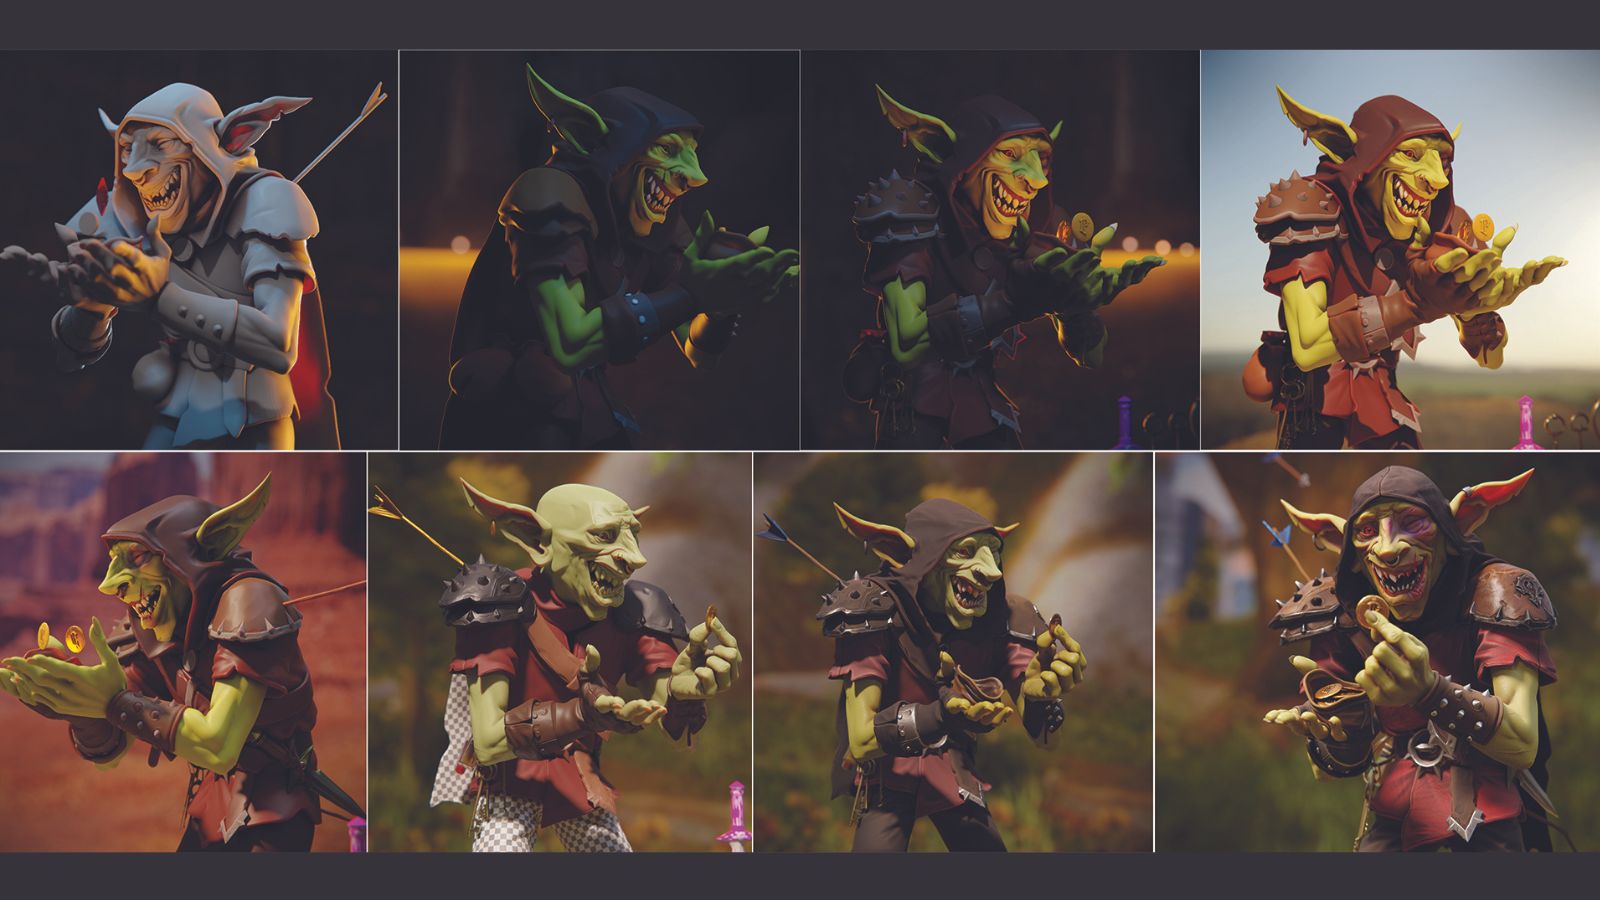
My personal project here is a tribute to World of Warcraft and features a goblin fit for use in a cinematic. We’re going to cover all the steps and tools you can use, starting from sculpting with ZBrush, exploring techniques to optimise your model and setting up a smart material in Substance 3D Painter, before finishing our journey rendering the character with Cycles in Blender.
Create a stylised 3D character: the process
Here's my step by step guide to creating this goblin character. As well as using ZBrush, Blender and Substance 3D Painter as mentioned, we're also going to be dipping into Marmoset Toolbag and Photoshop. If you're inspired by my work, consider picking up one of the best laptops for 3D modelling and try it for yourself. I hope you find the tutorial to be useful!
01. Setting up a PureRef file
Take a moment to create a PureRef file where you can choose images to inspire your project, rather than sculpting without any references. Of course, creating our own character design is the primary target here, but having some good references such as clothes, environments and moods will give you an overall feeling for where you’re going and will keep you on the right path, which can save a lot of time. For example, I took inspiration from in-game props and weapons to help with the character’s storytelling.
02. Starting the blocking-out

You can begin sculpting from scratch with a raw sphere to blockout your character in ZBrush. Working with the DynaMesh option is good for building the wireframe with a simple click and drag in the Viewport. With that, you can use your Move brush to reshape the model without fear of destroying your wireframe.
The most important brushes you can use here are the ClayBuildup and Smooth to add the global shape, the Move brush for the silhouette and the proportions, the Dam Standard for cavities and folds, and the Trim Dynamic for the hard-surface elements.
03. Using ZRemesher for retopology
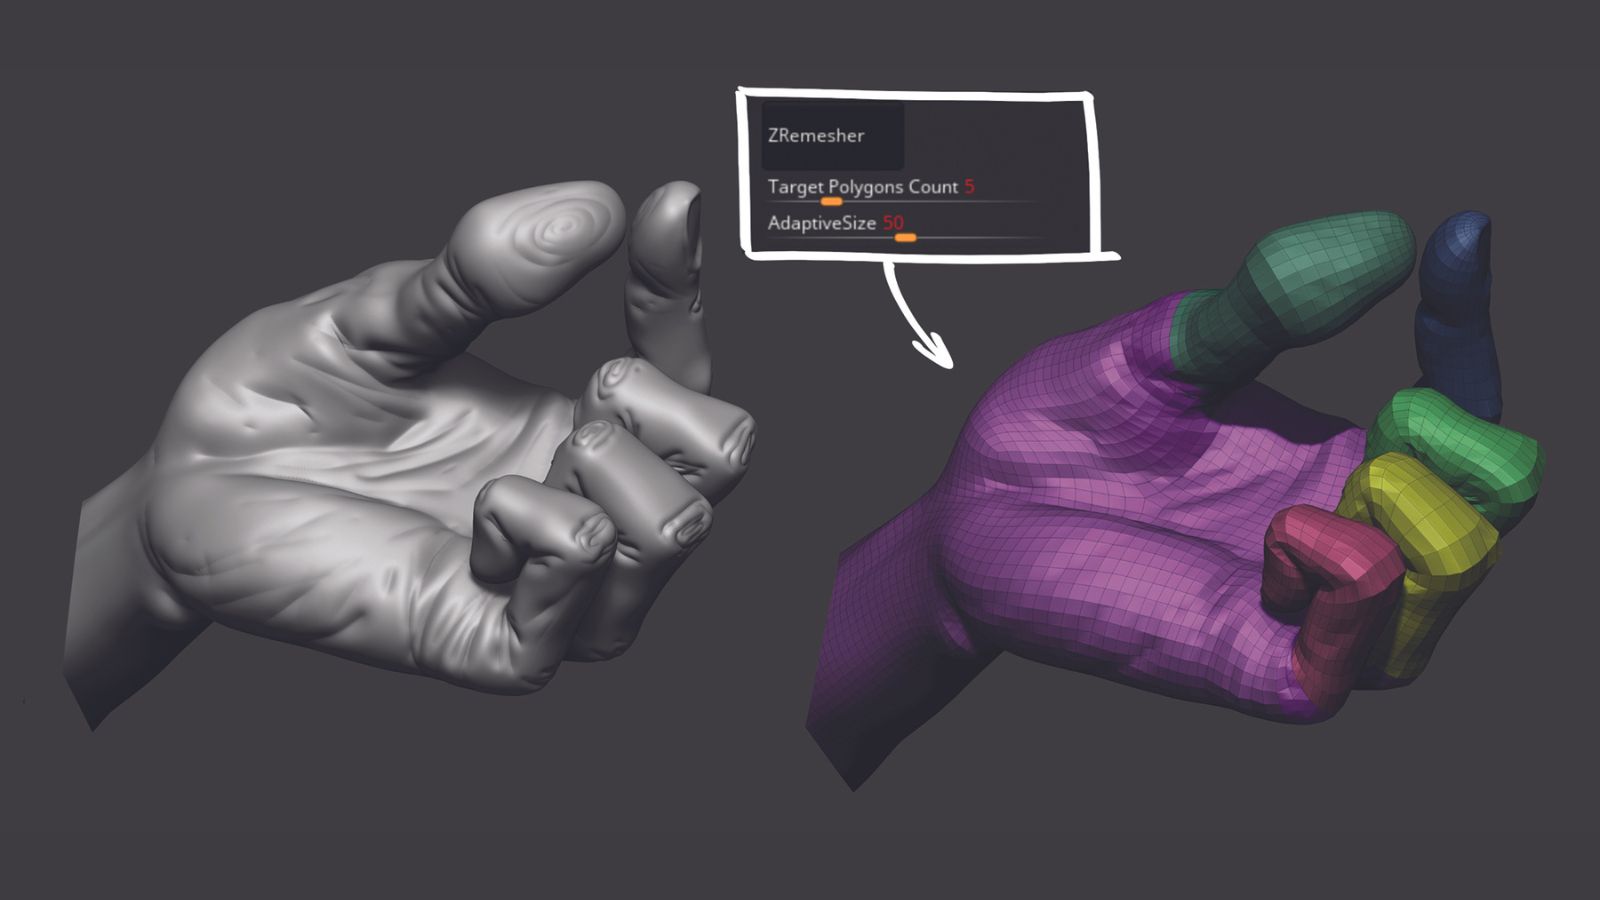
When your blockout is finished, you can start the retopology with this simple method for rebuilding meshes. For a detailed character like this, ZRemesher will get the job done and save you a lot of time.
Set the Target Polygons Count to 5 for the majority of your mesh’s parts, which is a decent percentage of polygons to catch all the shapes. Increase this to 10- 15 for the important areas like the head to keep the silhouette and shapes readable.
Next, use the Project All tool to reproject all the detail information from your old mesh to the new topology.
04. Posing and refining the shapes
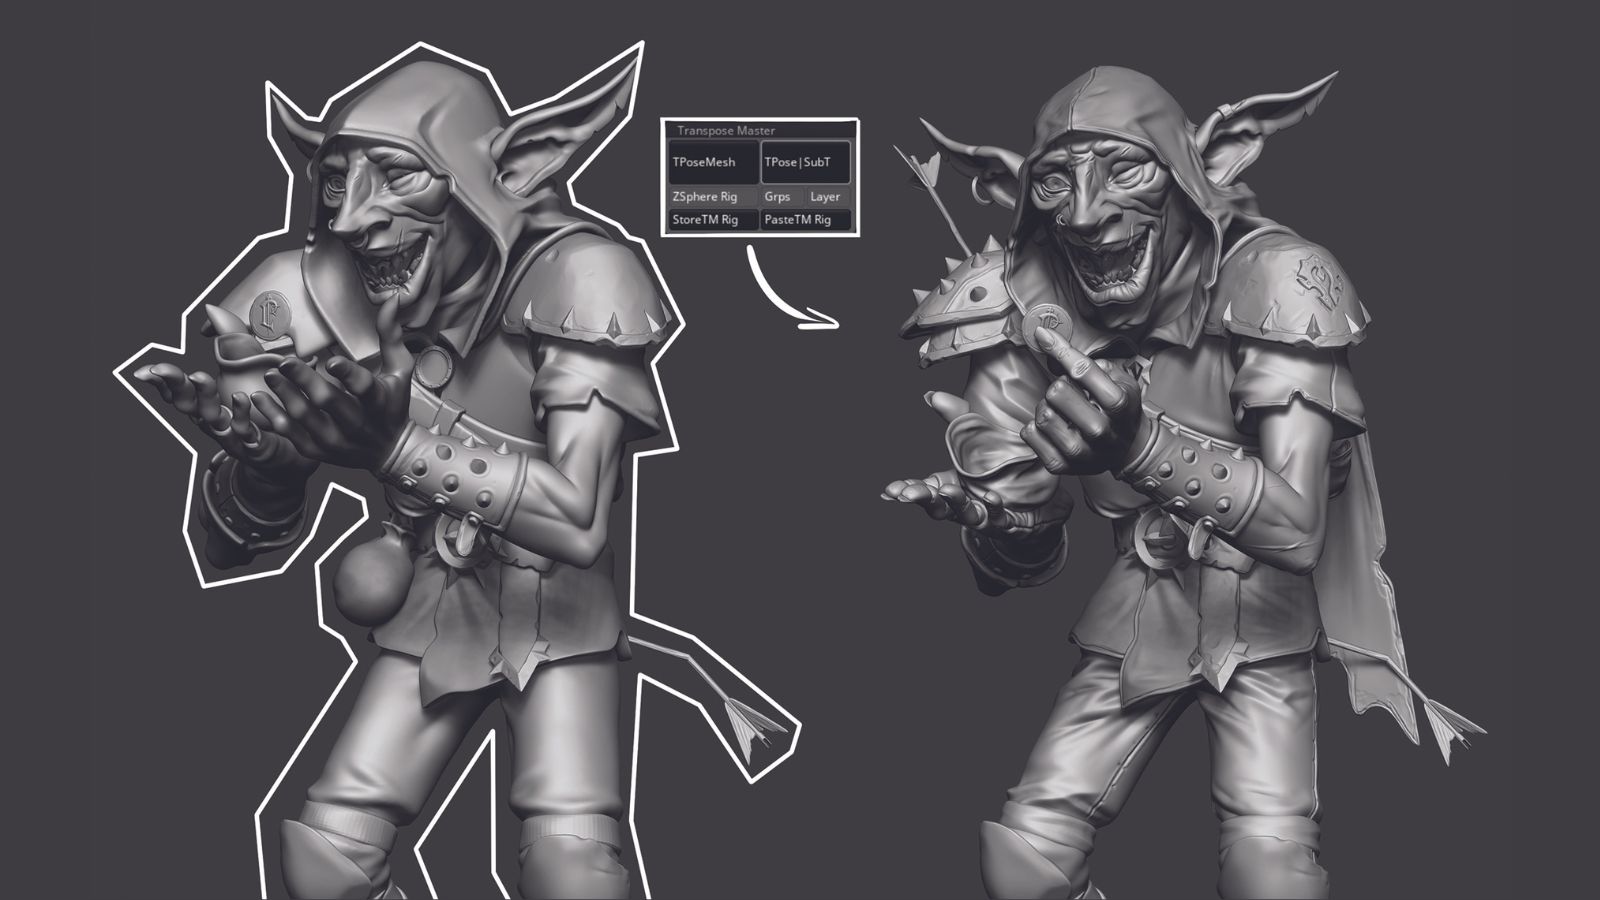
When the meshes have their new topology and you’ve projected all the details, you can continue refining the character. Even if you haven’t finished sculpting yet, you can still pose the model by using the Transpose Master option. TPoseMesh will create a new SubTool where your character has only the first subdivision level, which will make it easier for you to pose.
With that, you can mask parts, move and rotate, and start posing the character as you need using the Gizmo. When you’re happy with the posing, just hit the ‘TPose>SubT’ button and ZBrush will transfer the data to your main character SubTool.
05. Making the UVs in Blender
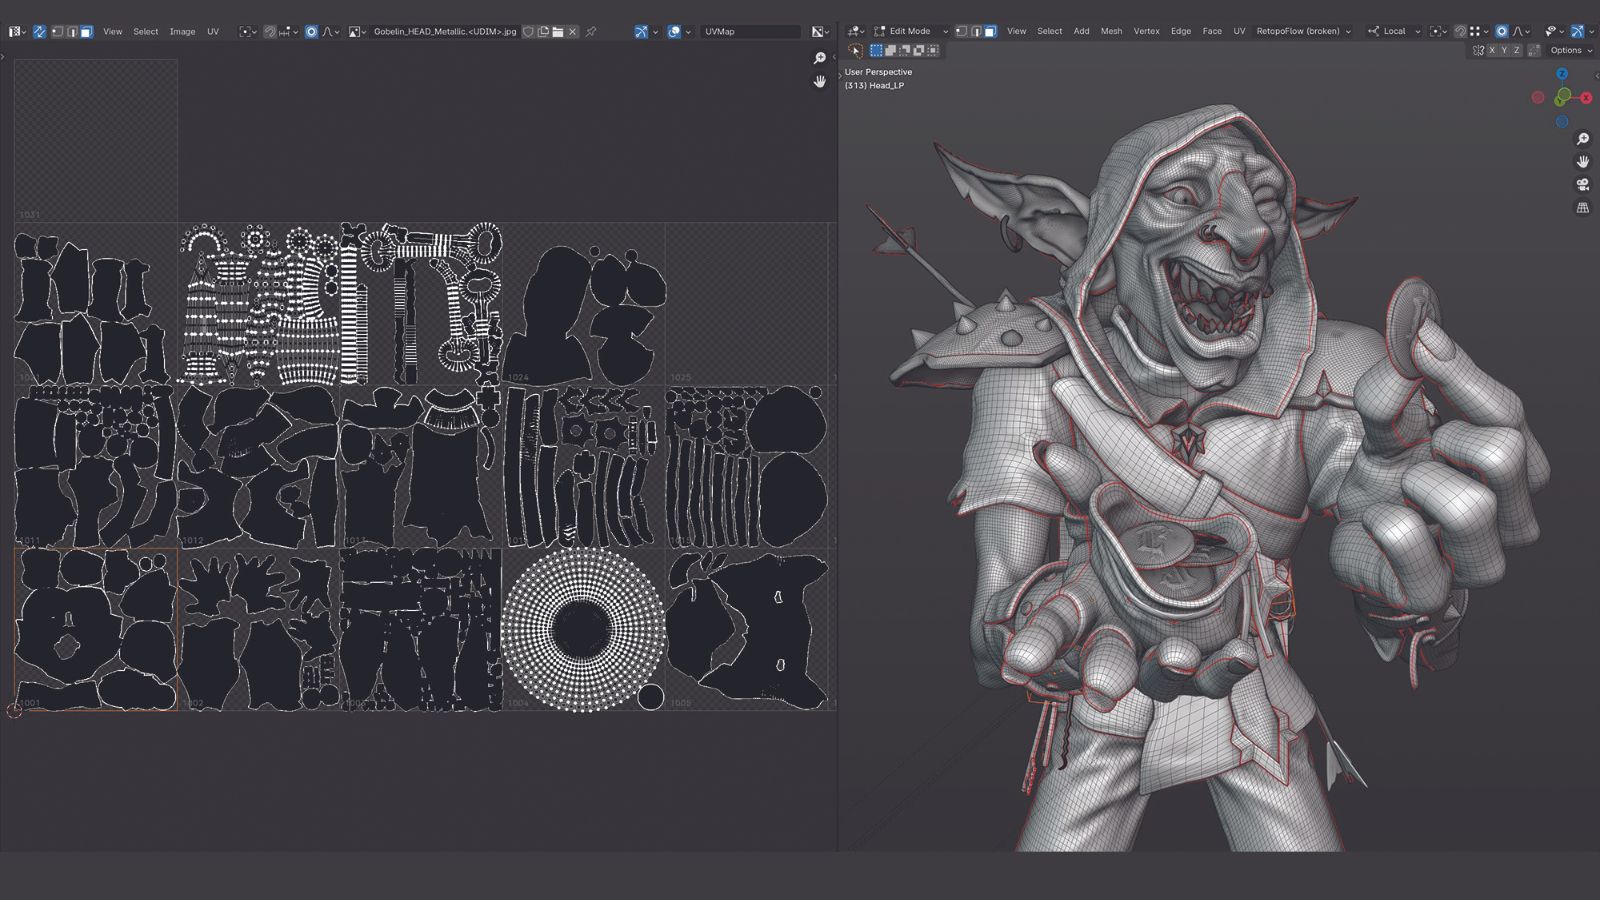
The approach for creating the UVs is simple. We’ll put less time into the UVs as all of our parts will have different UDIMs with 4K textures, because ultimately we want high-definition images. Import your meshes into Blender, enter Edit Mode with Tab and select the edge you want to cut. Press ‘U’, click Mark Seam, and then Unwrap. Don’t worry about weird visuals as long as there’s no overlap in the UV Editor. Here the character ended up with 14 UVs, which is fine for a hero character.
06. Baking the mesh in Marmoset Toolbag
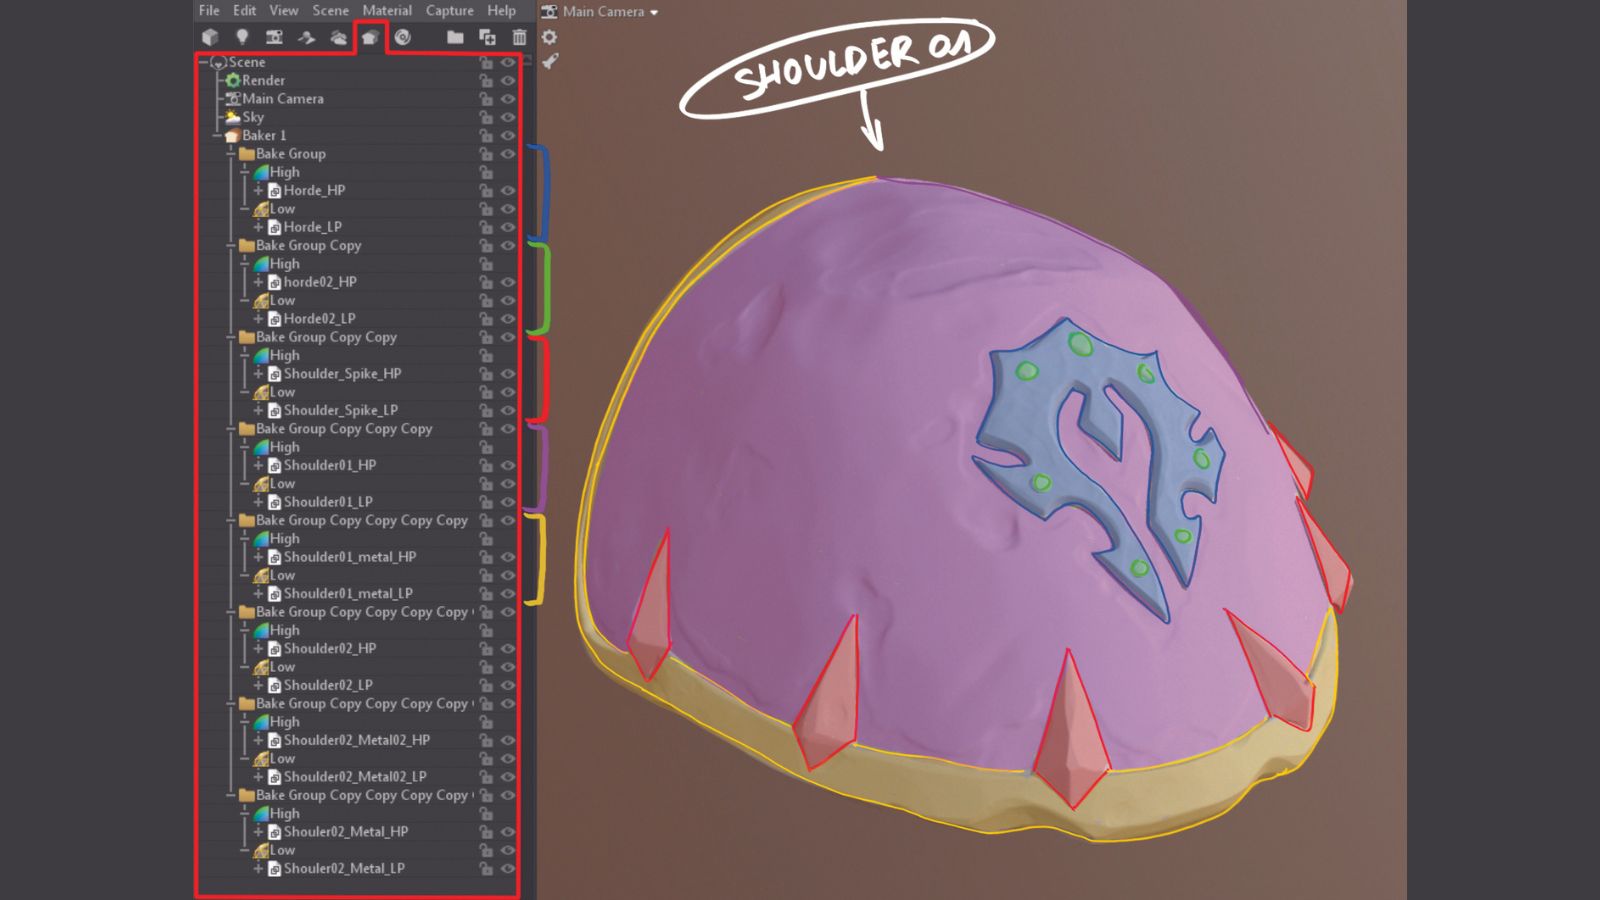
As soon as your UVs are done you can start exporting the meshes as FBX or OBJ files in Marmoset Toolbag. Hit the Baking button to add bake folders, then duplicate the folder with Ctrl+D and drop each separate mesh in, which will create different cages for the meshes. What’s important here is to maintain a clean workflow so that if you want to modify one part like the sculpt, retopology or UVs, you just have to export the new file to the same OBJ location and it will directly replace the old mesh in Marmoset.
07. Baking the maps required for texturing
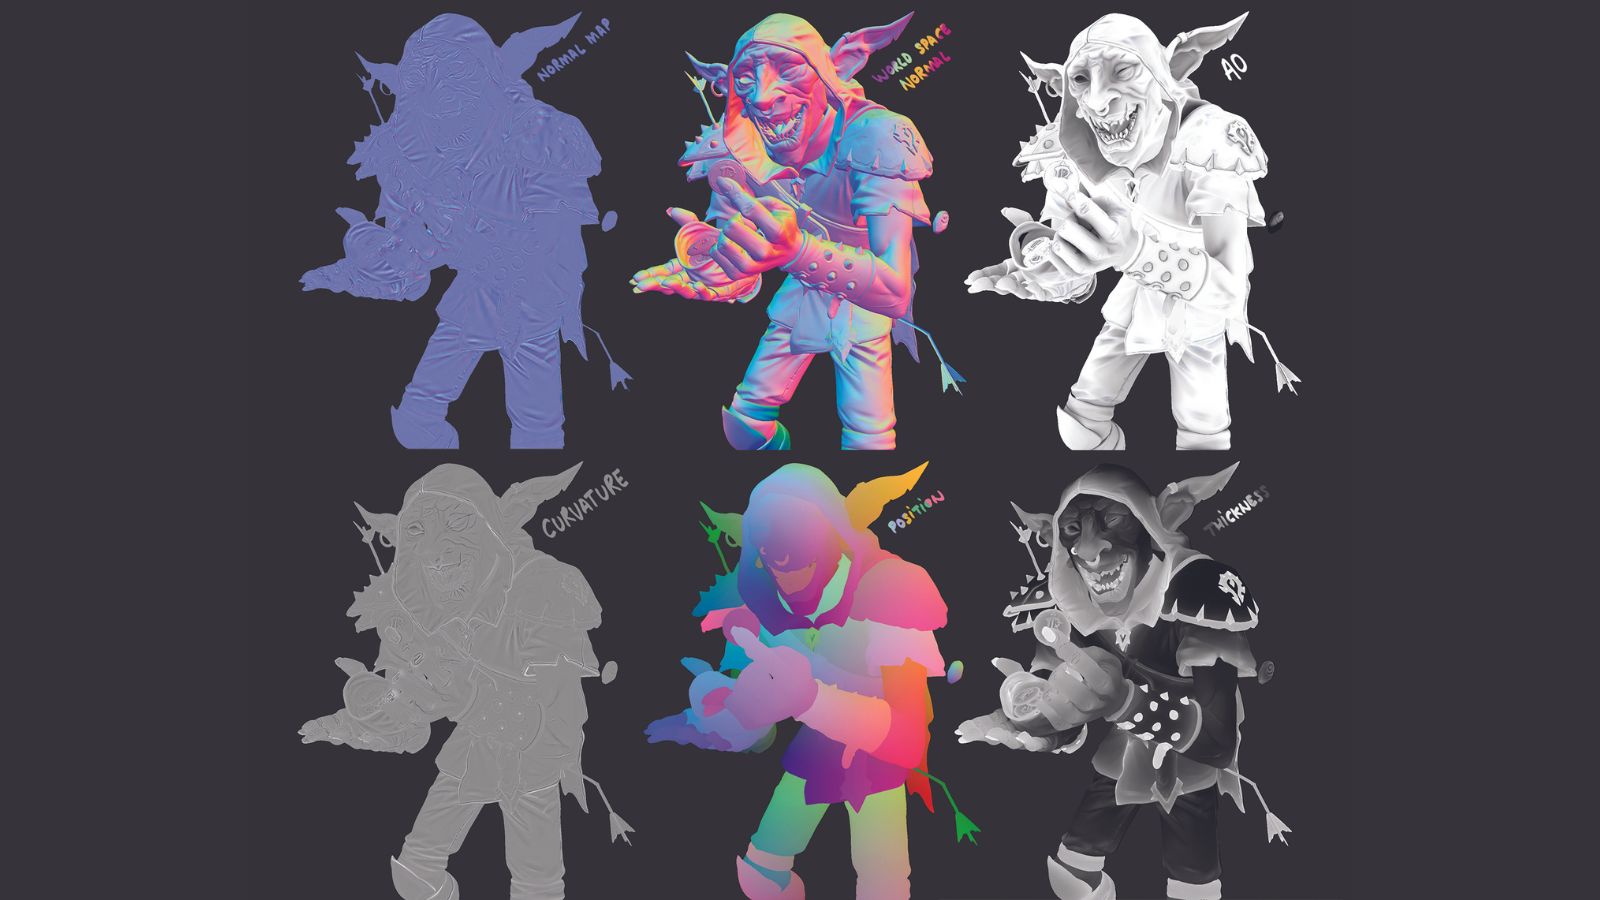
When your baking setup is complete, you’ll want to bake the following maps in preparation for texturing work in Substance 3D Painter: Normal for the detail data from your high-poly to low-poly; World Space Normal for fake/ bake light; Ambient Occlusion to bring more shadow and contrast into the character’s base colour; Curvature to add colour on the edge of the mesh; Position for the gradient; and Thickness for subsurface scattering.
08. Setting up your smart material
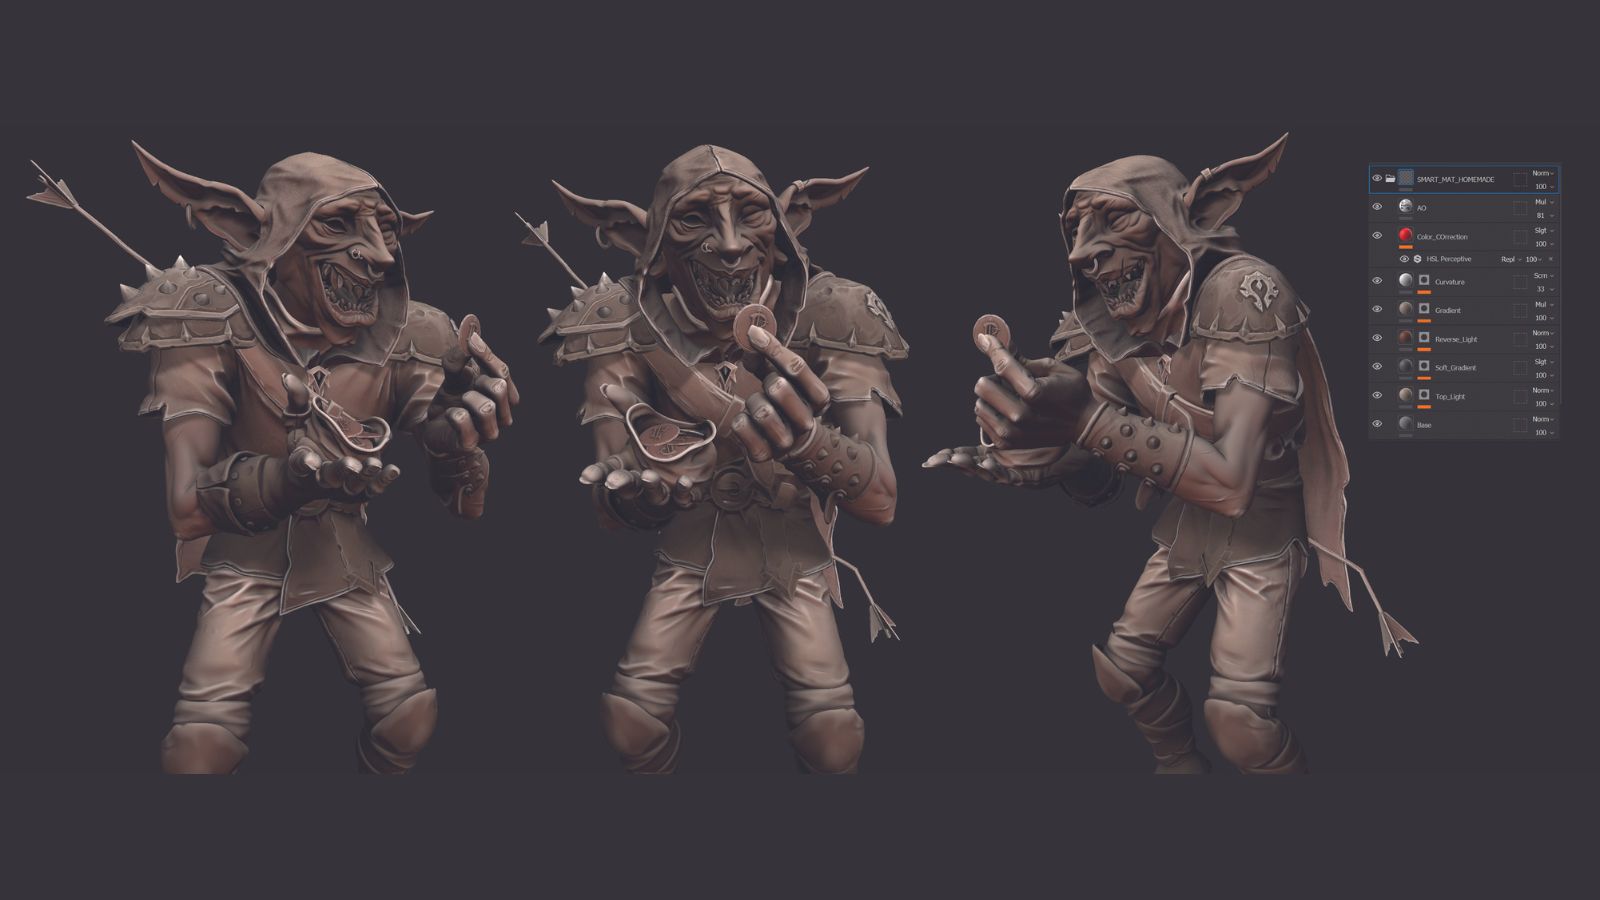
Using your own smart material is a must-have to quickly get a good base to work on. The key here is to set up the material colour so that you can better see where the ambient occlusion, gradient and light will go on the character, just for an overview. You can have a Gradient Fill layer, Curvature, Ambient Occlusion, and so on as long as your smart material creates a good texture base.
09. The texturing process
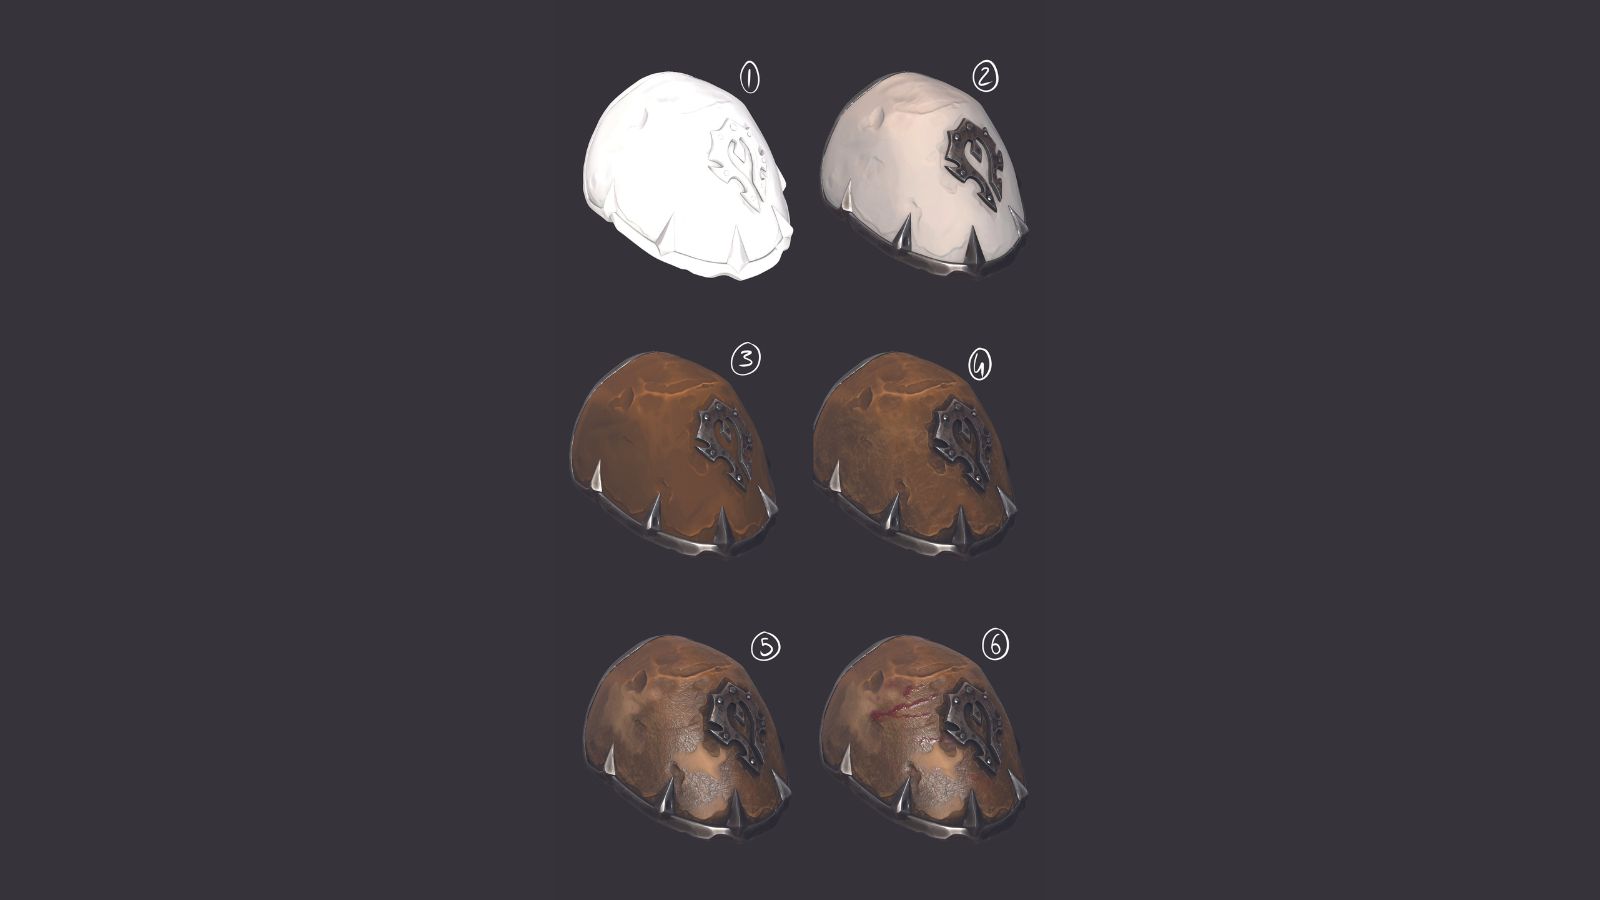
When the smart material is ready and you’re satisfied with the base colour, it’s time to begin working on the details of the character by hand. You can also use a filter or generator for any areas you’d like to include fine details like dirt, mud, blood and so on. Use a Fill layer with a dirt generator, for example, to create colour variation and add material information like the leather on the shoulders here. Finally, check the Roughness map for some interesting variations, which will bring contrast for all the different materials on your character.
10. Adding the textures
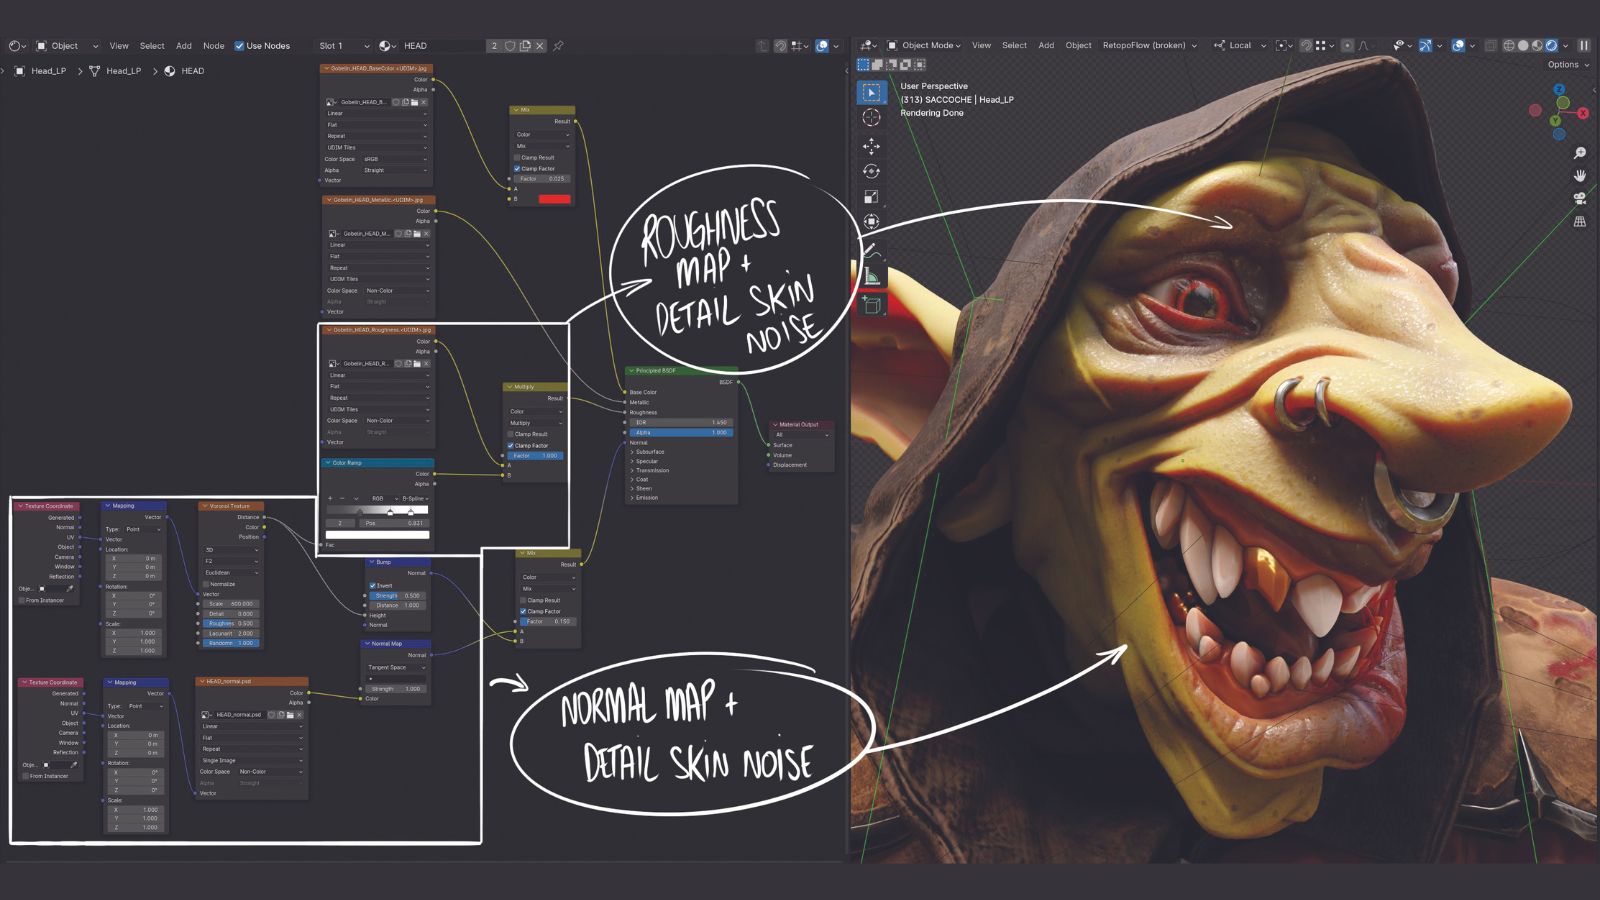
To assign the character’s textures in Blender you first have to add a Principled BSDF in the Shader Editor, then plug in your textures. During the texturing process you can also play around with procedural materials in the Shader Editor to make the eye textures and some of the metal parts, or add a Detail map for the skin and clothes. To do that you can add either a Noise or Voronoi node, plug it into a Bump node, and mix with your Normal map to create skin details in your texture.
11. Making props to create character
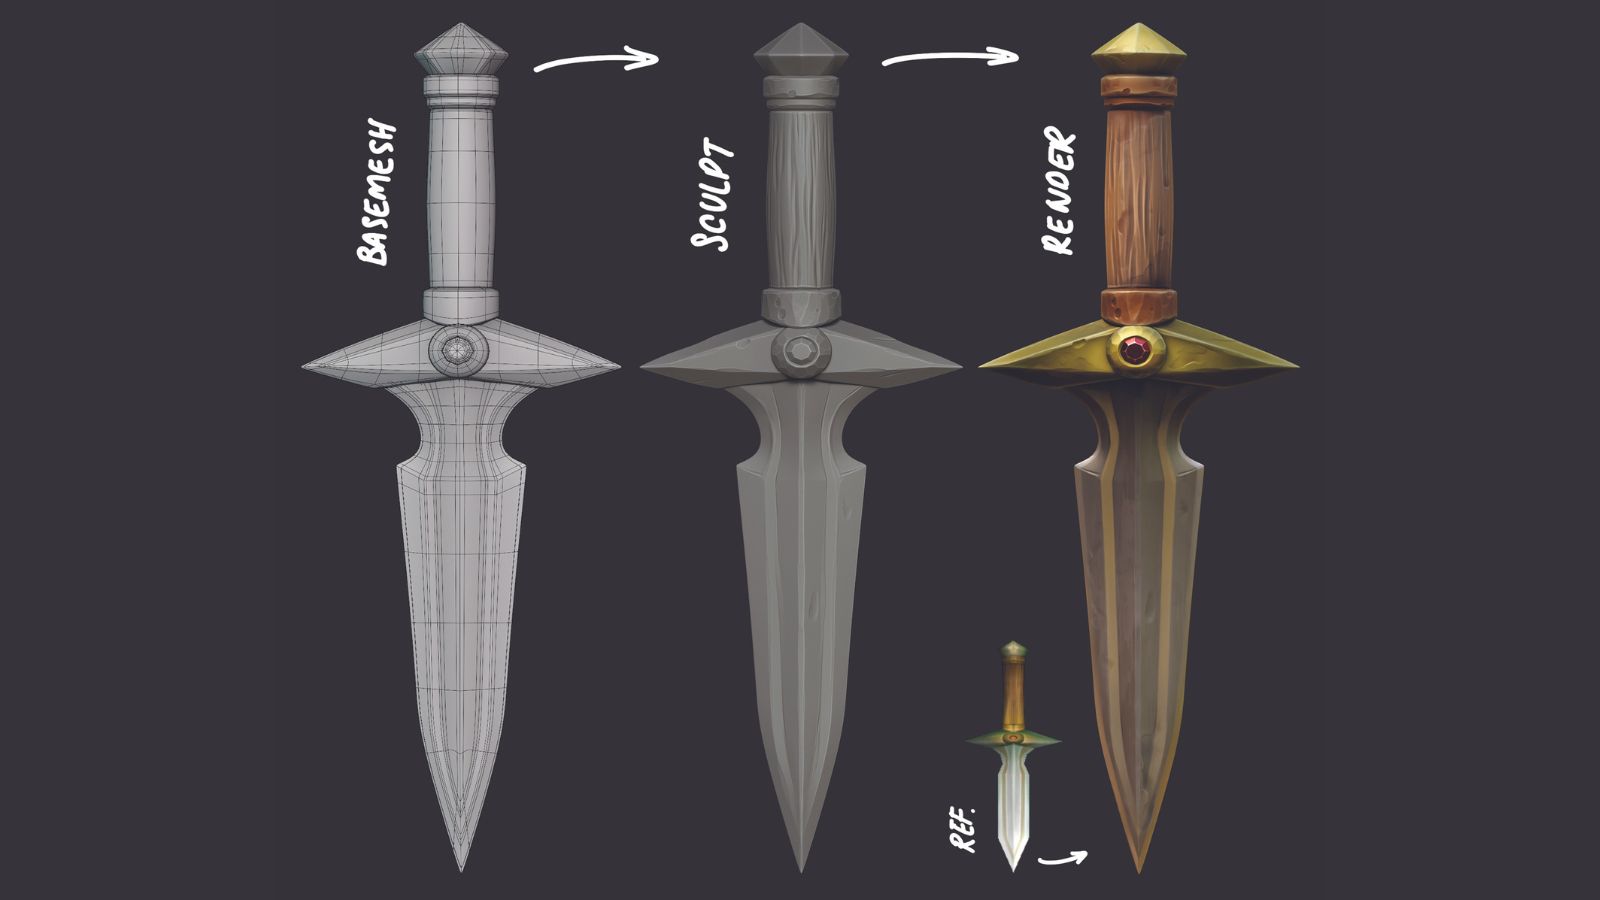
Adding props to your character is an absolute must. Even if they’re small, they can add so much life and lore, and make the character feel more consistent. If you’re creating a hard-surface model you can start working directly in Blender to blockout the shapes and silhouette. The workflow for making the props is largely the same as the one we followed for the character modelling.
12. Lighting the scene
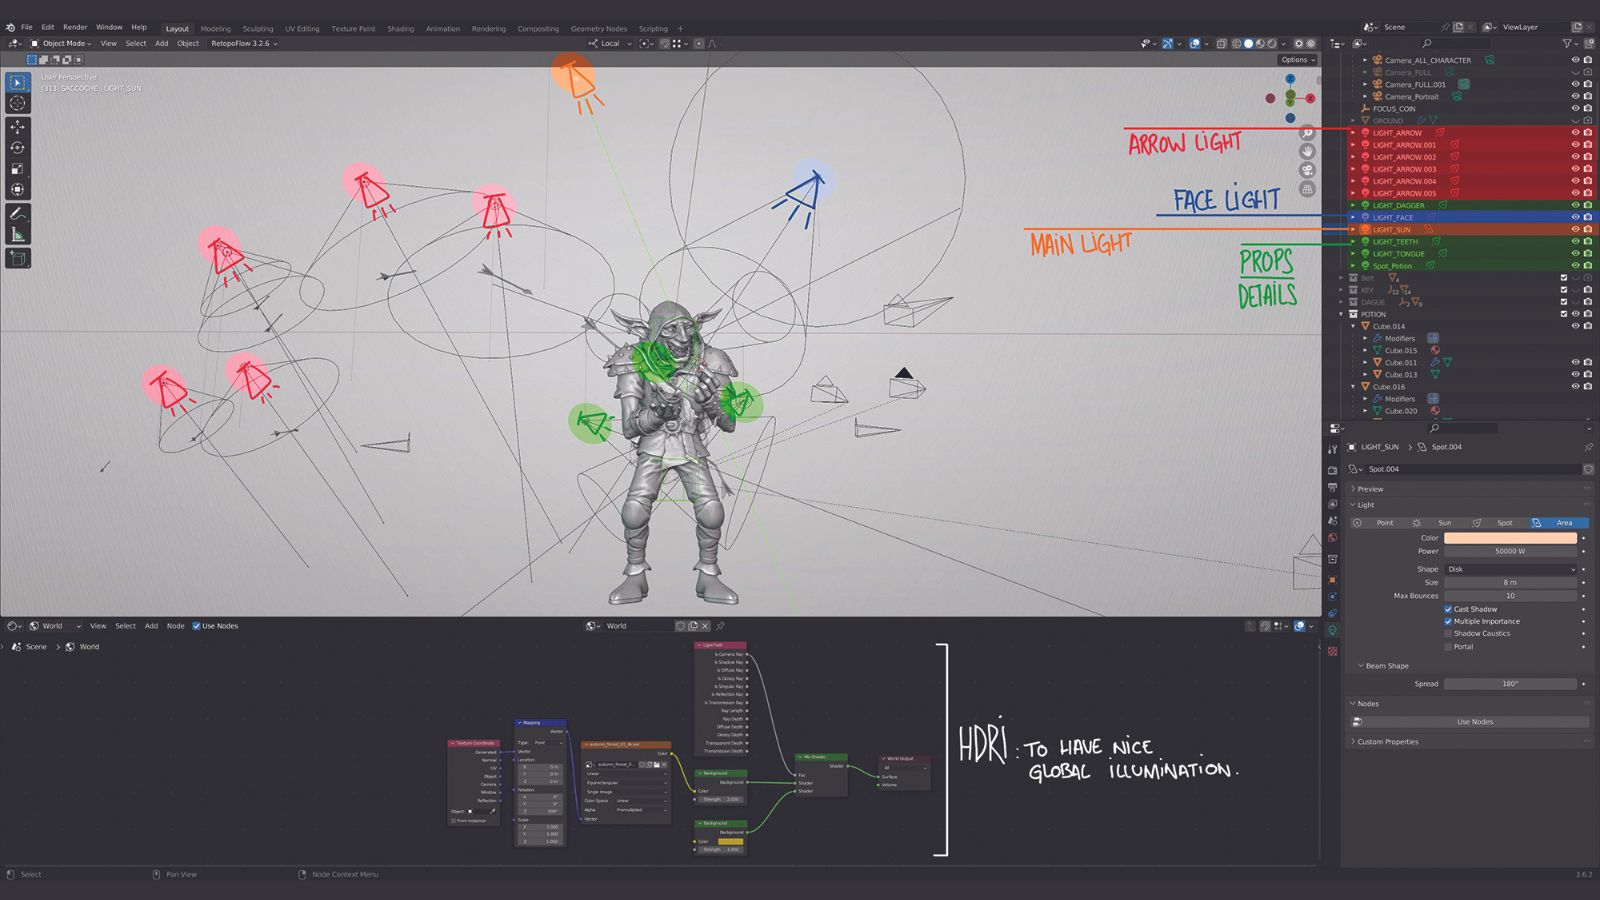
It’s nice to start working on the lighting when you have a good first sculpting pass done to consider what kind of ambience you’re looking for. Keep in mind that the lighting should match your character’s posing, facial expression and mood to give the project a consistent feeling and good storytelling.
Try to aim for a non-complex lighting workflow so your render will be more efficient and less noisy. For example you can add one Sun Light, some prop lights to eliminate most of the shadows caused by the sun, rim lights to catch the character’s silhouette, and finally an HDRI for global illumination.
13. Designing a background in Photoshop
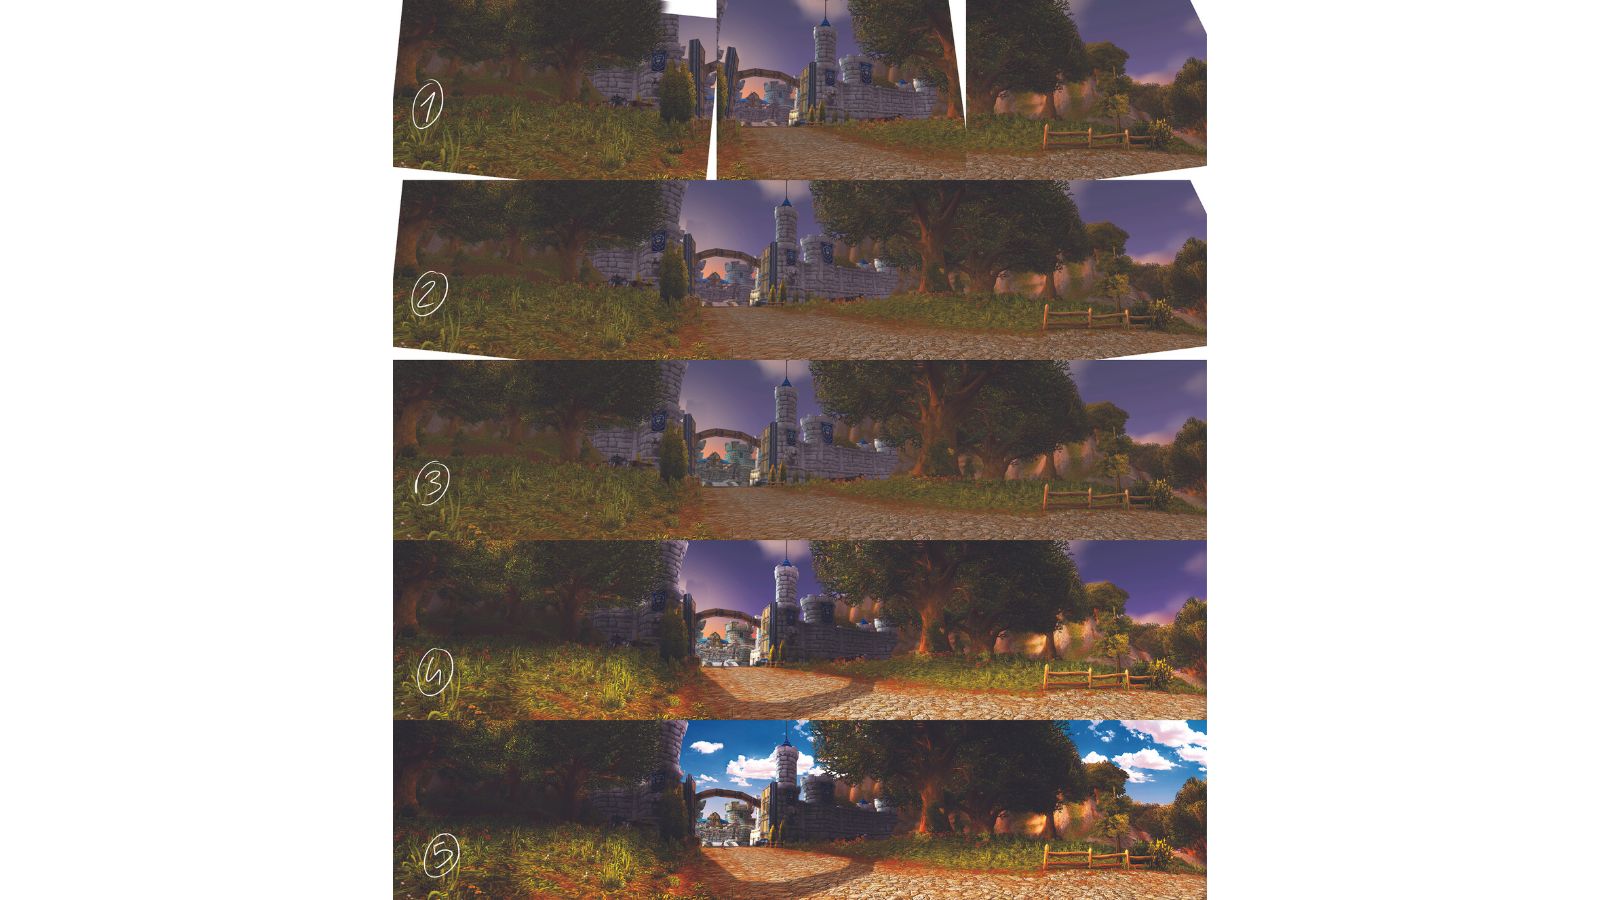
To bring more life to your project you can add an environment to fit the mood of your character, or even just a simple background image.
Here, for example, several screens were taken from World of Warcraft and blended to create a panoramic view. The Saturation and Brightness were adjusted, with shadows and highlights also created to match the direction of the Sun Light in Blender.
Next, create a plane that can be bent, assign the textures to it, and add depth of field to your camera with an f-stop close to 0.5 , which will make the background blurry and keep the focus on the character
14. Defining the render settings
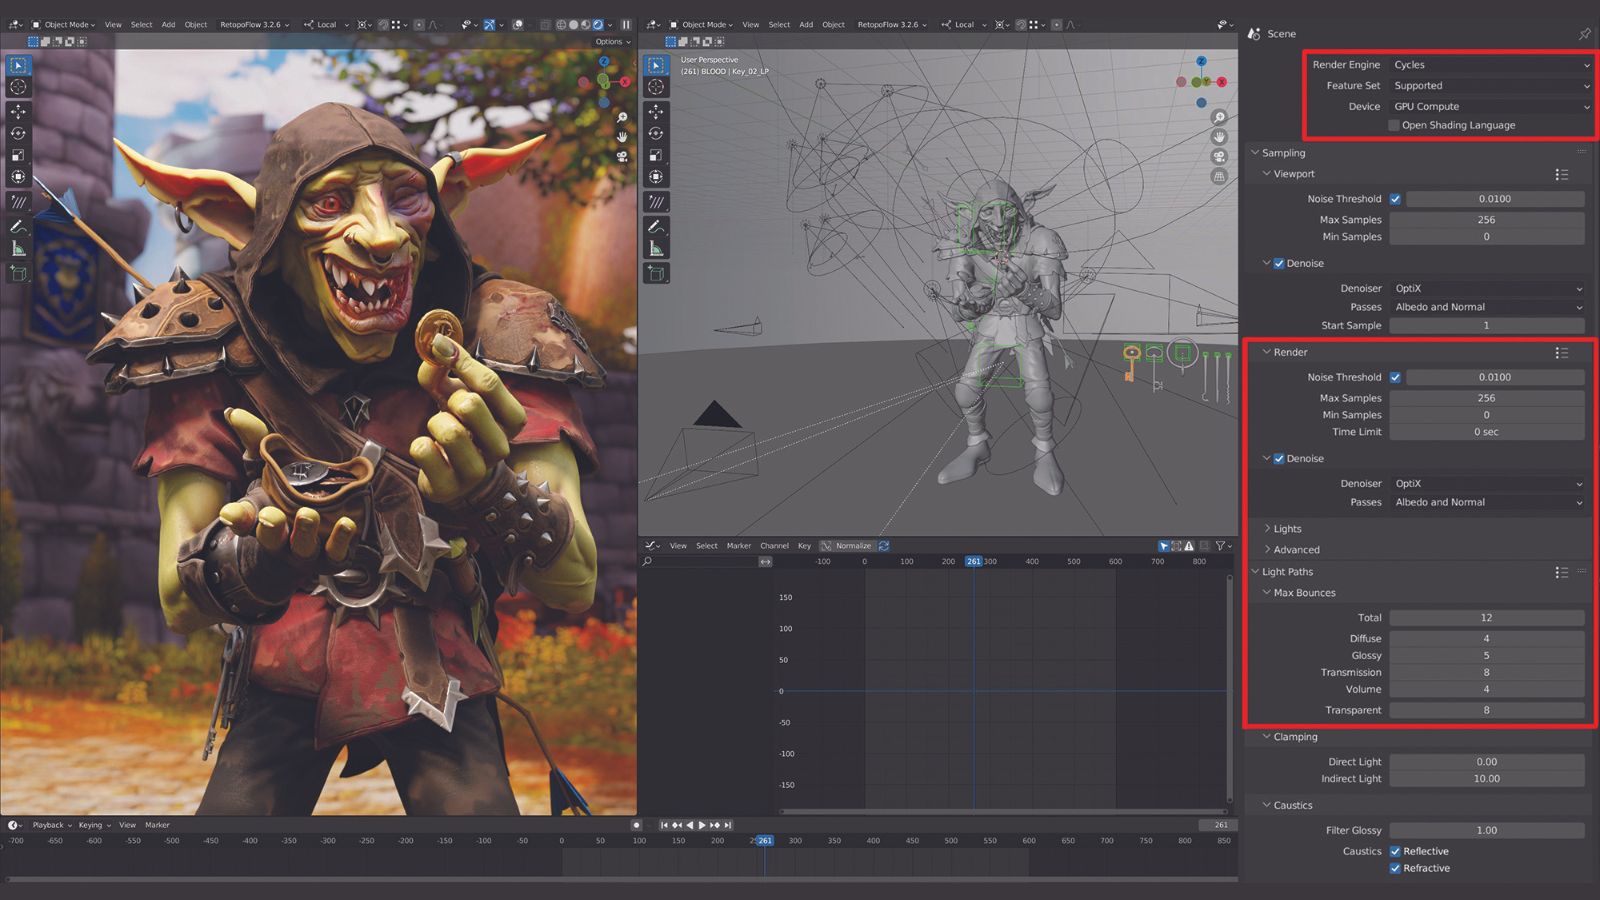
There are so many options when you want to render an image with Cycles. You have to choose between using the CPU or GPU, the number of samples used to calculate the image, the denoiser, and the Max Bounces of the Light Paths. You can stick with low sample settings such as 256 samples, then enable the Denoiser option with OptiX. This lets you maintain quality without incurring excessively long render times for a single image.
Create a stylised 3D character: quick tips
Here I've put together a few more quick tips to help you when you're creating characters in 3D.
Procedural positives
Even if you have a good texel ratio in your UV Map, it can be more useful to add details with separate Normal and Roughness maps. This allows you to adjust tiling and detail textures as needed. This workflow can save plenty of time as it’s a non-destructive way to work and can quickly be corrected.
What about retopology?
In the game industry topology is a hugely important step, and you should take your time to do it properly using retopology tools like Quad Draw in Maya or SpeedRetopo in Blender. If your topology is poor you may encounter problems with the engine, riggers, animators and more.
Samples and the denoiser
When rendering, the denoiser will erase noise and smooth your image, but can also get rid of details and lines if you don’t have enough samples. That’s why using 256 samples and the OptiX denoiser is a good choice to keep quality and erase noise for 4K images.
Get more software tutorials in 3D World
This content originally appeared in 3D World magazine, the world's leading CG art magazine. 3D World is on sale in the UK, Europe, United States, Canada, Australia and more. Limited numbers of 3D World print editions are available for delivery from our online store (the shipping costs are included in all prices). Subscribe to 3D World at Magazines Direct.