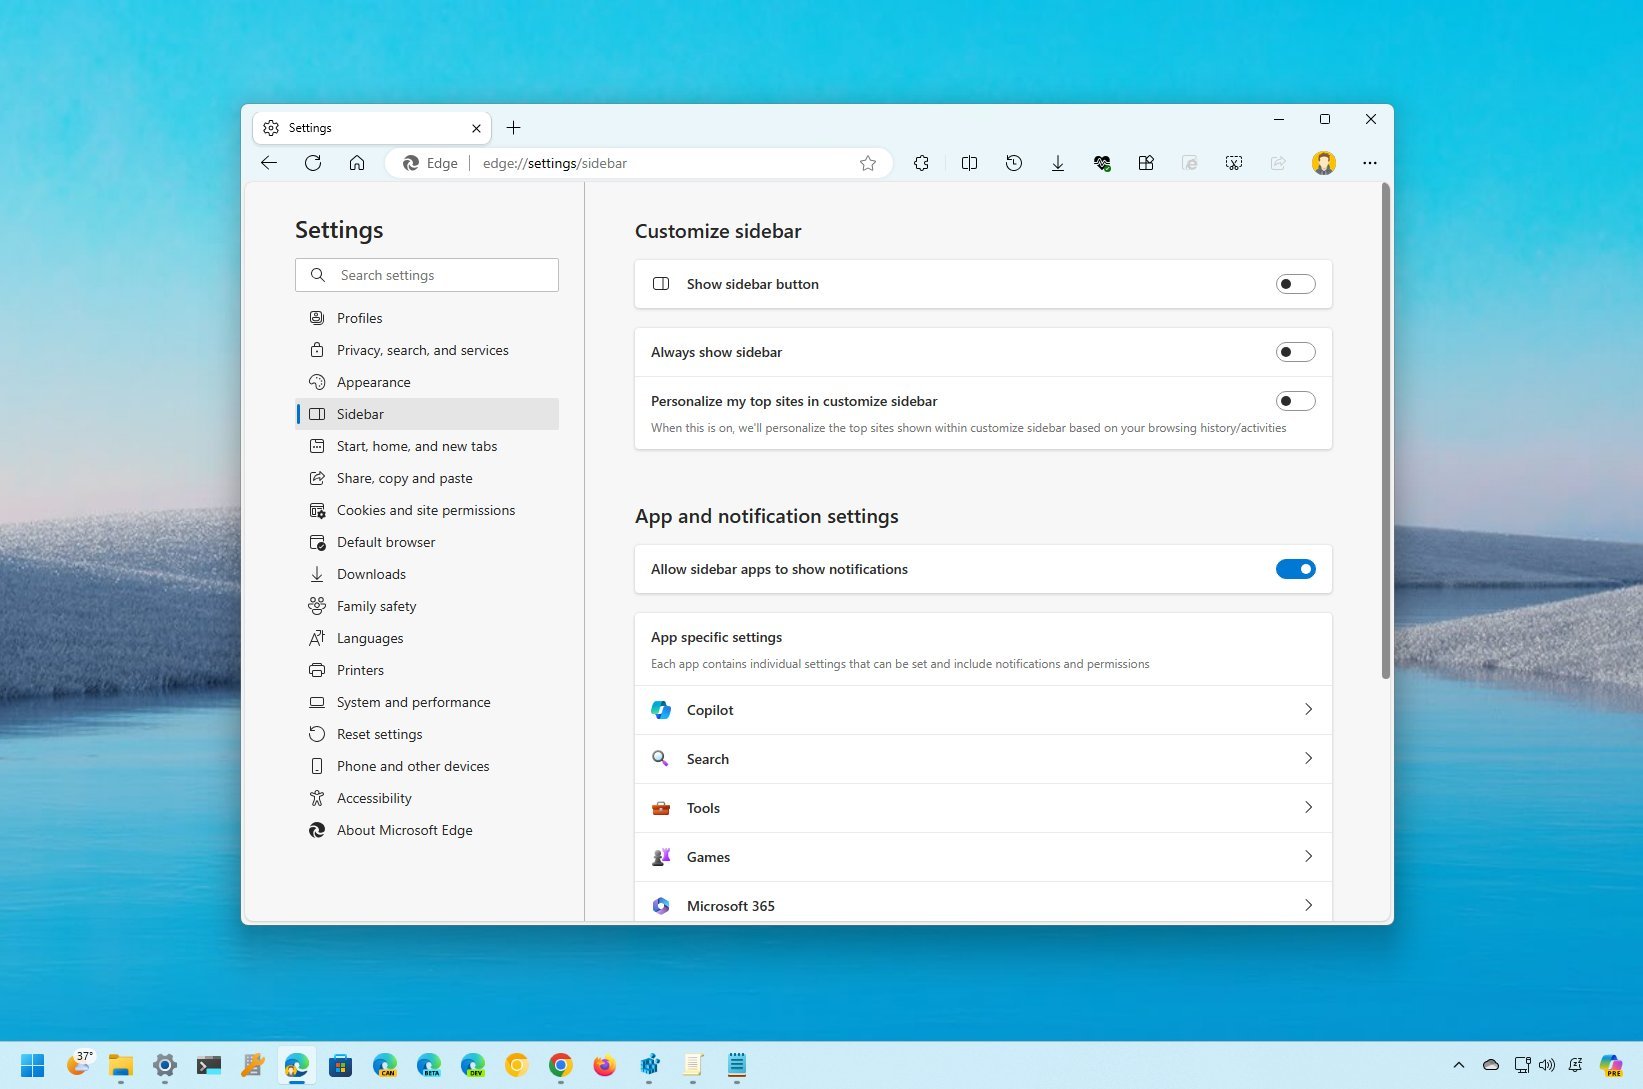
On Windows 11, if you prefer Microsoft Edge over other browsers to access the internet, there are some configuration changes every user should make for the best experience.
When you install Windows 11 or set up a new computer, Microsoft Edge loads a set of default settings, but some of the default selections are questionable. For example, out of the box, the browser comes with "Do Not Track" disabled, but targeted advertising is enabled.
The browser also comes with many unnecessary features turned on by default, such as those for shopping and recommendations, and a sidebar that adds even more clutter and reduces the available space. However, not all the features are "bad." Some are great, but they come disabled by default.
In this how-to guide, I'll walk you through the settings I consider to be the most optimal for most users on Windows 11.
Best Microsoft Edge settings for Windows 11
You should consider applying these settings on your Microsoft Edge browser.
To get started, click the "Settings and more" (three dots) button from the top-right and choose the "Settings" option.
Profiles
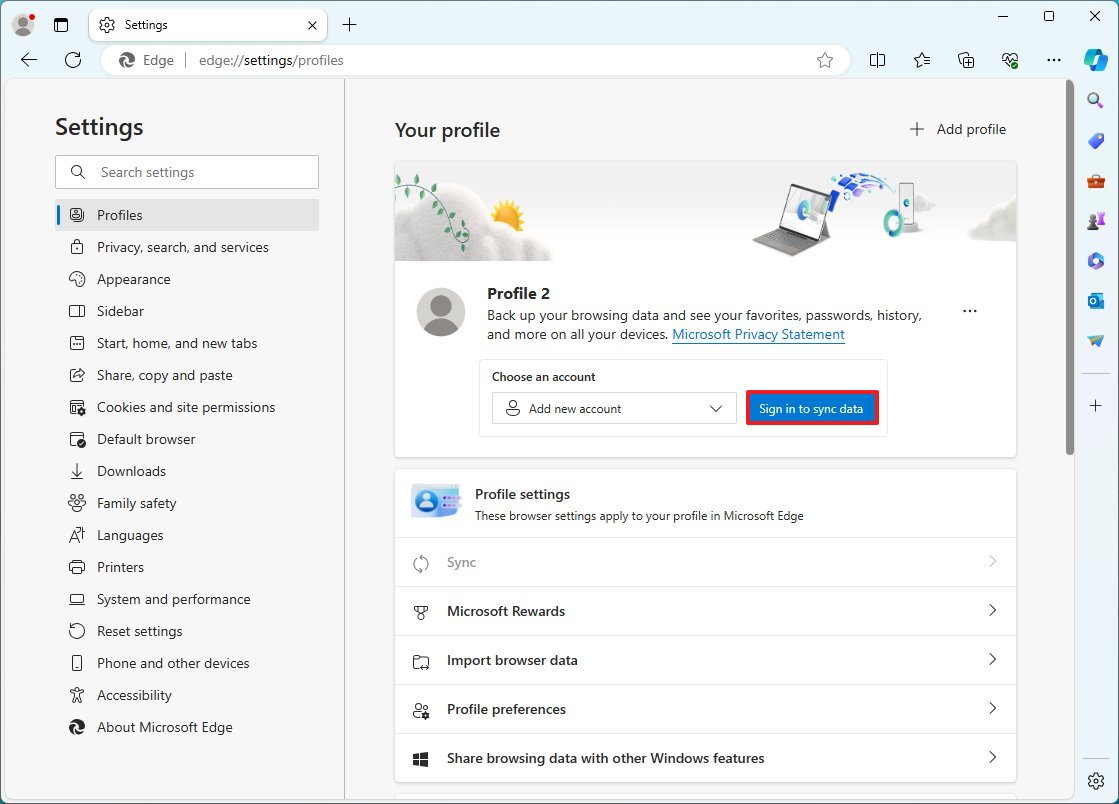
On the "Profiles" page, you should use the default configuration, but it's recommended that you connect your Microsoft account to sync your browsing activities, credentials, and other information across devices. To do so, you only have to click the "Sign in to sync data" button and sign in with your Microsoft account.
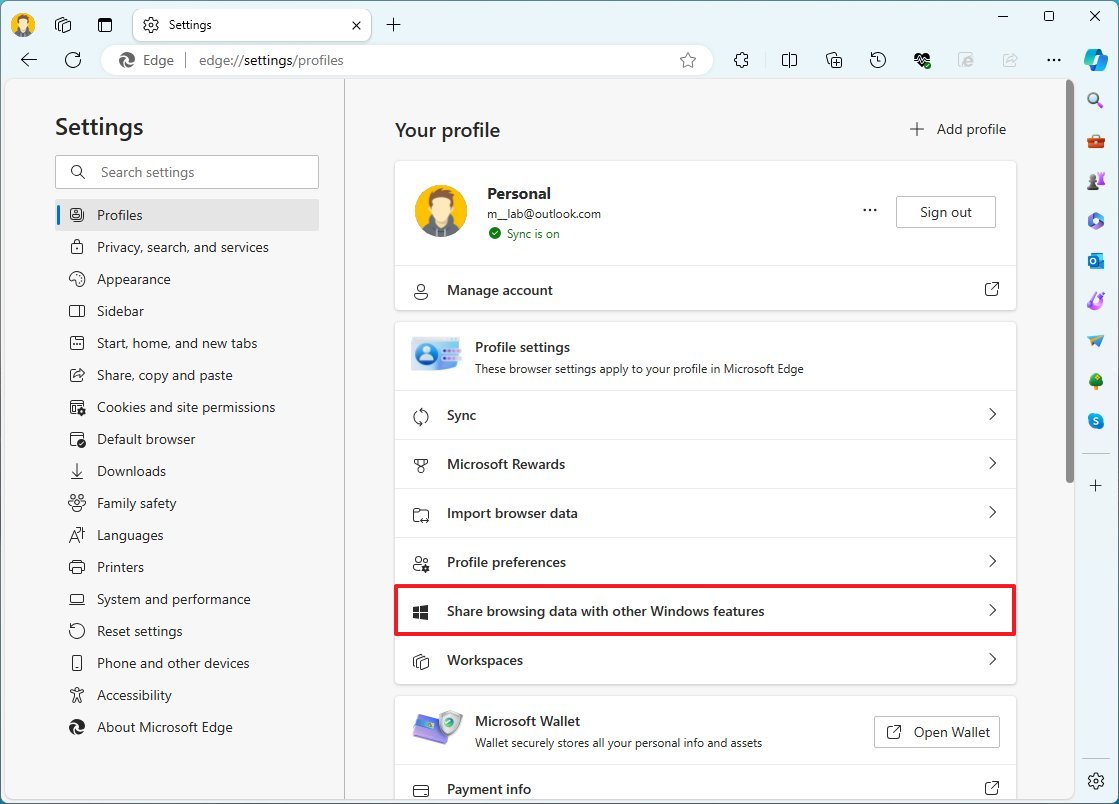
Under the "Profile settings" section, click the "Share browsing data with other Windows features" setting and turn off the feature to prevent Windows 11 from making online activities searchable from the Search experience.
Privacy, search, and services
On the "Privacy, search, and services" page, you should turn on the "Tracking prevention" with (at least) the "Basic" setting.
As part of the privacy features, Microsoft Edge includes "Tracking prevention" that allows you to block websites from minimizing the amount of information they collect about your online activities.
The feature provides three configuration levels: "Basic," "Balanced," and "Strict." You should at least use the "Balanced" setting to block harmful website trackers. The "Strict" setting blocks the majority of trackers, but it can break the site, so I wouldn't recommend using it.
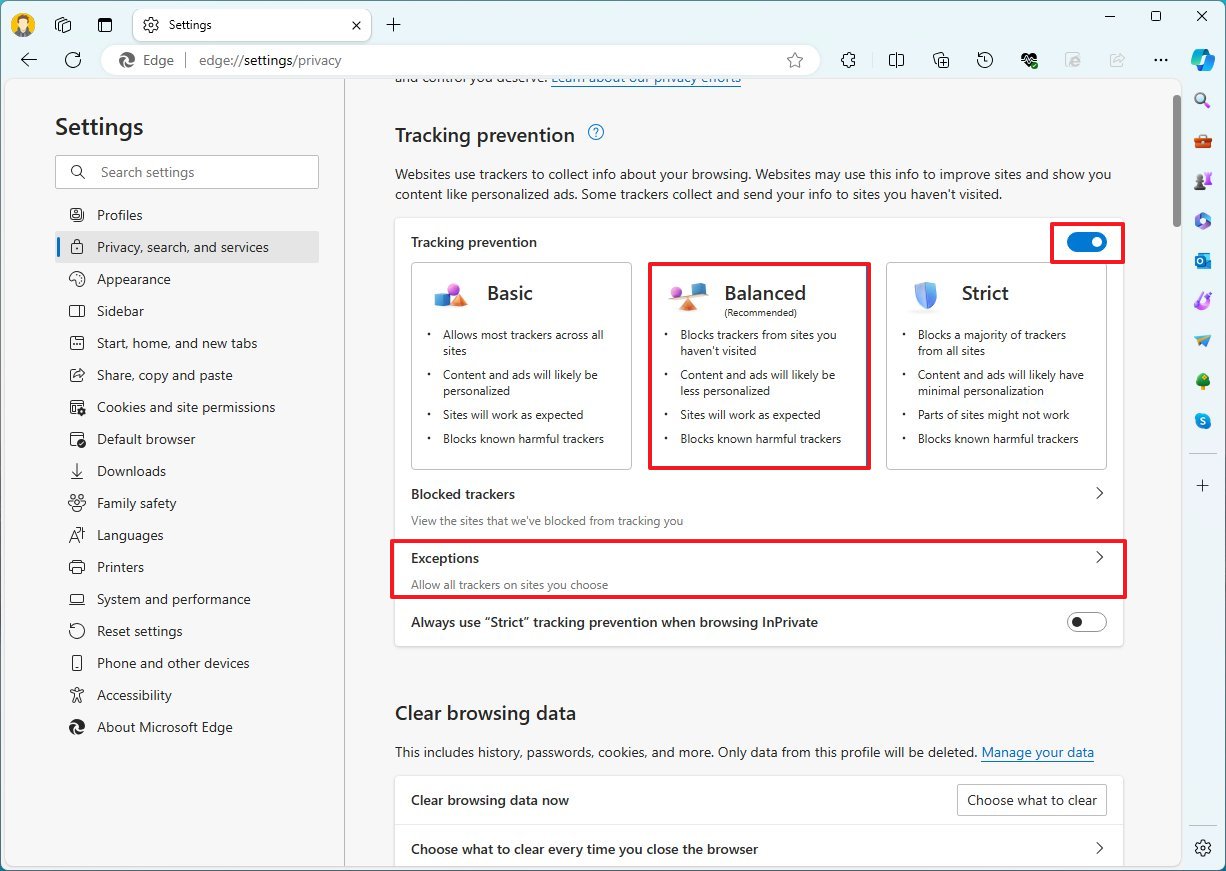
You can use the "Exceptions" setting to prevent the browser from blocking specific websites.
Under the "Privacy" section, turn on the "Send "Do Not Track" requests" setting to signal to websites that you don't want them to collect or share your browsing data.
Although it's a good practice to turn on this feature, the only caveat is that the site can ignore your request. I have created another guide that shares more details about this privacy feature.
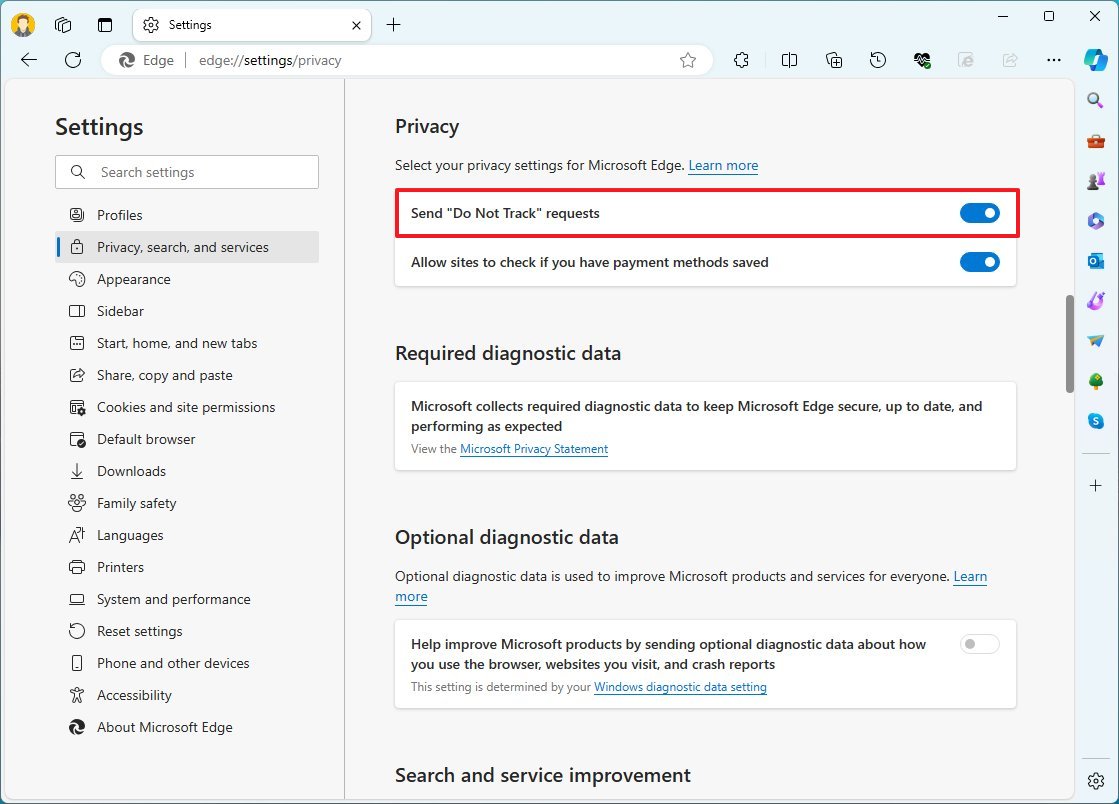
Under the "Search and service improvement" section, turn off the "Help improve Microsoft products by sending the results from searches on the web" setting to minimize the data you send to the company.
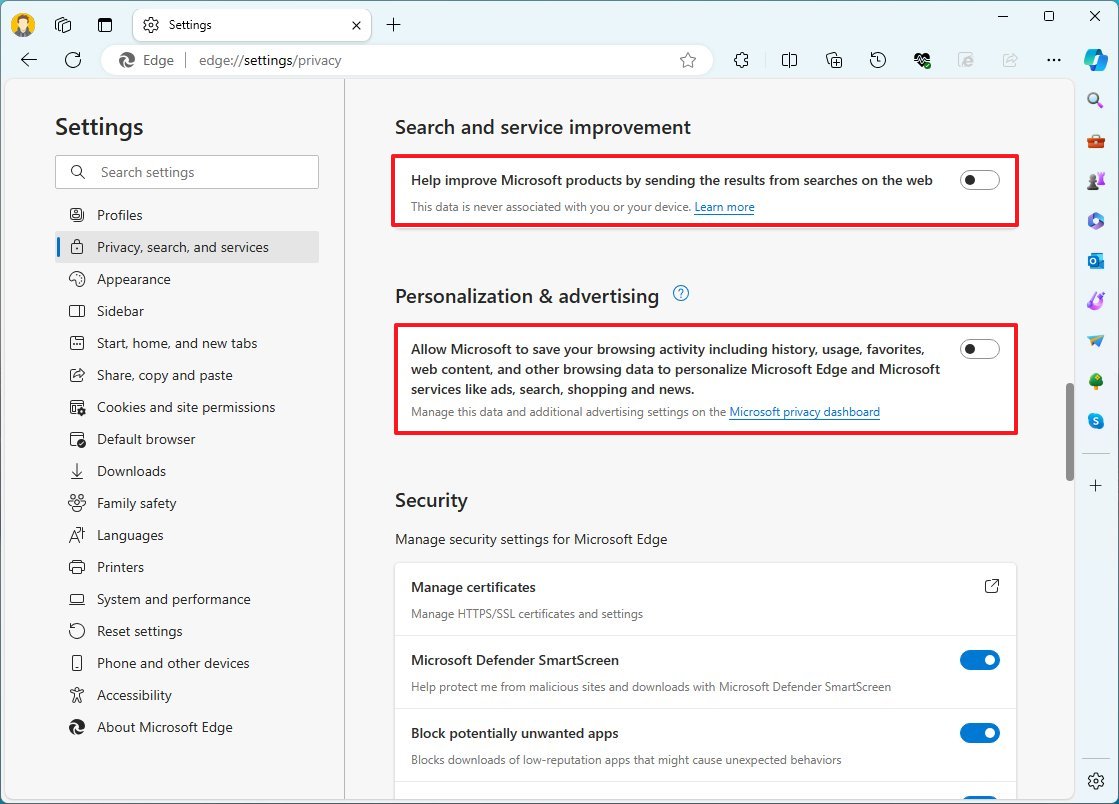
Under the "Personalization & advertising" section, turn off the toggle switch of the feature to prevent Microsoft from using your online activities, favorites, and web content to show targeted ads, search, shopping, and news.
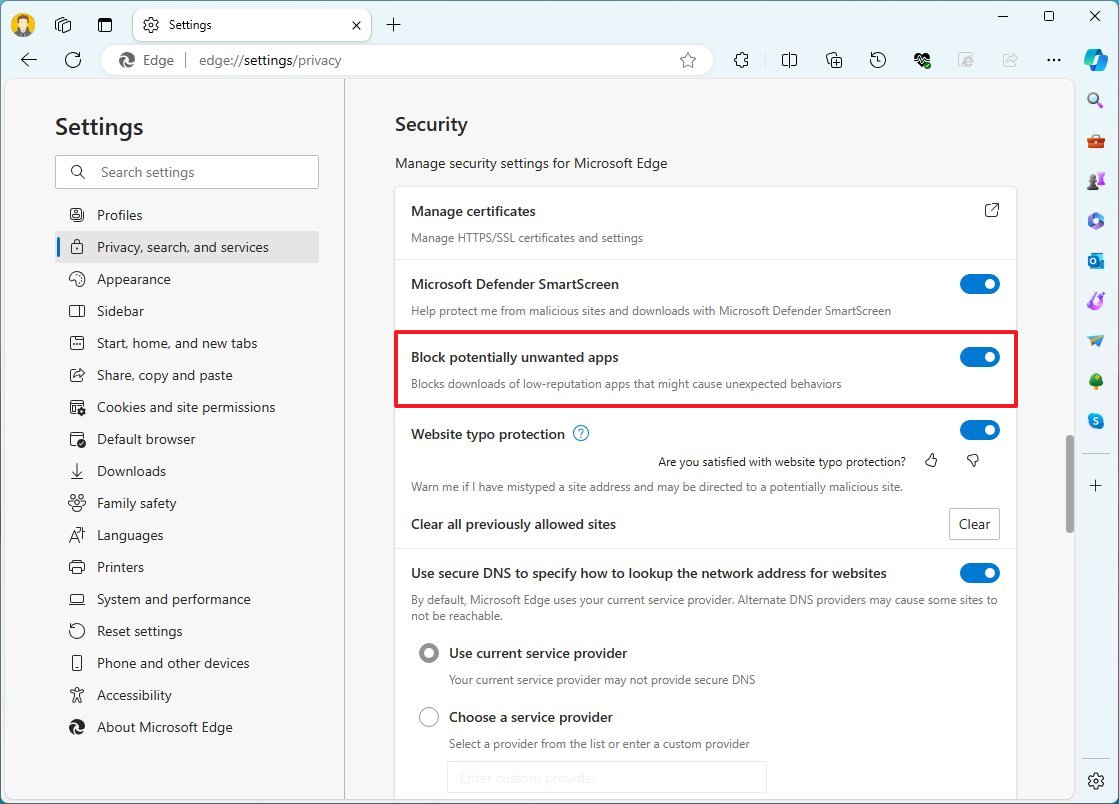
Under the "Security" section, turn on the "Block potentially unwanted apps" setting to allow the browser to block downloads that can harm your installation. (It's important to note that this setting can cause false positives. You can leave this option off if you're a tech-savvy user.)
You should also turn on the "Enhance your security on the web" setting and set the option to "Balanced." This is another security layer that implements several mitigations to protect the browser from malware attacks.
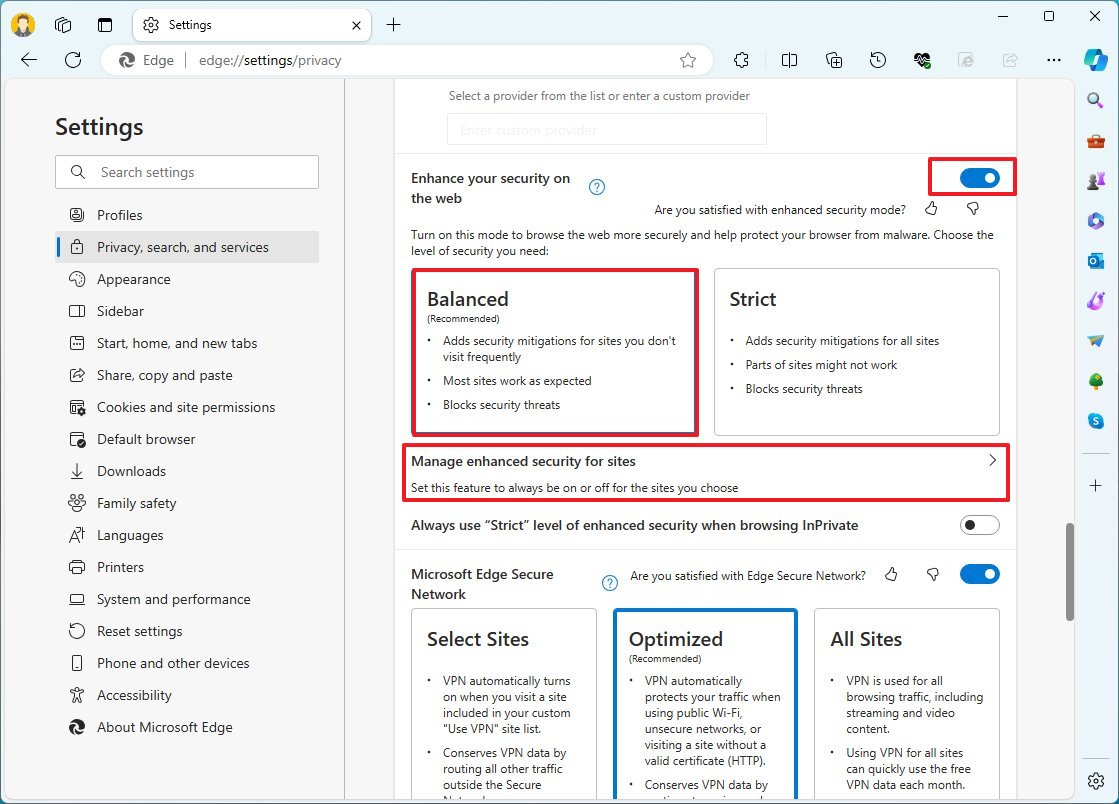
On the "Manage enhanced security for sites" page, you can add or remove sites manually. This option comes in handy when you want to use this feature, but a specific website doesn't work correctly.
Another feature worth turning on is the "Microsoft Edge Secure Network" feature, a free VPN (Virtual Private Network) service that Microsoft offers at no extra cost in partnership with Cloudflare.
The secure network feature adds an extra layer of security by rerouting your browser traffic through the VPN server, adding encryption to the connection, hiding your public IP address, and protecting your browsing activities.
You can enable it by turning on the "Microsoft Edge Secure Network" toggle switch and choosing one of the available options, including "Select Sites," "Optimized," and "All Sites."
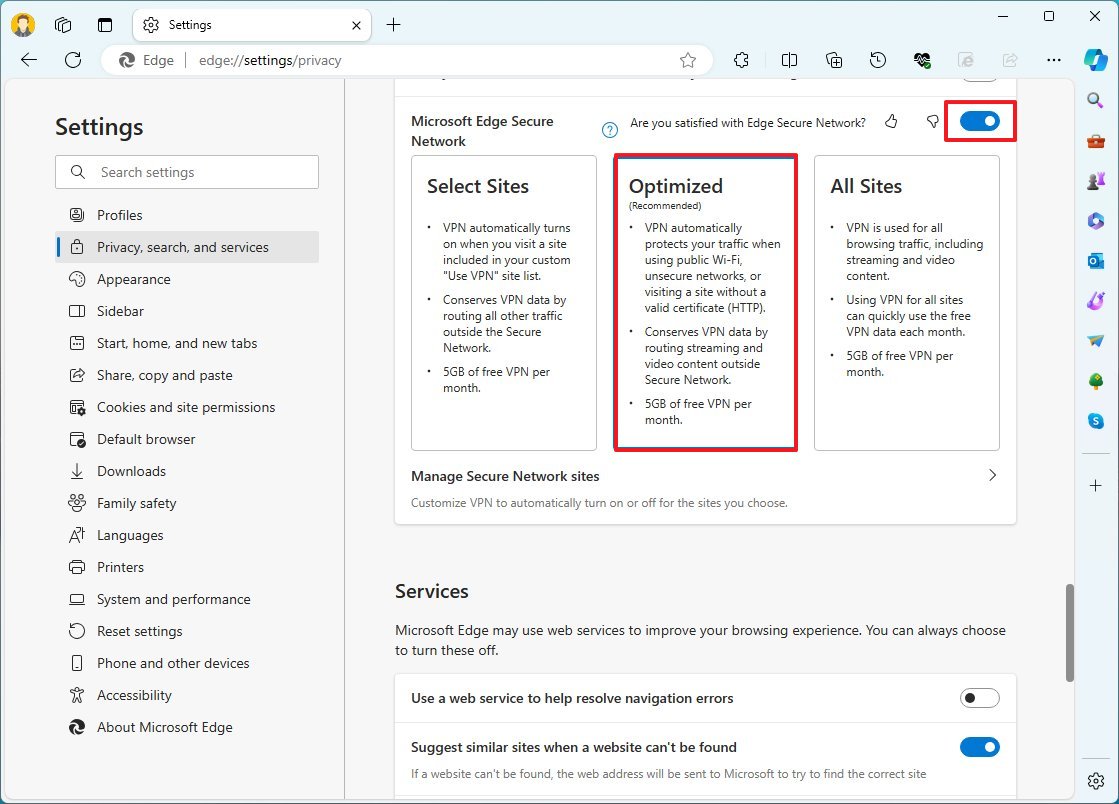
I agree with Microsoft that "Optimized" is the best option, as it will automatically protect you on public and unsecure networks and websites automatically. However, you can always turn on the VPN option for a specific site using the "Manage Secure Network sites" page or turn on the "VPN" toggle switch from the browser's essential side panel.
The only caveat is that it only offers 5GB of data per month.
Under the "Services" section, you can manage different features and services that may only end up cluttering the browsing experience.
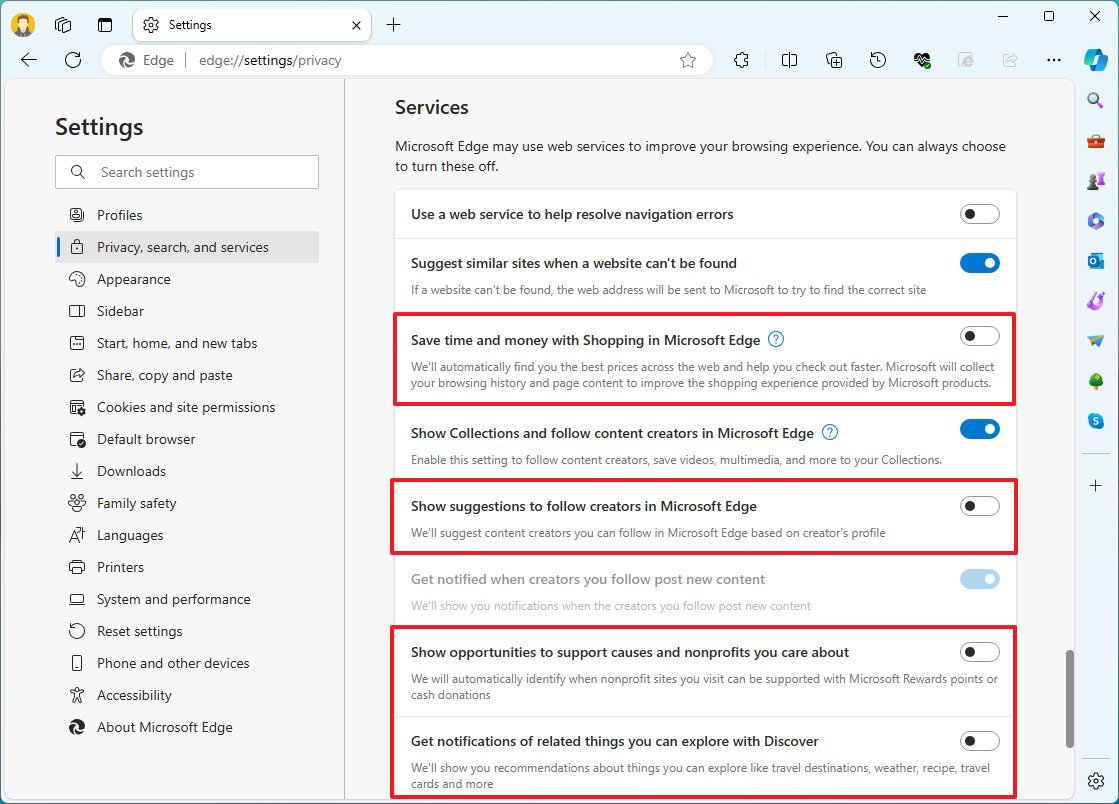
On this page, you should turn off the "Save time and money with Shopping in Microsoft Edge" toggle switch to prevent constant offer notifications in the address bar. (Sure, saving some money when shopping online is good, but constant reminders can lead to interruptions and buying things you probably don't need.)
Some other features you can turn off include:
- Show suggestions to follow creators in Microsoft Edge.
- Show opportunities to support causes and nonprofits you care about.
- Get notifications of related things you can explore with Discover.
If Bing is your preferred search engine, you can click the "Address bar and search option" setting and select your preferred engine from the "Search engine used in the address bar" setting.
Finally, on this page, you may want to enable the "Save screenshots of sites for history" toggle switch. The feature will show an image preview of the site when hovering over links in the history tab.
Appearance
On the Appearance page, in addition to switching between the dark and light color modes and changing themes, you can also customize various aspects of the toolbar, context menu, sidebar, and more.
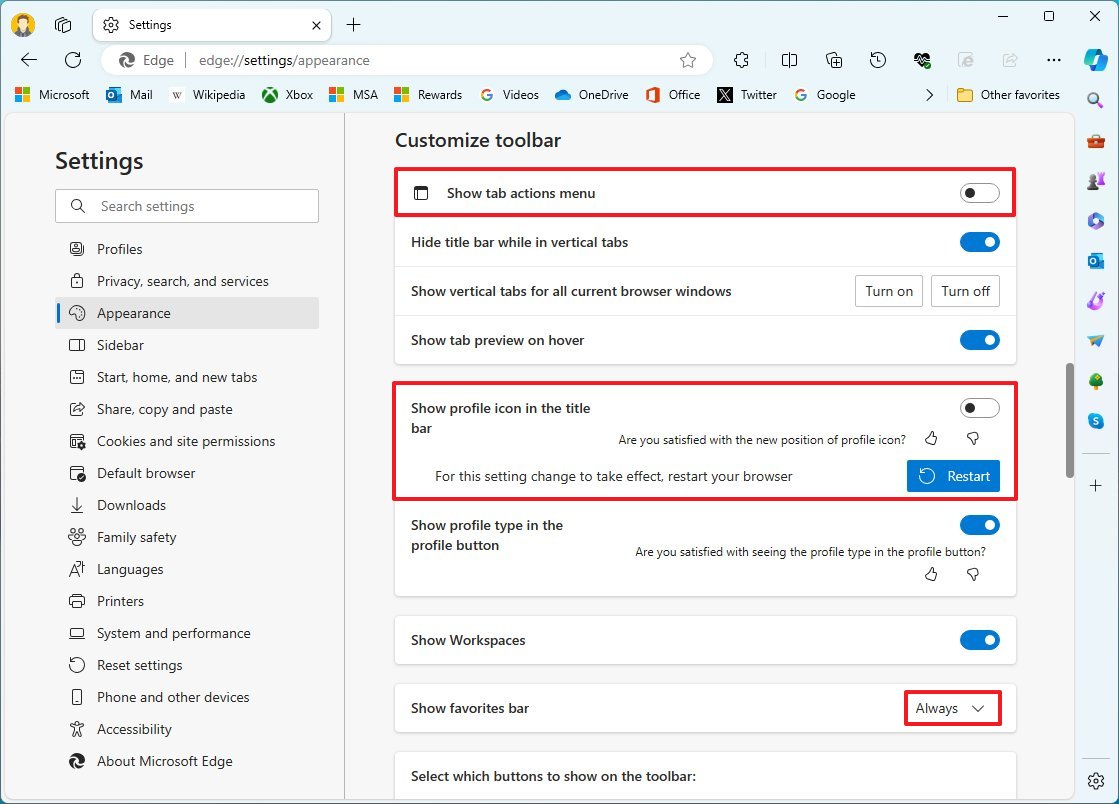
Under the "Customize toolbar" section, you should turn off the "Show tab actions menu" toggle switch to remove the tab menu button from the top-left corner. (You will rarely use this menu.)
Turn off the "Show profile icon in the title bar" toggle switch to move the profile menu to the address bar, freeing up space in the tabs area.
Choose the "Always" option in the "Show favorites bar" setting to list favorites under the address bar. In the favorite bar, that's where you should save your more frequent websites (like WindowsCentral.com).
You should also turn off the "Show Workspaces" toggle switch to disable the feature.
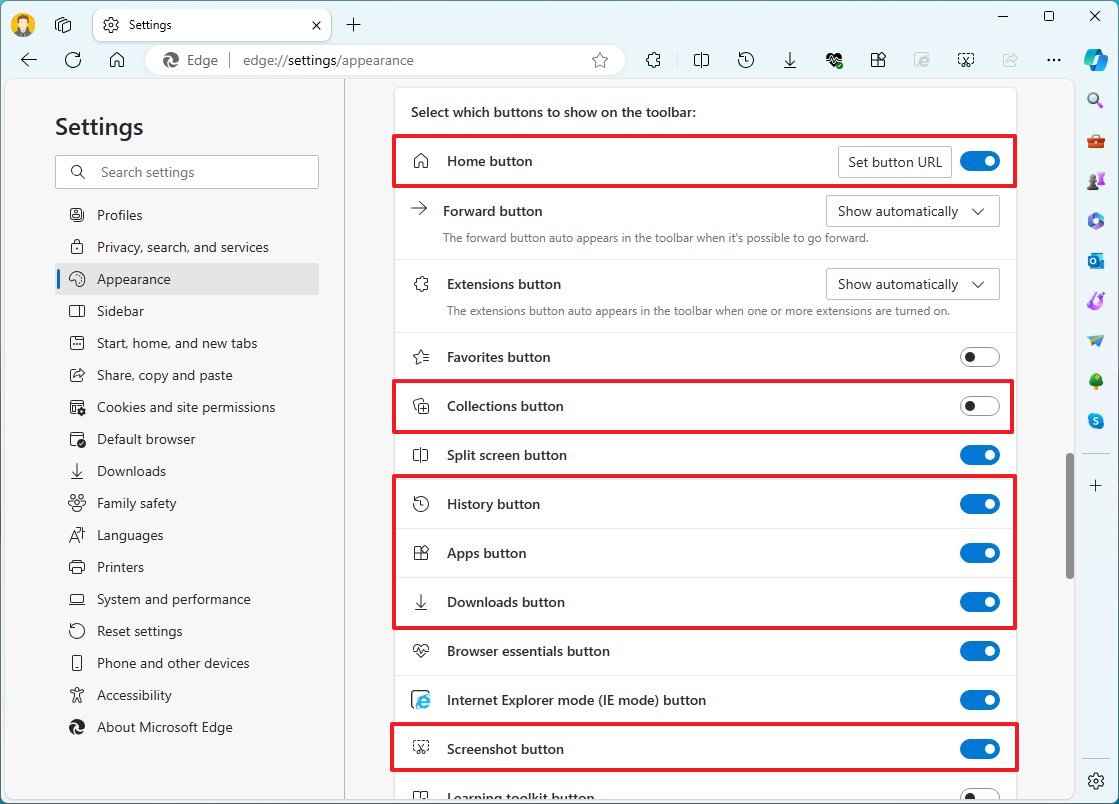
Turn on the "Home button" setting to show the button next to the address bar. The default option is the "new tab" page, but you can use the "Set button URL" option to specify any website.
Turn off the "Collection button" toggle switch if you don't use collections.
Other useful features you may want to enable on this page include:
- History button: Quick access to your activity history.
- App button: Quick access to install or access web apps.
- Downloads button: Gives you access to the download history.
- Screenshot button: Gives you faster access to the option to take page screenshots.
Under the "Context menu" section, you can customize the menu behaviors.
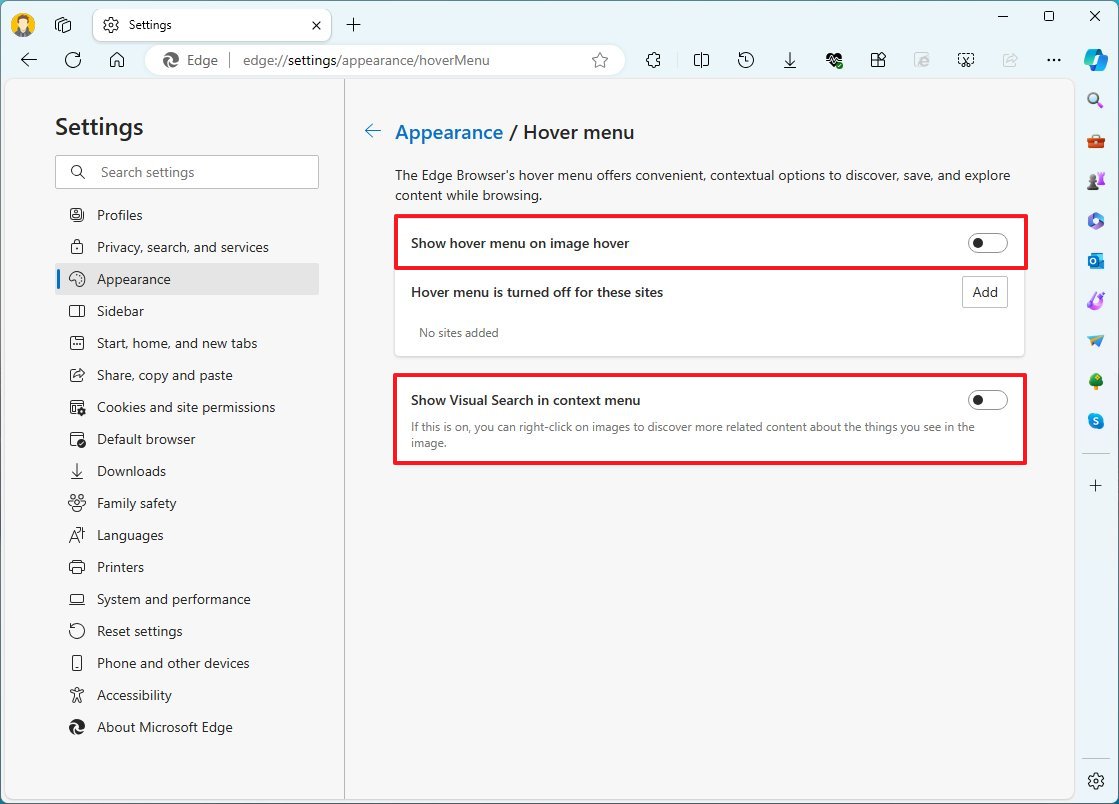
For example, on the "Hover menu" page, you should turn off the "Show hover menu on image hover" and "Show Visual Search in context menu" features. When these features are disabled, images on web pages no longer show extra elements, making the page less cluttered.
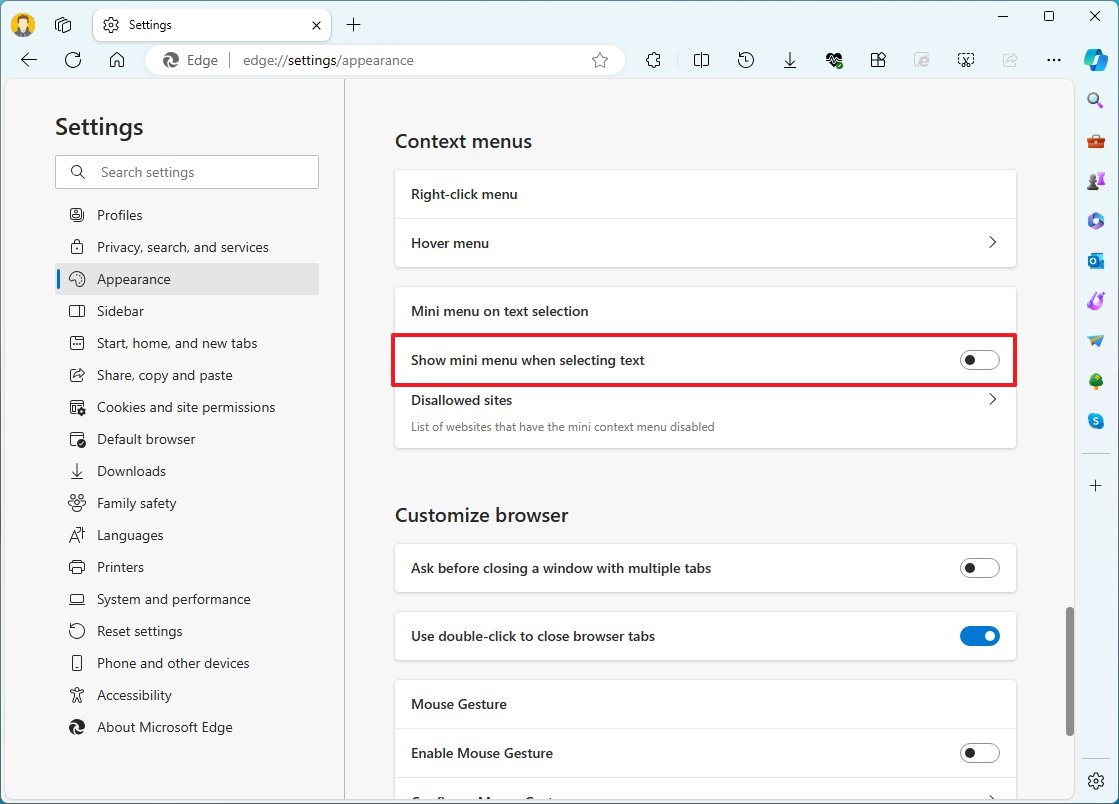
You should also turn off the "Show mini menu when selecting text" toggle switch to prevent the secondary menu from popping up automatically. You can always right-click the selection to access the available options.
Under the "Customize browser" section, you may turn on the "Ask before closing a window with multiple tabs" toggle switch to prevent some tabs from closing by accident.
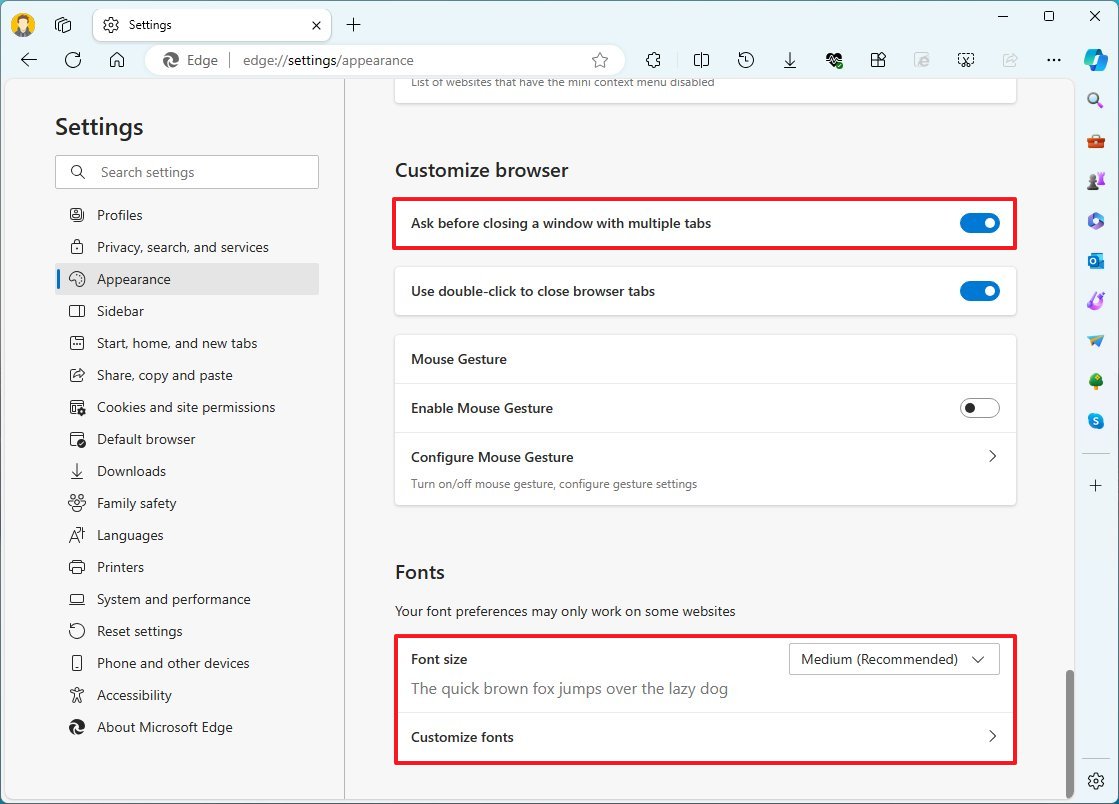
Under the "Fonts" section, you can change the default text size without having to change the scaling or zoom settings, and inside the "Customize fonts" page.
Sidebar
On the "Sidebar" page, you can completely disable the sidebar and Copilot.
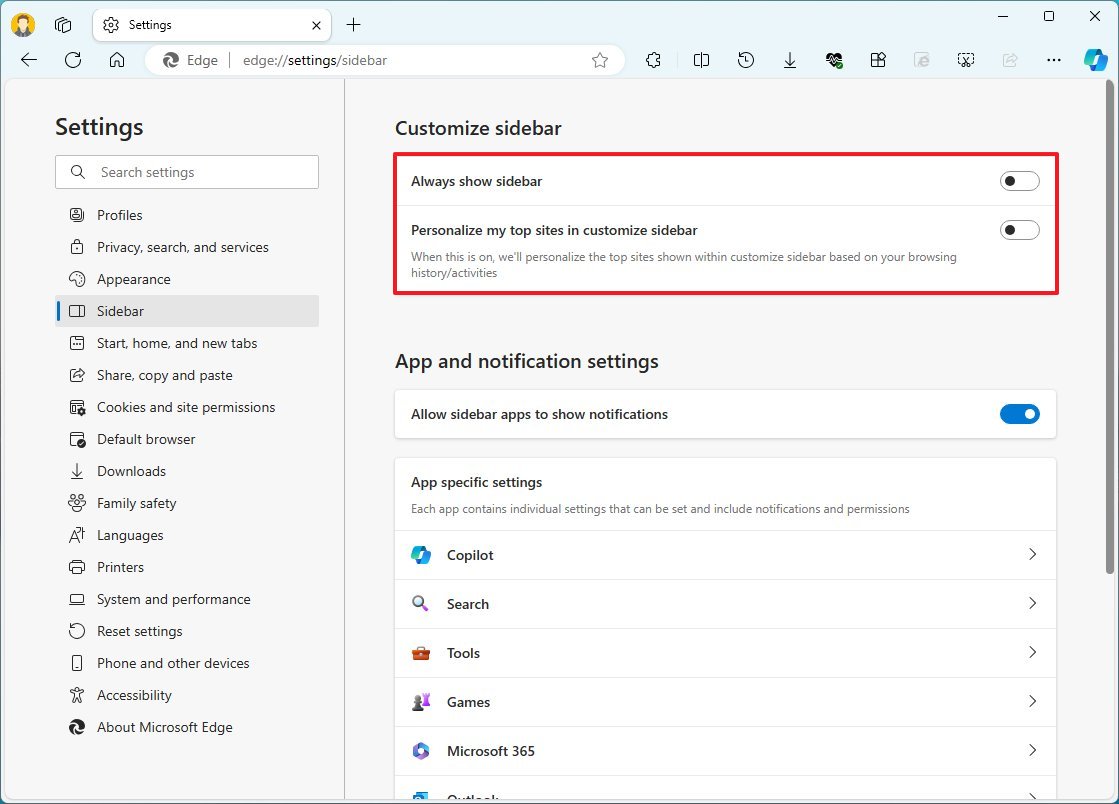
You can disable the sidebar by turning off the "Always show sidebar" toggle switch. (You may also have to turn off the "Show sidebar button" toggle switch after disabling this Copilot button.)
Also, turn off the "Personalize my top site in customize sidebar" and the "Allow sidebar apps to show notifications" settings.
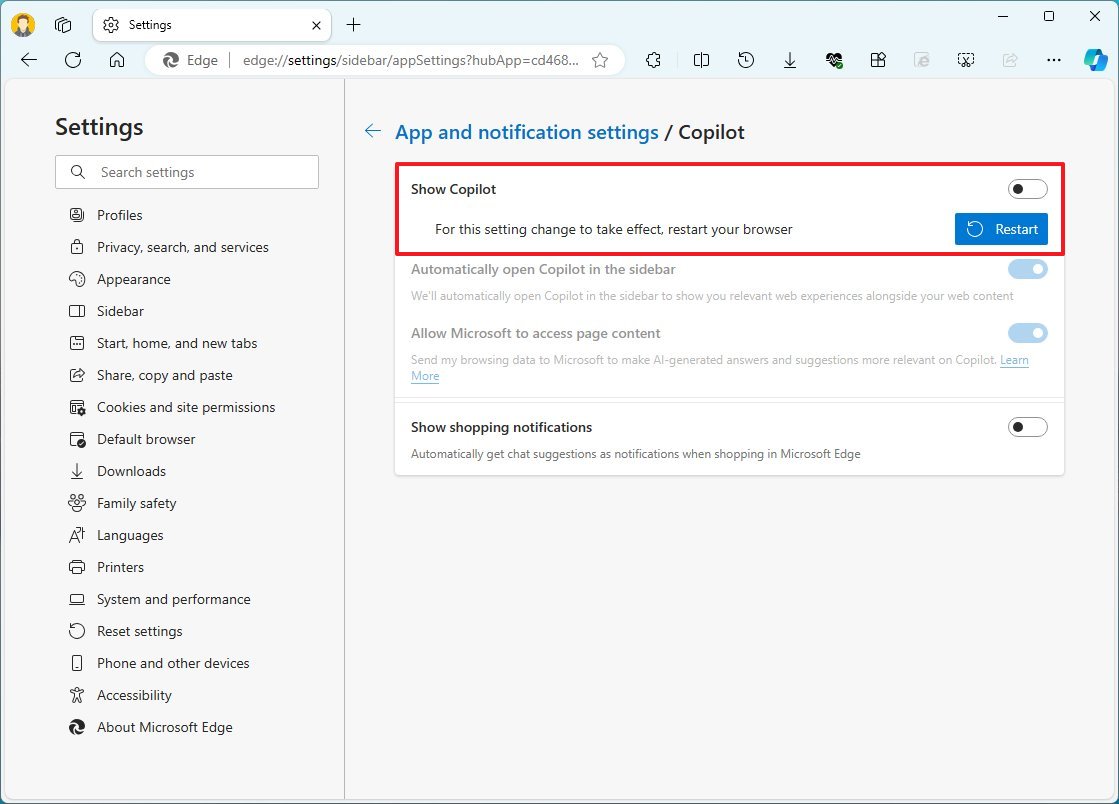
If you want to remove the Copilot button, click the "Copilot" setting, turn off the "Show Copilot" toggle switch, and click the "Restart" button.
While on this page, you should also turn off the "Show shopping notifications" toggle switch to prevent the chatbot AI from suggesting shopping deals.
Start, home, and new tabs
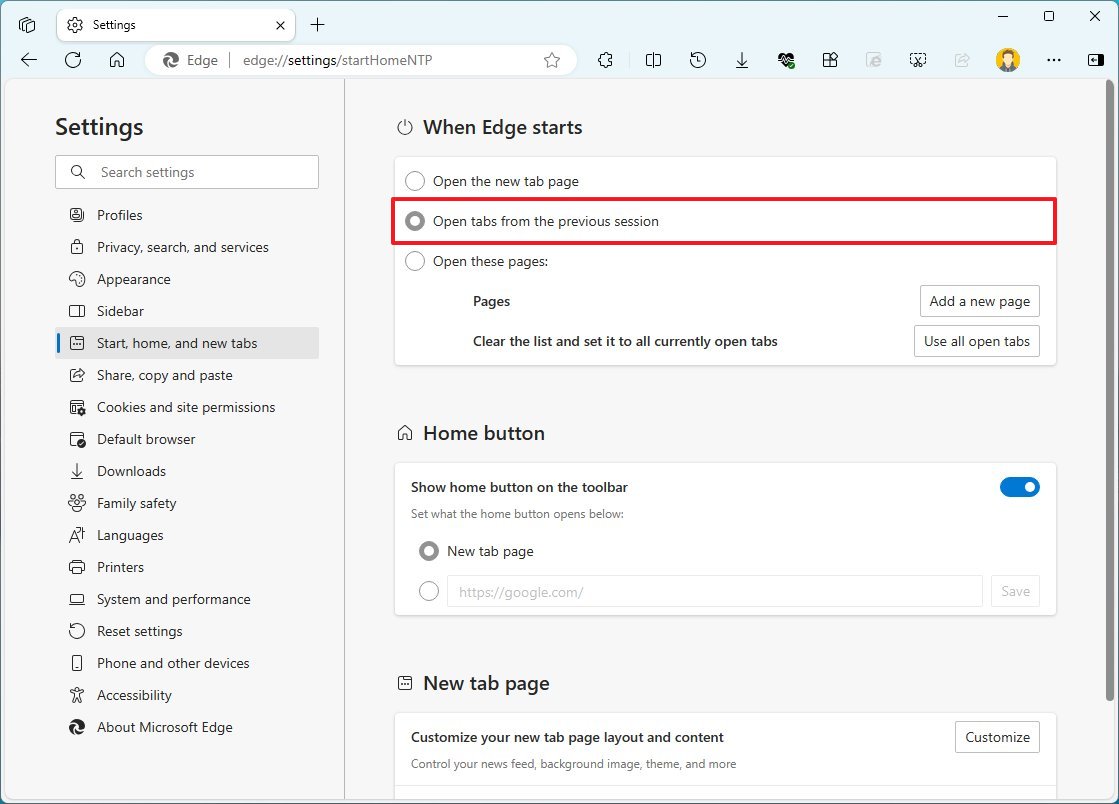
On the "Start, home, and new tabs" page, you can control a couple of settings regarding the startup behavior and the home button (which is also available on the "Appearance" page).
On this page, you only want to choose the "Open tabs from the previous session" option. If you prefer closing the tabs, leave the "Open the new tab page" option selected.
You can also refer to my other set of instructions on how to customize the "new tab" page.
Share, copy and paste
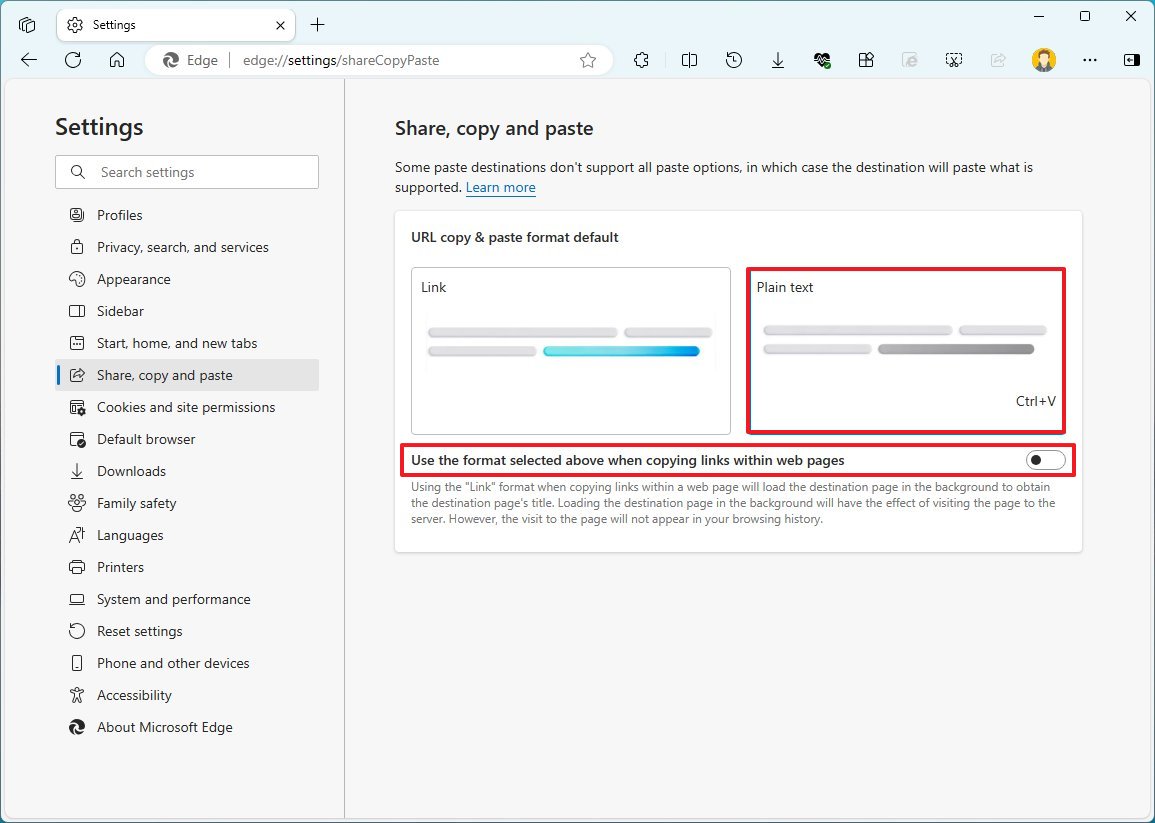
On the "Share, copy and paste" page, you want to select the "Plain text" option to copy and paste links in the plain text instead of a short link with the page title.
You should also turn off the "Use the format selected above when copying links within web pages" toggle switch.
Downloads
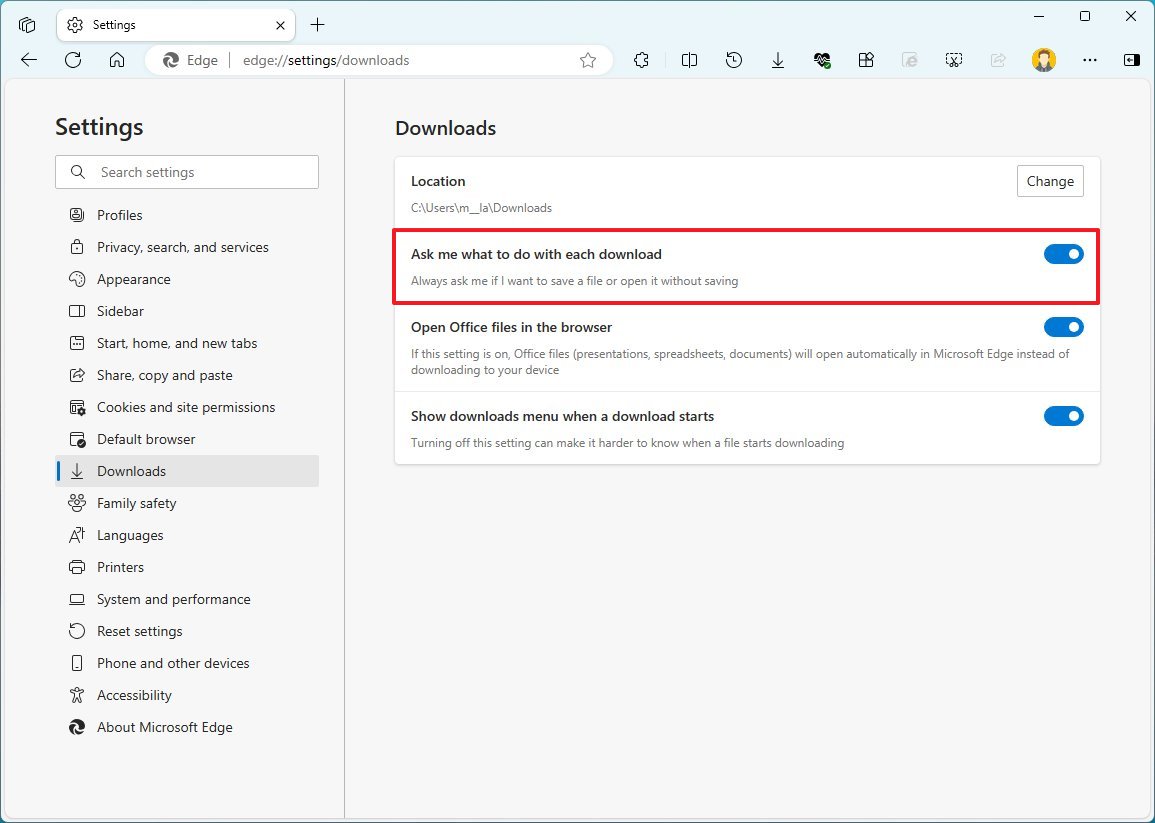
On the "Downloads" page, you should only consider turning on the "Ask me what to do with each download" toggle switch to allow the browser to ask you whether to save or open the download without saving.
Languages
On the "Languages" page, the default settings are optimal, but you can make some customizations if you speak more than one language and the browser dictionary.
In the "Preferred languages" setting, click the "Add languages" button, choose the new language, and click the "Add" button.
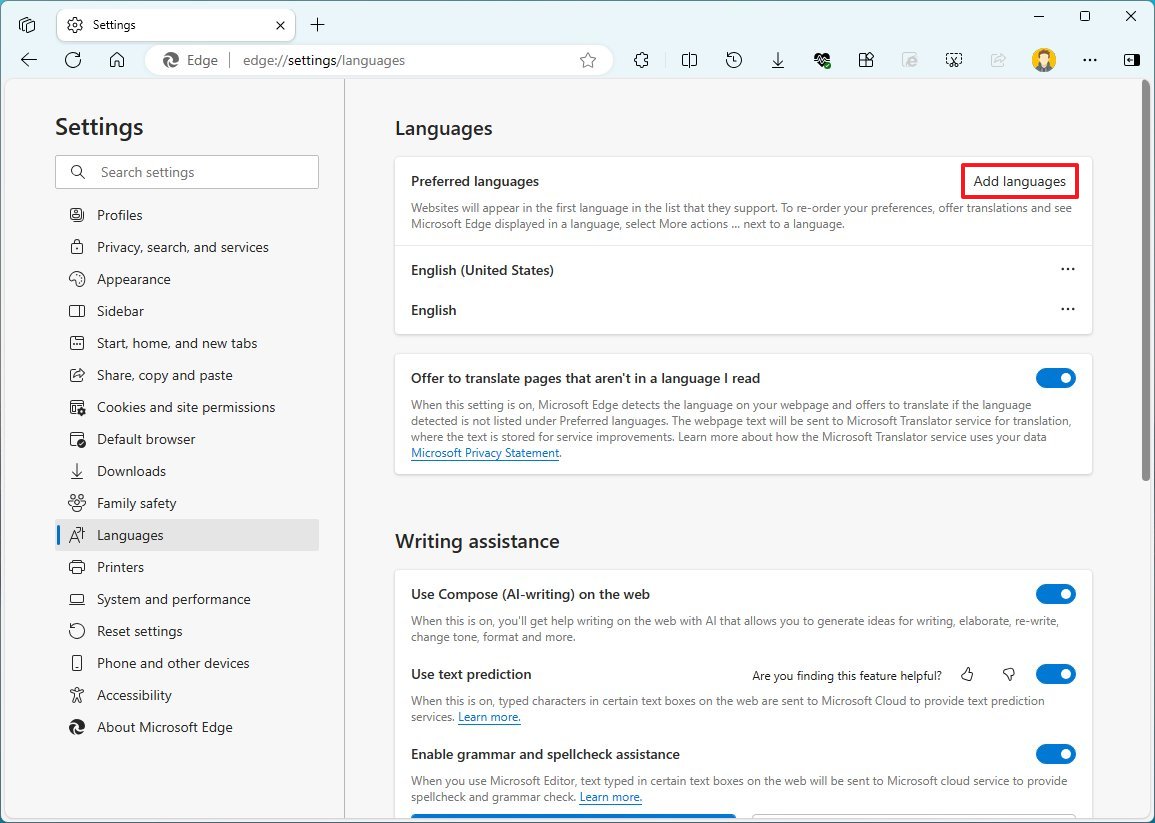
You will have to repeat the steps to install additional languages.
Once you complete the steps, websites will appear in the first language in the list they support.
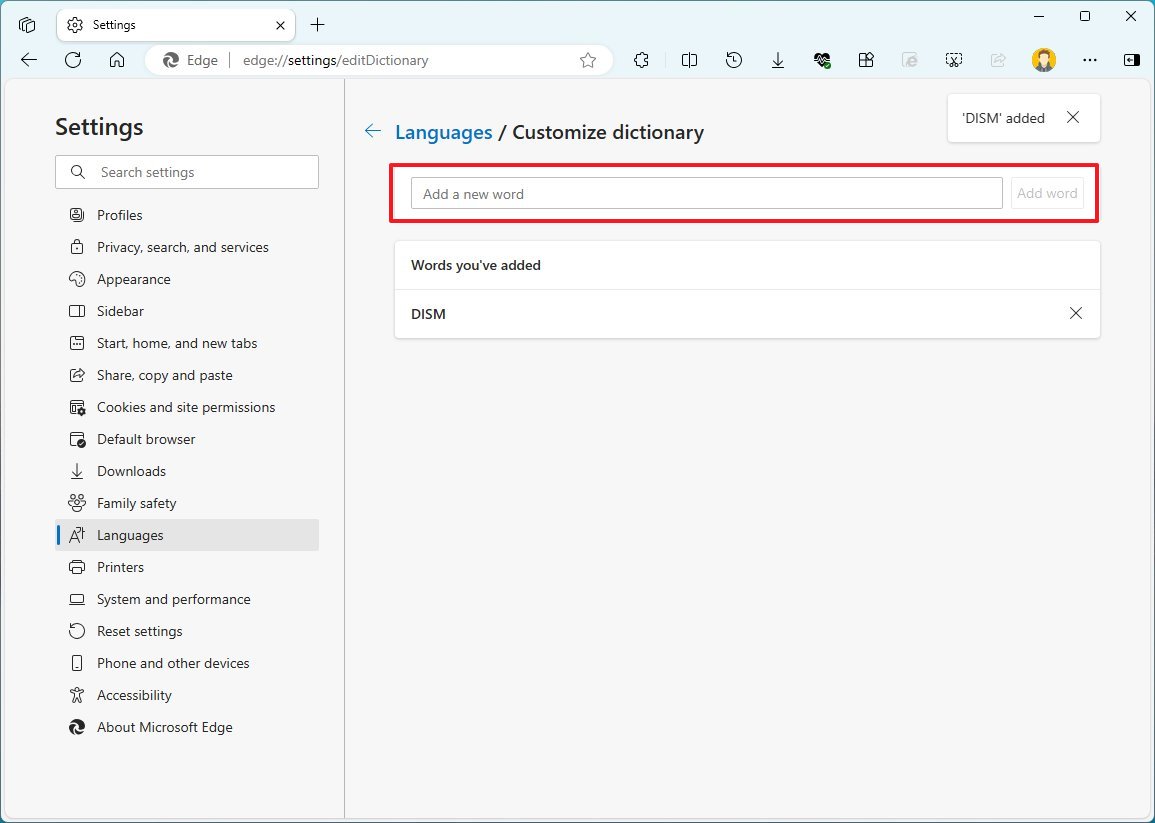
If the browser keeps marking specific words as incorrect, when they're correct, you can add those words to the Microsoft Edge dictionary so that they won't be marked as incorrect.
Under the "Writing assistance" section, click the "Customize dictionary" setting, insert the word, and click the "Add word" button.
System and performance
On the "System and performance" page, you can customize multiple features related to how the browser operates.
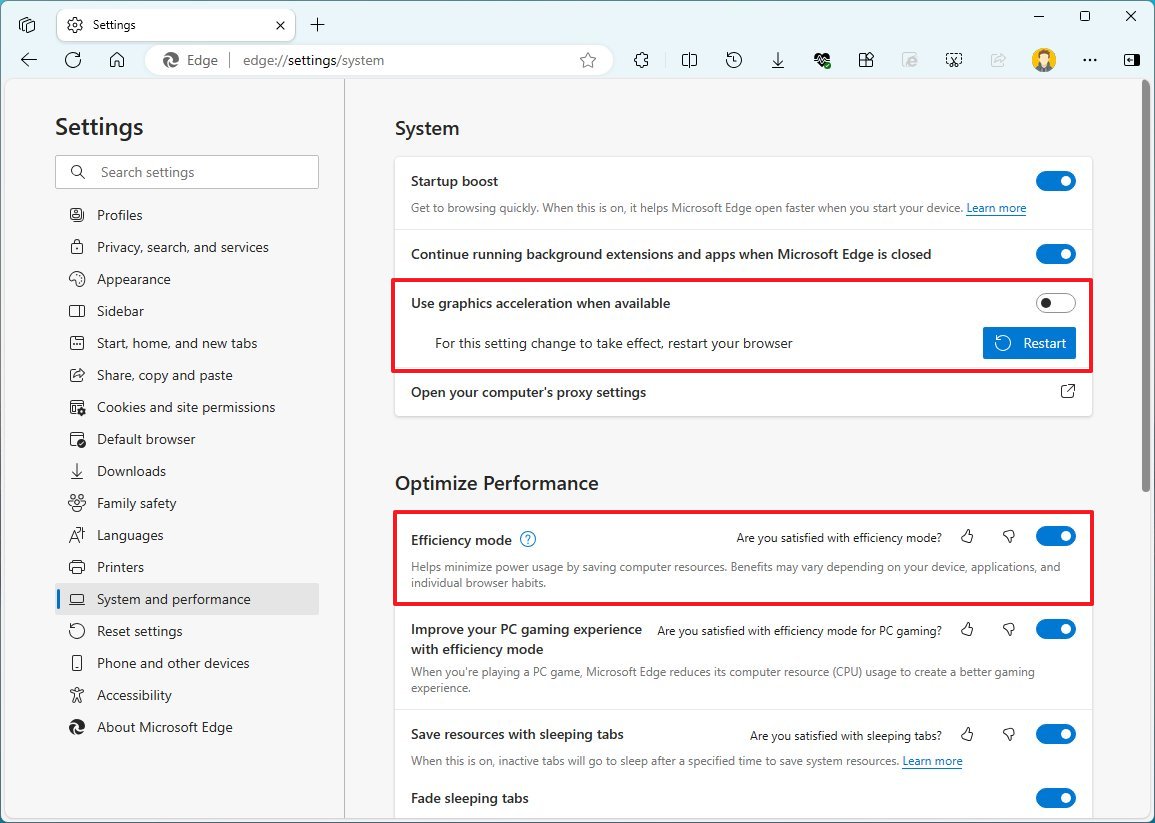
If you're having trouble loading a page, such as a video with a black or green screen, you can try turning off the "Use graphic acceleration when available" toggle switch.
If the laptop is running on battery, turn on the "Efficiency mode" toggle switch. This feature will help to preserve the battery, but you will notice a drop in performance. (When you turn on this feature, you won't be able to control the sleeping tabs functionality.)
Under the "Optimize Performance" section, the "Save resources with sleeping tabs" should be turned on, and then you should choose the lowest setting you feel comfortable with before the browser puts the tab to sleep after some time of inactivity with the "Put inactive tabs to sleep after the specified amount of time" setting.
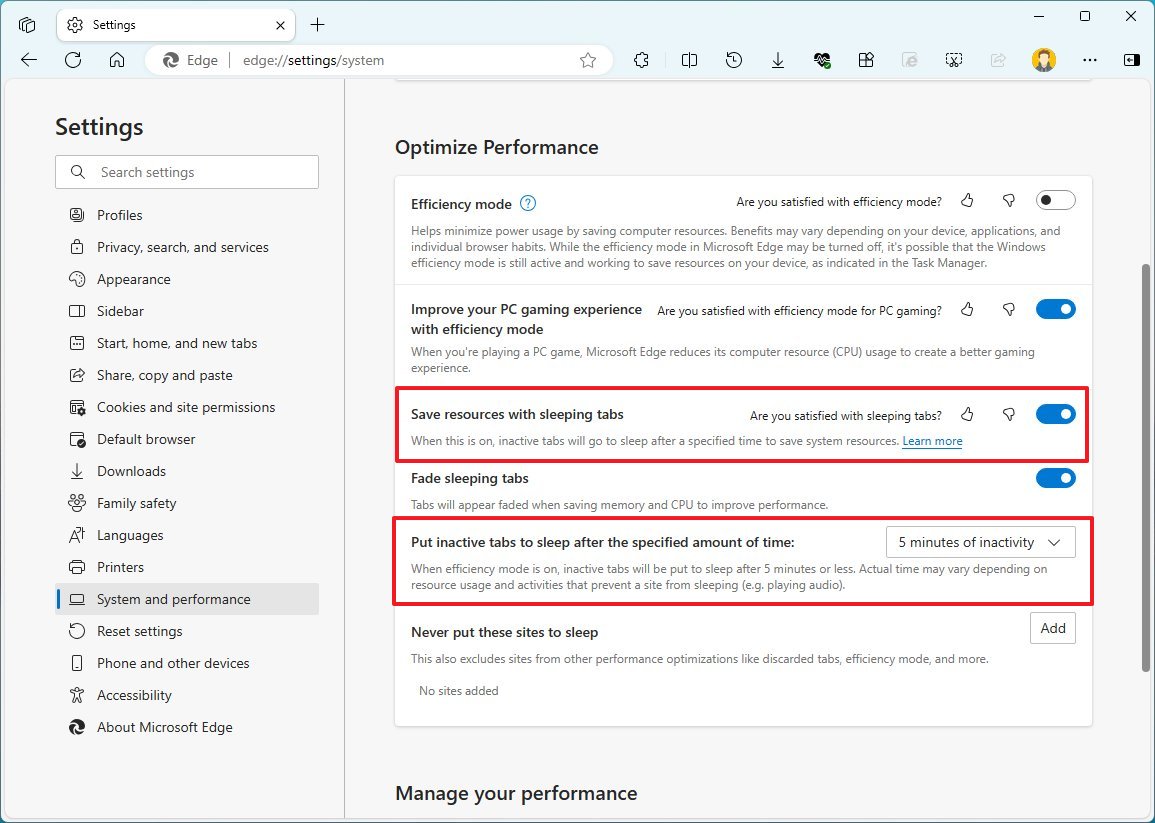
If you have a few websites that you prefer to keep running all the time, you can click the "Add" button to add them to the list in the "Never put these sites to sleep" setting.
For any setting I'm not mentioning in this guide, I recommend leaving it with its default configuration unless you understand it and have a different opinion.
Also, these are only recommendations. If you already use some of the features, disabling them is unnecessary.
If you want to customize the new tab page, refer to my other instructions.
More resources
For more helpful articles, coverage, and answers to common questions about Windows 10 and Windows 11, visit the following resources:
- Windows 11 on Windows Central — All you need to know
- Windows 10 on Windows Central — All you need to know
On the "Languages" page, the default settings are optimal, but you can make some customizations if you speak more than one language and the browser dictionary.
In the "Preferred languages" setting, click the "Add languages" button, choose the new language, and click the "Add" button.
You will have to repeat the steps to install additional languages.
Once you complete the steps, websites will appear in the first language in the list they support.
If the browser keeps marking specific words as incorrect, when they're correct, you can add those words to the Microsoft Edge dictionary so that they won't be marked as incorrect.


