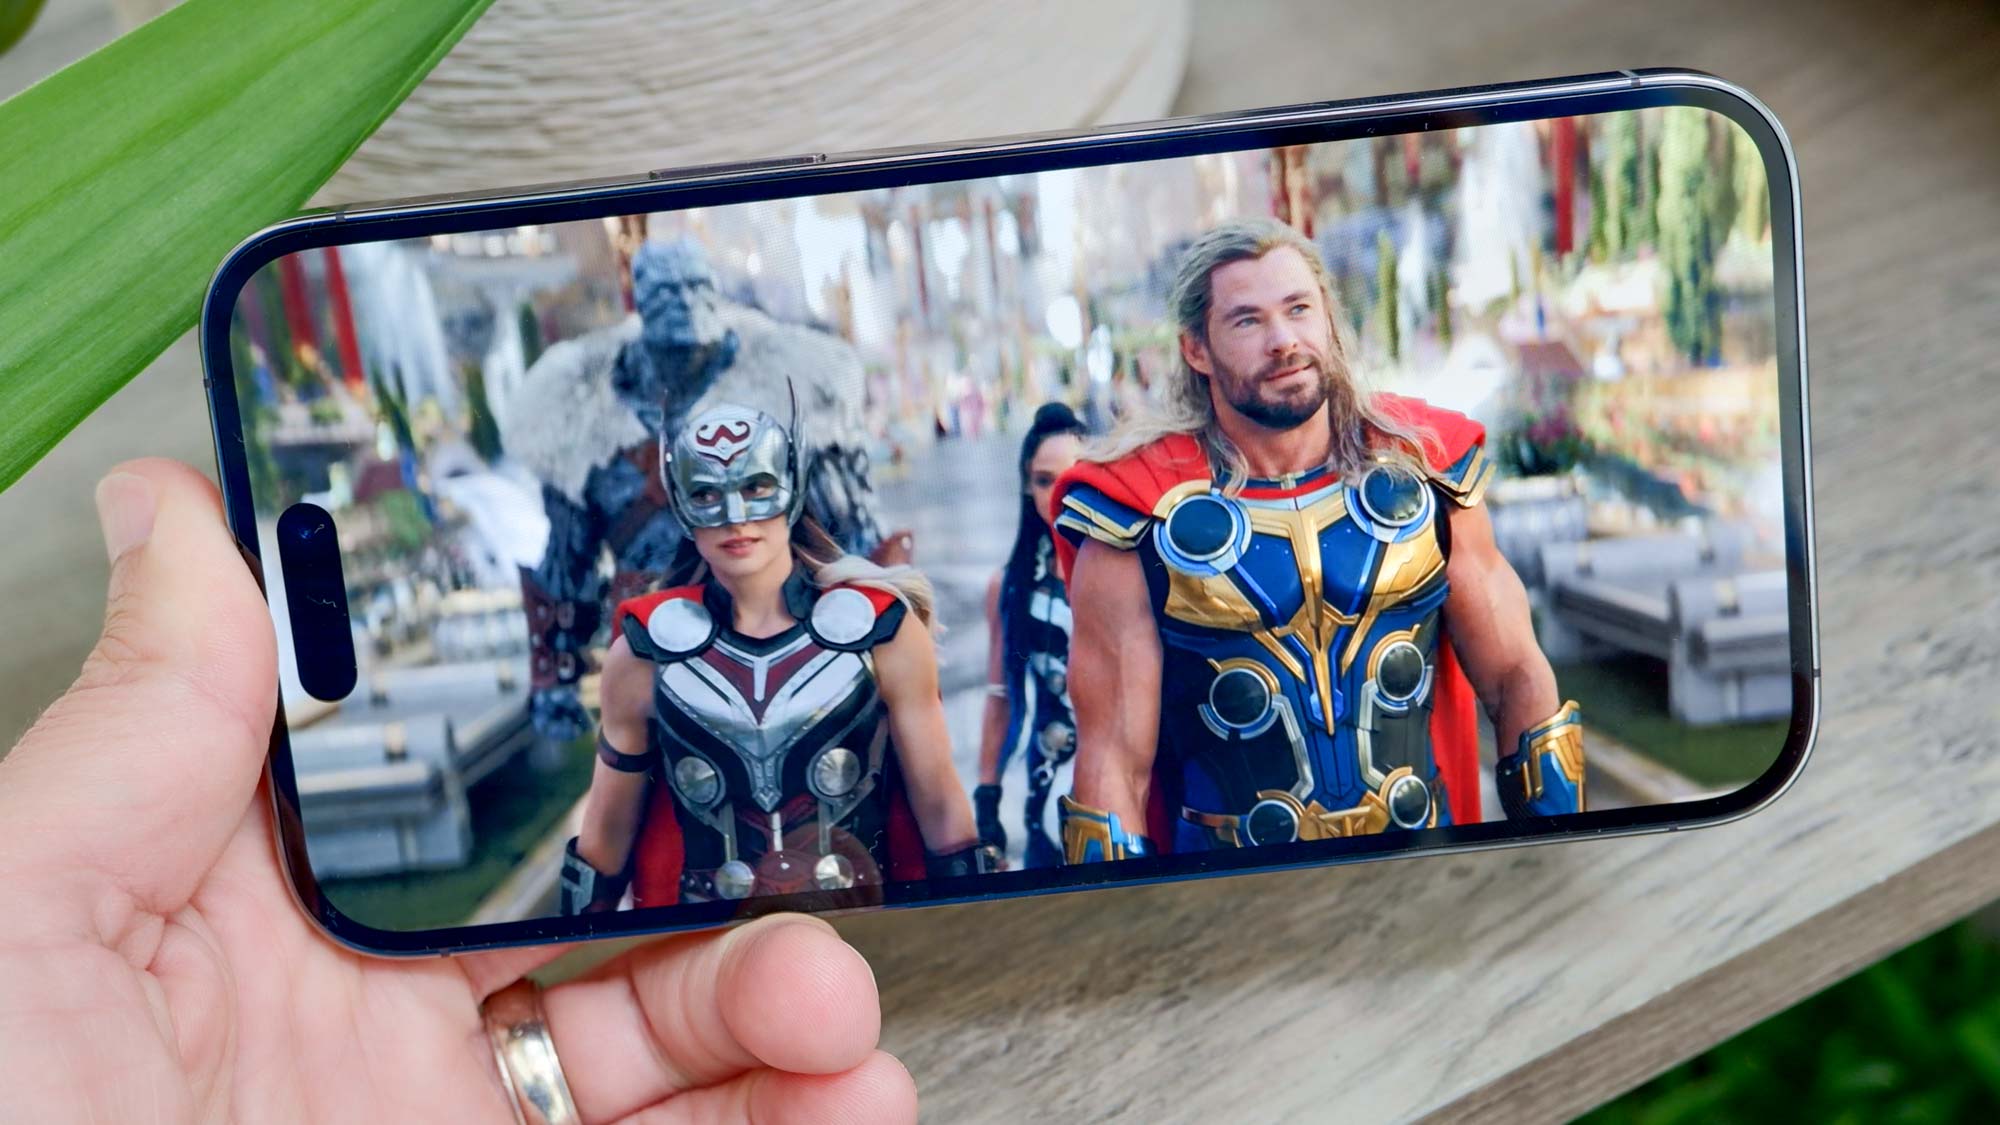
With an iPhone in your hand (or even iPad if you prefer), you can enjoy movies on the go. You could watch blockbusters on the train, catch a classic while chilling out on the beach or view indie marvels while out enjoying a coffee. Sure, the screens are small in comparison to your TV or the cinema but since iPhones are among the best phones around — in part because of the Super Retina XDR displays on iPhone 13 and iPhone 14 models — you're not actually compromising on quality viewing.
We'd be lying if we said the experience was perfect, though. Watching a movie on your iPhone, especially when out and on the move, comes with challenges that you won't experience in a home theater. Luckily, by checking out the tips below, you can combat these to take your movie watching to another level. You'll be able to enhance the sound experience, enjoy better quality visuals and put a stop to unwanted interruptions.
You will also find that watching movies on an iPhone can be hugely pleasurable so go ahead and unleash the content. There's plenty to view on Apple TV Plus and Amazon Prime — why not even go as far as learning how to unblock Netflix on iOS, iPhone and iPad for even more content? So let's take a look at 7 iPhone features every movie buff should know.
7 iPhone features that every movie buff needs to be using
Note: To make the most of the examples below, make sure you know how to update an iPhone so that it's at least on iOS 16.
1. Activate Noise Cancellation on AirPods
When watching a movie, especially if you aren't at home, it's likely that you'll want to block out any distractions. That way you can totally engross yourself in the action without the sound of munching on food or asking you what's going on every 10 minutes.
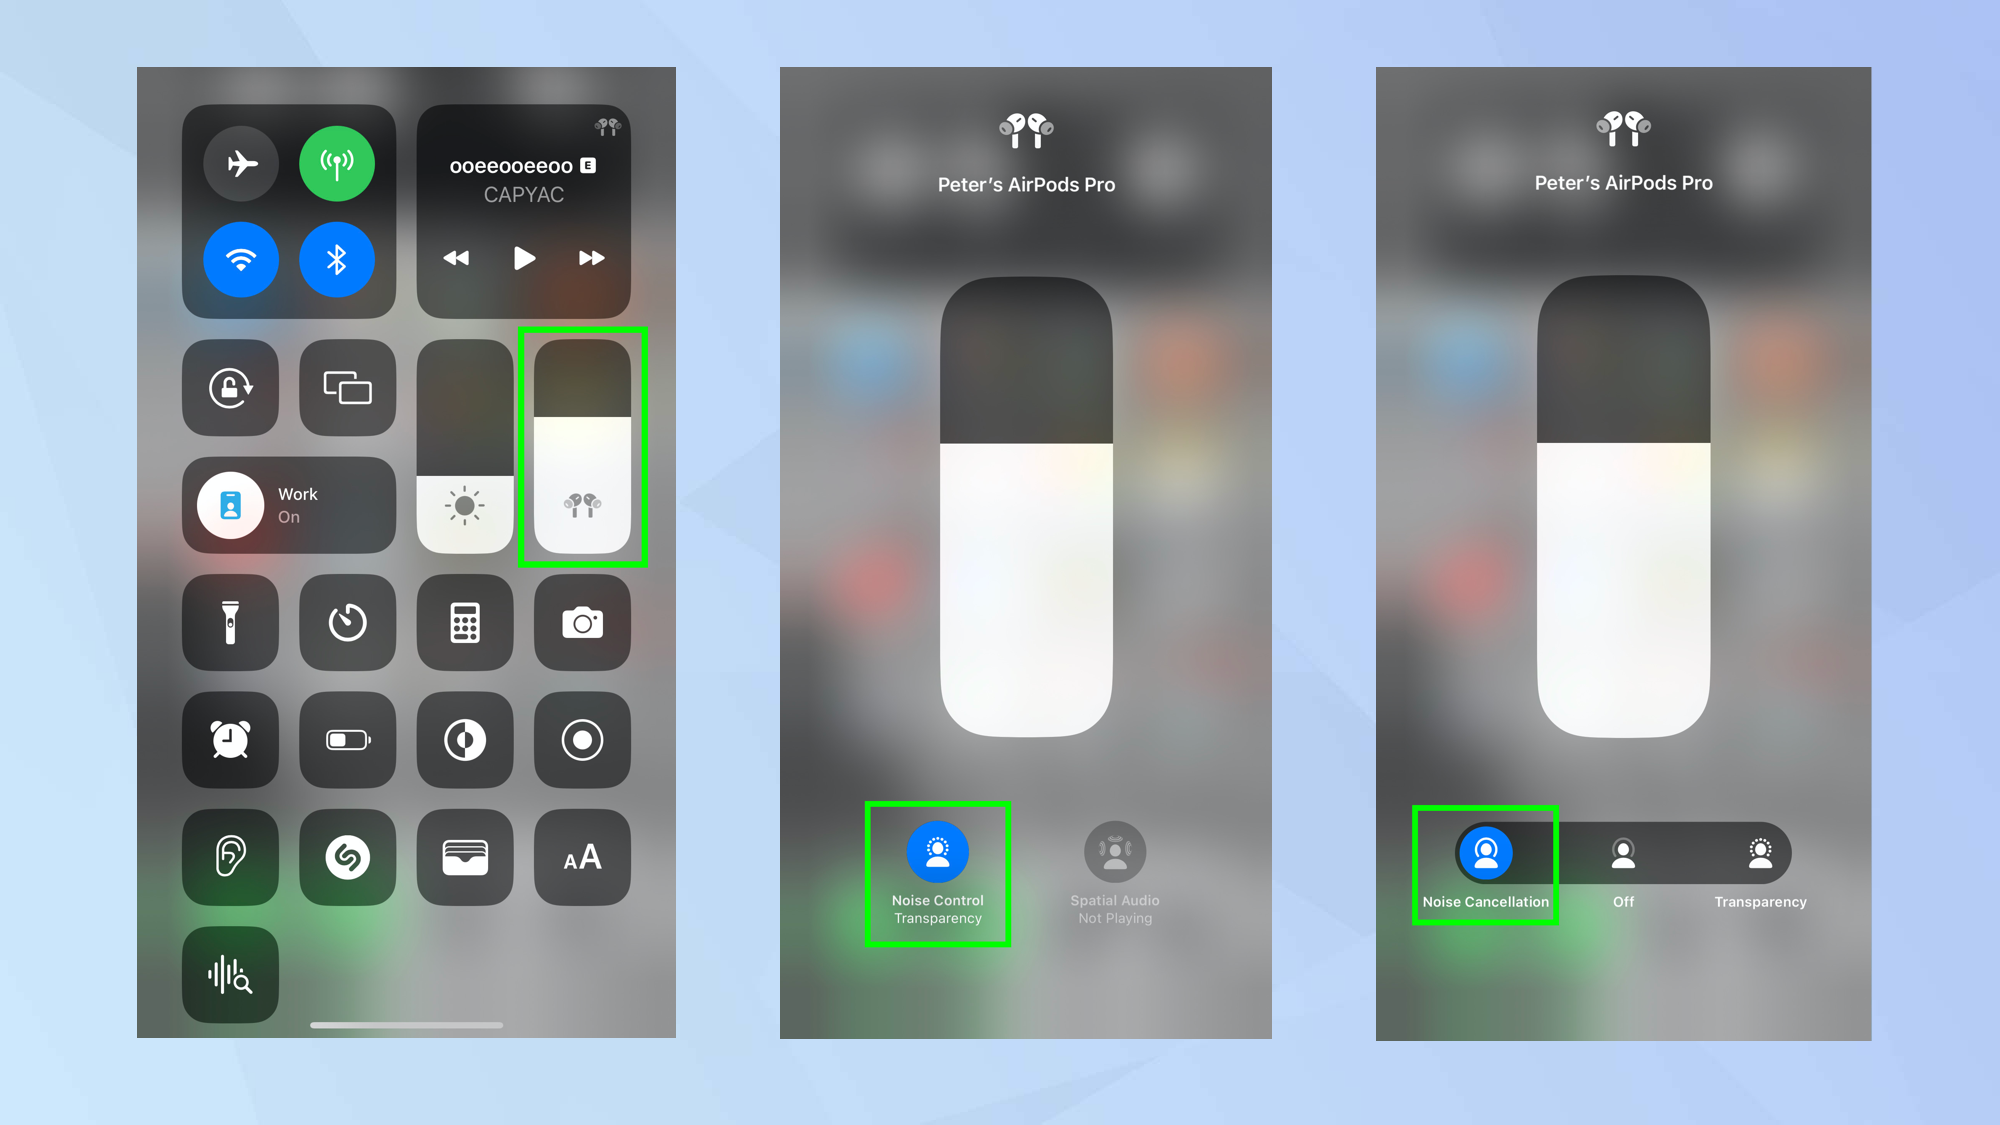
To zone out of everyday life, you can activate noise cancellation on the AirPods Pro and AirPods Pro 2, both of which are among the best headphones around. You can do this on the earbuds themselves if you press and hold the force sensor until you hear a chime. You can also pop your earbuds in your ears and launch Control Center on your iPhone or iPad. Simply tap and hold the audio slider, select the Noise Control icon and tap Noise Cancellation.
Full guide: How to activate noise cancellation on the AirPods Pro
2. Turn on Spatial Audio
Watching movies on a tiny screen isn't the same as viewing them at the cinema, yet you can still turn on the atmosphere and enjoy the feel of a multiplex by using Apple's spatial audio — a 360-degree sound format that recreates a surround sound effect through a pair of compatible headphones or earbuds. These include the AirPods Pro 2, AirPods Max, AirPods 3 and Beats Fit Pro but, if you open the Settings app, tap Music and select Always On, then you will be able to make use of the feature on any Dolby Atmos supported headphones.
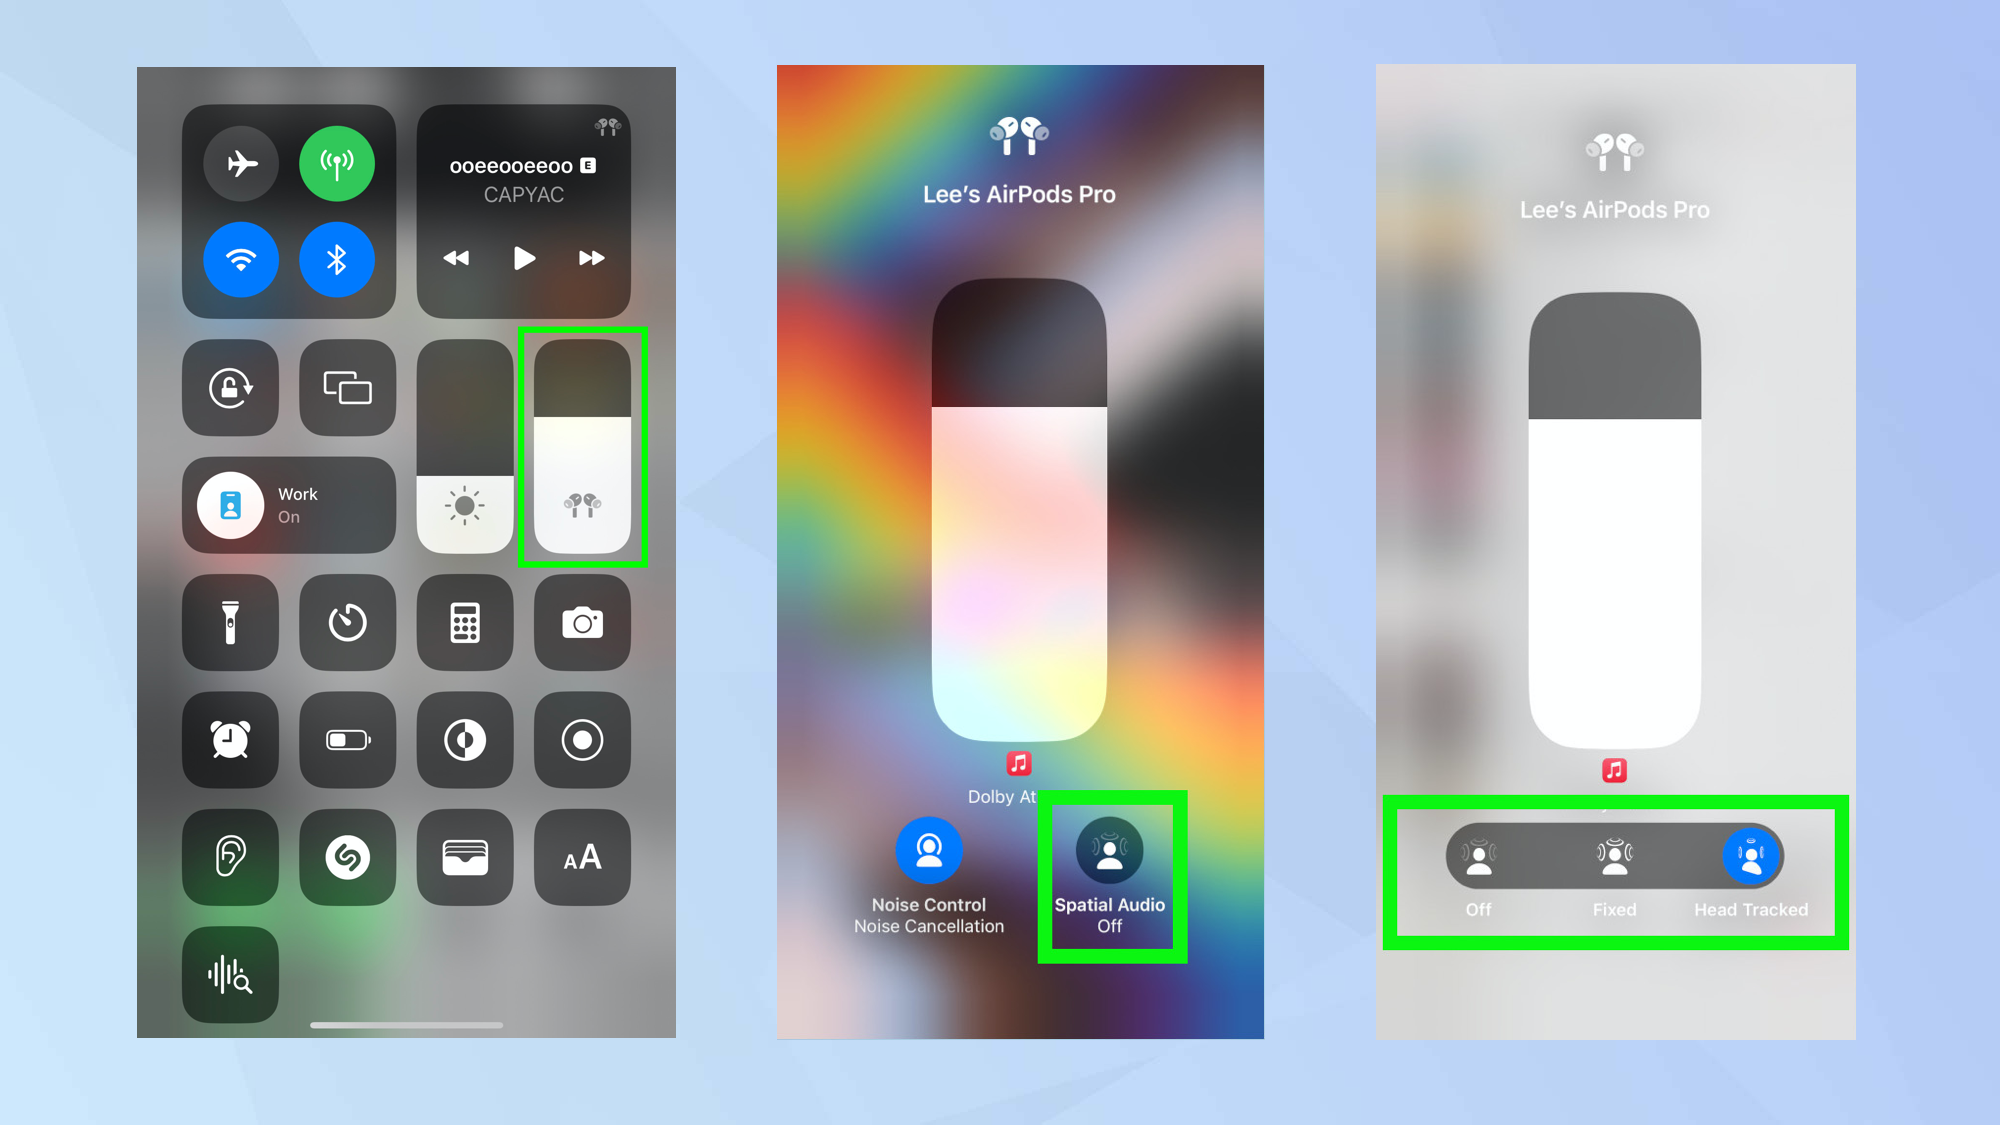
To do this, open the Control Center, then tap and hold the volume control and tap Spatial Audio. You can now decide between Fixed and Head Tracked. Tap Fixed if you only want to benefit from spatial audio and tap Head Tracked if you would like the audio to adjust based on your head movement. The latter is best enjoyed when you are sitting still, making it ideal for watching a movie.
Full guide: How to turn on spatial audio on iPhone
3. Turn off Night Shift and Tru Tone
If authentic picture quality is your thing (and, as a movie buff, we reckon it is), you're bound to want to view movies as the director intended. Trouble is, if you have Night Shift enabled on an iPhone or iPad then the colours of the display will shift to warmer colours when it's sunset, while True Tone automatically adjusts colors at whatever time of day to suit the surrounding ambient lighting.
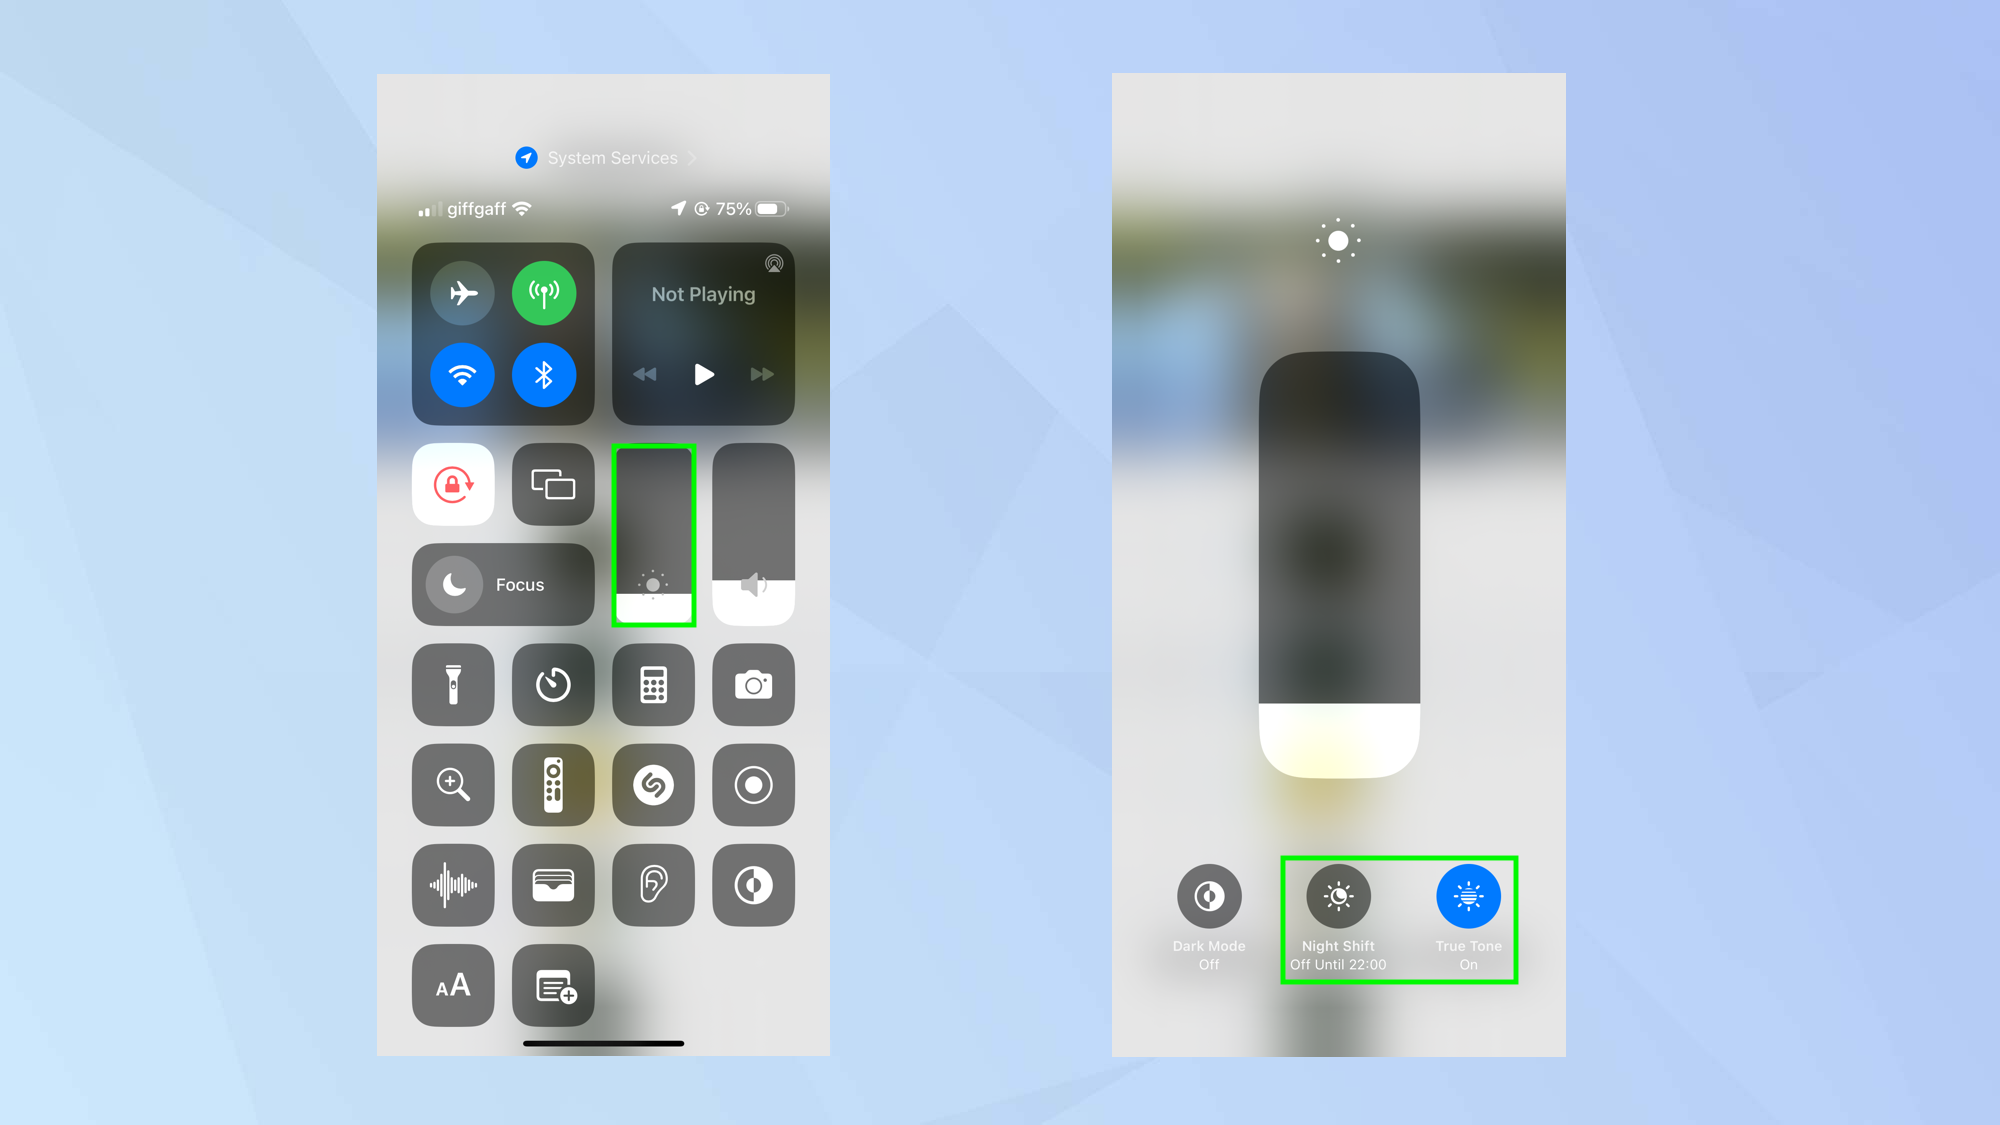
It's a good idea, then, to turn both of these off when you're watching a movie. Open the Control Centre, then press down firmly on the Brightness control icon. You can then tap the icons at the bottom of the screen to turn off Night Shift and True Tone. Just tap them again to reactivate once the movie has finished.
4. Change the focus mode to Do Not Disturb
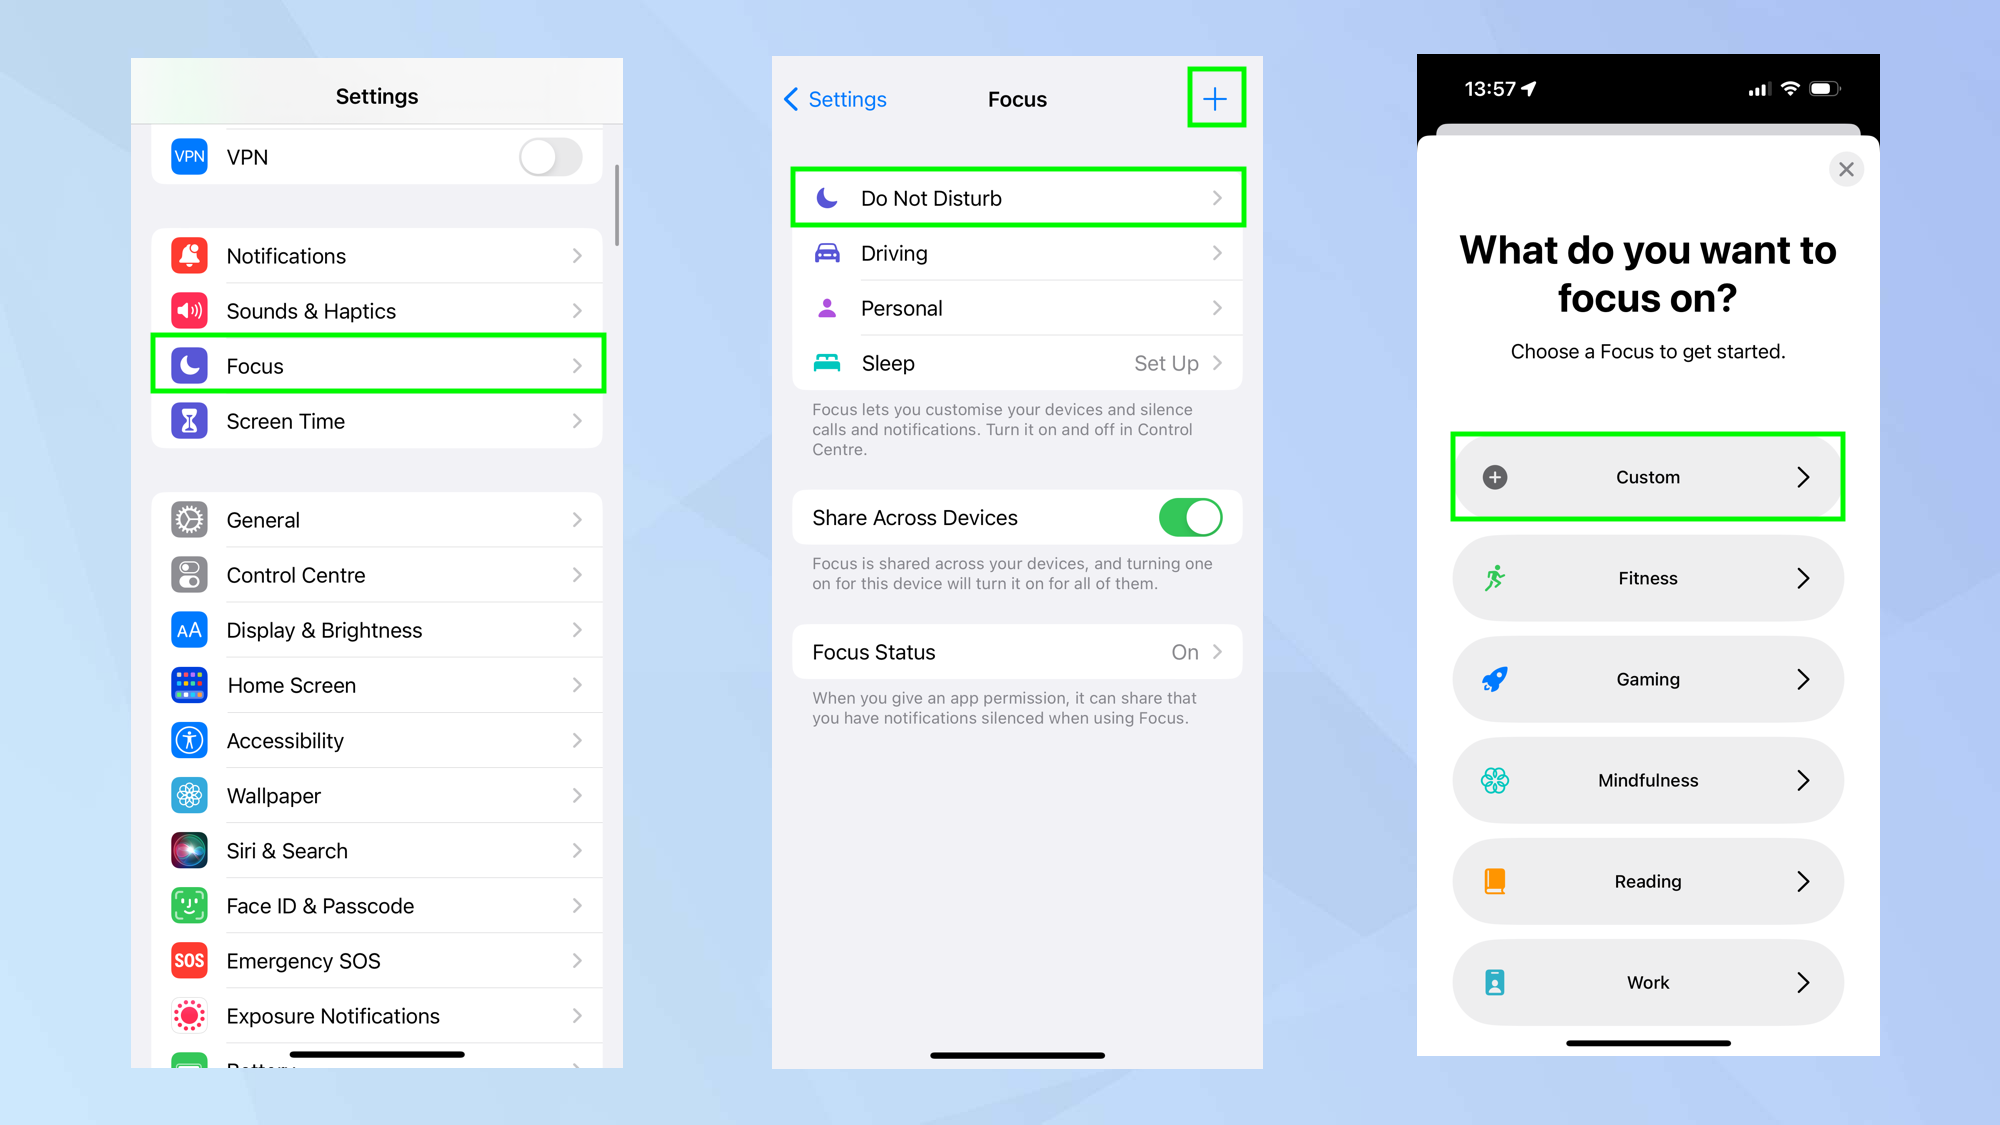
So you're in the midst of a movie and a notification pops up, pulling you out of the action. Then another one appears and another... and then your mom calls you. Needless to say, your movie experience will have been ruined. You can stop this by using the Do Not Disturb Focus. In fact, you could create a special Focus just for movie watching — a task made easier with iOS 16 Focus modes.
Open the Settings app and tap Focus. Then tap Do Not Disturb if you want to keep things simple — from this point, you will stop receiving notifications, alerts and phone calls while your device is locked. But lets go that bit further. Tap the + icon in the top right corner and select Custom Focus. From here you will be able to decide which individuals you want to silence or allow notifications, calls or apps from. In short, you are setting up filters, allowing only important people or notifications through. Check the full guide for a more in-depth look at iOS Focus modes.
Full guide: How to set up a Focus mode on your iPhone in iOS 16
5. Set the correct video quality settings
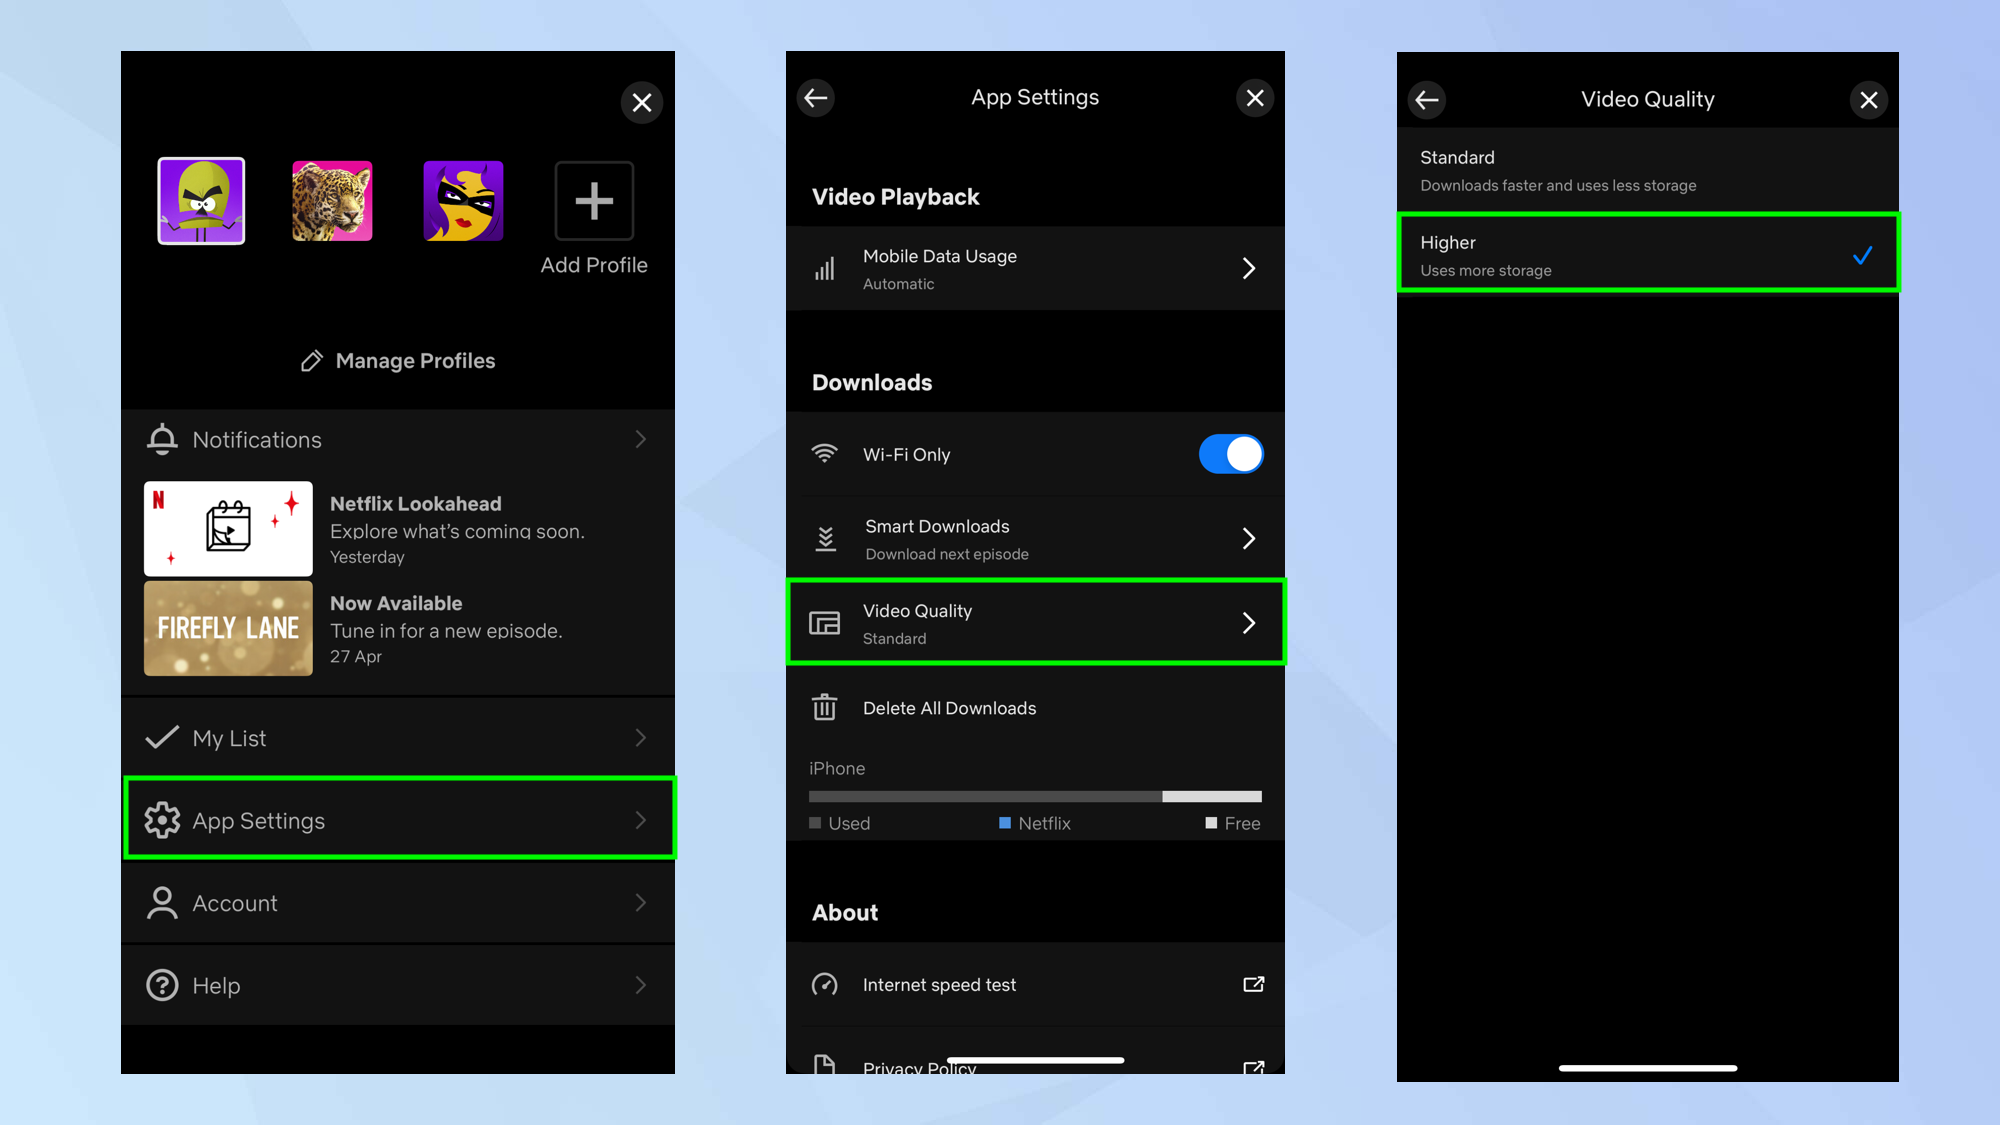
If you want to download a video for later, then you will want to ensure that you're saving it as the best possible quality. A lot of steaming apps won't do this by default because the downloads will take longer, use more data and will also take up more room on your device. But, as a movie buff, this will matter little. You'll just want to be able to download so you can watch in high quality whenever you are unable to get an internet connection.
We're going to use Netflix as an example but there are similar settings in other streaming apps. Simply tap the Profile icon in the top-right of the screen then select App Settings. Now, in the Downloads section, select Video Quality. You will have a choice of quality settings. Choose the quality setting you want to use.
6. Change the subtitle/caption appearance
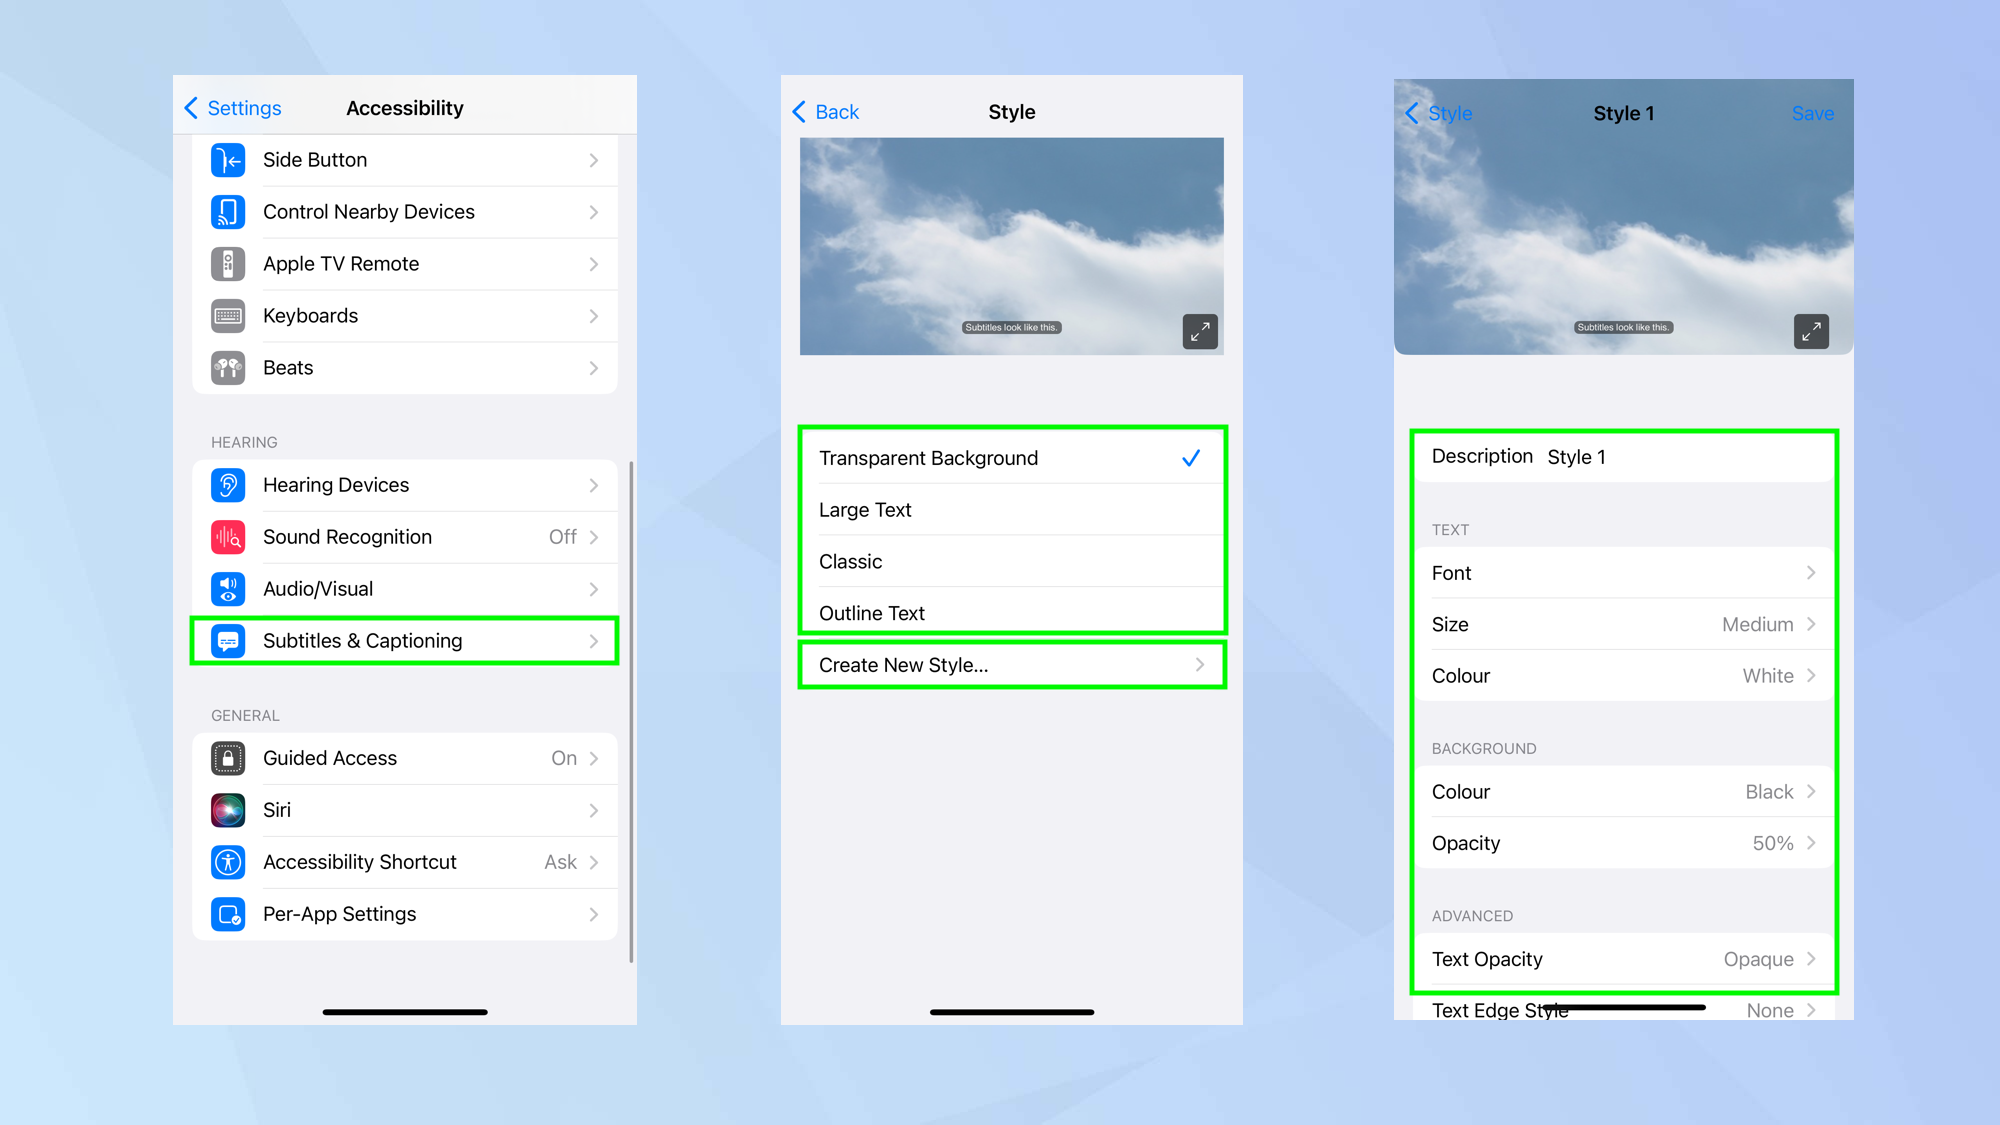
Whether you are hard of hearing, looking to watch a movie in a quiet location without your headphones or just find it hard to decipher the dialogue of a movie, subtitles or captions come into their own.
But you don't need to stick to the default appearance of these. If you simply don't like subtitles overlaid on a transparent background, you can have them large, classic or outlined. You can even create your own style. Just open the Settings app and select Accessibility. Then choose Subtitles and Captioning and tap Style. Select the Style you'd like to use or tap Create New Style. For the latter, you can choose the font, size or color of the text and the color and opacity of the backgrounds. There are more advanced options too which let you choose the text opacity, select a text edge style or choose a text highlight.
7. Dim Flashing lights
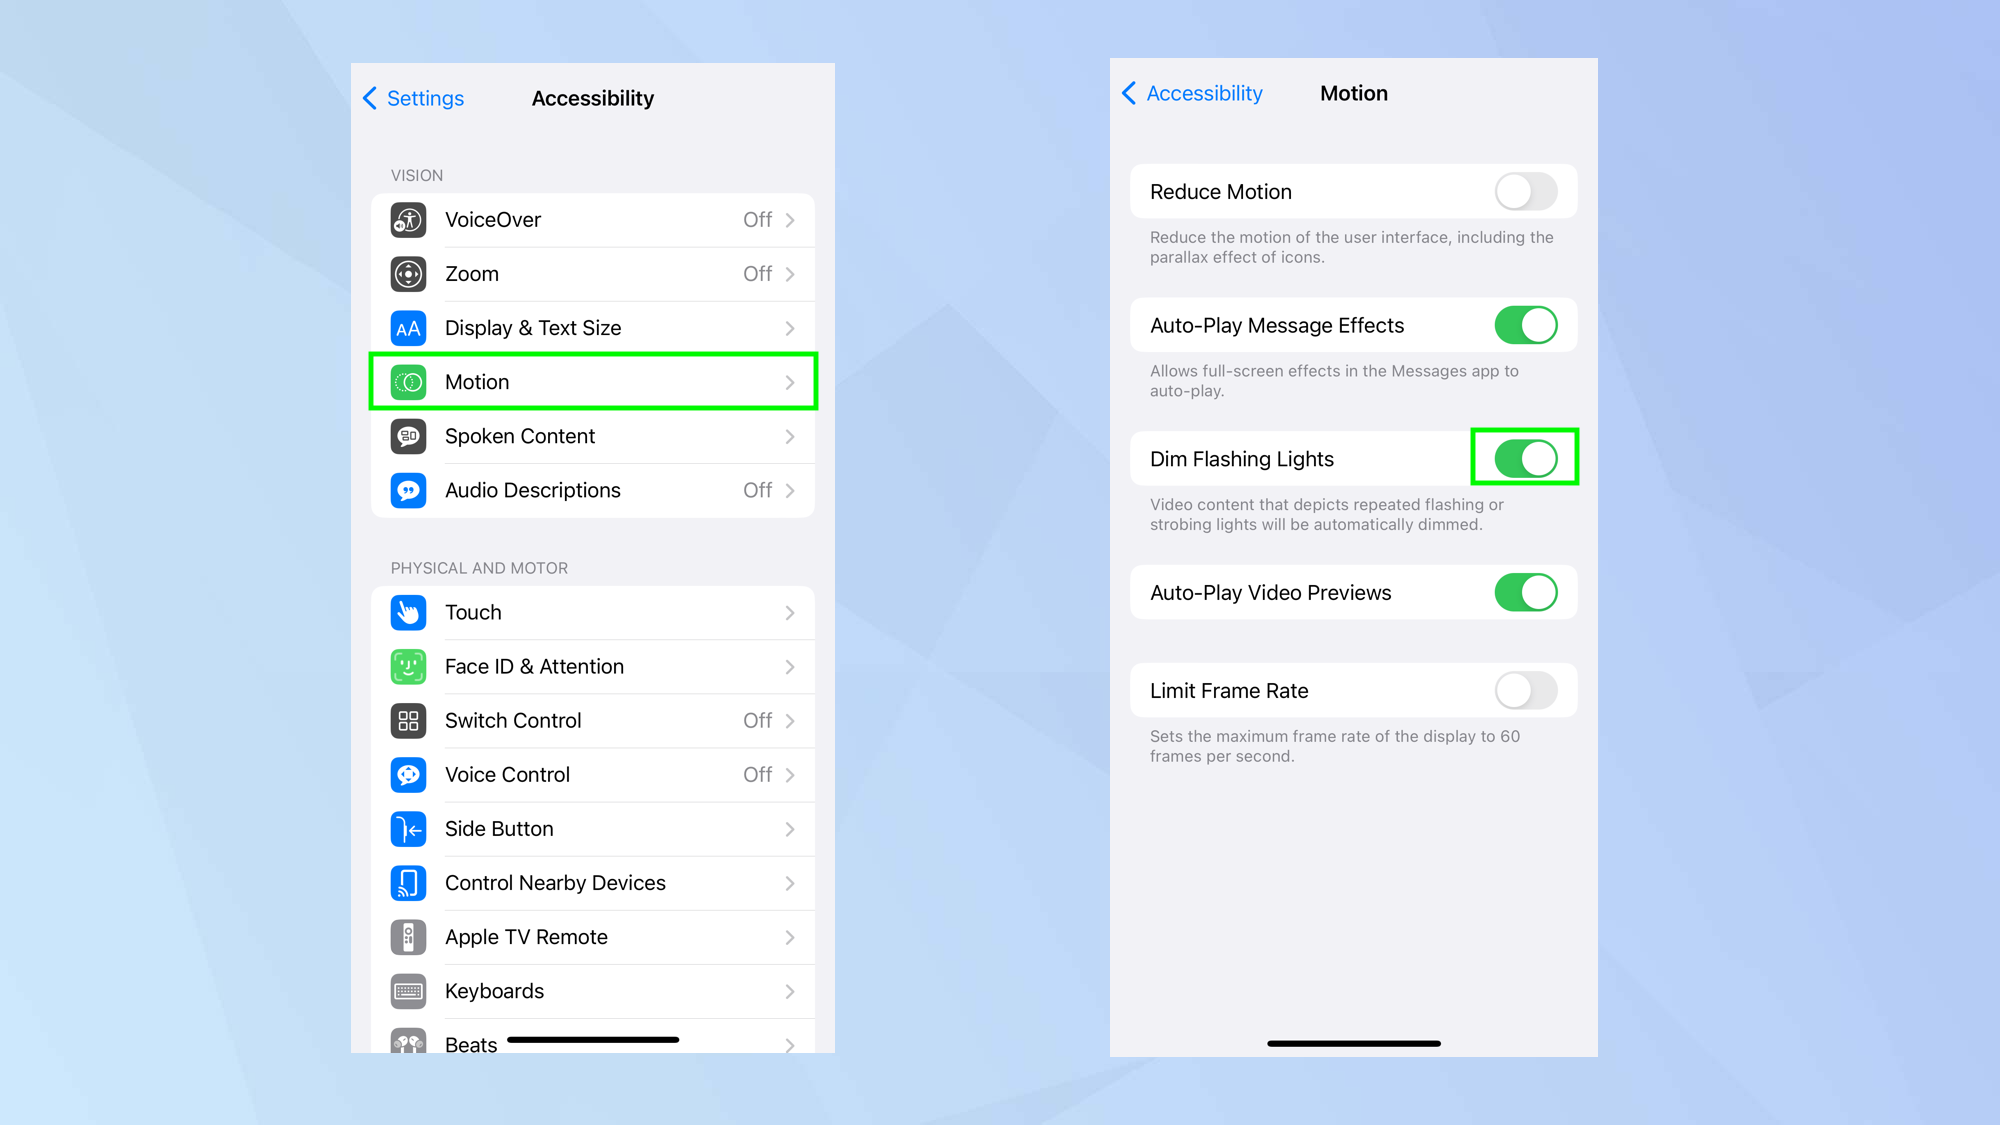
If you have photo-sensitive epilepsy, you find flashing lights make you feel ill, or if you simply hate flashes, then you're able to dim flashing lights within a movie. It'll tackle stroboscopic effects and make movies easier on the eye. It does so by detecting the issue and dimming the screen to compensate at that moment.
It's easy to activate. Open the Settings app and tap Accessibility. Now, under the section Vision, tap Motion. Toggle on Dim Flashing Lights.
Full guide: how to dim flashing lights on iPhone
For more iPhone tutorials, make sure you check out our other guides including how to edit videos on iPhone (why always watch other people's work when you create your own?) and how to add music to a video on iPhone. Looking for something to watch? Learn how to watch the Marvel movies in order or how to watch the Star Wars movies in order.


