I've been neck-deep in Windows 11, Microsoft's latest operating system, since it launched in October 2021; I've kicked the tires on the earliest betas, and I've learned a few things about how to make the most of it.
If you've recently upgraded from an earlier version of Windows or have purchased a new Windows 11 PC, it can seem like an awfully unfamiliar place. The Start button's in the wrong place, the menus are all different, and there are strange new ways of organizing your windows around your desktop.
I wasn't a huge fan of the OS when I first upgraded to it from Windows 10 either, but over time I've learned to appreciate the strengths of Windows 11 and the ways in which it makes my life easier. Along the way I picked up a few tricks to make it a bit easier to use, and I'm sharing them with you in the hope that they'll make your life a bit easier too.
Here are the 5 things I wished I knew about Windows 11 when I first started using it.
There's a system-wide Dark Mode, and it's excellent
White backgrounds are painful to look at on a bright screen, and screens get brighter every year as display tech advances. The massive fields of white that eat up large swathes of Windows and the apps/websites I visit are positively eye-searing now that I'm regularly using OLED screens with HDR support, which is why I've become a diehard fan of dark modes wherever available.
I truly feel that every app and website should offer a dark mode option, but that's not yet the case. Worse, it can be a hassle to fiddle with the settings on each and every one.
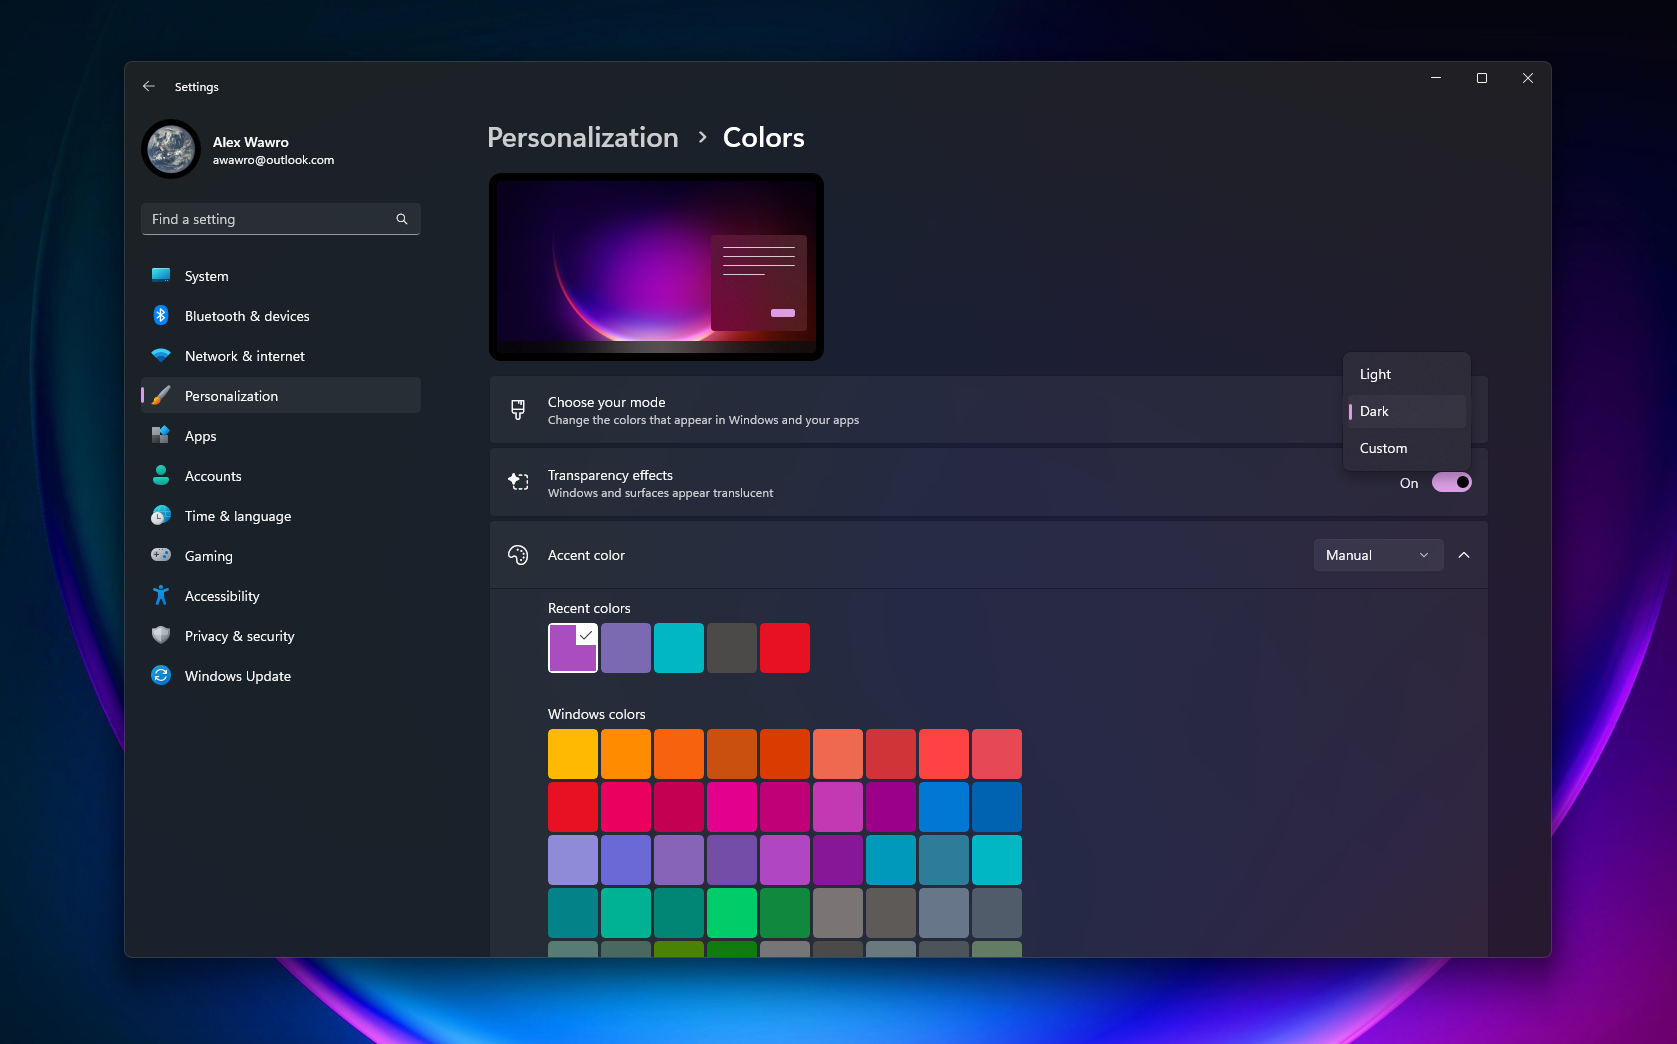
That's why I'm so grateful Windows 11 has a "dark mode" you can enable which will switch the appearance of Windows to a cooler, darker palette. Even better, it will do its best to automatically switch all apps which support it to dark mode, saving you some time and hassle.
To enable Dark Mode in Windows 11, navigate to Settings > Personalization > Colors and select "Dark" from the "Choose your mode" dropdown menu. You can also set up custom color palettes if you prefer.
Clear out annoying taskbar clutter
When I first started using Windows 11 I was so annoyed by what Microsoft did to the taskbar. I'm not talking about the centered Start menu, either; I got used to that pretty quickly, and after all you can move it back to the lefthand corner if you really want (just right-click the taskbar and select Taskbar settings > Taskbar behaviors and change Taskbar alignment to Left).
What took me longer to sort out was the annoying row of Microsoft apps that are pinned to the Windows 11 taskbar by default. I don't mind having stuff I use regularly pinned there, like File Explorer, but Microsoft adds a bunch of other apps it thinks you might want that frankly, I don't. We're talking about those little taskbar icons for Microsoft Teams, Microsoft Edge, the Microsoft Store and the Task view button.
Some of these, like the Microsoft Store shortcut, can be removed by simply right-clicking the icon on the taskbar and selecting Unpin from taskbar from the context menu.
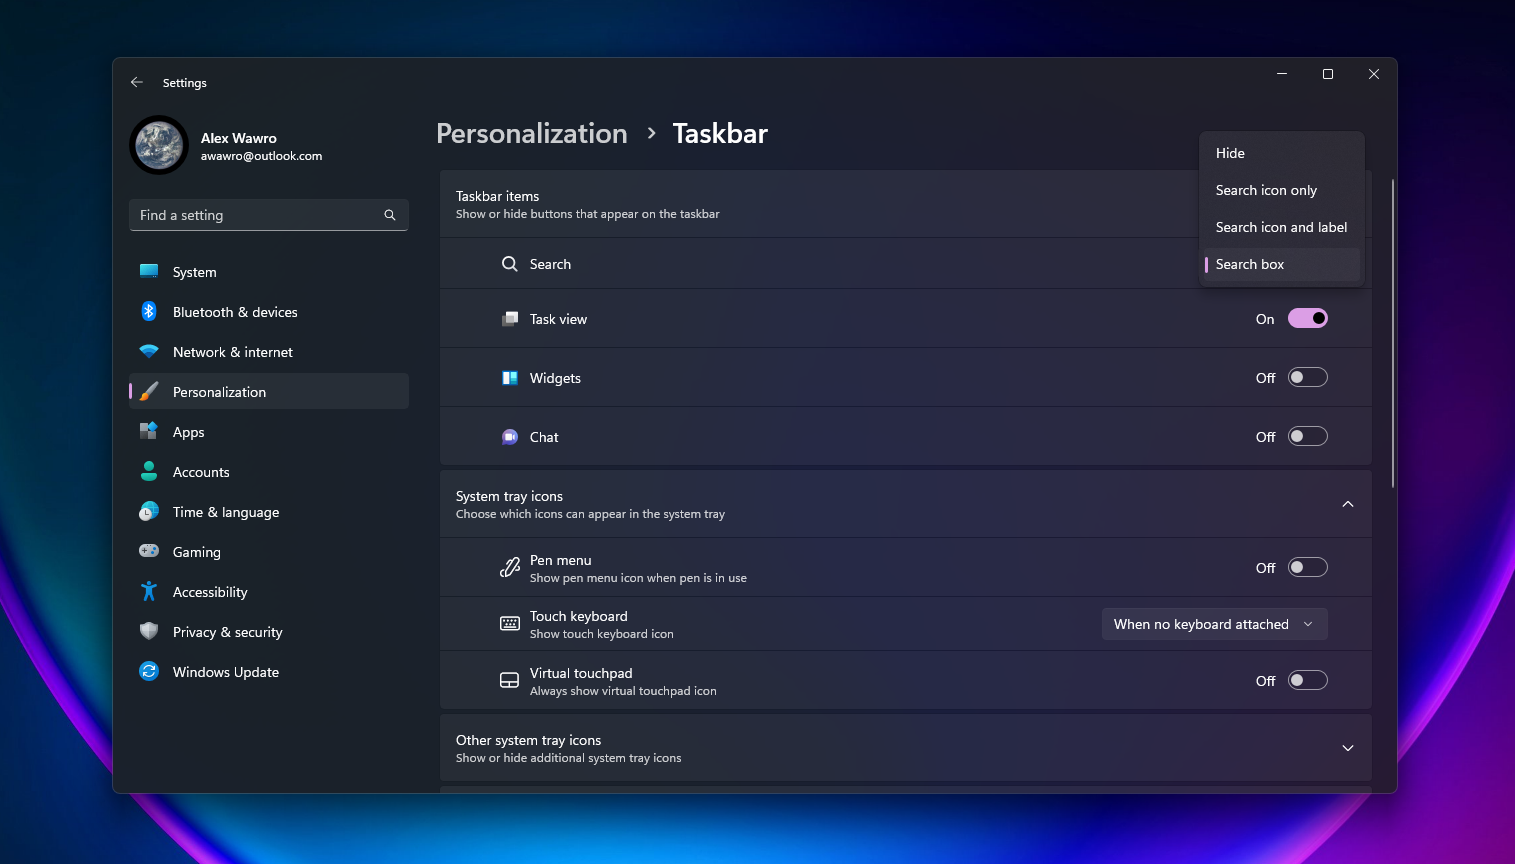
Others take more work to dislodge. You can hide them from the taskbar by navigating to Settings > Personalization > Taskbar and opening the Taskbar items sub-menu, where you'll have the choice to disable the Microsoft Teams, Widgets, and Task view buttons. Note that if you disable the Widgets button it will disappear from the taskbar, meaning you will no longer get live weather updates via it (if you have it configured that way) and you won't be able to access your Widget menu by mousing over it.
You can also choose to hide the Search box that's now included in the Windows 11 taskbar by default, or slim it down to just an icon. I got rid of it entirely, which means I don't get to enjoy the dubious benefits of ready access to Bing with ChatGPT on the Windows 11 taskbar.
Shake things up to stay focused
Windows 11 has a handy little feature that allows you to quickly minimize all windows except the one you're focusing on by simply shaking it around a bit. The window, that is, not your PC—try not to shake that around at all if possible.
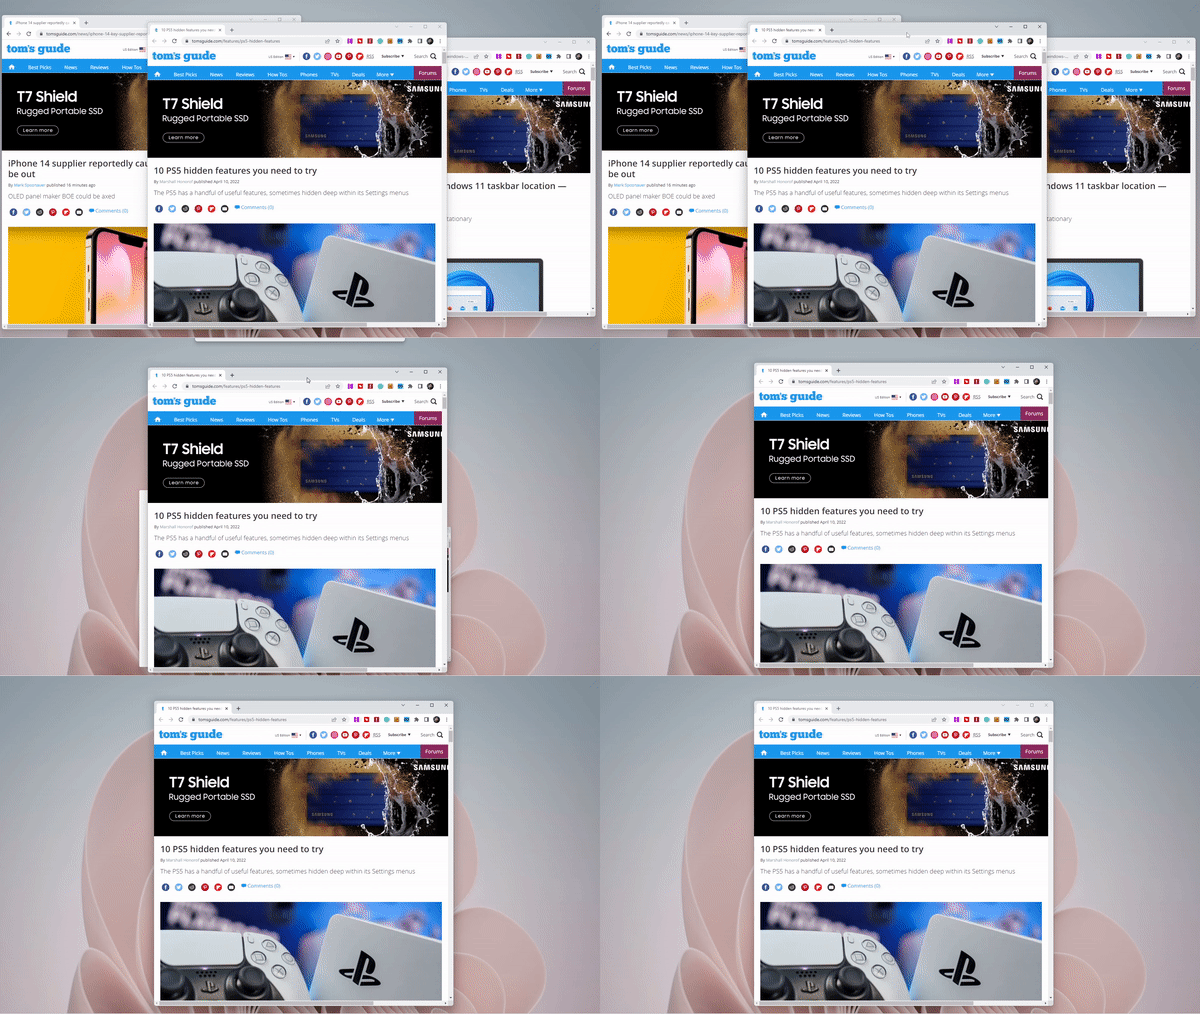
This is a fun way to quickly get rid of (without actually closing) everything except what you want to focus on. I've found it comes in real handy when working across multiple monitors.
To enable it, simply navigate to Settings > System > Multitasking and switch Title bar window shake to On.
The Clipboard has a history
I've been copying and pasting things in Windows since I was a wee lad, so much so that my fingers have started to curl slightly into the claw they so regularly form when banging out that critical CTRL + C - CTRL + V one-two combo. That said, I'm a little embarrassed at how long I kept doing that with the Windows Clipboard without realizing it had a hidden feature which makes it far more useful than I'd realized.
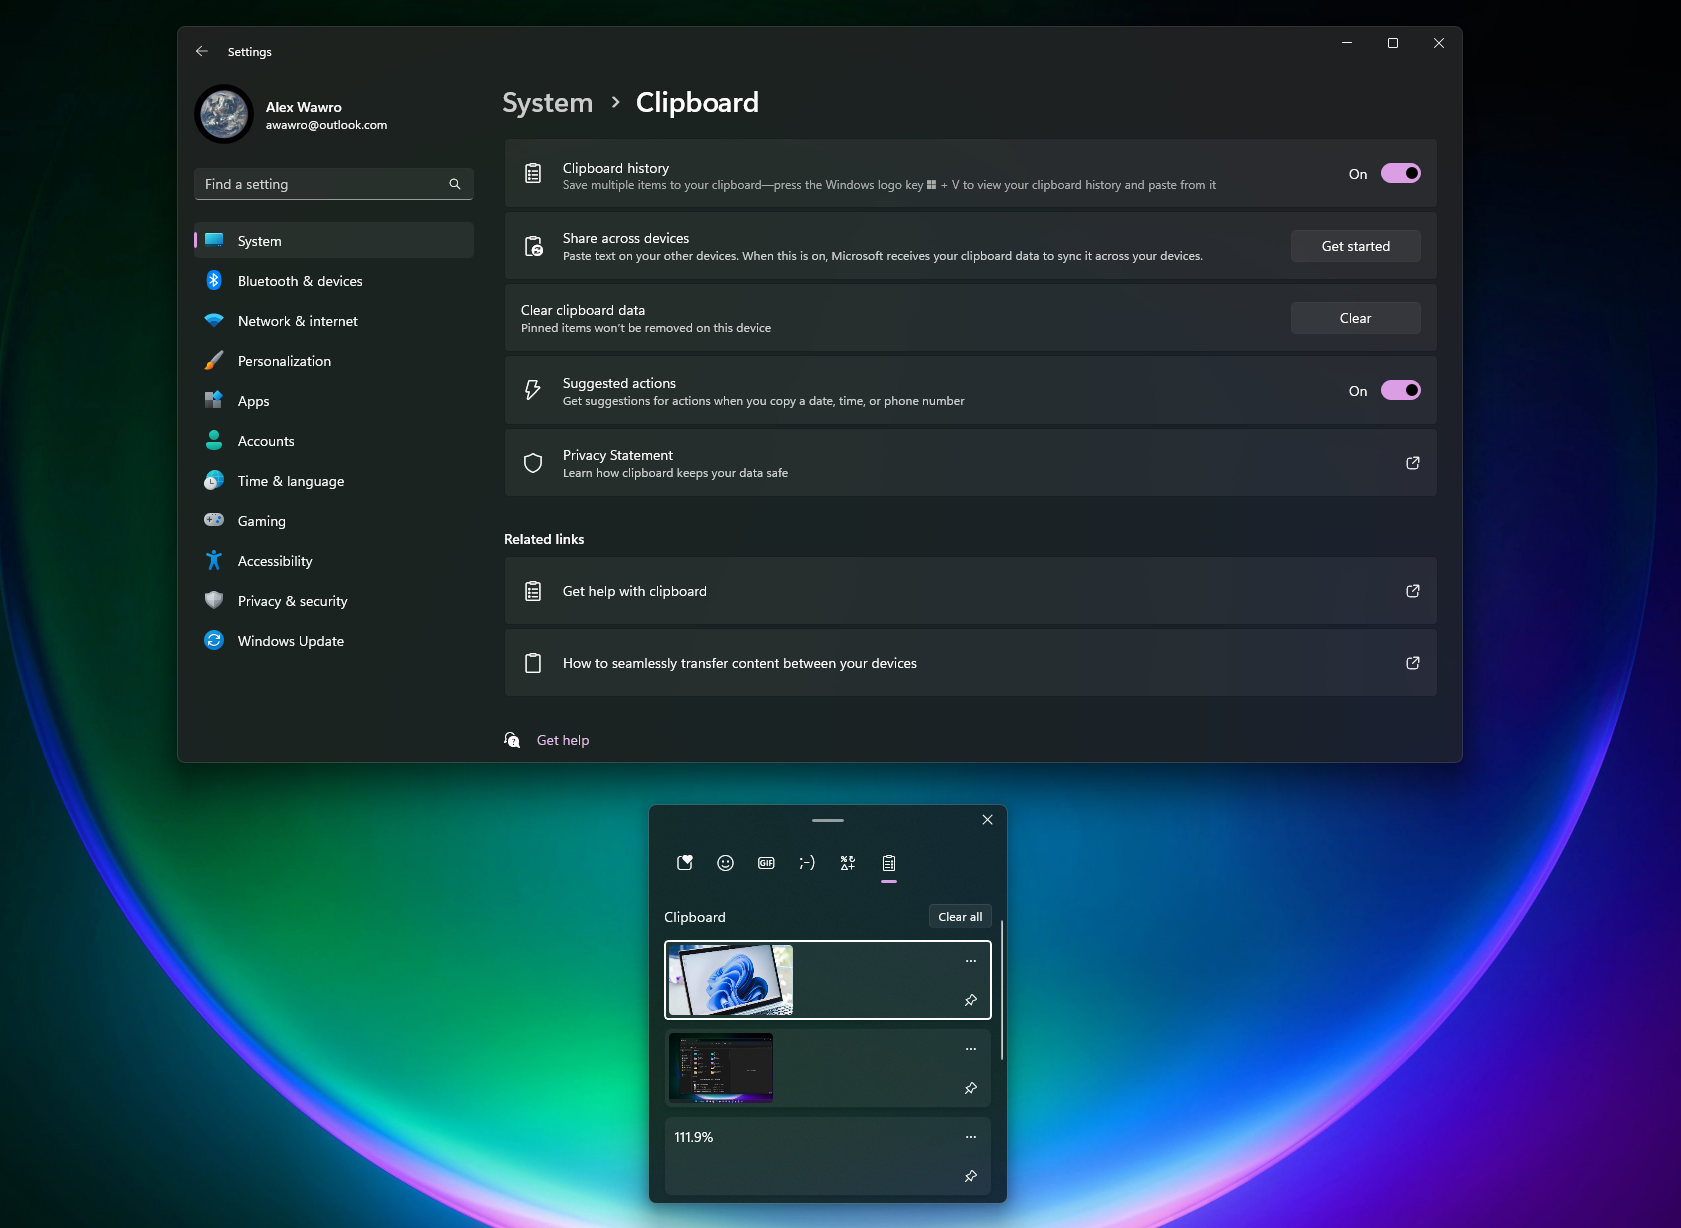
I'm talking of course about the Clipboard History, a handy little app that shows you a chronological list of what you've copied. This is a small but hugely useful feature to know about, especially if you (like me) spend a lot of time copying data, text and images across your various projects. With the Clipboard History, no longer do you need to worry about flipping back and forth between windows, repeatedly copying and pasting the same things when you realize you need them. Instead, you can simply open it whenever you need something you've copied and it's right there waiting for you to paste in.
The fastest way to access Clipboard History is the Windows key + V key combo. Press them together and it will pop up with a list of what you've recently copied, though if you've never used it before you'll first have to press a button to enable the feature.
You can get even more fine-tuned control of your Windows 11 Clipboard if you're willing to dive into its settings menu. To find it, navigate to Settings > System > Clipboard. Here you'll be able to enable/disable Clipboard History, choose whether or not your Windows clipboard syncs across other Windows devices, and switch Windows 11's "suggested actions" feature (which tries to intelligently prompt you with contextually relevant actions when it recognizes copied data like times, dates and phone numbers) on or off.
You can put folders back on the Start menu — sort of
Longtime Windows users will likely be flummoxed by the fact that Windows 11's Start menu by default shows only a truncated list of apps and files when you open it. Gone are the good old days when you could click that big button in Windows 10 and have easy access to key system folders like, say, your Documents, Downloads, and Pictures.
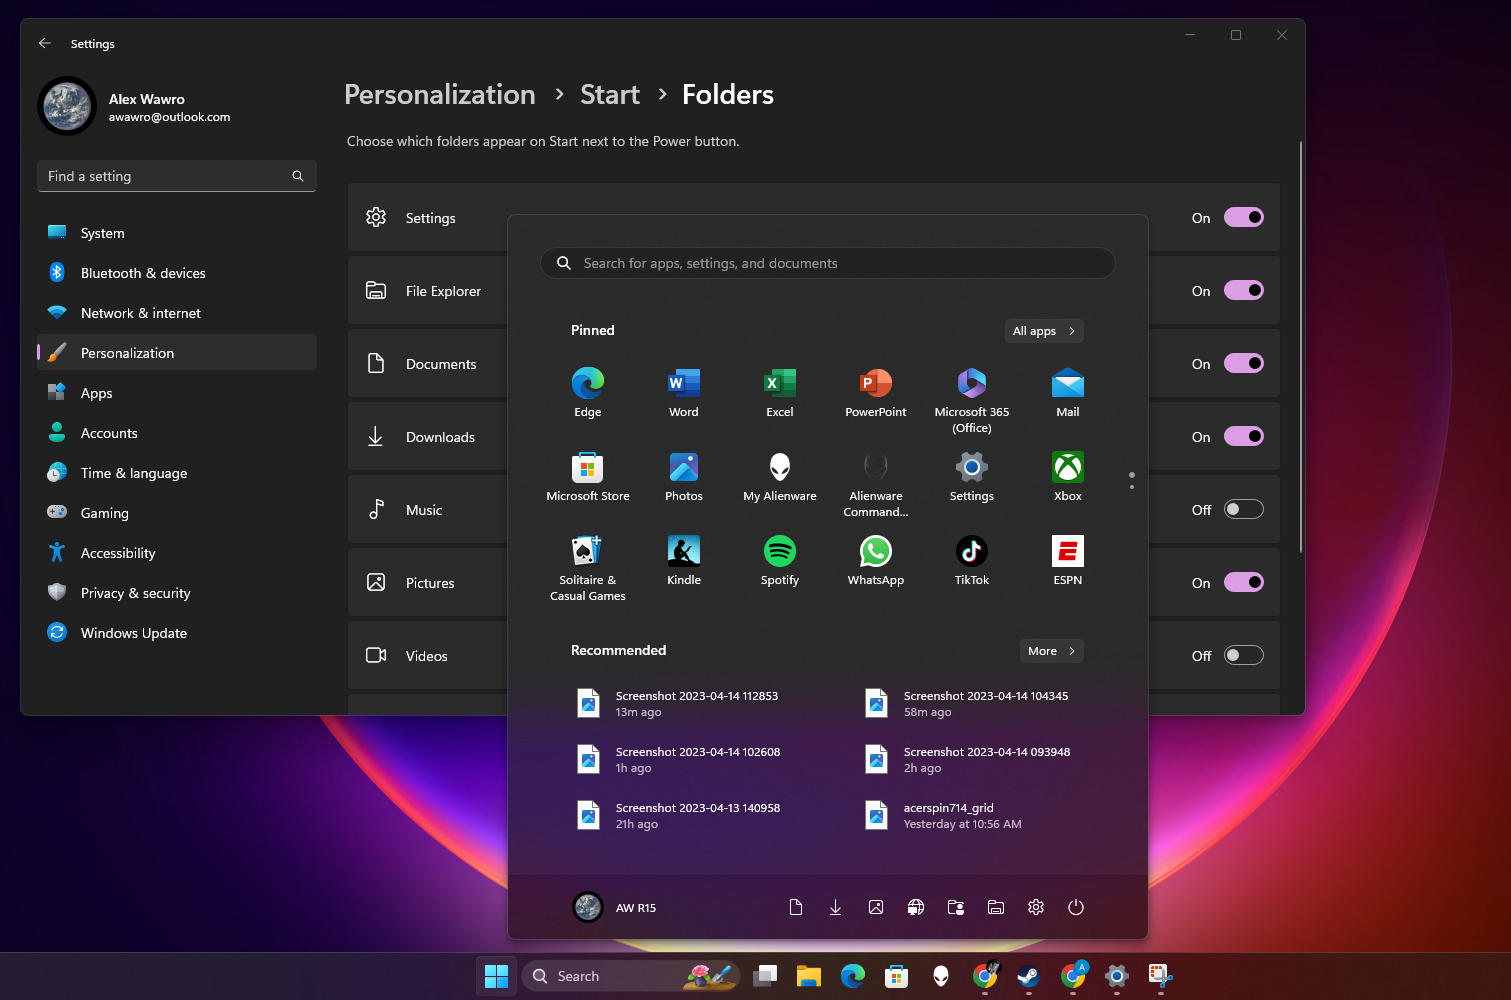
While Microsoft has yet (as of this writing) to give you full control over what appears in your Start menu, there are some hidden options you can enable to put some of those key folders back.
To find them, navigate to Settings > Personalization > Start > Folders. In this sub-menu you'll see a list of roughly nine items (as of publication) you can choose to put back on the Start menu. Note that they appear not with their usual icons alongside everything else, but rather as small white glyphs in the lower-right corner of the Start Menu.
You can do even deeper customization of your Start Menu if you back out of the Folders sub-menu. In the general Start Menu settings you'll have options to change the way icons are spaced in the menu, whether or not your most recently-used apps and files appear, and more.
Much like the other entries in this list, it's the sort of simple tip that can make your Windows 11 experience a lot more enjoyable, if you only know about it. Hopefully something I've mentioned here will be of use to you, and we've got lots of other guides to making Windows 11 work better for you.
Check out my colleague's guide to how to move the taskbar in Windows 11 if you don't like the way it's centered by default, for example, or how to get iMessages on Windows 11 via Phone Link for iPhone if you're not an Android user (but you're jealous of how easily they can transfer files to their PC).


.png?w=600)


